开发工具:STS
前言:
对外提供一个Api,无论是对开发、测试、维护,都有很大的帮助。
下面我们来实现swagger2。
参考实例:https://blog.csdn.net/weixin_39477597/article/details/79639239
实例:
1.添加依赖:
 1         <dependency>
 2             <groupId>io.springfox</groupId>
 3             <artifactId>springfox-swagger2</artifactId>
 4             <version>2.7.0</version>
 5         </dependency>
 6         <dependency>
 7             <groupId>io.springfox</groupId>
 8             <artifactId>springfox-swagger-ui</artifactId>
 9             <version>2.7.0</version>
10         </dependency>
2.配置:
package com.xm.shiro.config;

import org.springframework.context.annotation.Bean;
import org.springframework.context.annotation.Configuration;

import springfox.documentation.builders.ApiInfoBuilder;
import springfox.documentation.builders.PathSelectors;
import springfox.documentation.builders.RequestHandlerSelectors;
import springfox.documentation.service.ApiInfo;
import springfox.documentation.service.Contact;
import springfox.documentation.spi.DocumentationType;
import springfox.documentation.spring.web.plugins.Docket;
import springfox.documentation.swagger2.annotations.EnableSwagger2;

@Configuration
@EnableSwagger2
public class SwaggerConfig {

    @Bean
    public Docket docket(){
        return new Docket(DocumentationType.SWAGGER_2).apiInfo(apiInfo()).select()
//                   当前包路径
                   .apis(RequestHandlerSelectors.basePackage("com.xm.shiro.controller"))
                    .paths(PathSelectors.any()).build();

    }
//构建api文档的详细信息函数
    private ApiInfo apiInfo(){
        return new ApiInfoBuilder()
                //页面标题
                    .title("springBoot测试使用Swagger2构建RESTful API")
                //创建人
                    .contact("郭小明")
                 //版本号
                    .version("1.0")
                //描述
                    .description("API 描述")
                    .build();
    }

}
3.在controller中引用api:
注解说明:
@Api():作用于类上,表示这个类是swagger的资源。
tags = ”说明该类的作用“
@ApiOperation():用在请求的方法上,说明的方法的用户和作用
value=“说明方法的用途、作用”
notes="方法的备注说明“
@ApiImplicitParams():用在请求的方法上,表示一组参数说明,可以包含多个@ApiImplicitParam()
@ApiImplicitParam():指定一个请求参数的各个方面
name:参数名
value:参数的汉字说明
required:参数是否必须传
dataType:参数类型
defaultValue:参数的默认值
@ApiResponses():用在请求的方法上,表示一组响应。可以包含多个@ApiResponse()
@ApiResponse():用于表示一个错误的响应信息
code:数字
message:信息
response:抛出异常的类
@ApiModel():用在响应类上,表示一个返回响应数据的信息。
@ApiModelProperty():用在属性上,描述响应类的属性
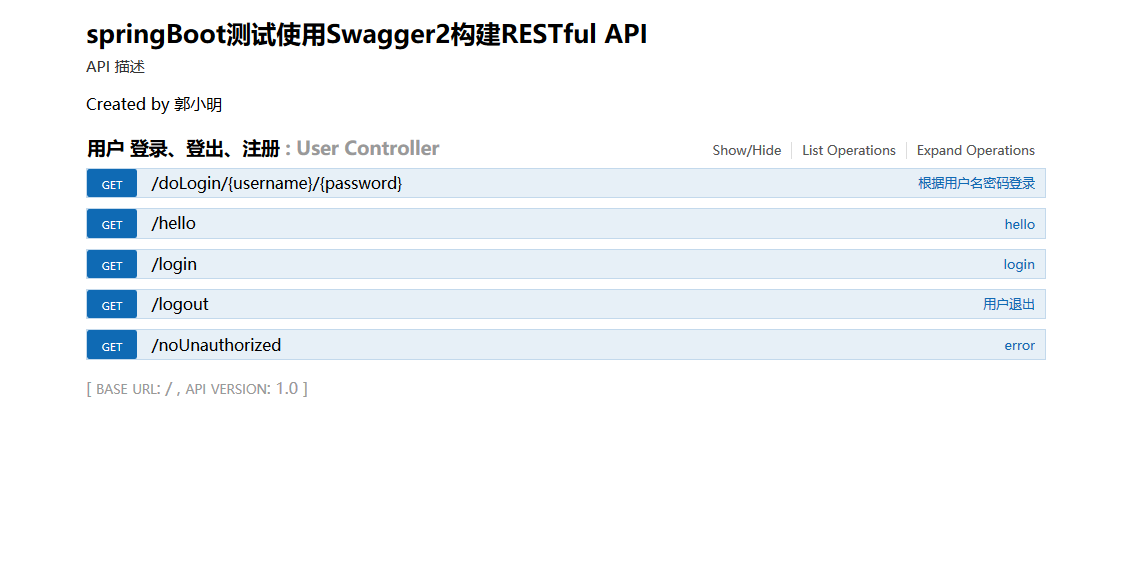
package com.xm.shiro.controller;

import org.apache.shiro.SecurityUtils;
import org.apache.shiro.authc.AuthenticationException;
import org.apache.shiro.authc.IncorrectCredentialsException;
import org.apache.shiro.authc.UsernamePasswordToken;
import org.apache.shiro.authz.annotation.RequiresPermissions;
import org.apache.shiro.authz.annotation.RequiresRoles;
import org.apache.shiro.subject.Subject;
import org.springframework.web.bind.annotation.GetMapping;
import org.springframework.web.bind.annotation.PathVariable;
import org.springframework.web.bind.annotation.RequestMapping;
import org.springframework.web.bind.annotation.RestController;

import io.swagger.annotations.Api;
import io.swagger.annotations.ApiOperation;

@Api(value="UserController",tags="用户 登录、登出、注册")
@RestController
public class UserController {

    @RequiresPermissions("hello")
    @GetMapping("/hello")
    public String hello() {
        return "Hello Shiro!";
    }

    @GetMapping("/login")
    public String login() {
        return "权限管理";
    }

    @ApiOperation(value="根据用户名密码登录",notes="用户登录")
    @GetMapping("/doLogin/{username}/{password}")
    public String doLogin(@PathVariable("username") String username,@PathVariable("password") String password) {
        UsernamePasswordToken token = new UsernamePasswordToken(username, password);
        Subject currentUser = SecurityUtils.getSubject();
        try {
            currentUser.login(token);
            //此步将 调用realm的认证方法
        } catch(IncorrectCredentialsException e){
            //这最好把 所有的 异常类型都背会
            return "密码错误";
        } catch (AuthenticationException e) {
            return "登录失败";
        }

        currentUser.hasRole("sun");
        currentUser.hasRole("sun");
        currentUser.hasRole("sun");
        currentUser.hasRole("sun");
        return token.getPrincipal()+":登录成功";
    }

    @ApiOperation(value="用户退出",notes="注销用户")
    @GetMapping("/logout")
    public String logout() {
        Subject currentUser = SecurityUtils.getSubject();
        currentUser.logout();
        return "退出登录";
    }

    @GetMapping("/noUnauthorized")
    public String error() {
        return  "无权限";
    }

}
4.登录http://localhost:8080/swagger-ui.html,查看api