1. 安装ansible
        yum install epel-release -y
        yum install ansible -y
       Playbook是一个不同于使用ansible命令行执行方式的模式,功能更强大更灵活。
playbooks使用步骤:
        1.1 在playbooks 中定义任务:
	- name: task description     #任务描述信息
	 module_name: module_args    #需要使用的模块名字:  模块参数
        1.2    ansible-playbook 执行 命令:
                 ansible-playbook site.yml
playbook是由一个或多个"play"组成的列表。play的主要功能在于将事先归为一组的主机装扮成事先通过ansible中的task定义好的角色。
github上提供了大量的实例供大家参考  https://github.com/ansible/ansible-examples

2. 使用Playbook批量部署多台LAMP环境
            Playbook常用文件夹作用:
        files:存放需要同步到异地服务器的源码文件及配置文件;
        handlers:当服务的配置文件发生变化时需要进行的操作,比如:重启服务,重新加载
    配置文件; 处理程序
        meta:角色定义,可留空;
        tasks:需要进行的执行的任务;   #任务
        templates:用于执行lamp安装的模板文件,一般为脚本;
        vars:本次安装定义的变量
3. 我们可以在ansible服务器上安装LAMP环境,然后,再将配置文件通过ansible拷贝到远程主机
3.1 安装httpd软件
yum install httpd -y
3.2 安装mysql
yum install mariadb-server mariadb -y
创建数据目录-->授权-->修改mariadb配置文件
mkdir -p /mysql/data chown -R mysql.mysql /mysql vim /etc/my.cnf
datadir=/var/lib/mysql --> datadir=/mysql/data
3.3 安装PHP和php-mysql模块
yum install php php-mysql -y
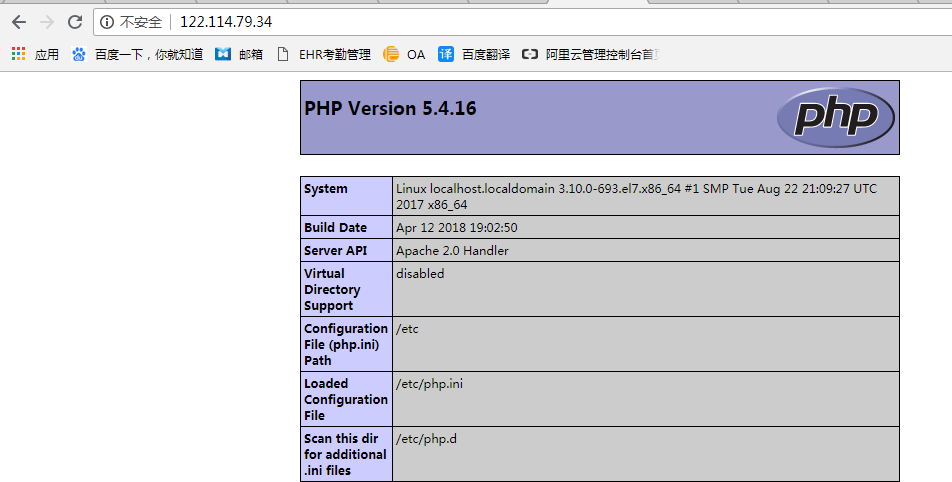
3.4 提供php测试页
vim /var/www/html/index.php --->apache默认家目录
<?php
phpinfo()
?>
3.5 启动apache,访问本机httpd服务
4. vim /etc/ansible/host
将节点主机ip加入到配置文件
[web-servers]
节点ip
ssh-keygen--->生成密钥
ssh-copy-id root@节点ip
5. 使用playbook创建一个LAMP构建的任务
5.1 mkdir -p /etc/ansible/lamp/roles/{prepare,httpd,mysql,php}/{tasks,files,templates,vars,meta,default,handlers}
cp /etc/httpd/conf/httpd.conf /etc/ansible/lamp/roles/httpd/files/
cp /etc/my.cnf /etc/ansible/lamp/roles/mysql/files/
5.2 prepare(前期准备)角色的playbooks
vim /etc/ansible/lamp/roles/prepare/tasks/main.yml -->增加以下内容
- name: delete yum config
shell: rm -rf /etc/yum.repos.d/* #删除原有的yum配置文件
- name: provide yumrepo file
shell: wget -O /etc/yum.repos.d/CentOS-Base.repo http://mirrors.aliyun.com/repo/Centos-7.repo #下载新的yum配置文件
- name: clean the yum repo
shell: yum clean all #清除原有的yum缓存信息
- name: clean the iptables
shell: iptables -F #清除原有防火墙规则,不然后可能上不了网
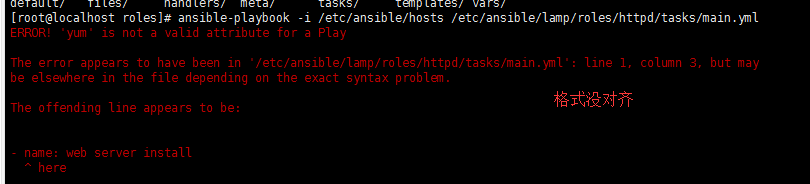
5.3 构建httpd任务
cd /etc/ansible/lamp/roles
mv /var/www/html/index.php httpd/files/
vim httpd/tasks/main.yml
- name: web server install
yum: name=httpd state=present #安装httpd服务
- name: provide test page
copy: src=index.php dest=/var/www/html #提供测试页
- name: delete apache config
shell: rm -rf /etc/httpd/conf/httpd.conf #删除原有的apache配置文件,如果不删除,下面的copy任务是不会执行的,因为当源文件httpd.conf和目标文件一样时,copy命令是不执行的。如果copy命令不执行,那么notify将不调用handler。
- name: provide configuration file
copy: src=httpd.conf dest=/etc/httpd/conf/httpd.conf #提供httpd的配置文件
notify: restart httpd #当前面的copy复制成功后,通过notify通知名字为restart httpd的handlers运行。
5.4 构建httpd的handlers
vim /etc/ansible/lamp/roles/httpd/handlers/main.yml
- name: restart httpd
service: name=httpd enabled=yes state=restarted
5.5 部署mariadb数据库
vim /etc/ansible/lamp/roles/mysql/tasks
- name: install the mysql
yum: name=mariadb-server state=present #安装mysql服务
- name: mkdir date directory
shell: mkdir -p /mydata/data #创建挂载点目录
- name: provide configration file
copy: src=my.cnf dest=/etc/my.cnf #提供mysql的配置文件
- name: chage the owner
shell: chown -R mysql:mysql /mydata/* #更改属主和属组
- name: start mariadb
service: name=mariadb enabled=yes state=started #启动mysql服务
5.6 构建PHP任务
/etc/ansible/lamp/roles/php/tasks/main.yml
- name: install php
yum: name=php state=present #安装php
- name: install php-mysql
yum: name=php-mysql state=present #安装php与mysql交互的插件
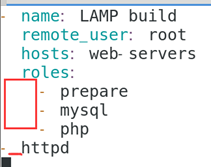
5.7 定义整个任务
vim /etc/ansible/lamp/roles/site.yml
- name: LAMP build
remote_user: root
hosts: web-servers
roles:
- prepare
- mysql
- php
- httpd
6.  开始部署lamp环境
          ansible-playbook -i /etc/ansible/hosts  /etc/ansible/lamp/roles/site.yml
     完成之后直接访问节点80端口的http服务
1、默认情况下,首次登陆一台服务器,系统会提示是否要记住对端的指纹,用ansible也会这样,这样会导致需要手工输入yes或no,ansible 才可以往下执行。如需避免这种情况,需要在 /etc/ansible/ansible.cfg 文件中设置 host_key_checking = False
     rm -rf /root/.ssh/known_hosts
     ansible-playbook -i /etc/ansible/hosts  ./site.yml   #发现需要输入yes,来保存对端的指纹