1、按下电源开机键
2、系统进行BIOS开机自检,检测计算机硬件设备,选择开机介质,并寻找MBR(主引导记录,在/boot分区)
3、MBR(master boot record) 在硬盘的0磁道,0柱面,1扇区上的前512bytes:
MBR分两部分:
(1)0-446bytes引导记录(pre-boot)存放引导文件或指向引导文件
(2)后64bytes(partition table)存放硬盘的分区信息,因为每个分区表信息需要占用16bytes 所以一块MBR的硬盘做多只能分4个主分区(gpt分区可以分4个以上)
4、读取grub.conf进行引导(位置:/boot/grub/grub.conf)
# grub.conf generated by anaconda
#
# Note that you do not have to rerun grub after making changes to this file
# NOTICE:  You have a /boot partition.  This means that
#          all kernel and initrd paths are relative to /boot/, eg.
#          root (hd0,0)
#          kernel /vmlinuz-version ro root=/dev/mapper/VolGroup-lv_root
#          initrd /initrd-[generic-]version.img
#boot=/dev/sda
default=0
timeout=5
splashimage=(hd0,0)/grub/splash.xpm.gz
hiddenmenu
title CentOS (3.6.32-696.28.1.el6.x86_64)
        root (hd0,0)
        kernel /vmlinuz-2.6.32-696.28.1.el6.x86_64 ro root=/dev/mapper/VolGroup-lv_root rd_NO_LUKS LANG=en_US.UTF-8 rd_NO_MD rd_LVM_
LV=VolGroup/lv_swap SYSFONT=latarcyrheb-sun16 crashkernel=auto rd_LVM_LV=VolGroup/lv_root  KEYBOARDTYPE=pc KEYTABLE=us rd_NO_DM rhgb
 quiet
        initrd /initramfs-2.6.32-696.28.1.el6.x86_64.img
title CentOS 6 (2.6.32-696.el6.x86_64)
        root (hd0,0)
        kernel /vmlinuz-2.6.32-696.el6.x86_64 ro root=/dev/mapper/VolGroup-lv_root rd_NO_LUKS LANG=en_US.UTF-8 rd_NO_MD rd_LVM_LV=Vo
lGroup/lv_swap SYSFONT=latarcyrheb-sun16 crashkernel=auto rd_LVM_LV=VolGroup/lv_root  KEYBOARDTYPE=pc KEYTABLE=us rd_NO_DM rhgb quie
t
        initrd /initramfs-2.6.32-696.el6.x86_64.img
default=0(设置默认系统)
timeout=5(设置默认进入系统等待时间)
splashimage=(hd0,1)/grub/splash.xpm.gz (启动grub 的背景画面)
Hiddenmenu (隐藏菜单,在此处可以设置grup启动密码)
password=密码字符串
title CentOS (2.6.32-696.28.1.el6.x86_64) 系统标题
password=密码字符串
两个密码都支持MD5加密方式,如:
password --md5= 密码字符串(grub-md5-crypt生成)
(1)root (hd0,0)定义下边所使用的内核文件的位置
(2)kernel /vmlinuz-版本号 ro root=LABEL=/ rhgb quiet
其中ro表示只读
root=LABEL=/ 指定系统的真实根分区
quiet 在加载内核等文件时不显示加载信息
(3)initrd /initrd-版本号.img
启动initrd ram 盘
title Other 其他系统标题
root (hd0,0) 系统存放在hd0,0中
5、运行进程号为1的init程序,并根据/etc/inittab配置文件完成引导过程 。(在grub加载完kernel后会在initrd-版本号.img文件,此文件是一个微型根系统,由它运行自己的init程序,进行系统初始化,加载真正的根文件系统的驱动,读取根文件,并把引导工作交给根目录下的/sbin/init程序进行系统的初始化和启动)
inittab内容:
[root@localhost ~]# cat /etc/inittab
# inittab is only used by upstart for the default runlevel.
#
# ADDING OTHER CONFIGURATION HERE WILL HAVE NO EFFECT ON YOUR SYSTEM.
#
# System initialization is started by /etc/init/rcS.conf
#
# Individual runlevels are started by /etc/init/rc.conf
#
# Ctrl-Alt-Delete is handled by /etc/init/control-alt-delete.conf
#
# Terminal gettys are handled by /etc/init/tty.conf and /etc/init/serial.conf,
# with configuration in /etc/sysconfig/init.
#
# For information on how to write upstart event handlers, or how
# upstart works, see init(5), init(8), and initctl(8).
#
# Default runlevel. The runlevels used are:
#   0 - halt (Do NOT set initdefault to this)
#   1 - Single user mode
#   2 - Multiuser, without NFS (The same as 3, if you do not have networking)
#   3 - Full multiuser mode
#   4 - unused
#   5 - X11
#   6 - reboot (Do NOT set initdefault to this)
#
id:3:initdefault:
运行级别:
0》--> 关机
1》--> 单用户模式
2》--> 多用户模式,没有NFS
3》--> 完全多用户模式
4》--> 保留给用户自定义
5》--> X11图形模式
6》--> 系统重新启动(设置此模式系统会不断重启)
指定了模式之后,系统会加载指定运行级别下的程序:
/etc/rc.d下的目录:
[root@localhost rc.d]# ll /etc/rc.d/
total 60
drwxr-xr-x. 2 root root  4096 Jun  5 02:56 init.d
-rwxr-xr-x. 1 root root  2617 Oct  4  2017 rc
-rwxr-xr-x. 1 root root   307 May 26 14:31 rc.local
-rwxr-xr-x. 1 root root 20199 Oct  4  2017 rc.sysinit
drwxr-xr-x. 2 root root  4096 Jun  5 02:56 rc0.d
drwxr-xr-x. 2 root root  4096 Jun  5 02:56 rc1.d
drwxr-xr-x. 2 root root  4096 Jun  5 02:56 rc2.d
drwxr-xr-x. 2 root root  4096 Jun  5 02:56 rc3.d
drwxr-xr-x. 2 root root  4096 Jun  5 02:56 rc4.d
drwxr-xr-x. 2 root root  4096 Jun  5 02:56 rc5.d
drwxr-xr-x. 2 root root  4096 Jun  5 02:56 rc6.d
七种预设的"运行级别"各自有一个目录,存放需要开机启动的程序。不难想到,如果多个"运行级别"需要启动同一个程序,那么这个程序的启动脚本,就会在每一个目录里都有一个拷贝。这样会造成管理上的困扰:如果要修改启动脚本,岂不是每个目录都要改一遍?
Linux的解决办法,就是七个 /etc/rcN.d 目录里列出的程序,都设为链接文件,指向另外一个目录 /etc/init.d ,真正的启动脚本都统一放在这个目录中。init进程逐一加载开机启动程序,其实就是运行这个目录里的启动脚本。
6、加载用户配置脚本
两个全局文件:/etc/bashrc /etc/profile
两个用户配置文件: ~/.bash_profile ~/.bashrc
7、进入用户登录界面
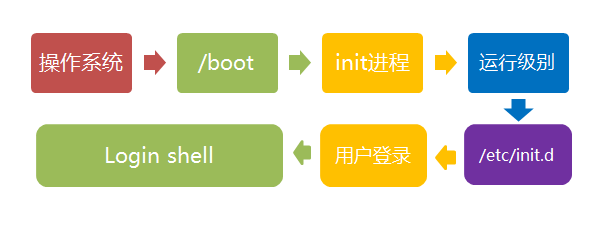
登录过程图解: