网络通信协议:

通信链路的端点就被称为“套接字”(英文名Socket) 是提供给应用程序的接口。
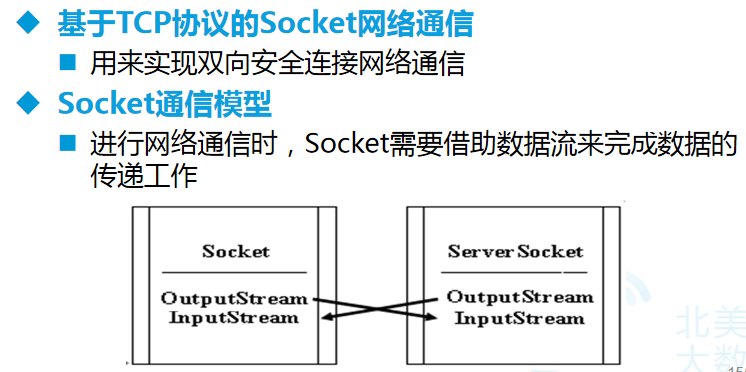
基于TCP协议的Socket编程:
基于多线程的客户端与服务器端的信息交流:
一,读取Socket对象流的类
public class ReadThread implements Runnable{
    //定义一个Socket类型的私有变量
    private Socket socket;

    public void run(){
        try {
            //对Socket对象的流进行包装
            BufferedReader br=new BufferedReader(new InputStreamReader(socket.getInputStream()));
            while(true){
                //打印线程名和读取的信息
                System.out.println(Thread.currentThread().getName()+":"+br.readLine());
            }
        } catch (Exception e) {
            e.printStackTrace();
        }
        }

    public ReadThread(Socket socket) {
        this.socket = socket;
    }

    }
二,写入Socket对象流的类
public class WriteThread implements Runnable{
    //定义一个Socket类型的私有变量
    private Socket socket;


    public void run(){
        try {
            //对socket的对象流进行包装
            PrintWriter pw=new PrintWriter(socket.getOutputStream());
            //对要在控制台输入的数据进行包装
            BufferedReader br=new BufferedReader(new InputStreamReader(System.in));
            while(true){
                try {
                    //把控制台上输入的数据输出出去
                    pw.println(br.readLine());
                } catch (IOException e) {
                    e.printStackTrace();
                }finally{
                    pw.flush();
                }
            }
        } catch (IOException e) {
            e.printStackTrace();
        }
    }
    public WriteThread(Socket socket) {
        super();
        this.socket = socket;
    }

}
三、创建服务器端
public class ServiceSocket {

    public static void main(String[] args) throws Exception{
        //实例化ServerSocket对象
        ServerSocket server=new ServerSocket(55555);
        //等待客户端发起请求
        Socket socket=server.accept();
        System.out.println("连接成功!");
        //创建线程对象
        ReadThread read=new ReadThread(socket);
        WriteThread write=new WriteThread(socket);
        //分别调用读、写线程,并启动
        Thread t1=new Thread(read,"客户端");
        Thread t2=new Thread(write);
        t1.start();
        t2.start();
  }
  }
四、创建客户端
public class ClientSocket {
    public static void main(String[] args) throws Exception{
        //创建Socket对象
        Socket socket=new Socket("localhost",55555);
        ReadThread read=new ReadThread(socket);
        WriteThread write=new WriteThread(socket);
        //调用读线程
        Thread t1=new Thread(read,"服务器");
        //调用写线程
        Thread t2=new Thread(write);
        t1.start();
        t2.start();
   }
   }
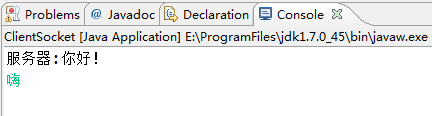
运行结果:由结果可知客户端和服务器端实现了信息的交流

基于多线程的服务器与客户端的对象的传输:
一、创建一个可序列化的类
public class User implements Serializable{//通过实现Serializble来实现类的可序列化
    private String name;
    private String password;

    public User(String name, String password) {
        this.name = name;
        this.password = password;
    }
    public String getName() {
        return name;
    }
    public void setName(String name) {
        this.name = name;
    }
    public String getPassword() {
        return password;
    }
    public void setPassword(String password) {
        this.password = password;
    }

}
二、创建一个线程类,来处理服务器传过来的对象的判断
public class UserThread extends Thread{
    //创建Socket类型的私有变量
    private Socket socket;

    public UserThread(Socket socket) {
        this.socket = socket;
    }
    public void run(){
        try {
            //包装socket的流
            ObjectInputStream ob=new ObjectInputStream(socket.getInputStream());
            PrintWriter pw=new PrintWriter(socket.getOutputStream());
            //接收传过来的对象
            User user=(User) ob.readObject();
//获取客户端的IP地址
InetAddress ia=socket.getInetAddress();
String s=ia.getHostAddress();
if(user!=null){
                //输出判断结果
                pw.println("登录成功!");
                pw.flush();
            }else{
                pw.println("登录失败!");
                pw.flush();
            }
            ob.close();
        } catch (Exception e) {
            e.printStackTrace();
        }
    }
}
三、创建服务器
public class UserService {
    public static void main(String[] args) throws Exception {
        //创建ServerSocket对象
        ServerSocket server=new ServerSocket(57889);
        while(true){
            Socket socket=server.accept();
            System.out.println("连接成功!");
            new UserThread(socket).start();
        }
   }
   }
四、创建两个客户端
public class UserClient {
    public static void main(String[] args) throws Exception {
        Socket socket=new Socket("localhost",57889);
        User user=new User("张三","123");
        //把对象输出出去
        ObjectOutputStream ob=new ObjectOutputStream(socket.getOutputStream());
        ob.writeObject(user);
        //读取socket输入流中的数据
        BufferedReader br=new BufferedReader(new InputStreamReader(socket.getInputStream()));
        System.out.println(br.readLine());
        br.close();
        ob.close();
        socket.close();
    }
}
public class UserClient02 {
    public static void main(String[] args) throws Exception {
        Socket socket=new Socket("localhost",57889);
        //创建空对象
        User user=null;
        //包装socket对象的流
        ObjectOutputStream obi=new ObjectOutputStream(socket.getOutputStream());
        obi.writeObject(user);
        //读取socket输入流中的数据
        BufferedReader br=new BufferedReader(new InputStreamReader(socket.getInputStream()));
        System.out.println(br.readLine());
        br.close();
        obi.close();
        socket.close();
    }
}
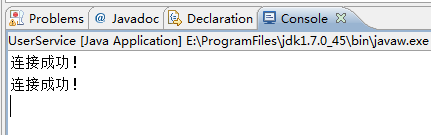
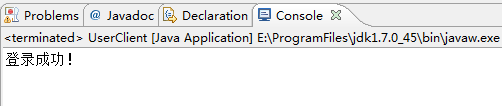
运行结果截图:由结果可得,两个客户端都连接成功了,但是UserClient02中的对象为null,所以登录失败了。由此可得对象传输是正确的。

基于UDP的DatagramPacket和DatagramSocket
一、创建服务器类
public class LoginServerUDP {
    public static void main(String[] args) {
        //定义一个空数组
        byte[] bytes=new byte[1024];
        //定义一个空包
        DatagramPacket dp=new DatagramPacket(bytes,bytes.length);
        //定义socket对象
        DatagramSocket ds=null;
        try  {
             ds= new DatagramSocket(55555);
             //接受发送过来的数据包
             ds.receive(dp);
             //报数据包中的数据转换成字符串
             String s=new String(dp.getData(),0,dp.getData().length);
             System.out.println("客户端:"+s);

             String info="我收到了,测试通过!";
             //字符串打散放进数组
             byte[] bytes1=info.getBytes();
             //获得ip地址
            SocketAddress sa = dp.getSocketAddress();
            //把数据、ip包装起来
            DatagramPacket dp2=new DatagramPacket(bytes1,0,bytes1.length,sa);
            //发送数据包
            ds.send(dp2);
        }catch(Exception e){
            e.printStackTrace();
        }finally {
            ds.close();
        }
    }
}
二、创建客户端类
public class LoginClientUDP {
    public static void main(String[] args) {
        String info="我要测试UDP协议";
        byte[] bytes=info.getBytes();
        //创建ip对象
        InetAddress id= null;
        //创建socket对象
        DatagramSocket ds=null;
        try {
            //通过ip名获得ip
            id = InetAddress.getByName("localhost");
            //把要发送的数据,发往的ip和端口,包装起来
            DatagramPacket dp=new DatagramPacket(bytes,bytes.length,id,55555);
            ds=new DatagramSocket();
            //发送包
            ds.send(dp);

            //定义一个空数组
            byte[] bytes2=new byte[1024];
            //定义一个空包
            DatagramPacket dp2=new DatagramPacket(bytes2,bytes2.length);
            //用空包接受发送过来的数据包
            ds.receive(dp2);
            //把包中的数据转换成字符串
            String s=new String(dp2.getData(),0,dp2.getData().length);
            System.out.println("服务器:"+s);

        } catch (Exception e) {
            e.printStackTrace();
        }finally {
            ds.close();
        }
    }
}
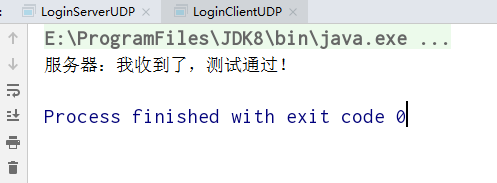
三、运行结果