springcloud-Netflix创建服务消费者
目录
在微服务架构中,业务都会被拆分成一个独立的服务,服务与服务的通讯是基于 http restful 的。Spring cloud 有两种服务调用方式,两种都是http方式的不是rpc方式
一种是 ribbon + restTemplate
另一种是 feign。首先讲解下基于 ribbon + rest
Ribbon
创建服务消费者-Ribbon方式
Ribbon 是一个负载均衡客户端,可以很好的控制 http 和 tcp 的一些行为。
创建方式也是,在总工程下面创建maven工程包,导入pom.xml,application.yml,Application入口类;以及编写自己的业务逻辑
1.创建一个 hello-spring-cloud-web-admin-ribbon 服务消费者项目
POM.XML,导入springboot和Ribbon的依赖
<?xml version="1.0" encoding="UTF-8"?>
<project xmlns="http://maven.apache.org/POM/4.0.0" xmlns:xsi="http://www.w3.org/2001/XMLSchema-instance"
         xsi:schemaLocation="http://maven.apache.org/POM/4.0.0 http://maven.apache.org/xsd/maven-4.0.0.xsd">
    <modelVersion>4.0.0</modelVersion>

    <parent>
        <groupId>com.outlook.liufei32</groupId>
        <artifactId>hello-spring-cloud-dependencies</artifactId>
        <version>1.0.0-SNAPSHOT</version>
        <relativePath>../hello-spring-cloud-dependencies/pom.xml</relativePath>
    </parent>

    <artifactId>hello-spring-cloud-web-admin-ribbon</artifactId>
    <packaging>jar</packaging>

    <name>hello-spring-cloud-web-admin-ribbon</name>
    <url>https://github.com/Swagger-Ranger</url>
    <inceptionYear>2018-Now</inceptionYear>

    <dependencies>
        <!-- Spring Boot Begin -->
        <dependency>
            <groupId>org.springframework.boot</groupId>
            <artifactId>spring-boot-starter-web</artifactId>
        </dependency>
        <dependency>
            <groupId>org.springframework.boot</groupId>
            <artifactId>spring-boot-starter-tomcat</artifactId>
        </dependency>

        <!--web需要thymeleaf模板引擎-->
        <dependency>
            <groupId>org.springframework.boot</groupId>
            <artifactId>spring-boot-starter-thymeleaf</artifactId>
        </dependency>
        <dependency>
            <groupId>org.springframework.boot</groupId>
            <artifactId>spring-boot-starter-actuator</artifactId>
        </dependency>
        <dependency>
            <groupId>org.springframework.boot</groupId>
            <artifactId>spring-boot-starter-test</artifactId>
            <scope>test</scope>
        </dependency>
        <!-- Spring Boot End -->

        <!-- Spring Cloud Begin -->
        <dependency>
            <groupId>org.springframework.cloud</groupId>
            <artifactId>spring-cloud-starter-netflix-eureka-server</artifactId>
        </dependency>
        <!--ribbon的插件-->
        <dependency>
            <groupId>org.springframework.cloud</groupId>
            <artifactId>spring-cloud-starter-netflix-ribbon</artifactId>
        </dependency>
        <!-- Spring Cloud End -->

        <!-- 解决 thymeleaf 模板引擎一定要执行严格的 html5 格式校验问题 -->
        <dependency>
            <groupId>net.sourceforge.nekohtml</groupId>
            <artifactId>nekohtml</artifactId>
        </dependency>
    </dependencies>

    <build>
        <plugins>
            <plugin>
                <groupId>org.springframework.boot</groupId>
                <artifactId>spring-boot-maven-plugin</artifactId>
                <configuration>
                    <mainClass>com.outlook.liufei32.hello.spring.cloud.web.admin.ribbon.WebAdminRibbonApplication</mainClass>
                </configuration>
            </plugin>
        </plugins>
    </build>
</project>
完善结构目录,并将服务注册到服务中心
在启动类上加入@EnableDiscoveryClient 注解注册到服务中心
package com.outlook.liufei32.hello.spring.cloud.web.admin.ribbon;

import org.springframework.boot.SpringApplication;
import org.springframework.boot.autoconfigure.SpringBootApplication;
import org.springframework.cloud.client.discovery.EnableDiscoveryClient;

@SpringBootApplication
@EnableDiscoveryClient    //发现服务注解,注解是不分顺序的
public class WebAdminRibbonApplication {

    public static void main( String[] args ) {
        SpringApplication.run(WebAdminRibbonApplication.class, args);
    }
}
配置application.yml
spring:
  application:
    name: hello-spring-cloud-web-admin-ribbon
  thymeleaf:
    cache: false
    mode: LEGACYHTML5
    encoding: UTF-8
    servlet:
      content-type: text/html

server:
  port: 8764

eureka:
  client:
    serviceUrl:
      defaultZone: http://localhost:8761/eureka/
配置Configuration,注入RestTemplate 的 Bean,并通过 @LoadBalanced 注解表明开启负载均衡功能
package com.outlook.liufei32.hello.spring.cloud.web.admin.ribbon.config;

import org.springframework.cloud.client.loadbalancer.LoadBalanced;
import org.springframework.context.annotation.Bean;
import org.springframework.context.annotation.Configuration;
import org.springframework.web.client.RestTemplate;

@Configuration
public class RestTemplateConfiguration {

    @Bean//生成配置一个Bean
    @LoadBalanced//访问负载均衡器,自动去寻找服务提供者
    public RestTemplate restTemplate() {
        return new RestTemplate();
    }
}
创建service,来测试请求restTemplate负载均衡
package com.outlook.liufei32.hello.spring.cloud.web.admin.ribbon.service;

import org.springframework.beans.factory.annotation.Autowired;
import org.springframework.stereotype.Service;
import org.springframework.web.client.RestTemplate;

@Service
public class AdminService {

    @Autowired
    private RestTemplate restTemplate;//因为我在config里配置了restTemplate Bean所以能自动注入

    /**
     * url:就是http://+服务名,即在你要调用的service微服务里applicat.yml中配置的服务名,restTemplate会自动去寻找可用的服务
     * @param message
     * @return
     */
    public String sayHi( String message ) {
        return restTemplate.getForObject("http://hello-spring-cloud-service-admin/hi?message=" + message, String.class);
    }
}
创建controller来解释web访问然后去访问service
package com.outlook.liufei32.hello.spring.cloud.web.admin.ribbon.controller;

import com.outlook.liufei32.hello.spring.cloud.web.admin.ribbon.service.AdminService;
import org.springframework.beans.factory.annotation.Autowired;
import org.springframework.web.bind.annotation.RequestMapping;
import org.springframework.web.bind.annotation.RequestMethod;
import org.springframework.web.bind.annotation.RequestParam;
import org.springframework.web.bind.annotation.RestController;

@RestController
public class AdminController {

    @Autowired
    private AdminService adminService;

    @RequestMapping(value = "hi",method = RequestMethod.GET)
    public String sayHi( @RequestParam String message ) {
        return adminService.sayHi(message);
    }
}
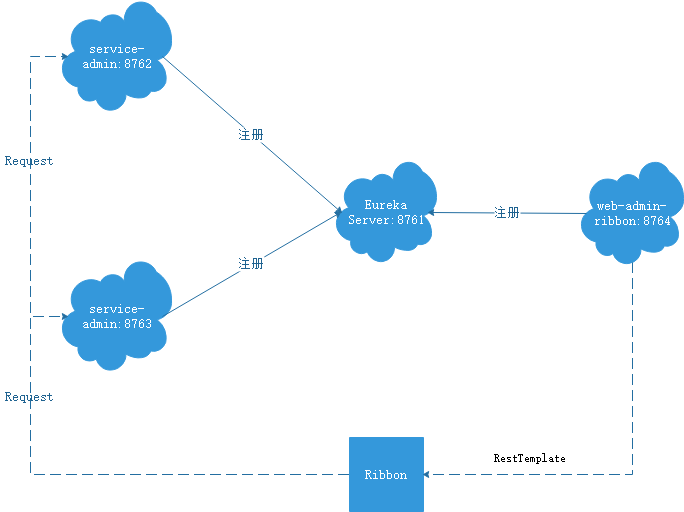
ribbon的架构
Feign
创建包和基本项目结构
在总的包下新建
spring-cloud-web-admin-feign工程,导入pom.xml
<?xml version="1.0" encoding="UTF-8"?>
<project xmlns="http://maven.apache.org/POM/4.0.0" xmlns:xsi="http://www.w3.org/2001/XMLSchema-instance"
         xsi:schemaLocation="http://maven.apache.org/POM/4.0.0 http://maven.apache.org/xsd/maven-4.0.0.xsd">
    <modelVersion>4.0.0</modelVersion>

    <parent>
        <groupId>com.outlook.liufei32</groupId>
        <artifactId>spring-cloud-dependencies</artifactId>
        <version>1.0.0-SNAPSHOT</version>
        <relativePath>../spring-cloud-dependencies/pom.xml</relativePath>
    </parent>

    <artifactId>spring-cloud-web-admin-feign</artifactId>
    <packaging>jar</packaging>

    <name>spring-cloud-web-admin-feign</name>
    <url></url>
    <inceptionYear>2019-Now</inceptionYear>

    <dependencies>
        <!-- Spring Boot Begin -->
        <dependency>
            <groupId>org.springframework.boot</groupId>
            <artifactId>spring-boot-starter-web</artifactId>
        </dependency>
        <dependency>
            <groupId>org.springframework.boot</groupId>
            <artifactId>spring-boot-starter-tomcat</artifactId>
        </dependency>
        <dependency>
            <groupId>org.springframework.boot</groupId>
            <artifactId>spring-boot-starter-thymeleaf</artifactId>
        </dependency>
        <dependency>
            <groupId>org.springframework.boot</groupId>
            <artifactId>spring-boot-starter-actuator</artifactId>
        </dependency>
        <dependency>
            <groupId>org.springframework.boot</groupId>
            <artifactId>spring-boot-starter-test</artifactId>
            <scope>test</scope>
        </dependency>
        <!-- Spring Boot End -->

        <!-- Spring Cloud Begin -->
        <dependency>
            <groupId>org.springframework.cloud</groupId>
            <artifactId>spring-cloud-starter-netflix-eureka-server</artifactId>
        </dependency>
        <dependency>
            <groupId>org.springframework.cloud</groupId>
            <artifactId>spring-cloud-starter-openfeign</artifactId>
        </dependency>
        <!-- Spring Cloud End -->

        <!-- 解决 thymeleaf 模板引擎一定要执行严格的 html5 格式校验问题 -->
        <dependency>
            <groupId>net.sourceforge.nekohtml</groupId>
            <artifactId>nekohtml</artifactId>
        </dependency>
    </dependencies>

    <build>
        <plugins>
            <plugin>
                <groupId>org.springframework.boot</groupId>
                <artifactId>spring-boot-maven-plugin</artifactId>
                <configuration>
                    <mainClass>com.outlook.liufei32.spring.cloud.web.admin.feign.WebAdminFeignApplication</mainClass>
                </configuration>
            </plugin>
        </plugins>
    </build>
</project>
其中feign的依赖就是:
<dependency>
  <groupId>org.springframework.cloud</groupId>
    <artifactId>spring-cloud-starter-openfeign</artifactId>
</dependency>
创建启动类
package com.outlook.liufe32.spring.cloud.web.admin.feign;

import org.springframework.boot.SpringApplication;
import org.springframework.boot.autoconfigure.SpringBootApplication;
import org.springframework.cloud.client.discovery.EnableDiscoveryClient;
import org.springframework.cloud.openfeign.EnableFeignClients;

@SpringBootApplication
@EnableDiscoveryClient//发现服务
@EnableFeignClients//Feign
public class WebAdminFeignApplication {

    public static void main( String[] args ) {
        SpringApplication.run(WebAdminFeignApplication.class, args);
    }
}
配置yml
spring:
  application:
    name: spring-cloud-web-admin-feign
  thymeleaf:
    cache: false
    mode: LEGACYHTML5
    encoding: UTF-8
    servlet:
      content-type: text/html

server:
  port: 8765

eureka:
  client:
    serviceUrl:
      defaultZone: http://localhost:8761/eureka/
创建Feign访问服务的接口和访问controller
这一步是不同于ribbon的地方,feign其实也集成了ribbon
package com.outlook.liufe32.spring.cloud.web.admin.feign.service;

import org.springframework.cloud.openfeign.FeignClient;
import org.springframework.web.bind.annotation.RequestMapping;
import org.springframework.web.bind.annotation.RequestMethod;
import org.springframework.web.bind.annotation.RequestParam;

@FeignClient(value = "spring-cloud-service-admin")//这里就是访问的服务名,在服务提供者的yml里或者去eureka里找服务名
public interface AdminService {

//这里的写法就类似controller但不是方法而是接口
    @RequestMapping(value = "hi", method = RequestMethod.GET)
    public String sayHi( @RequestParam(value = "message") String message );

}
创建controller
package com.outlook.liufe32.spring.cloud.web.admin.feign.controller;

import com.outlook.liufe32.spring.cloud.web.admin.feign.service.AdminService;
import org.springframework.beans.factory.annotation.Autowired;
import org.springframework.web.bind.annotation.RequestMapping;
import org.springframework.web.bind.annotation.RequestMethod;
import org.springframework.web.bind.annotation.RequestParam;
import org.springframework.web.bind.annotation.RestController;

@RestController
public class WebAdminController {

    @Autowired
    private AdminService adminService;

    @RequestMapping(value = "hi", method = RequestMethod.GET)
    public String sayHi(@RequestParam(value = "message") String message) {
        return adminService.sayHi(message);
    }
}
测试访问
访问feign的fontroller,就可以看到feign去调用了不同的服务提供者端口,即不同的服务者实例
Hi,your message is :"HelloFeign" i am from port:8762
Hi,your message is :"HelloFeign" i am from port:8763
本博客为Swagger-Ranger的笔记分享,文章会持续更新
文中源码地址: https://github.com/Swagger-Ranger
欢迎交流指正,如有侵权请联系作者确认删除: liufei32@outlook.com