前言:
本文地址:http://www.cnblogs.com/SugarLSG/p/3953399.html
RSS,根据维基百科的描述:RSS(简易信息聚合)是一种消息来源格式规范,用以聚合经常发布更新数据的网站,例如博客文章、新闻、音频或视频的网摘。Really Simple Syndication"聚合真的很简单"就是RSS的英文原意。
各大网络新闻网站均会有自己的 RSS 源,这次我选择了博客园的:http://feed.cnblogs.com/blog/sitehome/rss
准备:
开发语言:Object-C
开发环境:Xcode Version 5.1.1 (5B1008)
部署环境:iPhone ios7.1
使用第3方类库:AFNetworking2.0、GDataXML
博客园 RSS 数据结构分析:
打开 http://feed.cnblogs.com/blog/sitehome/rss,获取到的数据是 XML 格式的,结构如下:
(2014-09-03 10:40)

结构很清楚,<feed>为根节点,接着几个子节点分别描述标题、子标题、id、更新时间(UTC,+8 转为北京时间,下同)、生成者;
接着,可以看成是由多个(事实是20个)<entry>组成的一个博文数组,每一个<entry>节点为一篇博文信息。展开节点可看到一篇博文信息包括了 id(即博文路径)、标题、摘要、发布时间、更新时间、作者信息、详细内容等。
弄清楚了博客园 RSS 数据的结构,就可以着手开发了。
首先解决两个问题:1、数据获取;2、数据解析;
数据获取,简单 GET 形式即可,我使用了当下最热门的 AFNetworking,已更新到2.0版本,Git 的地址:https://github.com/AFNetworking/AFNetworking;
数据解析,这次数据源格式是 XML,网上有很多优秀的第3方类库可供选择,如何选择可参考:http://www.cnblogs.com/dotey/archive/2011/05/11/2042000.html 或 http://www.raywenderlich.com/553/xml-tutorial-for-ios-how-to-choose-the-best-xml-parser-for-your-iphone-project,我使用 GDataXML;
开始项目:
——准备
Xcode 新建一个工程项目,就叫 SGCnblogs,我习惯手写代码创建 Controller、View 等,所以这里没用到 storyboard。
删了 Tests Target,分好层级:

使用 GDataXML,还需做一下配置:
1、添加 libxml2.dylib;
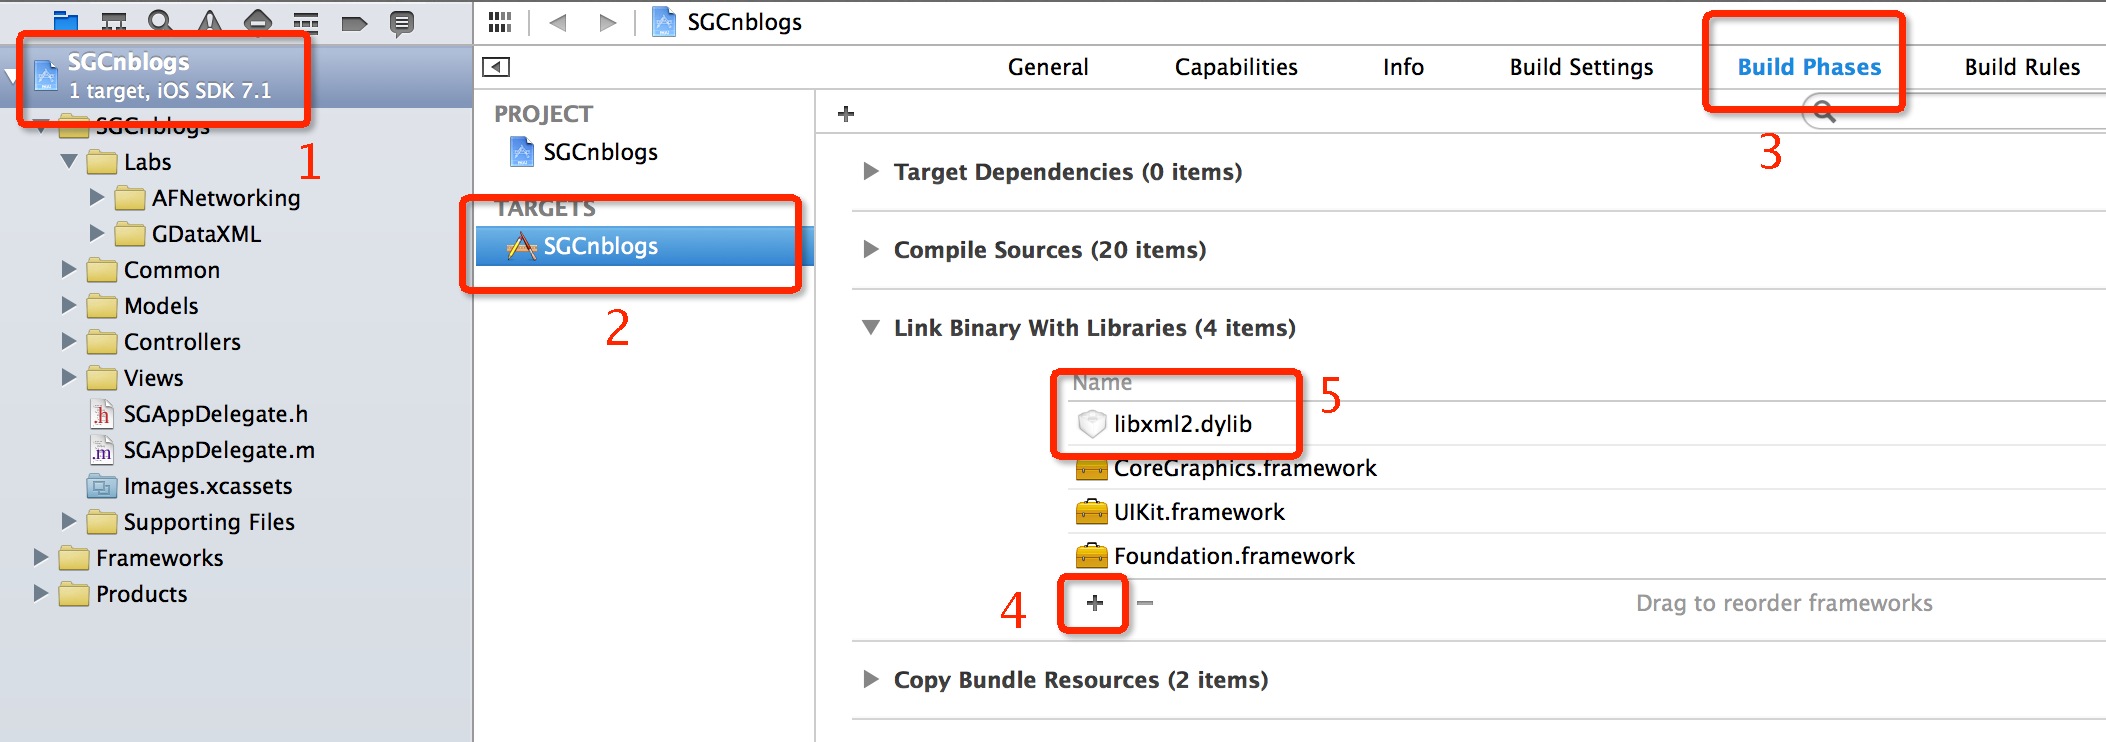
2、为 Header Search Paths 添加 /usr/include/libxml2;为 Other Linker Flags 添加 -lxml2;

新建一个 SGHomeTableViewController,继承自 UITableViewController,用来显示博文列表;
SGAppDelegate 里实例化 SGHomeTableViewController,并使用 UINavigationController 做界面切换模式:
SGHomeTableViewController *homeVC = [[SGHomeTableViewController alloc] init];
homeVC.title  = @"博客园";
UINavigationController *navigationController = [[UINavigationController alloc] initWithRootViewController:homeVC];
self.window.rootViewController = navigationController;
根据 RSS 数据的结构,分别新建3个 Model:SGCnblogsFeedModel、SGCnblogsEntryModel、SGCnblogsAuthorModel,加上各自的属性:
@interface SGCnblogsFeedModel : NSObject

@property (nonatomic, strong) NSString *title;
@property (nonatomic, strong) NSString *subtitle;
@property (nonatomic, strong) NSString *id;
@property (nonatomic, strong) NSString *updated;
@property (nonatomic, strong) NSString *generator;

@property (nonatomic, strong) NSMutableArray *enties;

@end
@interface SGCnblogsEntryModel : NSObject

@property (nonatomic, strong) NSString *id;
@property (nonatomic, strong) NSString *title;
@property (nonatomic, strong) NSString *summary;
@property (nonatomic, strong) NSString *published;
@property (nonatomic, strong) NSString *updated;
@property (nonatomic, strong) SGCnblogsAuthorModel *author;
@property (nonatomic, strong) NSString *content;

@end
@interface SGCnblogsAuthorModel : NSObject

@property (nonatomic, strong) NSString *name;
@property (nonatomic, strong) NSString *uri;

@end
——数据获取
新建一个 Helper -- SGCnblogsRSSHelper,用于请求 RSS 数据。对外提供一个类方法:
+ (void)requestCnblogsRSSWithHandleSuccess:(void (^)(SGCnblogsFeedModel *feedModel))success handleFailure:(void (^)(NSError *error))failure;
success 用于处理请求成功后的操作,传入 Response 数据(已封装成 SGCnblogsFeedModel);
failure 用于处理请求失败后的操作,传入错误信息;
#define URL_CNBLOGSRSS @"http://feed.cnblogs.com/blog/sitehome/rss"

+ (void)requestCnblogsRSSWithHandleSuccess:(void (^)(SGCnblogsFeedModel *feedModel))success handleFailure:(void (^)(NSError *error))failure
{
    // 使用 AFNetworking
    AFHTTPRequestOperationManager *manager = [AFHTTPRequestOperationManager manager];

    // 用 GET 方式请求 RSS
    [manager GET:URL_CNBLOGSRSS
            parameters:nil
            success:^(AFHTTPRequestOperation *task, id responseObject) {
                NSLog(@"responseObject: %@", responseObject);
            }
            failure:^(AFHTTPRequestOperation *task, NSError *error) {
                NSLog(@"error: %@", error);
            }
     ];
}
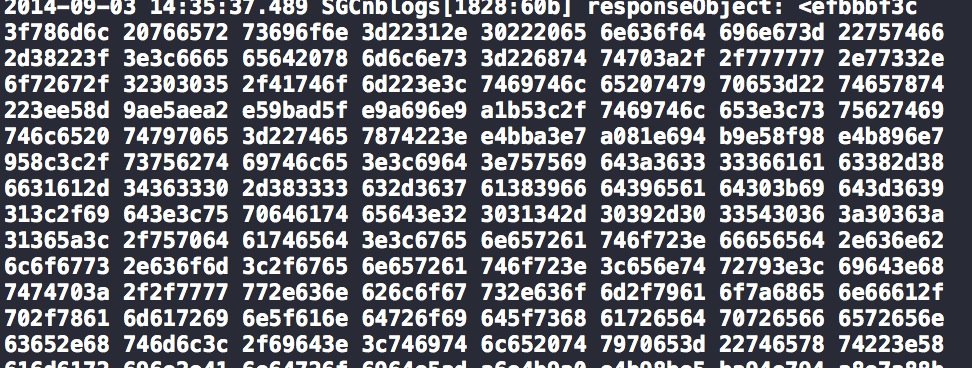
使用 AFHTTPRequestOperationManager 的 GET 方法,先做个简单测试,Debug 后看到打印出的部分 log 如下:

"无法接收这个类型的内容"。
AFHTTPRequestOperationManager 可设置 request 和 response 的类型,跟踪进 [AFHTTPRequestOperationManager manager] 方法可看到这里实例化出来的 response 类型是 [AFJSONResponseSerializer serializer],我需要的是 application/atom+xml,只需在实例化后再加上以下两句:
    // 设置请求
    manager.responseSerializer = [AFHTTPResponseSerializer serializer];
    manager.responseSerializer.acceptableContentTypes = [NSSet setWithObject:@"application/atom+xml"];
再次 Debug 测试:
数据拿到了,接着就是解析、封装。
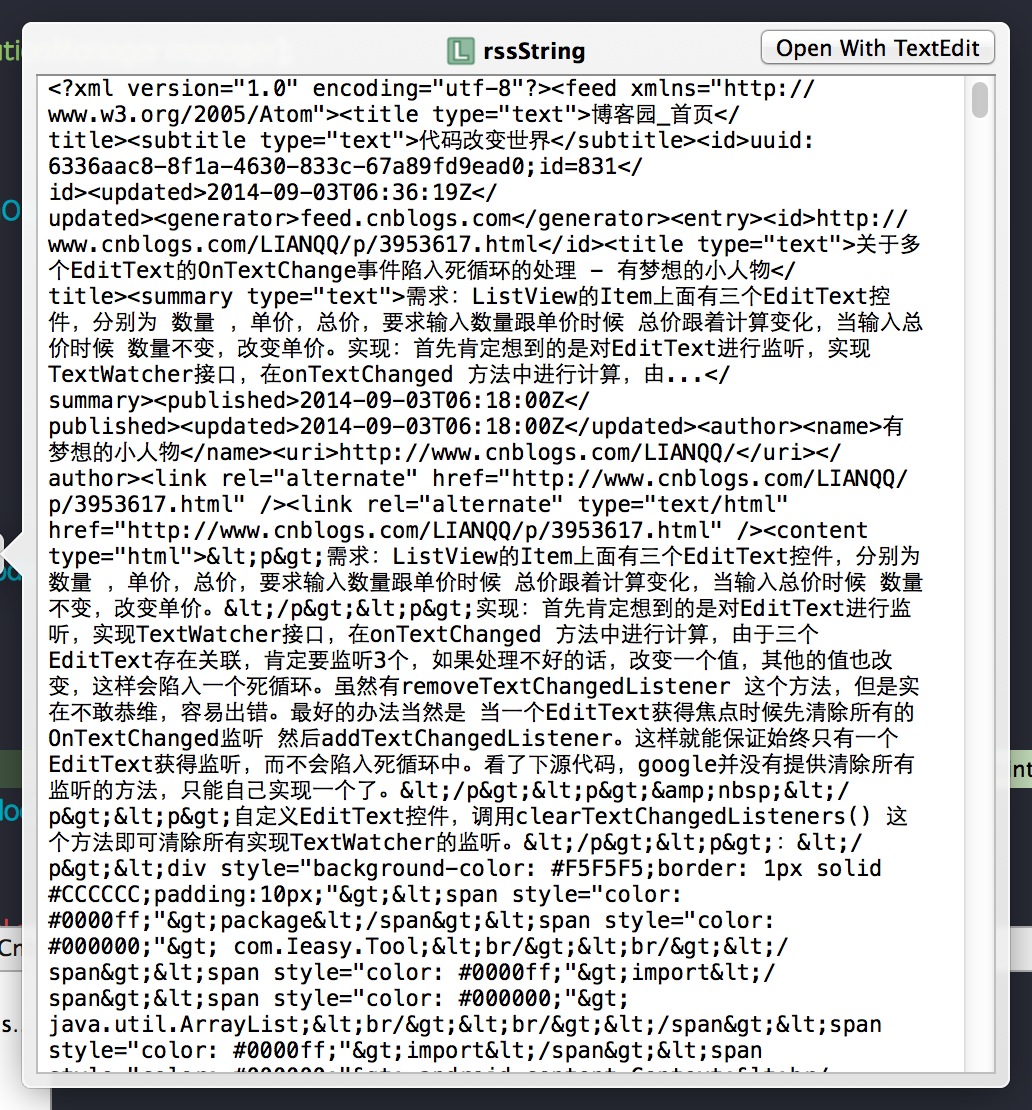
我在这步卡了很久,原因是 Debug 进入后,看到的数据并不是 XML 字符串格式的,而是这样的:

error?!!后来找了很久,才知道原来要这么转才能得到 XML 字符串:
                // 处理 Response 数据
                NSString *rssString = nil;
                if ([responseObject isKindOfClass:[NSData class]]) {
                    rssString = [[NSString alloc] initWithData:responseObject encoding:NSUTF8StringEncoding];
                } else {
                    rssString = (NSString *)responseObject;
                }
——数据解析、封装
XML 字符串数据,最终解析、封装成 SGCnblogsFeedModel。我在 SGCnblogsFeedModel 中对外提供一个构造函数(initWithRSSString:),传进 XML 字符串后,自动解析、封装成 SGCnblogsFeedModel 实例:
- (id)initWithRSSString:(NSString *)rssString
{
    if (self = [super init]) {
        // 使用 GDataXML 解析字符串
        GDataXMLDocument *xmlDoc = [[GDataXMLDocument alloc] initWithXMLString:rssString options:0 error:nil];
        GDataXMLElement *rootEle = [xmlDoc rootElement];

        self.title = [[[rootEle elementsForName:@"title"] objectAtIndex:0] stringValue];
        self.subtitle = [[[rootEle elementsForName:@"subtitle"] objectAtIndex:0] stringValue];
        self.id = [[[rootEle elementsForName:@"id"] objectAtIndex:0] stringValue];
        self.updated = [[[rootEle elementsForName:@"updated"] objectAtIndex:0] stringValue];
        self.generator = [[[rootEle elementsForName:@"generator"] objectAtIndex:0] stringValue];
        self.enties = [[NSMutableArray alloc] init];

        for (GDataXMLElement *entryEle in [rootEle elementsForName:@"entry"]) {
            SGCnblogsEntryModel *entryModel = [[SGCnblogsEntryModel alloc] init];

            entryModel.id = [[[entryEle elementsForName:@"id"] objectAtIndex:0] stringValue];
            entryModel.title = [[[entryEle elementsForName:@"title"] objectAtIndex:0] stringValue];
            entryModel.summary = [[[entryEle elementsForName:@"summary"] objectAtIndex:0] stringValue];
            entryModel.published = [[[entryEle elementsForName:@"published"] objectAtIndex:0] stringValue];
            entryModel.updated = [[[entryEle elementsForName:@"updated"] objectAtIndex:0] stringValue];
            entryModel.content = [[[entryEle elementsForName:@"content"] objectAtIndex:0] stringValue];

            GDataXMLElement *authorEle = [[entryEle elementsForName:@"author"] objectAtIndex:0];
            entryModel.author = [[SGCnblogsAuthorModel alloc] init];
            entryModel.author.name = [[[authorEle elementsForName:@"name"] objectAtIndex:0] stringValue];
            entryModel.author.uri = [[[authorEle elementsForName:@"uri"] objectAtIndex:0] stringValue];

            [self.enties addObject:entryModel];
        }
    }

    return self;
}
最简单粗暴的解析,这里不多做说明了。
SGCnblogsRSSHelper 里的 GET 方法修改成这样:
    // 用 GET 方式请求 RSS
    [manager GET:URL_CNBLOGSRSS
            parameters:nil
            success:^(AFHTTPRequestOperation *task, id responseObject) {
                // 处理 Response 数据
                NSString *rssString = nil;
                if ([responseObject isKindOfClass:[NSData class]]) {
                    rssString = [[NSString alloc] initWithData:responseObject encoding:NSUTF8StringEncoding];
                } else {
                    rssString = (NSString *)responseObject;
                }

                if (rssString && [rssString length] > 0) {
                    SGCnblogsFeedModel *feedModel = [[SGCnblogsFeedModel alloc] initWithRSSString:rssString];
                    if (feedModel) {
                        success(feedModel);
                        return;
                    }
                }

                failure([NSError errorWithDomain:@"can not parse the rss xml string." code:0 userInfo:nil]);
            }
            failure:^(AFHTTPRequestOperation *task, NSError *error) {
                failure(error);
            }
     ];
——数据显示
在 SGHomeTableViewController 中增加一个 SGCnblogsFeedModel 属性,同时实现 UITableViewDataSource 中以下4个 Delegate:
- (NSInteger)numberOfSectionsInTableView:(UITableView *)tableView;
- (NSInteger)tableView:(UITableView *)tableView numberOfRowsInSection:(NSInteger)section;
- (CGFloat)tableView:(UITableView *)tableView heightForRowAtIndexPath:(NSIndexPath *)indexPath;
- (UITableViewCell *)tableView:(UITableView *)tableView cellForRowAtIndexPath:(NSIndexPath *)indexPath;
并在 viewDidLoad 中,绑定数据(同样也可以放在 init 方法中,这样就不需要 reload data 了):
@interface SGHomeTableViewController()

@property (nonatomic, strong) SGCnblogsFeedModel *feedModel;

@end


- (void)viewDidLoad
{
    [super viewDidLoad];

    [SGCnblogsRSSHelper requestCnblogsRSSWithHandleSuccess:^(SGCnblogsFeedModel *feedModel) {
        self.feedModel = feedModel;
        // 重新渲染界面
        [self.tableView reloadData];
    } handleFailure:^(NSError *error) {
        NSLog(@"%@", error);
    }];
}


#pragma mark - UITableViewDataSource

/**
 设置 Section 数
 */
- (NSInteger)numberOfSectionsInTableView:(UITableView *)tableView
{
    return 1;
}

/**
 设置每个 Section 对应的数据行数
 */
- (NSInteger)tableView:(UITableView *)tableView numberOfRowsInSection:(NSInteger)section
{
    return self.feedModel && self.feedModel.enties ? self.feedModel.enties.count : 0;
}

/**
 设置每行高度
 */
- (CGFloat)tableView:(UITableView *)tableView heightForRowAtIndexPath:(NSIndexPath *)indexPath
{
    return 105;
}

/**
 绑定每行数据
 */
- (UITableViewCell *)tableView:(UITableView *)tableView cellForRowAtIndexPath:(NSIndexPath *)indexPath
{
    // 重用 TableViewCell
    SGCnblogsEntryTableViewCell *cell = [tableView dequeueReusableCellWithIdentifier:@"SGCnblogEntryTableViewCell"];
    if (!cell) {
        cell = [[SGCnblogsEntryTableViewCell alloc] init];
    }

    // 加载界面
    [cell loadView:self.feedModel && self.feedModel.enties ? [self.feedModel.enties objectAtIndex:indexPath.row] : nil];

    return cell;
}
这里用到 SGCnblogsEntryTableViewCell,这个是我自定义的一个继承自 UITableViewCell 的 TableViewCell,用于显示博文列表页每一行的数据,这个类对外提供一个实例方法:
- (void)loadView:(SGCnblogsEntryModel *)entryModel;
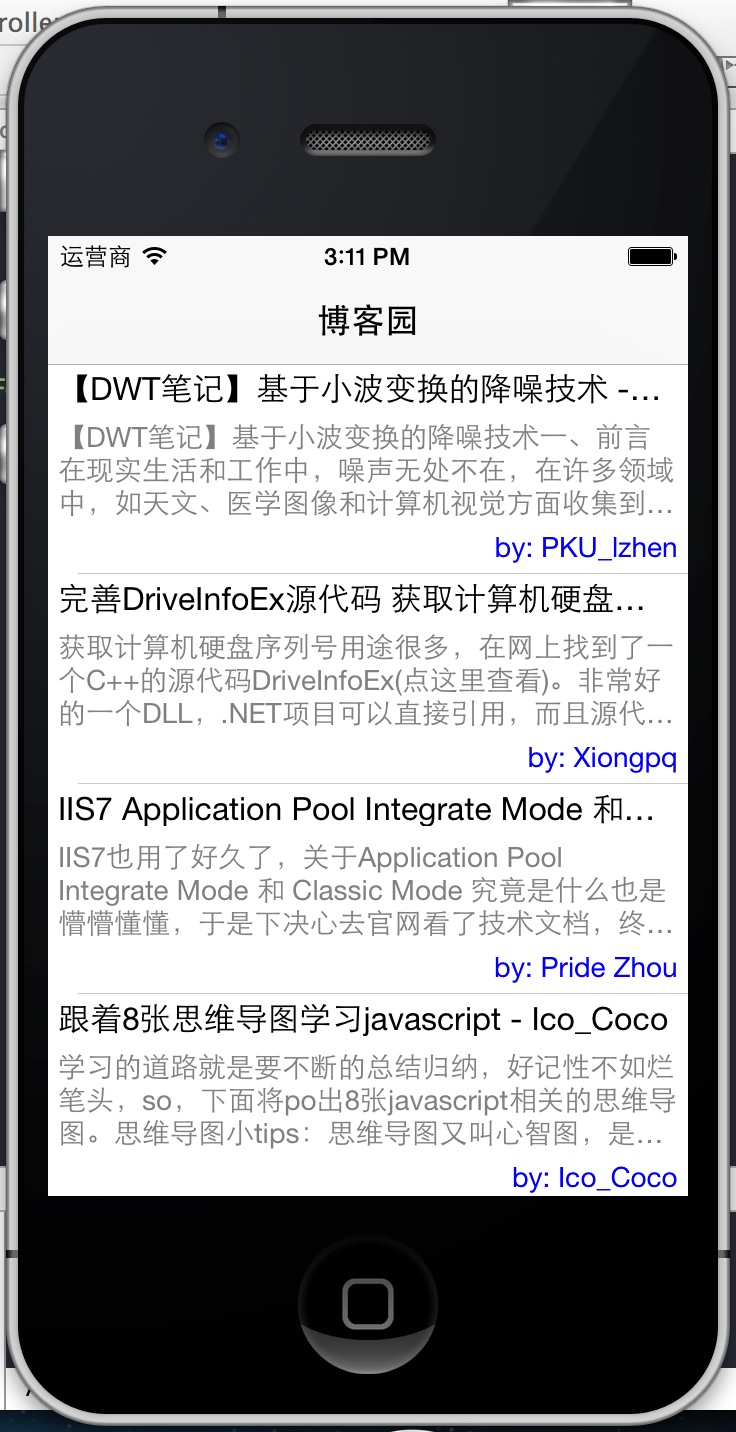
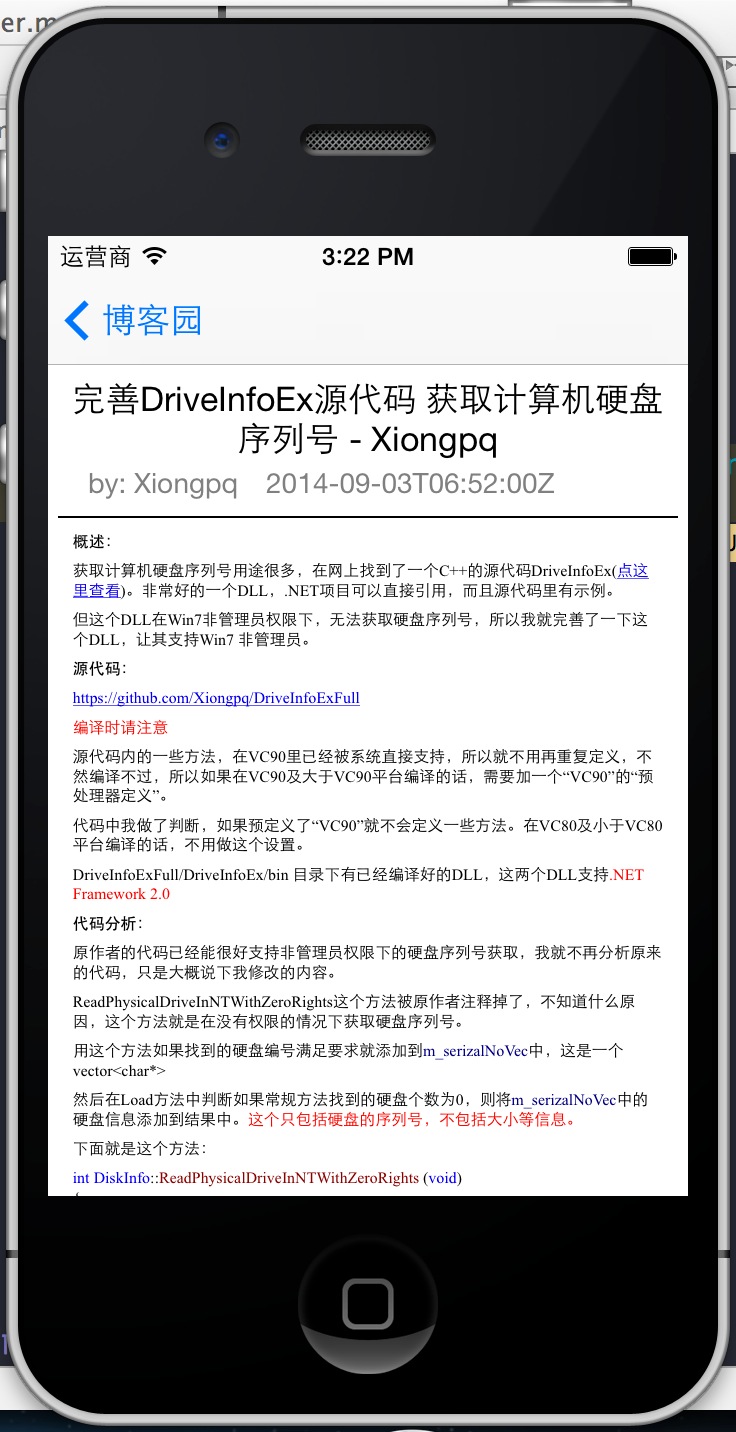
简单的将数据显示出来,这里不贴出代码了,看看 Run 的结果:
——界面跳转
接着实现列表每一行的点击事件,当点击某一行时,界面切换到博文详细页。只需在 SGHomeTableViewController 中实现 UITableViewDelegate 中的
tableView:didSelectRowAtIndexPath: 方法即可:
#pragma mark - UITableViewDelegate

/**
 处理点击事件
 */
- (void)tableView:(UITableView *)tableView didSelectRowAtIndexPath:(NSIndexPath *)indexPath
{
    SGCnblogsEntryModel *entryModel = self.feedModel && self.feedModel.enties ? [self.feedModel.enties objectAtIndex:indexPath.row] : nil;
    SGEntryViewController *entryVC = [[SGEntryViewController alloc] initWithEntryModel:entryModel];

    [self.navigationController pushViewController:entryVC animated:YES];
}
获取到对应的 Model 后,使用 Navigation Push 一个新 Controller。
SGEntryViewController 是我自定义的一个 ViewController,继承自 UIViewController,增加一个 SGCnblogsEntryModel 属性,并且对外提供一个构造函数(initWithEntryModel:)。
这个界面用于显示博文的详细内容,代码不贴出来了,看看简单效果:
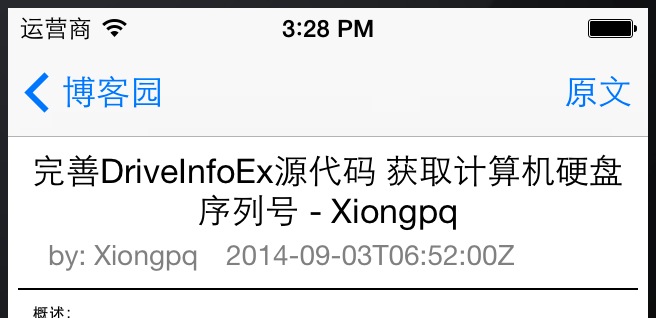
我还想增加一个功能,能够跳转到原文页面。
于是我在这个界面的 NavigationItem 处添加一个右侧按钮,点击跳转到原文页面。在 initWithEntryModel: 中添加以下代码:
        // 查看原文按钮
        UIBarButtonItem *rightBarBtn = [[UIBarButtonItem alloc] initWithTitle:@"原文" style:UIBarButtonItemStyleBordered target:self action:@selector(selectedRightAction:)];
        self.navigationItem.rightBarButtonItem = rightBarBtn;
并且实现对应的点击响应方法(selectedRightAction:):
- (void)selectedRightAction:(UIBarButtonItem *)rightBarBtn
{
    SGWebViewController *webVC = [[SGWebViewController alloc] initWithUrl:self.entryModel.id];
    [self.navigationController pushViewController:webVC animated:YES];
}
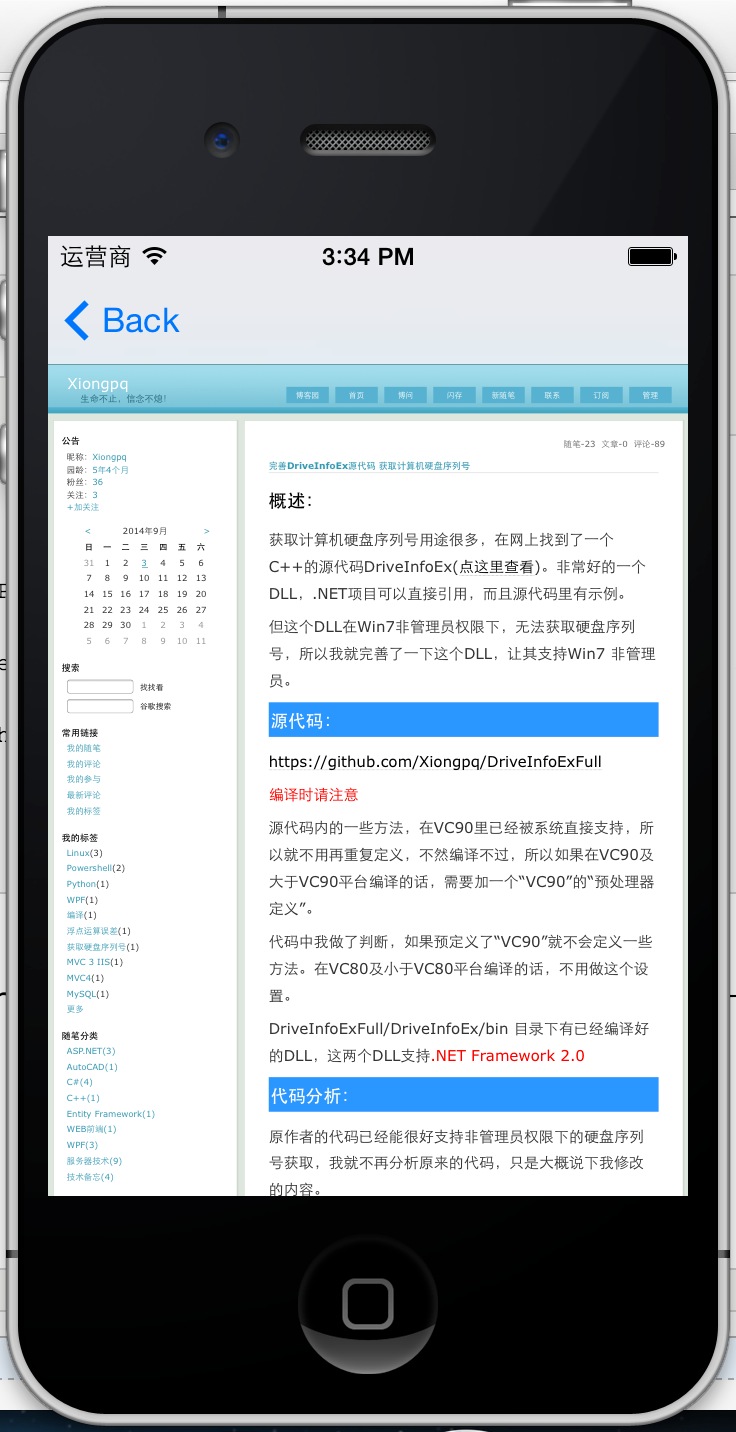
SGWebViewController,继承自 UIViewController,用来加载网络页面,这里没做返回、前进、重加载等功能,只是简单显示。
直接贴代码和效果图:
@interface SGWebViewController()

@property (nonatomic, strong) NSString *url;

@end


@implementation SGWebViewController

- (id)initWithUrl:(NSString *)url
{
    if (self = [super init]) {
        self.url = url;
    }
    return self;
}

- (void)viewDidLoad
{
    [super viewDidLoad];

    NSURL *url = [NSURL URLWithString:self.url];
    NSURLRequest *request = [NSURLRequest requestWithURL:url];
    UIWebView *webView = [[UIWebView alloc] init];
    webView.frame = CGRectMake(0, 0, self.view.frame.size.width, self.view.frame.size.height);
    //  适应屏幕大小
    webView.scalesPageToFit = YES;
    [webView loadRequest:request];
    [self.view addSubview:webView];
}
结语:
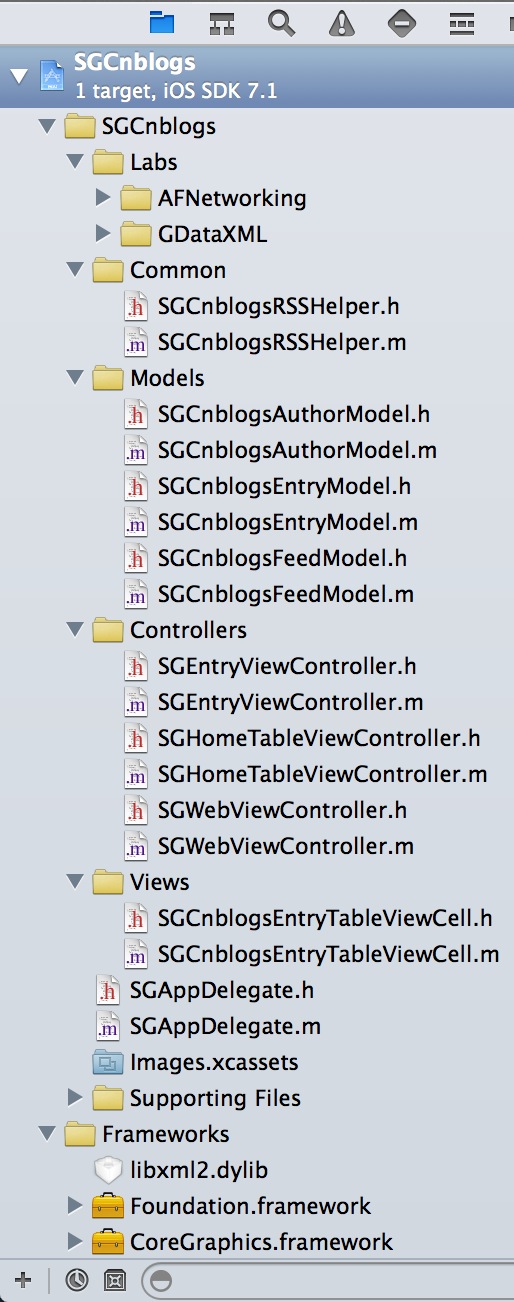
最后的文档结构是:
项目已放到 Github 上:https://github.com/SugarLSG/SGCnblogs