学习链接:
https://blog.csdn.net/qq_24708791/article/details/78535565
https://mianhuaman.iteye.com/blog/2224250
https://blog.csdn.net/ae6623/article/details/9494601
https://www.cnblogs.com/vhua/p/cas_4.html
1. 配置cas.server
修改服务ip server.name=http://localhost:8080
Cas服务端其实就是一个war包。
在资源cassourcecas-server-4.0.0-releasecas-server-4.0.0modules目录下
cas-server-webapp-4.0.0.war 将其改名为cas.war放入tomcat目录下的webapps下。启动tomcat自动解压war包。浏览器输入http://localhost:8080/cas/login ,可看到登录页面
固定的用户名和密码4.0 casuser /Mellon 3.5 admin/admin
2. 将cas.client相关的jar 放在项目的lib中
3. 在web.xm中配置认证校验 (注意过滤器顺序,最后放在最后面)
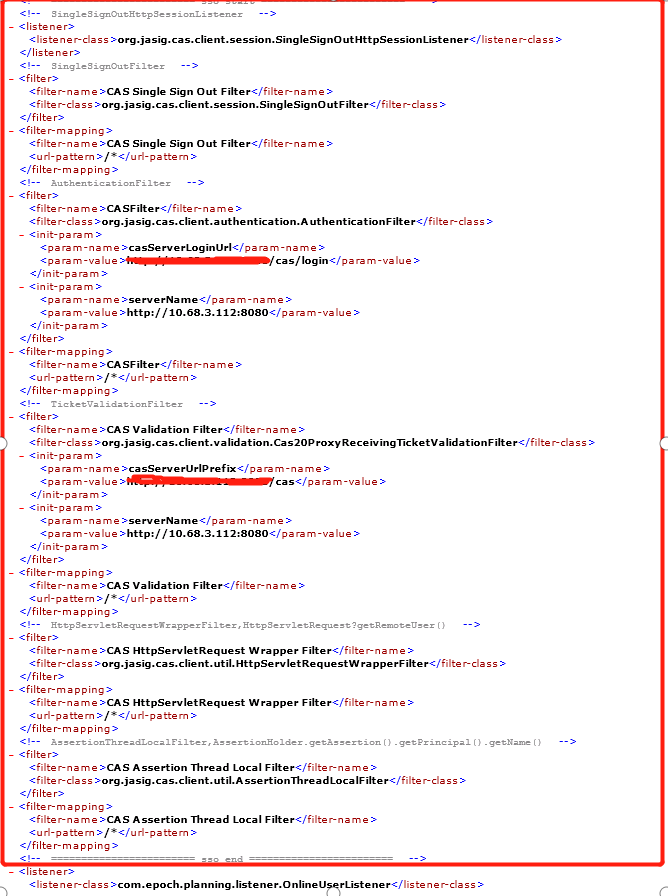
    <!-------------SSO ----------------->
<filter>
    <filter-name>CAS Single Sign Out Filter</filter-name>
    <filter-class>org.jasig.cas.client.session.SingleSignOutFilter</filter-class>
  </filter>
  <filter-mapping>
    <filter-name>CAS Single Sign Out Filter</filter-name>
    <url-pattern>/*</url-pattern>
  </filter-mapping>
  <listener>
    <listener-class>org.jasig.cas.client.session.SingleSignOutHttpSessionListener</listener-class>
  </listener>
  <filter>
    <filter-name>CAS Filter</filter-name>
    <filter-class>org.jasig.cas.client.authentication.AuthenticationFilter</filter-class>
    <init-param>
      <param-name>casServerLoginUrl</param-name>
      <param-value>http://10.56.2.53/cas/login</param-value>
    </init-param>
    <init-param>
      <param-name>serverName</param-name>
      <param-value>http://10.68.2.123:8080</param-value>
    </init-param>
  </filter>
  <filter-mapping>
    <filter-name>CAS Filter</filter-name>
    <url-pattern>/*</url-pattern>
  </filter-mapping>

  <filter>
    <filter-name>CAS Validation Filter</filter-name>
    <filter-class>org.jasig.cas.client.validation.Cas20ProxyReceivingTicketValidationFilter</filter-class>
    <init-param>
      <param-name>casServerUrlPrefix</param-name>
      <param-value>http://10.56.99.53/cas</param-value>
    </init-param>
    <init-param>
      <param-name>serverName</param-name>
      <param-value>http://10.68.2.123:8080</param-value>
    </init-param>
  </filter>
  <filter-mapping>
    <filter-name>CAS Validation Filter</filter-name>
    <url-pattern>/*</url-pattern>
  </filter-mapping>
  <filter>
    <filter-name>CAS HttpServletRequest Wrapper Filter</filter-name>
    <filter-class>org.jasig.cas.client.util.HttpServletRequestWrapperFilter</filter-class>
  </filter>
  <filter-mapping>
    <filter-name>CAS HttpServletRequest Wrapper Filter</filter-name>
    <url-pattern>/*</url-pattern>
  </filter-mapping>
    <!----------end------------->
4. 获取用户名(三种方式)
4.1 getUserPrincipal()
AttributePrincipal principal = (AttributePrincipal) request.getUserPrincipal();
String username = principal.getName();
4.2 getRemoteUser()
<%
String loginName1 = request.getRemoteUser();
%>
<br>request.getRemoteUser(): <%=loginName1%>;<br/>
4.3 session 中获取
<%
Object object =request.getSession().getAttribute("_const_cas_assertion_");
Assertion assertion =(Assertion)object;
String loginName3 =assertion.getPrincipal().getName();
%>
request.getSession().getAttribute("_const_cas_assertion_").getPrincipal().getName():<%=loginName3%><br/>
4.4 获取其他信息
<%

    String loginUser= request.getRemoteUser();
    if (StringUtils.isBlank(loginUser)) {
        loginUser = request.getParameter("user");

    }
    String requestURI=request.getRequestURI();

    boolean ssoFlag=false;
      if (StringUtils.isNotBlank(request.getRemoteUser())) {
          //如果是单点进入,
         ssoFlag=true;
      }
%>
<script>
    var ssoFlag = "<%=ssoFlag%>";
    var requestURI = "<%=requestURI%>";
</script>
5.单点退出
cas server 3.5
在Cas-Server项目的cas-servlet.xml中,找到
 <bean id="logoutController" class="org.jasig.cas.web.LogoutController"
        p:centralAuthenticationService-ref="centralAuthenticationService"
        p:logoutView="casLogoutView"
        p:followServiceRedirects="true"
        p:warnCookieGenerator-ref="warnCookieGenerator"
        p:ticketGrantingTicketCookieGenerator-ref="ticketGrantingTicketCookieGenerator" />
界面的注销连接到CAS的logout地址,如http://localhost:8080/cas/logout 完事
备注:如果直接访问CAS的logout话,会出现注销成功页面,其实大部分情况下这个页面是没有必要的,更多的需求可能是退出后显示登录页面,并且登录成功后还是会进入到之前的业务系统,那么可以修改cas-servlet.xml文件,在"logoutController"的bean配置中增加属性“followServiceRedirects”,设置为“true”,然后在业务系统的注销连接中加入"service参数",值为业务系统的绝对URL,这样就OK了,如你的业务系统URL为:http://localhost:8080/casClient,那么注销URL就为:http://localhost:8080/cas/logout?service=http://localhost:8080/casClient
function logout() {
            window.location.href = "http://localhost/cas/logout?service=http://ip:8080/C1-Planning/login.jsp";
        }
https://www.cnblogs.com/notDog/p/5276638.html
cas server 4.0
https://blog.csdn.net/qq_24708791/article/details/78535565
6.CAS不拦截指定url过滤
https://my.oschina.net/ytliyang/blog/832644
7.spring boot配置Cas单点登录
https://github.com/apereo/cas-overlay-template/tree/5.3
https://blog.csdn.net/shunhua19881987/article/details/72724169
https://blog.csdn.net/lhc0512/article/details/82466246
https://www.cnblogs.com/tjudzj/p/10187626.html