一、之前我们介绍过<include>标签,该标签可以再布局文件中引用另外一个布局文件,这种方式是在布局文件中固定导入,使用起来不是很方便。
ViewtSub的功能和<include>的功能类似,也是实现引用另外一个布局。但是唯一不同的是ViewStub并不会马上装载引用布局文件,只有在调用了ViewStub.inflate或ViewStub.setVisibility(View.VISIBILE)方法ViewStub才会装载引用的控件。
二、下面我们来一个实列讲解viewstub:

在main.xml文件中:
 1 <LinearLayout xmlns:android="http://schemas.android.com/apk/res/android"
 2     xmlns:tools="http://schemas.android.com/tools"
 3     android:layout_width="match_parent"
 4     android:layout_height="match_parent"
 5     android:orientation="vertical" >
 6     <!-- 静态加载布局文件 -->
 7     <include
 8         android:id="@+id/include1"
 9         android:layout_width="fill_parent"
10         android:layout_height="wrap_content"
11         layout="@layout/next" />
12     <!-- 动态加载布局文件 -->
13         <ViewStub
14             android:id="@+id/viewstub"
15             android:layout_width="fill_parent"
16             android:layout_height="wrap_content"
17             android:layout="@layout/next" />
18     <LinearLayout
19         android:layout_width="fill_parent"
20         android:layout_height="wrap_content"
21         android:layout_marginEnd="1dp"
22         android:orientation="horizontal" >
23         <Button
24         android:id="@+id/button1"
25         android:layout_width="0dp"
26         android:layout_height="wrap_content"
27         android:layout_weight="1"
28         android:text="加载" />
29         <Button
30             android:id="@+id/button2"
31             android:layout_width="0dp"
32             android:layout_height="wrap_content"
33             android:layout_weight="1"
34             android:text="隐藏" />
35     </LinearLayout>
36 </LinearLayout>
在next.xml文件中:
1 <?xml version="1.0" encoding="utf-8"?>
2 <RelativeLayout xmlns:android="http://schemas.android.com/apk/res/android"
3     android:layout_width="match_parent"
4     android:layout_height="match_parent" >
5     <RatingBar
6         android:id="@+id/ratingBar1"
7         android:layout_width="wrap_content"
8         android:layout_height="wrap_content" />
9 </RelativeLayout>
在.java文件中:
 1 private ViewStub stub;
 2     private Button button1,button2;
 3     @Override
 4     protected void onCreate(Bundle savedInstanceState) {
 5         super.onCreate(savedInstanceState);
 6         setContentView(R.layout.main);
 7         stub = (ViewStub) findViewById(R.id.viewstub);
 8         button1 = (Button) findViewById(R.id.button1);
 9         button2 = (Button) findViewById(R.id.button2);
10         button1.setOnClickListener(new OnClickListener() {
11
12             @Override
13             public void onClick(View v) {
14                 // TODO 自动生成的方法存根
15                 View view = stub.inflate();   //inflate()是通过ViewStub对象将next.xml加载到viewStub容器中,仅infalte这句语句就可以实现惰性装载控件
16                 RelativeLayout layout = (RelativeLayout) view;  //view 返回值是next.xml文件的View对象,通过强制转换得到next.xml文件中的布局对象,通过布局对象可以获得子控件Ratingbar
17
18             RatingBar bar = (RatingBar) layout.findViewById(R.id.ratingBar1);
19             bar.setNumStars(3);
20             Toast.makeText(MainActivity.this, "layout.getId();" + view.getId(), Toast.LENGTH_LONG).show();
21             }
22         });
23
24         button2.setOnClickListener(new OnClickListener() {
25
26             @Override
27             public void onClick(View v) {
28                 // TODO 自动生成的方法存根
29                 stub.setVisibility(stub.GONE);//隐藏布局
30             }
31         });
32
33         stub.setOnInflateListener(new OnInflateListener() {
34
35             @Override
36             public void onInflate(ViewStub stub1, View inflated) {
37                 // TODO 自动生成的方法存根
38                 Toast.makeText(MainActivity.this, "getLayoutResource" + stub.getLayoutResource(), Toast.LENGTH_LONG).show();//getresource                                          //的值就是next.xml(R.layout.next)的Id值
39  } 40  }); 41 }
运行结果:
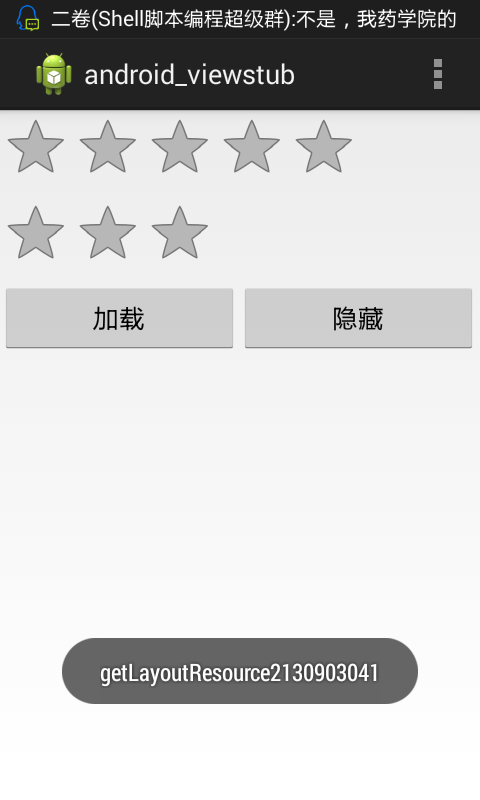
注意::viewstub不能反复inflate,只能inflate一次注意: