数据库连接池的基本思想就是为数据库连接建立一个“缓冲池”。预先在缓冲池中放入一定数量的连接,当需要建立数据库连接时,只需从“缓冲池”中取出一个,使用完毕之后再放回去。
数据库连接池负责分配、管理和释放数据库连接,它允许应用程序重复使用一个现有的数据库连接,而不是重新建立一个。
数据库连接池在初始化时将创建一定数量的数据库连接放到连接池中,这些数据库连接的数量是由最小数据库连接数来设定的。无论这些数据库连接是否被使用,连接池都将一直保证至少拥有这么多的连接数量。连接池的最大数据库连接数量限定了这个连接池能占有的最大连接数,当应用程序向连接池请求的连接数超过最大连接数量时,这些请求将被加入到等待队列中。

JDBC 的数据库连接池使用 javax.sql.DataSource 来表示,DataSource 只是一个接口,该接口通常由服务器(Weblogic, WebSphere, Tomcat)提供实现,也有一些开源组织提供实现:
DBCP 数据库连接池
C3P0 数据库连接池
DataSource 通常被称为数据源,它包含连接池和连接池管理两个部分,习惯上也经常把 DataSource 称为连接池
1.DBCP 数据源
![]()
![]()
![]()
![]()
使用 DBCP 数据库连接池
* 1. 加入 jar 包(2 个jar 包). 依赖于 Commons Pool
* 2. 创建数据库连接池
* 3. 为数据源实例指定必须的属性
* 4. 从数据源中获取数据库连接
public void testDBCP() throws SQLException{
		final BasicDataSource dataSource = new BasicDataSource();

		//2. 为数据源实例指定必须的属性
		dataSource.setUsername("root");
		dataSource.setPassword("1230");
		dataSource.setUrl("jdbc:mysql:///atguigu");
		dataSource.setDriverClassName("com.mysql.jdbc.Driver");

		//3. 指定数据源的一些可选的属性.
		//1). 指定数据库连接池中初始化连接数的个数
		dataSource.setInitialSize(5);

		//2). 指定最大的连接数: 同一时刻可以同时向数据库申请的连接数
		dataSource.setMaxActive(5);

		//3). 指定小连接数: 在数据库连接池中保存的最少的空闲连接的数量
		dataSource.setMinIdle(2);

		//4).等待数据库连接池分配连接的最长时间. 单位为毫秒. 超出该时间将抛出异常.
		dataSource.setMaxWait(1000 * 5);

		//4. 从数据源中获取数据库连接
		Connection connection = dataSource.getConnection();
		System.out.println(connection.getClass());
	}
从外部配置的properties中使用BasicDataSourceFactory获取DataSource
* 1. 加载 dbcp 的 properties 配置文件: 配置文件中的键需要来自 BasicDataSource的属性.
* 2. 调用 BasicDataSourceFactory 的 createDataSource 方法创建 DataSource实例
* 3. 从 DataSource 实例中获取数据库连接.
public void testDBCPWithDataSourceFactory() throws Exception{

		Properties properties = new Properties();
		InputStream inStream = JDBCTest.class.getClassLoader()
				.getResourceAsStream("dbcp.properties");
		properties.load(inStream);

		DataSource dataSource =
				BasicDataSourceFactory.createDataSource(properties);

		System.out.println(dataSource.getConnection());

//		BasicDataSource basicDataSource =
//				(BasicDataSource) dataSource;
//
//		System.out.println(basicDataSource.getMaxWait());
	}
dbcp.properties
username=root
password=1230
driverClassName=com.mysql.jdbc.Driver
url=jdbc:mysql:///atguigu

initialSize=10
maxActive=50
minIdle=5
maxWait=5000
采用多线程方式测试最大连接数
同一时刻最大连接数为5,在第6个连接时,必须在等待时间内释放掉一个连接,第六个连接才能连接上,否则会抛异常
采用的是多线程方式,一个线程释放连接,一个线程获取连接
public void testDBCP() throws SQLException{
		final BasicDataSource dataSource = new BasicDataSource();

		//2. 为数据源实例指定必须的属性
		dataSource.setUsername("root");
		dataSource.setPassword("1230");
		dataSource.setUrl("jdbc:mysql:///atguigu");
		dataSource.setDriverClassName("com.mysql.jdbc.Driver");

		//3. 指定数据源的一些可选的属性.
		//1). 指定数据库连接池中初始化连接数的个数
		dataSource.setInitialSize(5);

		//2). 指定最大的连接数: 同一时刻可以同时向数据库申请的连接数
		dataSource.setMaxActive(5);

		//3). 指定小连接数: 在数据库连接池中保存的最少的空闲连接的数量
		dataSource.setMinIdle(2);

		//4).等待数据库连接池分配连接的最长时间. 单位为毫秒. 超出该时间将抛出异常.
		dataSource.setMaxWait(1000 * 5);

		//4. 从数据源中获取数据库连接
		Connection connection = dataSource.getConnection();
		System.out.println(connection.getClass());

		connection = dataSource.getConnection();
		System.out.println(connection.getClass());

		connection = dataSource.getConnection();
		System.out.println(connection.getClass());

		connection = dataSource.getConnection();
		System.out.println(connection.getClass());

		Connection connection2 = dataSource.getConnection();
		System.out.println(">" + connection2.getClass());

		new Thread(){
			public void run() {
                    //第六个连接
				Connection conn;
				try {
					conn = dataSource.getConnection();
					System.out.println(conn.getClass());
				} catch (SQLException e) {
					e.printStackTrace();
				}
			};
		}.start();

		try {
			Thread.sleep(3000);
		} catch (InterruptedException e) {
			e.printStackTrace();
		}

		connection2.close();
	}
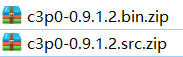
2.C3P0 数据源
![]()
查看c3p0文档

public void testC3P0() throws Exception{
		ComboPooledDataSource cpds = new ComboPooledDataSource();
		cpds.setDriverClass( "com.mysql.jdbc.Driver" ); //loads the jdbc driver
		cpds.setJdbcUrl( "jdbc:mysql:///atguigu" );
		cpds.setUser("root");
		cpds.setPassword("1230");

		System.out.println(cpds.getConnection());
	}
写配置文件
![]()
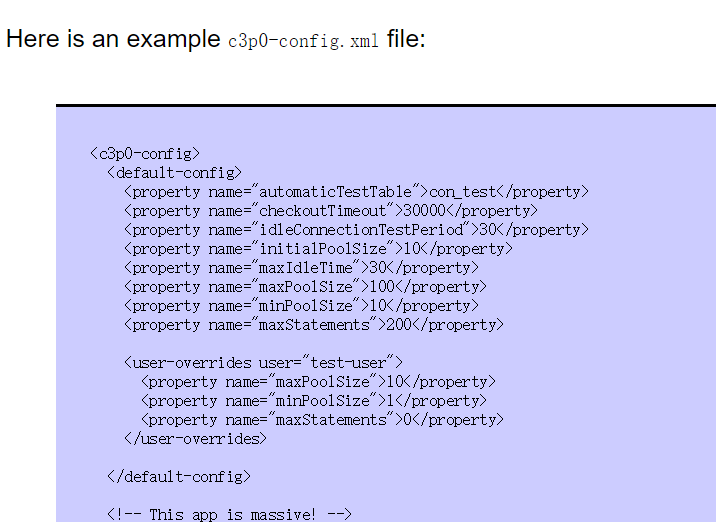
创建一个c3p0-config.xml 将说明文档中的复制过来
<c3p0-config>
  <default-config>
    <property name="automaticTestTable">con_test</property>
    <property name="checkoutTimeout">30000</property>
    <property name="idleConnectionTestPeriod">30</property>
    <property name="initialPoolSize">10</property>
    <property name="maxIdleTime">30</property>
    <property name="maxPoolSize">100</property>
    <property name="minPoolSize">10</property>
    <property name="maxStatements">200</property>

    <user-overrides user="test-user">
      <property name="maxPoolSize">10</property>
      <property name="minPoolSize">1</property>
      <property name="maxStatements">0</property>
    </user-overrides>

  </default-config>

  <!-- This app is massive! -->
  <named-config name="intergalactoApp">
    <property name="acquireIncrement">50</property>
    <property name="initialPoolSize">100</property>
    <property name="minPoolSize">50</property>
    <property name="maxPoolSize">1000</property>

    <!-- intergalactoApp adopts a different approach to configuring statement caching -->
    <property name="maxStatements">0</property>
    <property name="maxStatementsPerConnection">5</property>

    <!-- he's important, but there's only one of him -->
    <user-overrides user="master-of-the-universe">
      <property name="acquireIncrement">1</property>
      <property name="initialPoolSize">1</property>
      <property name="minPoolSize">1</property>
      <property name="maxPoolSize">5</property>
      <property name="maxStatementsPerConnection">50</property>
    </user-overrides>
  </named-config>
</c3p0-config>
主要的只需要中间的
<?xml version="1.0" encoding="UTF-8"?>
<c3p0-config>

	<named-config name="helloc3p0">

		<!-- 指定连接数据源的基本属性 -->
		<property name="user">root</property>
		<property name="password">1230</property>
		<property name="driverClass">com.mysql.jdbc.Driver</property>
		<property name="jdbcUrl">jdbc:mysql:///atguigu</property>

		<!-- 若数据库中连接数不足时, 一次向数据库服务器申请多少个连接 -->
		<property name="acquireIncrement">5</property>
		<!-- 初始化数据库连接池时连接的数量 -->
		<property name="initialPoolSize">5</property>
		<!-- 数据库连接池中的最小的数据库连接数 -->
		<property name="minPoolSize">5</property>
		<!-- 数据库连接池中的最大的数据库连接数 -->
		<property name="maxPoolSize">10</property>

		<!-- C3P0 数据库连接池可以维护的 Statement 的个数 -->
		<property name="maxStatements">20</property>
		<!-- 每个连接同时可以使用的 Statement 对象的个数 -->
		<property name="maxStatementsPerConnection">5</property>

	</named-config>

</c3p0-config>
C3P0使用步骤
* 1. 创建 c3p0-config.xml 文件, 参考帮助文档中 Appendix B: Configuation Files 的内容
* 2. 创建 ComboPooledDataSource 实例; DataSource dataSource = new ComboPooledDataSource("helloc3p0");
* 3. 从 DataSource 实例中获取数据库连接.
	@Test
	public void testC3poWithConfigFile() throws Exception{
		DataSource dataSource =
				new ComboPooledDataSource("helloc3p0");

		System.out.println(dataSource.getConnection());

		ComboPooledDataSource comboPooledDataSource =
				(ComboPooledDataSource) dataSource;
		System.out.println(comboPooledDataSource.getMaxStatements());
	}
从数据库连接池获取连接:
private static DataSource dataSource = null;

	//数据库连接池应只被初始化一次.
	static{
		dataSource = new ComboPooledDataSource("helloc3p0");
	}
	public static Connection getConnection() throws Exception {
		return dataSource.getConnection();
	}
注:connection.close()
数据库连接池的 Connection 对象进行 close 时
并不是真的进行关闭, 而是把该数据库连接会归还到数据库连接池中.