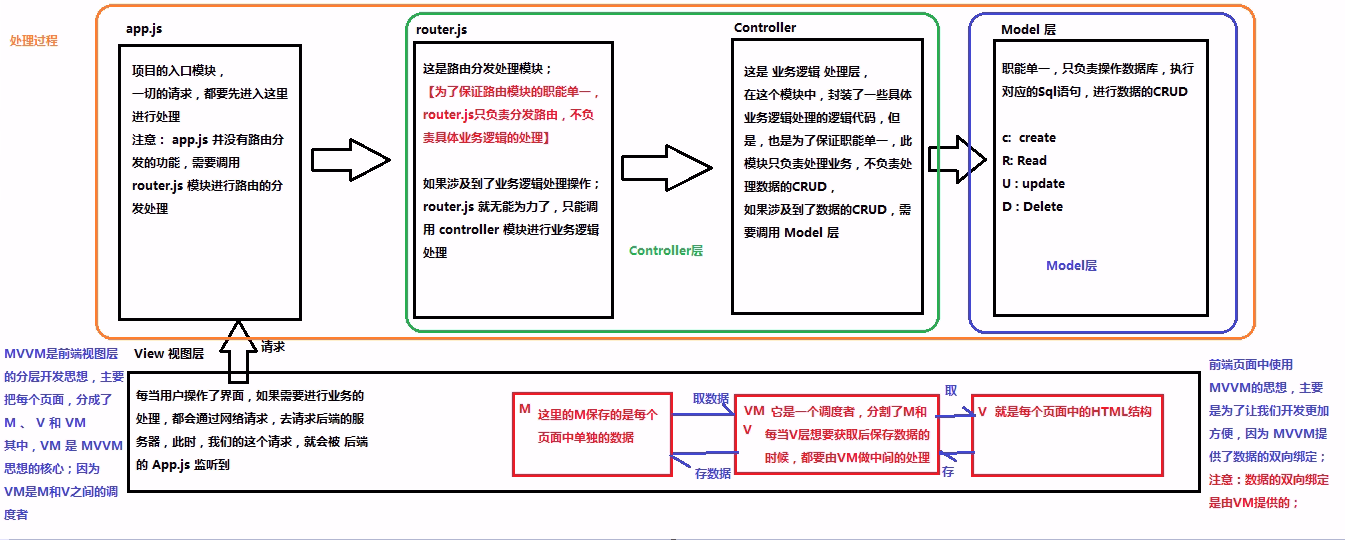
MVVM开发思想图(图片可能会被缩小,请右键另存查看,图片来源于网络)
定义基本Vue代码结构
1 v-text,v-cloak,v-html命令
默认 v-text没有闪烁问题,但是会覆盖元素中原本的内容,插值表达式只会替换自己的占位符,


<!DOCTYPE html>
<html>
    <head>
        <meta charset="UTF-8">
        <title></title>
    </head>
    <script src="vue.js">
    </script>
    <style type="text/css">
        [v-cloak]{
            display: none;
        }
    </style>
    <body>
        <div id="app">
            <p v-cloak="">{{msg}}</p>
        </div>
        <script type="text/javascript">
            var vm = new Vue({
                el:'#app',
                data:{
                    msg:"123"
                }
            })
        </script>
    </body>
</html>
以上两种 方法会默认转义成文本输出
如果需要输出成网页元素就需要 v-html
<div v-html="msg2"></div>
2 v-bind 使用【Vue中提供了 v-on:事件绑定机制】 缩写是【:】
v-bind : 是vue中,提供的用于绑定属性的指令
<input type="button" name="" id="" value="按钮" v-bind:title="msg3" />
<input type="button" name="" id="" value="按钮" v-bind:title="msg3+'123'" />
注意:
  v-bind:指令可以被简写为 : 要绑定的属性
  v-bind中,可以写合法的js表达式
<input type="button" name="" id="" value="按钮" :title="msg3" /> #这样也是可以的
3 v-on指令【Vue中提供了 v-on:事件绑定机制】 缩写是【@】
<body>
        <div id="app">
            <input type="button" value="按钮2" v-on:click="show" />
            <input type="button" value="按钮2" v-on:mouseover="show" />
        </div>
        <script type="text/javascript">
            var vm = new Vue({
                el:'#app',
                data:{
                    msg3:'大家都是好学生'
                },
                methods:{ //这个methods属性中定义了当前Vue实例所有可用的方法
                    show:function(){alert('hello')}
                }
            })
        </script>
    </body>
事件修饰符:
.stop 阻止冒泡
<body>
        <div id="app">
            <div class="inner" @click="div1Handler">
                <input type="button" value="惟他" @click.stop="btnHandler"/>
            </div>
        </div>
        <script type="text/javascript">
            var vm = new Vue({
                el:'#app',
                data:{

                    },
                methods:{
                    div1Handler(){
                        console.log('inner div 事件')
                    },
                    btnHandler(){
                        console.log('按钮事件')
                    }
                        }
            })
        </script>
    </body>
.prevent 阻止默认事件
<body>
        <div id="app">
            <a href="http://www.baidu.com" @click.prevent="linkClick">有问题,去百度</a>
        </div>
        <script type="text/javascript">
            var vm = new Vue({
                el:'#app',
                data:{

                    },
                methods:{
                    linkClick(){
                        console.log('触发连接点击事件')
                    }
                        }
            })
        </script>
    </body>
.capture 添加事件侦听器时使用事件捕获模式
<body>
        <div id="app">
            <div class="inner" @click.capture="divHandler">
                <input type="button" name="" id="" value="按钮" @click="btnHandler" />

            </div>
        </div>
        <script type="text/javascript">
            var vm = new Vue({
                el:'#app',
                data:{

                    },
                methods:{
                    divHandler(){
                        console.log('class触发')
                    },
                    btnHandler(){
                        console.log('按钮触发')
                    }
                        }
            })
        </script>
    </body>
.self 只当事件在该元素本身(比如不是子元素)触发时触发回调
<body>
        <div id="app">
            <div class="inner" @click.self="divHandler">
                <input type="button" name="" id="" value="按钮" @click="btnHandler" />

            </div>
        </div>
        <script type="text/javascript">
            var vm = new Vue({
                el:'#app',
                data:{

                    },
                methods:{
                    divHandler(){
                        console.log('class触发')
                    },
                    btnHandler(){
                        console.log('按钮触发')
                    }
                        }
            })
        </script>
    </body>
.once 事件只触发一次
<body>
        <div id="app">
            <div class="inner" @click.self.once="divHandler">
                <input type="button" name="" id="" value="按钮" @click.once="btnHandler" />

            </div>
        </div>
        <script type="text/javascript">
            var vm = new Vue({
                el:'#app',
                data:{

                    },
                methods:{
                    divHandler(){
                        console.log('class触发')
                    },
                    btnHandler(){
                        console.log('按钮触发')
                    }
                        }
            })
        </script>
    </body>
.self 只会阻止自己身上冒泡行为的触发,并不会真正阻止冒泡的行为
4 使用Vue完成一个跑马灯效果
<!DOCTYPE html>
<html>
    <head>
        <meta charset="UTF-8">
        <title></title>
    </head>
    <script type="text/javascript" src="vue.js">
    </script>
    <body>
        <div id="app">
            <input type="button" name="" id="" value="浪起来" v-on:click="lang"/>
            <input type="button" name="" id="" value="低调" @click="stop"/>
            <h4>{{msg}}</h4>
        </div>
        <script type="text/javascript">
            // 注意:在vm 实例中,如果想要获取data上的数据 或者想要调用
            //  methods中的方法     ,必须通过this.数据属性名 或this.方法名 来进行访问
            // 这里的this表示 我们new 出来 的 vm 实例对象

            var vm = new Vue({
                el:'#app',
                data:{
                    msg:'猥琐发育,别浪~~!',
                    intervalId:null
                },
                methods:{
                    lang(){
                        if (this.intervalId!=null)return;
                        // 箭头函数是解决this指向的问题
                        this.intervalId=setInterval(()=>{
                        //console.log(_this.msg)
                        // 获取到头的第一个字符
                        var start = this.msg.substring(0,1)
                        // 获取到后面的所有字符
                        var end = this.msg.substring(1)
                        // 重新拼接得到新的字符串,并赋值给this.msg
                        this.msg=end +start
                        },400)
                    },
                    stop(){ //停止定时器
                        clearInterval(this.intervalId)
                        this.intervalId=null;
                    }
                }
            })
            // 分析:
            // 1 给浪起来按钮绑定点击事件 用 v-on
            // 2 在按钮事件处理函数中,写相关的业务逻辑代码:拿到
            //    msg 然后调用字符串的 substring来进行字符串截取操作
            // 3 为了实现点击下按钮,自动截取的功能,需要实现定时功能
        </script>
    </body>
</html>
5 v-model双向绑定
v-bind 只能实现数据的单向绑定,从M 自动绑定到 V,无法实现双向绑定
<input type="text" name="" id="" v-bind:value="msg3" />
使用 v-model指令,可以实现表单元素和Model中数据双向数据绑定
注意:v-model 只能运用在表单元素中
input(radio,text,address,email...)  select checkbox
<input type="text" name="" id="" v-model="msg3" />
    <body>
        <div id="app">
            <input type="text" v-model="n1" />

            <select name="" id="" v-model="opt">
                <option value="+">+</option>
                <option value="-">-</option>
                <option value="*">*</option>
                <option value="/">/</option>
            </select>
            <input type="text" v-model="n2" />
            <input type="button" value="=" @click="calc"/>
            <input type="text" name="" id="" v-model="result" />
        </div>
        <script type="text/javascript">
            var vm = new Vue({
                el:'#app',
                data:{
                    n1:0,
                    n2:0,
                    result:0,
                    opt:'+'
                    },
                methods:{
                    calc(){ //计算器算数方法
//                        switch(this.opt){
//                            case "+":
//                            this.result = parseInt(this.n1)+parseInt(this.n2)
//                            break;
//                            case "-":
//                            this.result = parseInt(this.n1)-parseInt(this.n2)
//                            break;
//                            case "*":
//                            this.result = parseInt(this.n1)*parseInt(this.n2)
//                            break;
//                            case "/":
//                            this.result = parseInt(this.n1)+parseInt(this.n2)
//                            break;
//                        }
                        // 投机取巧法,正式开发中,尽量少用
                        var codeStr = 'parseInt(this.n1)'+this.opt+'parseInt(this.n2)'
                        this.result=eval(codeStr)
                    },

                        }
            })
        </script>
    </body>