Peter Shirley-Ray Tracing in One Weekend (2016)
原著:Peter Shirley
下篇主要对本书的后5章节进行学习,包括材质球的Metal,和Dielectrics。世界空间中相机的位置,相机通过光圈和焦距实现景深效果,最后结合全书知识点,渲染出一个如本篇封面的场景。
https://github.com/EStormLynn/Peter-Shirley-Ray-Tracing-in-one-weenkend
目录
- Chapter8:Metal
- Chapter9:Dielectrics
- Chapter10:Positionable camera
- Chapter11:Defocus
- Chapter12:Where next?
Chapter8:Metal
对于不同的物体,可能有不同的材质,所以就需要设计一个材质抽象类,包含一些参数。对于程序而言,材质需要做的事情包括
- 1.产生一个散射体(或者表示吸收了多少光线)
- 2.如果发生散射,表达出光线应该衰减多少
抽象类如下:
class material  {
public:
    // 散射虚函数
    // 参数:r_in 入射的光线, rec hit的记录, attenuation v3的衰减,scattered 散射后的光线
    virtual bool scatter(const ray& r_in, const hit_record& rec, vec3& attenuation, ray& scattered) const = 0;
};
hitables 和material须要知道对方的数据,所以在c++代码中,hit_record中加了一个指针 * mat_ptr 指向material这个类。
struct hit_record
{
    float t;
    vec3 p;
    vec3 normal;
    material *mat_ptr;
};
lambertian 材质,主要是漫反射,通过attenuation衰减,来控制散射之后的光线强度,散射的方向用random_in_unit_sphere()控制,albedo表示反射率
class lambertian : public material {
public:
    lambertian(const vec3& a) : albedo(a) {}
    virtual bool scatter(const ray& r_in, const hit_record& rec, vec3& attenuation, ray& scattered) const  {
        vec3 target = rec.p + rec.normal + random_in_unit_sphere();
        scattered = ray(rec.p, target-rec.p);
        attenuation = albedo;
        return true;
    }

    vec3 albedo;    // 反射率
};
对于光滑表面的物体,ray不会随机的散射,物理规律是反射角等于入射角,会发生镜面反射,向量的说明如下:
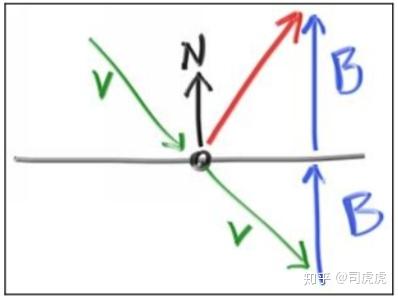
红色的是反射光线,向量表示是(v+2B),N是单位法向量,v是入射光线的方向向量,B的模是v和N的点乘 dot(v,N)。公式为:
vec3 reflect(const vec3& v, const vec3& n) {
	return v - 2*dot(v,n)*n;
}
metal材质只反射光线,代码如下:
class metal : public material {
public:
    metal(const vec3& a, float f) : albedo(a) { if (f < 1) fuzz = f; else fuzz = 1; }
    virtual bool scatter(const ray& r_in, const hit_record& rec, vec3& attenuation, ray& scattered) const  {
        vec3 reflected = reflect(unit_vector(r_in.direction()), rec.normal);
        scattered = ray(rec.p, reflected + fuzz*random_in_unit_sphere());
        attenuation = albedo;
        return (dot(scattered.direction(), rec.normal) > 0);
    }
    vec3 albedo;
    float fuzz;
};
修改color方法,对散射进行递归,求color
vec3 color(const ray& r,hitable *world, int depth)
{
    hit_record rec;
    if(world->hit(r,0.0,MAXFLOAT,rec))
    {
        // 散射后的光线
        ray scattered;
        // 衰减
        vec3 attenuation;

        if(depth<50 && rec.mat_ptr->scatter(r,rec,attenuation,scattered))
        {
            // 递归 衰减
            return attenuation * color(scattered, world, depth+1);
        } else
        {
            return vec3(0,0,0);
        }
    }
    else
    {
        vec3 unit_direction = unit_vector(r.direction());
        float t = 0.5 *(unit_direction.y() + 1.0);
        return (1.0-t)*vec3(1.0,1.0,1.0) + t*vec3(0.5,0.7,1.0);
    }
}
再在场景中添加2个metal材质的球,main函数如下
注意因为加了hitrecord添加了material ,sphere的hit函数须要将hit_record的引用传出来,须要在函数内形参的指针指向material的matptr。
int main()
{
    int nx =200;
    int ny =100;
    // 采样数量ns
    int ns = 100;
    cout<<"P3
"<<nx<<" "<<ny<<"
255
";

    camera cam;

    hitable *list[2];
    // 球1,2,3,4
    list[0] = new sphere(vec3(0,0,-1),0.5,new lambertian(vec3(0.8,0.3,0.3)));
    list[1] = new sphere(vec3(0,-100.5,-1),100,new lambertian(vec3(0.8,0.8,0.0)));
    list[2] = new sphere(vec3(1,0,-1),0.5,new metal(vec3(0.8,0.6,0.2),1));
    list[3] = new sphere(vec3(-1,0,-1),0.5,new metal(vec3(0.8,0.8,0.8),1));

    hitable *world = new hitable_list(list,4);
    random_device rd;

    for(int j=ny-1;j>=0;j--)
    {
        for(int i=0;i<nx;i++)
        {
            vec3 col(0,0,0);

            for(int s = 0; s<ns; s++)
            {
                float u = (float(i)+float(random(0,100))/100.0f)/float(nx);
                float v = (float(j)+float(random(0,100))/100.0f)/float(ny);

                ray r = cam.get_ray(u,v);
                vec3 p = r.point_at_parameter(2.0);
                col += color(r,world,0);
            }
            // color 取均值
            col /= float(ns);
            col = vec3(sqrt(col[0]),sqrt(col[1]),sqrt(col[2]));

            int ir=int(255.99* col[0]);
            int ig=int(255.99* col[1]);
            int ib=int(255.99* col[2]);;
            cout<<ir<<" "<<ig<<" "<<ib<<"
";
        }
    }

}
关于metal的反射,也可以用一个随机性的反射方向,来做微量的偏移,相当于一个小球上选endpoint。fuzzinss就相当于这个小球的半径,可以决定反射偏移的多少。fuzz取值在[0,1]之间
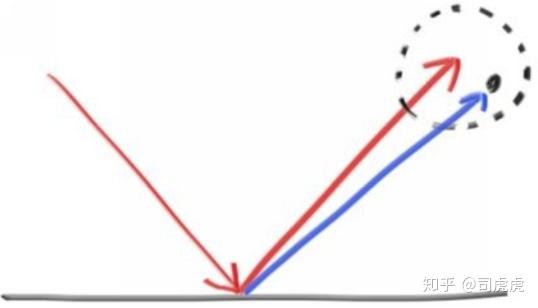
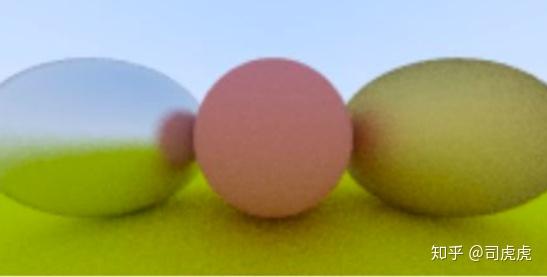
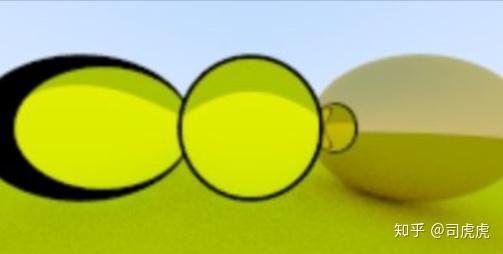
最后效果如下,注意两边的metal sphere中反射的边界模糊。
Chapter9:Dielectrics
透明的物体,比如水,玻璃,钻石是电介质,当光射入的时候,不仅发生反射,还会发生折射。折射光线是ray tracer中比较难debug的部分。本章节在场景中放入了2个玻璃球,渲染出来的画面是这样的:
光从一种介质进入另一种介质时,实际上,有一部分光会折射进入另一种介质,有另一部分光则会反射回来。反射系数=反射光振幅(能量)/入射光振幅(能量)。
反射系数的求解是是一个非常复杂的过程,Christophe Schlick这个人提供一个逼近公式,这个公式被称为“ChristopheSchlick’s Approximation”。Wiki链接:
https://en.wikipedia.org/wiki/Schlick's_approximation
当反射系数为0,只有折射,没有反射。
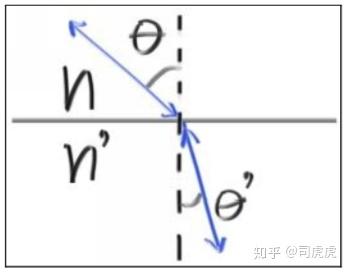
折射满足 斯涅尔定律(Snell law)
n * sin(theta) = n' * sin(theat')
折射系数(air= 1,glass = 1.3-1.7, diamond = 2.4)
折射部分的代码如下:
bool refract(const vec3& v, const vec3& n, float ni_over_nt, vec3& refracted) {
    vec3 uv = unit_vector(v);
    float dt = dot(uv, n);
    float discriminant = 1.0 - ni_over_nt*ni_over_nt*(1-dt*dt);
    if (discriminant > 0) {
        refracted = ni_over_nt*(uv - n*dt) - n*sqrt(discriminant);
        return true;
    }
    else
        return false;
}
电解质材质总是会发生折射,所以材质类中派生dielectric类。
class dielectric : public material {
public:
    dielectric(float ri) : ref_idx(ri) {}
    virtual bool scatter(const ray& r_in, const hit_record& rec, vec3& attenuation, ray& scattered) const  {
        vec3 outward_normal;
        vec3 reflected = reflect(r_in.direction(), rec.normal);
        float ni_over_nt;
        attenuation = vec3(1.0, 1.0, 1.0);
        vec3 refracted;
        float reflect_prob;
        float cosine;
        if (dot(r_in.direction(), rec.normal) > 0) {
            outward_normal = -rec.normal;
            ni_over_nt = ref_idx;
            //         cosine = ref_idx * dot(r_in.direction(), rec.normal) / r_in.direction().length();
            cosine = dot(r_in.direction(), rec.normal) / r_in.direction().length();
            cosine = sqrt(1 - ref_idx*ref_idx*(1-cosine*cosine));
        }
        else {
            outward_normal = rec.normal;
            ni_over_nt = 1.0 / ref_idx;
            cosine = -dot(r_in.direction(), rec.normal) / r_in.direction().length();
        }
        if (refract(r_in.direction(), outward_normal, ni_over_nt, refracted))
            reflect_prob = schlick(cosine, ref_idx);
        else
            reflect_prob = 1.0;

        // 随机数小与反射系数,设为反射光线,反之为折射光线
        if (drand48() < reflect_prob)
            scattered = ray(rec.p, reflected);
        else
            scattered = ray(rec.p, refracted);
        return true;
    }

    float ref_idx;
};
衰减始终是1,玻璃表面不吸收任何光线。
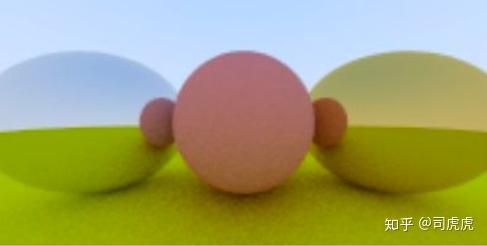
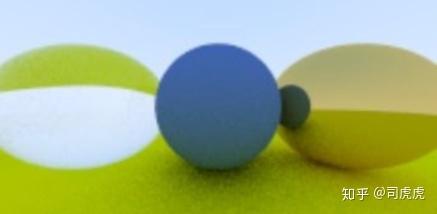
当场景中添加4个球,渲染出来的画面是这样的
    list[0] = new sphere(vec3(0,0,-1),0.5,new lambertian(vec3(0.8,0.3,0.3)));
    list[1] = new sphere(vec3(0,-100.5,-1),100,new lambertian(vec3(0.8,0.8,0.0)));
    list[2] = new sphere(vec3(1,0,-1),0.5,new metal(vec3(0.8,0.6,0.2),0.3));
    list[3] = new sphere(vec3(-1,0,-1),0.5,new dielectric(1.5));
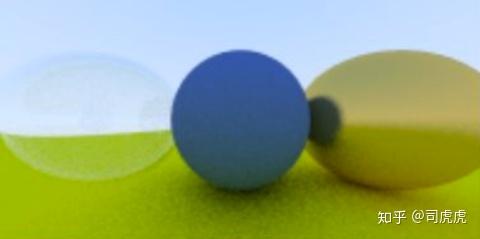
如果对于电介质的球内部再加一个半径为 负的球,得到的效果如下(感觉是不同介质之间负负得正了):
    list[0] = new sphere(vec3(0,0,-1),0.5,new lambertian(vec3(0.8,0.3,0.3)));
    list[1] = new sphere(vec3(0,-100.5,-1),100,new lambertian(vec3(0.8,0.8,0.0)));
    list[2] = new sphere(vec3(1,0,-1),0.5,new metal(vec3(0.8,0.6,0.2),0.3));
    list[3] = new sphere(vec3(-1,0,-1),0.5,new dielectric(1.5));
    list[4] = new sphere(vec3(-1,0,-1),-0.45,new dielectric(1.5));
Chapter10:Positionable camera
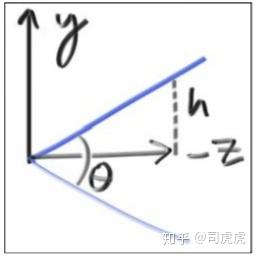
自由位置的camera,首先有了解FOV(Field of view)视场的概念,相当于视力看到的一定角度的内容。
从射线源点的位置,射向z=-1的平面,可以看到的高度h,满足:
h = tan(theta/2)
修改camera部分的代码,增加fov 和aspect来控制可以看到的宽和高。
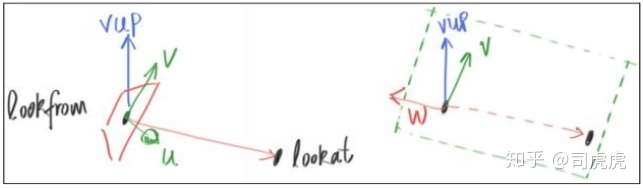
设置好camera的viewpoint之后,viewpoint就是lookfrom的点,看向的点就是lookat,还需要确定看过去水平方向的视野宽度,和竖直方向的视野宽度,camera所在平面竖直向上的向量"view up” vup,通过叉乘,拿到uvw,刚好相当于一个相机的坐标系。
class camera
{
    vec3 origin;
    vec3 horizontal;
    vec3 vertical;
    vec3 lower_left_corner;

public :
    camera(vec3 lookfrom, vec3 lookat, vec3 vup, float vfov, float aspect)
    {
        vec3 u,v,w;
        float theta = vfov*M_PI/180;
        float half_height = tan(theta/2);
        float half_width = aspect * half_height;
        origin = lookfrom;

        w = unit_vector(lookfrom - lookat);
        u = unit_vector(cross(vup, w));
        v = cross(w,u);

        lower_left_corner = vec3 (-half_width,-half_height,-1.0);
        lower_left_corner = origin - half_width*u - half_height*v - w;
        horizontal = 2*half_width*u;
        vertical = 2*half_height*v;
    }

    ray get_ray(float u,float v)
    {
        return ray(origin,lower_left_corner+u*horizontal + v*vertical - origin);
    }

};
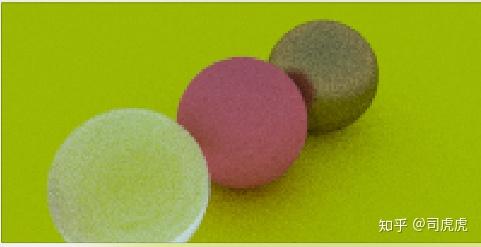
设置新的摄像机,fov分别设置90和30°,得到的画面如下:
Chapter11:Defocus Blur
散焦模糊(虚化),拍照的时候,我们经常会制造出虚化的效果,主题清晰,背景或者前景模糊,这是因为摄像机具有焦距,会有一个成像面,在有效焦距内的物体才能清晰成像,通过光圈控制进光量也可以控制虚化的范围。大光圈和长焦端,都可以制造出浅景深的效果。
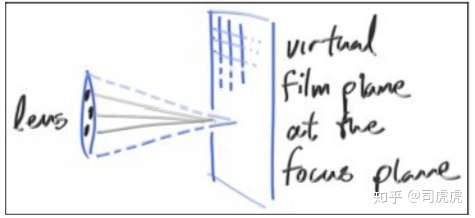
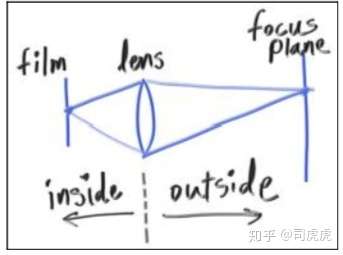
本章引入aperture(光圈),focus_dist(焦距) 2个参数,来实现画面的虚化效果。
class camera
{
    vec3 origin;
    vec3 u,v,w;
    vec3 horizontal;
    vec3 vertical;
    vec3 lower_left_corner;
    float len_radius;

public :
    camera(vec3 lookfrom, vec3 lookat, vec3 vup, float vfov, float aspect, float aperture, float focus_dist)
    {
        len_radius = aperture/2;
        float theta = vfov*M_PI/180;
        float half_height = tan(theta/2);
        float half_width = aspect * half_height;
        origin = lookfrom;

        w = unit_vector(lookfrom - lookat);
        u = unit_vector(cross(vup, w));
        v = cross(w,u);

        lower_left_corner = origin - half_width*focus_dist*u - half_height*focus_dist*v - focus_dist*w;
        horizontal = 2*half_width*focus_dist*u;
        vertical = 2*half_height*focus_dist*v;
    }

    ray get_ray(float s,float t)
    {
        vec3 rd = len_radius * random_in_unit_disk();
        vec3 offset = u * rd.x() +v*rd.y();
        return ray(origin + offset,lower_left_corner+s*horizontal + t*vertical - origin - offset);
    }

    vec3 random_in_unit_disk()
    {
        vec3 p;
        do{
            p = 2.0*vec3(drand48(),drand48(),0)-vec3(1,1,0);
        }while (dot(p,p)>=1.0);
        return p;
    }

};
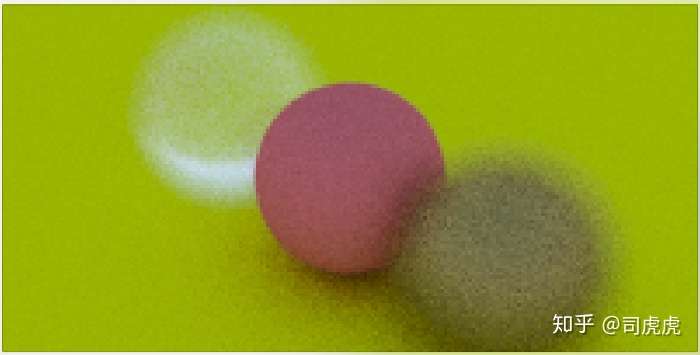
改变camera的参数,设置光圈和焦距
    vec3 lookfrom(3,3,2);
    vec3 lookat(0,0,-1);
    float dist_to_focus = (lookfrom-lookat).length();
    float aperture = 2.0;
    camera cam(lookfrom,lookat,vec3(0,1,0),20,float(nx)/float(ny),aperture,dist_to_focus);
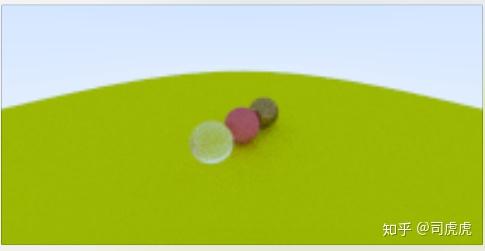
拿到的效果如下:
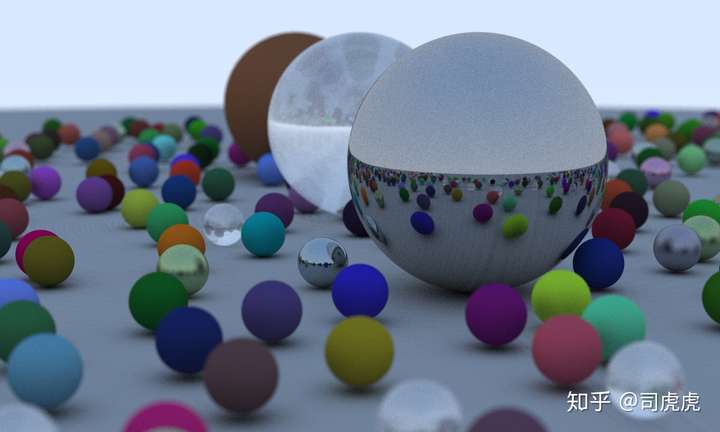
Chapter12:Where next?
这张主要运用本书学到的知识,完成封面上的图片的渲染。
通过添加一个随机生成的世界,达到很多个小球的效果
hitable *random_scene() {
    int n = 500;
    hitable **list = new hitable*[n+1];
    list[0] =  new sphere(vec3(0,-700,0), 700, new lambertian(vec3(0.5, 0.5, 0.5)));
    int i = 1;
    for (int a = -11; a < 11; a++) {
        for (int b = -11; b < 11; b++) {
            float choose_mat = drand48();
            vec3 center(a+0.9*drand48(),0.2,b+0.9*drand48());
            if ((center-vec3(4,0.2,0)).length() > 0.9) {
                if (choose_mat < 0.8) {  // diffuse
                    list[i++] = new sphere(center, 0.2, new lambertian(vec3(drand48()*drand48(), drand48()*drand48(), drand48()*drand48())));
                }
                else if (choose_mat < 0.95) { // metal
                    list[i++] = new sphere(center, 0.2,
                                           new metal(vec3(0.5*(1 + drand48()), 0.5*(1 + drand48()), 0.5*(1 + drand48())),  0.5*drand48()));
                }
                else {  // glass
                    list[i++] = new sphere(center, 0.2, new dielectric(1.5));
                }
            }
        }
    }

    list[i++] = new sphere(vec3(0, 1, 0), 1.0, new dielectric(2.5));
    list[i++] = new sphere(vec3(-4, 1, 0), 1.0, new lambertian(vec3(0.4, 0.2, 0.1)));
    list[i++] = new sphere(vec3(4, 1, 0), 1.0, new metal(vec3(1, 1, 1), 0.0));

    return new hitable_list(list,i);
}
下一本书Peter Shirley-Ray Tracing The Next Week (2016) 将会从以下几个方面继续学习光追。
-
Motion Blur
运动模糊。跟上面的DOF一样,暴力多渲几帧,每帧用不同的位置就行。
-
Bounding Volume Hierarchies
包围盒树。加速相交检测计算的。这方面另外有一大把更好的资料。
-
贴图
形状里定义好UV,然后用UV来采样贴图。当然采样方法有多种。
-
Perlin Noise
柏林噪声。这里重点对采样结果做了Filtering,已经简单介绍了Turb(N重噪声产生的大理石纹理)
-
光源
把光源当成Emissive材质就搞定了。
-
物件的摆放
之前都是写绝对坐标的,这里在形状的体系里面加了一层Transform,只要通过那个Transform把Ray变换到物体的局部空间就可以像之前一样进行相交检测了。
-
体(Volume / Participating Media)
依然暴力的把Ray一点点插进Volume里面进行采样,每个采样点上取得Volume自身的颜色,并把Ray四散开去即可。