Peter Shirley-Ray Tracing in One Weekend (2016)
原著:Peter Shirley
本书是Peter Shirley ray tracing系列三部曲的第一本,也是学习ray tracing 入门比较容易的一本书,自己照着书上的内容,抄了一遍,Github有完整的代码,和每一章学习过程的代码,部分代码加了注释。
目录:
- Chapter1:Output an image
- Chapter2:The vec3 class
- Chapter3:Rays, a simple camera, and background
- Chapter4:Adding a sphere
- Chapter5:Surface normals and multiple objects
- Chapter6:Antialiasing
- Chapter7:Diffuse Materials
Chapter1:Output an image
使用ppm渲染到图片
#include <iostream>

using namespace std;


int main()
{
    int nx =200;
    int ny=100;
    cout<<"P3
"<<nx<<" "<<ny<<"
255
";
    for(int j=ny-1;j>=0;j--)
    {
        for(int i=0;i<nx;i++)
        {
            float r=float(i)/float(nx);
            float g=float(j)/float(ny);
            float b=0.2;

            int ir=int(255.99*r);
            int ig=int(255.99*g);
            int ib=int(255.99*b);
            cout<<ir<<" "ig<<" "<<ib<<"
";
        }
    }
}
说明:
- 像素从左往右打印
- 从上向下打印
- 这个例子中RGB计算出来在[0,1]之间,输出之前映射到一个高范围空间
- 红+绿=黄
- 打印的内容保存成.ppm格式即可预览
Chapter2:The vec3 class
用于几何向量计算和颜色计算,包含颜色,向量,位置坐标,偏移,主要包含重写操作符,以及点乘、叉乘等操作。
class vec3  {
public:
    vec3() {}
    vec3(float e0, float e1, float e2) { e[0] = e0; e[1] = e1; e[2] = e2; }
    inline float x() const { return e[0]; }
    inline float y() const { return e[1]; }
    inline float z() const { return e[2]; }
    inline float r() const { return e[0]; }
    inline float g() const { return e[1]; }
    inline float b() const { return e[2]; }

    inline const vec3& operator+() const { return *this; }
    inline vec3 operator-() const { return vec3(-e[0], -e[1], -e[2]); }
    inline float operator[](int i) const { return e[i]; }
    inline float& operator[](int i) { return e[i]; };

    inline vec3& operator+=(const vec3 &v2);
    inline vec3& operator-=(const vec3 &v2);
    inline vec3& operator*=(const vec3 &v2);
    inline vec3& operator/=(const vec3 &v2);
    inline vec3& operator*=(const float t);
    inline vec3& operator/=(const float t);

    inline float length() const { return sqrt(e[0]*e[0] + e[1]*e[1] + e[2]*e[2]); }
    inline float squared_length() const { return e[0]*e[0] + e[1]*e[1] + e[2]*e[2]; }
    inline void make_unit_vector();

    float e[3];
};
Chapter3:Rays, a simple camera, and background
所有的ray tracers 都是以ray类为基础,计算颜色
p(t) = A + t*B
其中A是光源点,B是ray的方向,t是具体float值,空间中确定一条线,不同的t,可以到达不同地方。
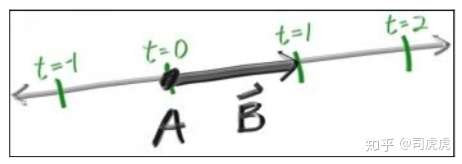
p(t)称为点A关于t的函数。Ray tracing的本质是通过发射射线,计算像素点的颜色。在ray tracing之前需要有个摄像机,建立坐标系,显示背景色,以及ray hit的点的颜色。
假设摄像机的位置就是眼睛位置,看到的内容为ppm显示的东西,简历坐标系,z轴正方向,垂直平面向外,x向右,y向上,
计算公式:
blended_value = (1-t)*start_value + t*end_value

Chapter4:Adding a sphere
球的公式:
x*x + y*y +z*z = R*R
对于任意xyz,如果满足球面公式,(x,y,z)为球面的一个点。
如果球心位置为(cx,cy,cz),公式为
(x-cx)*(x-cx) + (y-cy)*(y-cy) + (z-cz)*(z-cz) = R*R
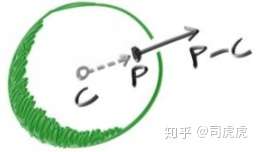
用向量表示,球面点P,球心点C,半径可以表示为向量PC
dot((p-C)(p-C)) = (x-cx)*(x-cx) + (y-cy)*(y-cy) + (z-cz)*(z-cz)
等价于
dot((A + t*B - C),(A + t*B - C)) = R*R
展开之后
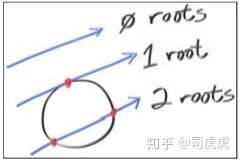
t*t*dot(B,B) + 2*t*dot(A-C,A-C) + dot(C,C) - R*R = 0
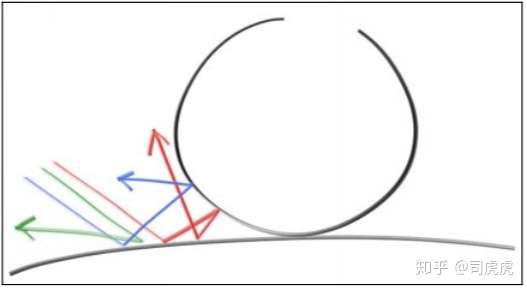
ABC已知,这里是一个关于t的一元二次方程,对于t无解,有一个解,有两个解的情况,即为下图
通过打印颜色,利用红色的射线,ray hit 圆,hit到的地方显示红色
bool hit_sphere(const vec3 & center, float radius,const ray& r)
{
    vec3 oc = r.origin() -center;
    float a = dot(r.direction(), r.direction());
    float b = 2.0 * dot(oc,r.direction());
    float c = dot(oc,oc) -radius*radius;
    float discriminant = b*b - 4*a*c;
    return (discriminant>0);
}

vec3 color(const ray& r)
{
    if(hit_sphere(vec3(0,0,-1),0.5,r))
        return vec3(1.0,0,0);

    vec3 unit_direction = unit_vector(r.direction());
    float t = 0.5 *(unit_direction.y() + 1.0);
    return (1.0-t)*vec3(1.0,1.0,1.0) + t*vec3(0.5,0.7,1.0);
}

Chapter5:Surface normals and multiple objects
法线是垂直与物体表面的一个向量,对于上一节提到的球,他的法线方向是,从球心出发,射向hitpoint的。就像在地球上,地面的法向是从地心出发,射向你站立的点的。
假设N是长度在[-1,1]之间的单位向量,映射到去见[0,1]之间,再映射x/y/z到r/g/b,通常除了须要知道是否hit点,还要拿到hit point的数据。
// 本章 hit_Sphere的返回值改为float了
float hit_sphere(const vec3 & center, float radius,const ray& r)
{
    vec3 oc = r.origin() -center;
    float a = dot(r.direction(), r.direction());
    float b = 2.0 * dot(oc,r.direction());
    float c = dot(oc,oc) -radius*radius;
    float discriminant = b*b - 4*a*c;
    if(discriminant<0)
        return -1.0;
    else
        return (-b-sqrt(discriminant))/(2.0*a);
}

vec3 color(const ray& r)
{
    float t = hit_sphere(vec3(0,0,-1),0.5,r);
    if(t>0.0)
    {
        // 球心到hitpoint的单位法向量
        vec3 N = unit_vector(r.point_at_parameter(t)-vec3(0,0,-1));
        return 0.5*vec3(N.x() +1,N.y()+1,N.z()+1);
    }

    vec3 unit_direction = unit_vector(r.direction());
    t = 0.5 *(unit_direction.y() + 1.0);
    return (1.0-t)*vec3(1.0,1.0,1.0) + t*vec3(0.5,0.7,1.0);
}

当场景中有多个可以被击中的物体的时候,需要一个Hitable的抽象类,包含抽象方法hit 是否击中,以及记录hit到的数据,包括hit的位置,hit点的法向,以及距离t
通过距离t
tmin< t < tmax
来控制hit到物体的距离远近,因为hit到之后将不再往后ray tracing。
#include "ray.h"

struct hit_record
{
    float t;
    vec3 p;
    vec3 normal;
};

class hitable
{
public:
    virtual bool hit(const ray& r,float t_min,float t_max,hit_record & rec)const =0;
};
对于sphere类基础hitable抽象类,实现自己的hit方法,去判断是否击中了球的对象
#include "hitable.h"

class sphere: public hitable  {
public:
    sphere() {}
    sphere(vec3 cen, float r) : center(cen), radius(r)  {};
    virtual bool hit(const ray& r, float tmin, float tmax, hit_record& rec) const;
    vec3 center;
    float radius;
};

bool sphere::hit(const ray& r, float t_min, float t_max, hit_record& rec) const {
    vec3 oc = r.origin() - center;
    float a = dot(r.direction(), r.direction());
    float b = dot(oc, r.direction());
    float c = dot(oc, oc) - radius*radius;
    float discriminant = b*b - a*c;
    if (discriminant > 0) {
        float temp = (-b - sqrt(discriminant))/a;
        if (temp < t_max && temp > t_min) {
            rec.t = temp;
            rec.p = r.point_at_parameter(rec.t);
            rec.normal = (rec.p - center) / radius;
            return true;
        }
        temp = (-b + sqrt(discriminant)) / a;
        if (temp < t_max && temp > t_min) {
            rec.t = temp;
            rec.p = r.point_at_parameter(rec.t);
            rec.normal = (rec.p - center) / radius;
            return true;
        }
    }
    return false;
}
还需要一个hitable list去记录击中所有的物体,也是继承hitable类,实现hit方法,去找出最近的物体。
#include "hitable.h"

class hitable_list: public hitable  {
public:
    hitable_list() {}
    hitable_list(hitable **l, int n) {list = l; list_size = n; }
    virtual bool hit(const ray& r, float tmin, float tmax, hit_record& rec) const;
    hitable **list;
    int list_size;
};

bool hitable_list::hit(const ray& r, float t_min, float t_max, hit_record& rec) const {
    hit_record temp_rec;
    bool hit_anything = false;
    double closest_so_far = t_max;
    for (int i = 0; i < list_size; i++) {
        if (list[i]->hit(r, t_min, closest_so_far, temp_rec)) {
            hit_anything = true;
            closest_so_far = temp_rec.t;
            rec = temp_rec;
        }
    }
    return hit_anything;
}
本章新的main函数如下
#include <iostream>
#include "sphere.h"
#include "hitable_list.h"
#include "float.h"
using namespace std;
vec3 color(const ray& r,hitable *world)
{
hit_record rec;
if(world->hit(r,0.0,MAXFLOAT,rec))
return 0.5*vec3(rec.normal.x()+1,rec.normal.y()+1,rec.normal.z()+1);
else
{
vec3 unit_direction = unit_vector(r.direction());
float t = 0.5 *(unit_direction.y() + 1.0);
return (1.0-t)*vec3(1.0,1.0,1.0) + t*vec3(0.5,0.7,1.0);
}
}
int main()
{
int nx =200;
int ny=100;
cout<<"P3
"<<nx<<" "<<ny<<"
255
";
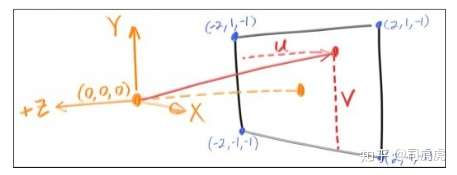
vec3 lower_left_corner(-2.0,-1.0,-1.0);
vec3 horizontal(4.0,0.0,0.0);
vec3 vertical(0.0,2.0,0.0);
vec3 origin(0.0,0.0,0.0);
hitable *list[2];
// 球1
list[0] = new sphere(vec3(0,0,-1),0.5);
// 球2
list[1] = new sphere(vec3(0,-100.5,-1),100);
hitable *world = new hitable_list(list,2);
for(int j=ny-1;j>=0;j--)
{
for(int i=0;i<nx;i++)
{
float u = float(i)/float(nx);
float v = float(j)/float(ny);
ray r(origin,lower_left_corner + u*horizontal +v * vertical);
vec3 p = r.point_at_parameter(2.0);
vec3 col = color(r,world);
int ir=int(255.99* col[0]);
int ig=int(255.99* col[1]);
int ib=int(255.99* col[2]);;
cout<<ir<<" "<<ig<<" "<<ib<<"
";
}
}
}
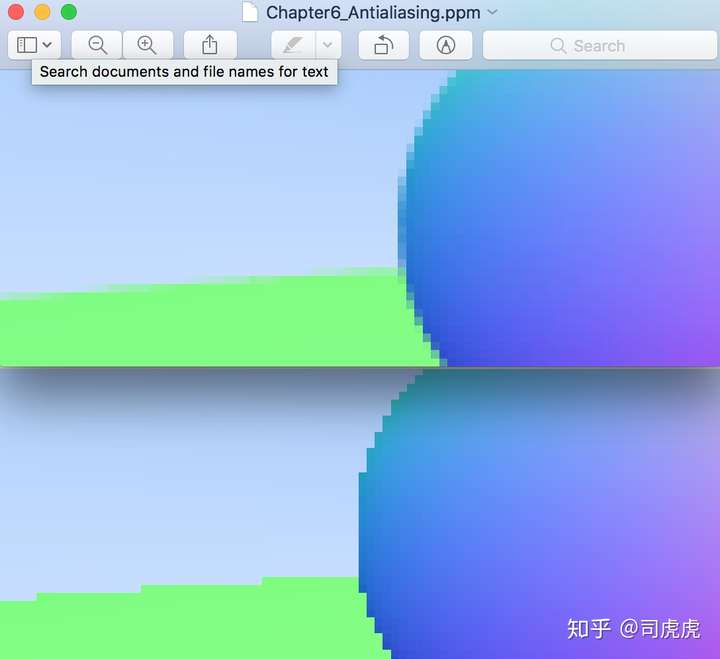
Chapter6:Antialiasing
真实世界中,照相机拍照时,一边边缘部分没有锯齿,因为每个像素,前景和背景在边缘的地方进行的混合。我们可以通过平均多个像素的值,达到一样的效果。我们的做法是,抽象camera类,后面再写颜色的部分。
还需要写个随机数的生成器,用来控制采样点的位置,范围是在[0,1]之间。这里我定义了一个宏
#define random(a,b) (rand()%(b-a+1)+a)
使用rand()程序运行时每次生成的随机数和上一次相同,便于调试。
对于给的一个像素,我们有好几个采样点在像素内,对每个采样点进行ray tracer,再平均每个采样点的color。
camera类
class camera
{
    vec3 origin;
    vec3 horizontal;
    vec3 vertical;
    vec3 lower_left_corner;

public :
    camera()
    {
       lower_left_corner = vec3 (-2.0,-1.0,-1.0);
       horizontal = vec3(4.0,0.0,0.0);
       vertical = vec3(0.0,2.0,0.0);
       origin = vec3(0.0,0.0,0.0);
    }

    ray get_ray(float u,float v)
    {
        return ray(origin,lower_left_corner+u*horizontal + v*vertical - origin);
    }

};
main函数
#include <iostream>
#include "sphere.h"
#include "hitable_list.h"
#include "float.h"
#include "camera.h"
#include "random"
#define random(a,b) (rand()%(b-a+1)+a)

using namespace std;

vec3 color(const ray& r,hitable *world)
{
    hit_record rec;
    if(world->hit(r,0.0,MAXFLOAT,rec))
        return 0.5*vec3(rec.normal.x()+1,rec.normal.y()+1,rec.normal.z()+1);
    else
    {
        vec3 unit_direction = unit_vector(r.direction());
        float t = 0.5 *(unit_direction.y() + 1.0);
        return (1.0-t)*vec3(1.0,1.0,1.0) + t*vec3(0.5,0.7,1.0);
    }
}

int main()
{
    int nx =200;
    int ny=100;
    // 采样数量ns
    int ns = 100;
    cout<<"P3
"<<nx<<" "<<ny<<"
255
";

    camera cam;

    hitable *list[2];
    // 球1
    list[0] = new sphere(vec3(0,0,-1),0.5);
    // 球2
    list[1] = new sphere(vec3(0,-100.5,-1),100);

    hitable *world = new hitable_list(list,2);
    random_device rd;

    for(int j=ny-1;j>=0;j--)
    {
        for(int i=0;i<nx;i++)
        {
            vec3 col(0,0,0);

            for(int s = 0; s<ns; s++)
            {
                float u = (float(i)+float(random(0,100))/100.0f)/float(nx);
                float v = (float(j)+float(random(0,100))/100.0f)/float(ny);

                ray r = cam.get_ray(u,v);
                vec3 p = r.point_at_parameter(2.0);
                col += color(r,world);
            }
            // color 取均值
            col /= float(ns);

            int ir=int(255.99* col[0]);
            int ig=int(255.99* col[1]);
            int ib=int(255.99* col[2]);;
            cout<<ir<<" "<<ig<<" "<<ib<<"
";
        }
    }

}
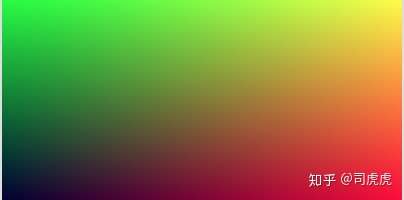
最后达到的效果如下
Chapter7:Diffuse Materials
之前已经实现了多个object 和每个像素多个采样,本章将实现漫反射材质。首先需要明确的一点是,物体和材质的关系,我们假设球体有一个自己的材质,通常在渲染中,每个物体都有自己的材质。
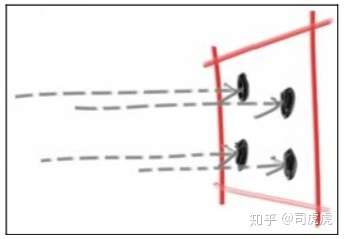
不发光的物体,漫反射是吸收周围的颜色,显示出来,物体表面反射周围的光线的方向是随机的,如下图,在2个不同的物体的漫反射表面间,发射了3条光线,三条光线的漫反射之后的路径各不相同:
漫反射物体的表面,也可能会吸收部分光线,表面越暗,吸收的光线越多,吸收之后看起来就像一个哑光的表面。
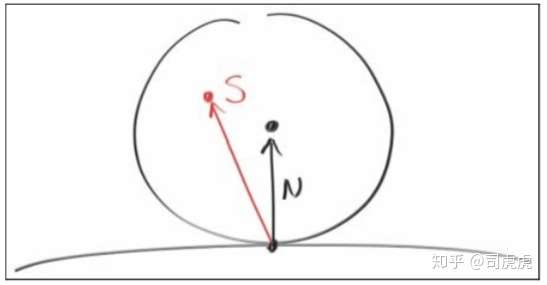
选择一个随机的点切一个单位半径的球,这个点就是hitpoint,在球上选个随机点s,从p到s做一条线,作为漫反射的方向,这个球的球心是(p + N),N是hitpoitn的法向。
关于球面上s点如何区,这里的做法是,在单位cube中,选一个点,x、y、z都在[-1,1]之间,如果这个点不在球内,继续选点,直到满足在球内的这个条件。
// 单位cube随机取点,返回一个在球内的点
vec3 random_in_unit_sphere()
{
    vec3 p;
    do{
        p = 2.0*vec3(random1,random1,random1) - vec3(1,1,1);
    }while (dot(p,p) >= 1.0);
    return p;
}

vec3 color(const ray& r,hitable *world)
{
    hit_record rec;
    if(world->hit(r,0.0,MAXFLOAT,rec))
    {
        vec3 target = rec.p + rec.normal + random_in_unit_sphere();
        return 0.5* color(ray(rec.p, target - rec.p), world);
    }
    else
    {
        vec3 unit_direction = unit_vector(r.direction());
        float t = 0.5 *(unit_direction.y() + 1.0);
        return (1.0-t)*vec3(1.0,1.0,1.0) + t*vec3(0.5,0.7,1.0);
    }
}
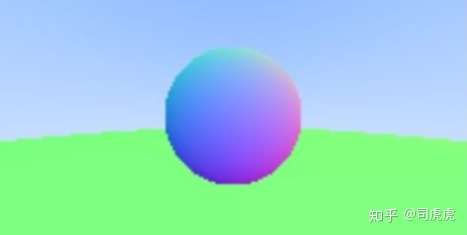
得到的图像如下:
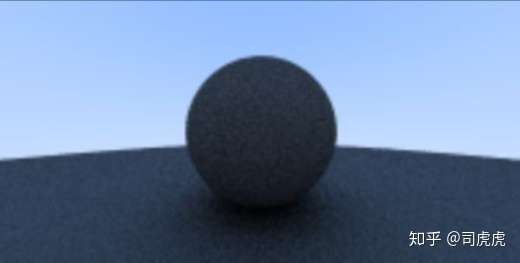
球和地板的交界处的颜色可能不明显,是因为吸收的光太多了,可以通多将颜色开放的方法,来提高物体表面的亮度,减少吸收的光
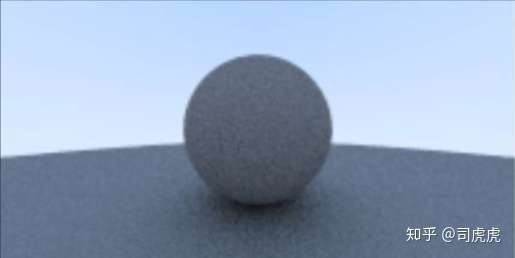
col = vec3(sqrt(col[0]),sqrt(col[1]),sqrt(col[2]));
这样就可以看清楚交界处的阴影效果了,如下图:
下篇将从以下几个方面继续学习
- Chapter8:Metal
- Chapter9:Dielectrics
- Chapter10:Positionable camera
- Chapter11:Defocus
- Chapter12:Where next?