前言:
随着大数据的普及,大部分企业的大数据查询与统计渐渐出现瓶颈。虽说存储方面有分布式的HDFS,HBSE,MongoDB等可以应对,但是面对千万级别(1x10^7)界别的数据量查询时,以上组件也不免显得力不从心。正因此,分布式查询引擎应运而生。而基于内存查询的分布式查询引擎--Presto正是其中之一。很多人都说现代计算机技术的发展都是拼开源,拼社区。而Presto的社区也不小,国际化的Facebook,也有国内电商大头京东。正因此,在经过实际尝试与测验之后决定简要地介绍一下presto的部署方式,希望能给有需要的朋友提供一些参考。
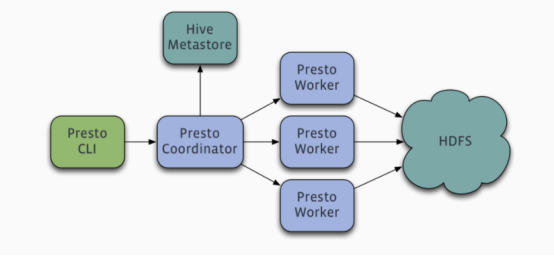
1. Presto集群部署架构图
2.安装步骤
step1:系统环境准备:
1)JDK8
2)Hadoop2.x
step2:软件准备
下载地址:https://repo1.maven.org/maven2/com/facebook/presto/presto-server/0.191/presto-server-0.191.tar.gz
$ wget http:xxxx/a-b-xxx.gz
$ tar -zxvf http:xxxx/a-b-xxx.gz
$ ln -s a-b-xxx presto-server
step3:新建文件目录
$PRESTO_INSTALL_HOME=/opt/prestodb
$PRESTO_INSTALL_HOME下面新建2个目录:
presto_data
presto_server
step4:在presto_server添加配置文件
$mkdir etc
$find
./jvm.config
./catalog
./catalog/hive.properties
./catalog/jmx.properties
./node.properties
./config.properties
./log.properties
① catalog/jmx.properties配置内容:
|
connector.name=jmx |
② catalog/hive.properties配置内容:
|
connector.name=hive-hadoop2 hive.metastore.uri=thrift://gzp210016clit01:9083 hive.config.resources=$HADOOP_HOME/core-site.xml,$HADOOP_HOME/hdfs-site.xml |
注意:
connector.name配置的是当前集群的hadoop版本,默认”hive-hadoop2”即可
hive.metastore.uri=hive元数据服务地址
hive.config.resources=core-site.xml和hdfs-site.xml的配置文件路径
③ jvm.config
|
-server -Xmx16G -XX:+UseG1GC -XX:G1HeapRegionSize=32M -XX:+UseGCOverheadLimit -XX:+ExplicitGCInvokesConcurrent -XX:+HeapDumpOnOutOfMemoryError -XX:+ExitOnOutOfMemoryError |
④ node.properties
|
node.environment=production node.id=ffffffff-ffff-ffff-ffff-ffffffffffff node.data-dir=/home/dev_chenjunhong/presto_data |
注意:
node.id全局唯一,建议用本机的ip最后2位结尾
node.data-dir配置的数据目录需提前创建
⑤ log.properties
|
com.facebook.presto=INFO |
⑥ config.properties
主节点:
|
coordinator=true node-scheduler.include-coordinator=true http-server.http.port=18080 query.max-memory=5GB query.max-memory-per-node=1GB discovery-server.enabled=true discovery.uri=http://localhost:18080 |
从节点:
|
coordinator=false http-server.http.port=18080 query.max-memory=5GB query.max-memory-per-node=1GB discovery.uri=http://master:18080 |
step5:启动测试
进入目录
$ cd presto-server
启动方式1:阻塞式启动
$ bin/launcher run
启动方式2:非阻塞式(后台)启动
$ bin/launcher start

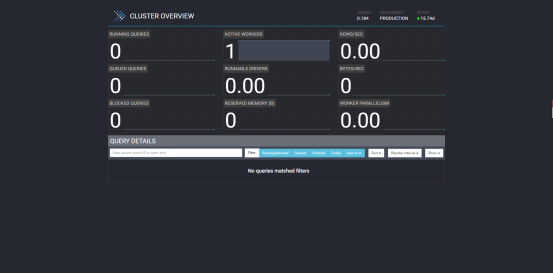
step6:web界面访问
附录
1.官网的安装说明 https://prestodb.io/docs/current/installation/deployment.html
2.客户端连接测试
step1:下载jar包并创建快捷方式
$ wget https://repo1.maven.org/maven2/com/facebook/presto/presto-cli/0.191/presto-cli-0.191-executable.jar
step2:连接服务
$ ln -s presto-cli-xxx.jar presto
$ ./presto --server server-ip:port --catalog hive --schema default