【模块】
本节目录
-
模块相关介绍
-
time
-
random
-
os
-
sys
-
json & pickle
-
shelve
-
xml
-
configparser
-
hashlib
-
subprocess
-
optparse
-
struct
-
所述一些模块方法并不完善,只是简单性的学习,或有错误,敬请指正
-
未完待续......
为什么要有模块:
在计算机程序的开发过程中,程序代码越写越多,在一个py文件中会越来越多,变得不容易维护
为了编写易维护的代码,将很多函数分组,分别放入不同的py文件中,每个文件包含的代码就会相对减少,诸多编程语言都这样做
在python中,一个.py文件中就可以称之为一个模块(moudle)
使用模块有什么好处:大大提高了代码的可维护性,也可区分逻辑
其次,在编写好一个模块,就可以在其它地方进行引用,不必从0开始
模块有三种:
- python标准库
- 第三方模块
- 应用程序自定义模块
模块的引用方式:
1、import语句 1)执行对应文件 2)引入变量名
|
1
|
import time # 导入时间模块 也可以同时导入多个模块,用逗号隔开 |
2、from....import 模块名
|
1
|
from my_moudle import main |
3、from....import *
引入一切,即导入模块中所有的项目,不推荐使用。因为引入的其它来源的命名,很可能覆盖了已有的定义。
4、运行本质
|
1
2
|
#1 import test#2 from test import add |
那么,python中是如何找到这些模块呢?
sys.path,存放的是执行文件的搜索路径(环境变量)。然而模块就是通过环境变量去找的.
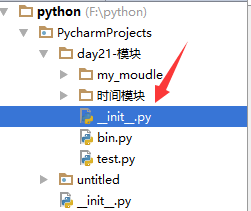
一个目录中带__iter__.py的文件成为包(package)
1、用来组织模块 2、避免相同模块名的冲突
注意,每一个包目录下面都会有一个__init__.py的文件,这个文件是必须存在的,否则,Python就把这个目录当成普通目录(文件夹),而不是一个包。__init__.py可以是空文件,也可以有Python代码,因为__init__.py本身就是一个模块,而它的模块名就是对应包的名字。
这里介绍一下__name__的属性
一个模块被另一个程序第一次引入时,其主程序将运行。如果我们想在模块被引入时,模块中的某一程序块不执行,我们可以用__name__属性来使该程序块仅在该模块自身运行时执行。
|
1
2
3
4
5
6
7
8
9
10
|
if __name__ == '__main__': print('程序自身在运行')else: print('我来自另一模块')python using_name.py程序自身在运行import using_name我来自另一模块 |
说明: 每个模块都有一个__name__属性,当其值是'__main__'时,表明该模块自身在运行,否则是被引入。
time
时间相关的操作,时间有三种表示方式:
时间戳 1970年1月1日之后的秒,即:time.time(),只有时间戳参数才能进行加减
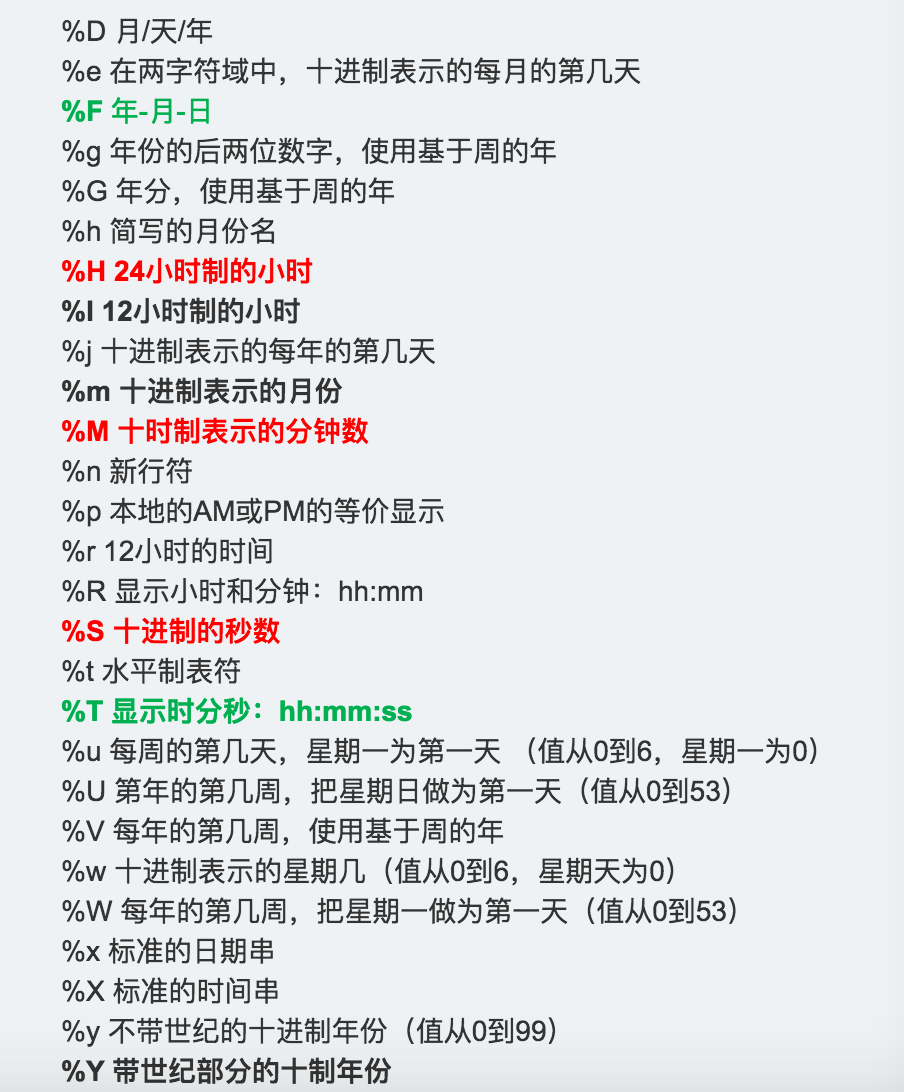
格式化的字符串 2014-11-11 11:11, 即:time.strftime('%Y-%m-%d')
结构化时间 元组包含了:年、日、星期等... time.struct_time 即:time.localtime()
|
1
2
3
4
5
6
7
8
9
10
11
12
13
14
15
16
17
18
19
20
21
22
23
24
25
|
print time.time()print time.mktime(time.localtime()) print time.gmtime() #可加时间戳参数print time.localtime() #可加时间戳参数print time.strptime('2014-11-11', '%Y-%m-%d') print time.strftime('%Y-%m-%d') #默认当前时间print time.strftime('%Y-%m-%d',time.localtime()) #默认当前时间print time.asctime()print time.asctime(time.localtime())print time.ctime(time.time()) import datetime'''datetime.date:表示日期的类。常用的属性有year, month, daydatetime.time:表示时间的类。常用的属性有hour, minute, second, microseconddatetime.datetime:表示日期时间datetime.timedelta:表示时间间隔,即两个时间点之间的长度timedelta([days[, seconds[, microseconds[, milliseconds[, minutes[, hours[, weeks]]]]]]])strftime("%Y-%m-%d")'''import datetimeprint datetime.datetime.now()print datetime.datetime.now() - datetime.timedelta(days=5) |
random(随机模块)
|
1
2
3
4
5
6
7
8
9
10
|
import random print(random.random()) # 0到1的随机浮点数print(random.randint(1,3)) # 整形 闭区间 [1,3]print(random.randrange(1,3)) # 整形,开区间 [1,3)li = [11,22,33,44,55]print(random.choice(li)) # 基于可迭代对象随机print(random.sample(li,2)) # 随机选定多个print(random.uniform(1,2)) # 任意范围的浮点型random.shuffle(li) # 随机打乱次序print(li) |
通过随机模块可以制作一个随机验证码


def v_code():
    checkcode = "" # 定义一个空字符串
    for i in range(4): # 遍历四次
        num = random.randint(0,9) # 随机选择0到9的整形
        alf = chr(random.randint(65,90)) # 随机选择chr对应的字母
        add = random.choice([num,alf]) # 基于上面的可迭代对象选择一个
        checkcode += str(add) # 将它们变为字符串,加到空字符串里面
    return checkcode
if __name__ == "__main__":
    print(v_code())
os
用于提供系统级别的操作
|
1
2
3
4
5
6
7
8
9
10
11
12
13
14
15
16
17
18
19
20
21
22
23
24
25
26
27
28
29
|
os.getcwd() 获取当前工作目录,即当前python脚本工作的目录路径os.chdir("dirname") 改变当前脚本工作目录;相当于shell下cdos.curdir 返回当前目录: ('.')os.pardir 获取当前目录的父目录字符串名:('..')os.makedirs('dir1/dir2') 可生成多层递归目录os.removedirs('dirname1') 若目录为空,则删除,并递归到上一级目录,如若也为空,则删除,依此类推os.mkdir('dirname') 生成单级目录;相当于shell中mkdir dirnameos.rmdir('dirname') 删除单级空目录,若目录不为空则无法删除,报错;相当于shell中rmdir dirnameos.listdir('dirname') 列出指定目录下的所有文件和子目录,包括隐藏文件,并以列表方式打印 ***os.remove() 删除一个文件os.rename("oldname","new") 重命名文件/目录 ***os.stat('path/filename') 获取文件/目录信息,相关信息的介绍 size 文件大小 atime 上次访问时间 mtime 上次修改时间 ctime 查看创建时间os.sep 操作系统特定的路径分隔符,win下为"\",Linux下为"/"os.linesep 当前平台使用的行终止符,win下为"
",Linux下为"
"os.pathsep 用于分割文件路径的字符串os.name 字符串指示当前使用平台。win->'nt'; Linux->'posix'os.system("bash command") 运行shell命令,直接显示os.environ 获取系统环境变量os.path.abspath(path) 返回path规范化的绝对路径os.path.split(path) 将path分割成目录和文件名二元组返回os.path.dirname(path) 返回path的目录。其实就是os.path.split(path)的第一个元素os.path.basename(path) 返回path最后的文件名。如何path以/或结尾,那么就会返回空值。即os.path.split(path)的第二个元素os.path.exists(path) 如果path存在,返回True;如果path不存在,返回Falseos.path.isabs(path) 如果path是绝对路径,返回Trueos.path.isfile(path) 如果path是一个存在的文件,返回True。否则返回Falseos.path.isdir(path) 如果path是一个存在的目录,则返回True。否则返回Falseos.path.join(path1[, path2[, ...]]) 将多个路径组合后返回,第一个绝对路径之前的参数将被忽略,涉及文件路径拼接就用它os.path.getatime(path) 返回path所指向的文件或者目录的最后存取时间os.path.getmtime(path) 返回path所指向的文件或者目录的最后修改时间 |
sys
提供对Python解释器相关的操作:
|
1
2
3
4
5
6
7
8
9
|
sys.argv 命令行参数List,第一个元素是程序本身路径 *****sys.exit(n) 退出程序,正常退出时exit(0)sys.version 获取Python解释程序的版本信息sys.maxint 最大的Int值sys.path 返回模块的搜索路径,初始化时使用PYTHONPATH环境变量的值sys.platform 返回操作系统平台名称sys.stdin 输入相关sys.stdout 输出相关sys.stderror 错误相关 |
通过sys模块可以做个简单的进度的小程序
import sys
import time
def view_bar(num, total):
    rate = float(num) / float(total)
    rate_num = int(rate * 100)
    r = '
%d%%' % (rate_num, )
    sys.stdout.write(r)
    sys.stdout.flush()
if __name__ == '__main__':
    for i in range(0, 101):
        time.sleep(0.1)
        view_bar(i, 100)
# 未研究

import sys
import time
for i in range(10):
    sys.stdout.write("#")
    sys.stdout.flush()
    time.sleep(1)
json & pickle
这是俩个用作于序列化的模块
json 用于【字符串】和 【python基本数据类型】 间进行转换 *****
(数据交互),可以进行多种语言的数据交互
pickle 用于【python特有的类型】 和 【python基本数据类型】间进行转换
Json模块提供了四个功能:dumps、dump、loads、load 无s的区别,应用于文件的操作
pickle模块提供了四个功能:dumps、dump、loads、load
import json
# json的用法
dic = {"name":"alex"}
data = json.dumps(dic)
print(data)
print(type(data))
with open("hello","w") as f:
    f.write(data)


with open("hello","r") as new_f:
    i = new_f.read()
    a = json.loads(i)
    print(type(i))
    print(type(a))

{"name": "alex"}
<class 'str'>
<class 'str'>
<class 'dict'>
json里面都会变为双引号的字符串
# dct="{'1':111}"#json 不认单引号
只要符合json字符串,则直接可以locals
import pickle                # 和json的方法的相同,序列化对象
dic = {"name":"alex"}
# data = pickle.dumps(dic)   # 转化为字节类型
# print(data)                # ---><class 'bytes'>

f = open("hello","wb")
f.write(pickle.dumps(dic))   #
f.close()

f = open("hello","rb")      # 反序列化
data = pickle.loads(f.read())# 相当于data = pickle.load(f)
print(data)
f.close()
Pickle的问题和所有其他编程语言特有的序列化问题一样,就是它只能用于Python,并且可能不同版本的Python彼此都不兼容,因此,只能用Pickle保存那些不重要的数据,不能成功地反序列化也没关系。
shelve
shelve模块比pickle模块简单,只有一个open函数,返回类似字典的对象,可读可写;key必须为字符串,而值可以是python所支持的数据类型,会生成三个文件
|
1
2
3
4
5
6
7
8
9
10
11
12
|
import shelve f = shelve.open(r'shelve.txt') # f['stu1_info']={'name':'alex','age':'18'}# f['stu2_info']={'name':'alvin','age':'20'}# f['school_info']={'website':'oldboyedu.com','city':'beijing'}### f.close() print(f.get('stu_info')['age']) |
xml
跟json差不多,用作实现不同语言之间的数据交互,但是json使用起来更简单。
至今很多传统和金融行业的系统的接口还是用的xml
xml的格式如下,就是通过<>节点来区别数据结构的:
|
1
2
3
4
5
6
7
8
9
10
11
12
13
14
15
16
17
18
19
20
21
22
|
<data> <country name="Liechtenstein"> <rank updated="yes">2</rank> <year>2008</year> <gdppc>141100</gdppc> <neighbor name="Austria" direction="E"/> <neighbor name="Switzerland" direction="W"/> </country> <country name="Singapore"> <rank updated="yes">5</rank> <year>2011</year> <gdppc>59900</gdppc> <neighbor name="Malaysia" direction="N"/> </country> <country name="Panama"> <rank updated="yes">69</rank> <year>2011</year> <gdppc>13600</gdppc> <neighbor name="Costa Rica" direction="W"/> <neighbor name="Colombia" direction="E"/> </country></data> # 有一个xml的数据 |
接下来我们可以进行对它操作
|
1
2
3
4
5
6
7
8
9
10
11
12
13
14
15
16
17
18
19
20
21
22
23
24
25
26
27
28
29
|
import xml.etree.ElementTree as ETtree = ET.parse("xml_t") # 解析(打开)xml文件root = tree.getroot() #print(root.tag) # .tag是取第一层的标签# 遍历root文档for child in root: print(child.tag,child.attrib) # 取每条的标签名,还有每条标签的属性值(是字典) for i in child: print(i.tag,i.text) # 取子标签下的标签名,还有每条标签下的内容# 只遍历yaer的节点for node in root.iter("year"): print(node.tag,node.text) # 取出year的标签名,还有year标签名下的内容#---------------------------------------import xml.etree.ElementTree as ETtree = ET.parse("xmltest.xml")root = tree.getroot()# 修改for node in root.iter('year'): # 只遍历yaer的节点 new_year = int(node.text) + 1 # 将每个year标签下的内容整形并+1 node.text = str(new_year) node.set("updated","yes") # 添加。set(标签名,属性值)tree.write("xmltest.xml") # 写入新的修改的xml文件# 删除for country in root.findall('country'): # 遍历标签名为country下的东西 rank = int(country.find('rank').text)# 找到country下的子标签为rank 取出它的内容,并复制 if rank > 50: # 如果大于50 root.remove(country) # 则删除country这个标签tree.write('output.xml') |
configarser
其实就是配置解析文件,有固定的格式
格式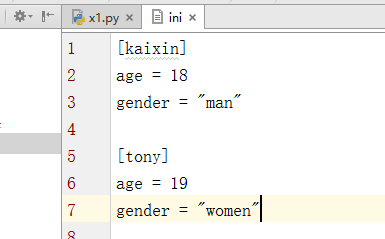
例如有个简单的文件,如上我们可以对这个相应格式的文件进行一些操作
1、获取所有节点 sections
|
1
2
3
4
5
6
|
import configparserxx = configparser.ConfigParser() # 创建一个对象xx.read("ini",encoding="utf8") # 读取相应文件result = xx.sections() # 获取所有节点print(result) |
2、获取指定节点下所有的键 options
|
1
2
3
4
5
6
7
|
import configparserxx = configparser.ConfigParser() # 创建一个对象# xx的对象的read功能,打开读取文件,放进内容xx.read("ini",encoding="utf8") # 读取相应文件result = xx.options("kaixin") # 获取指定节点下所有的键print(result) |
3、获取指定节点下所有的键值对 items
|
1
2
3
4
5
6
7
|
import configparserxx = configparser.ConfigParser() # 创建一个对象# xx的对象的read功能,打开读取文件,放进内容xx.read("ini",encoding="utf8") # 读取相应文件result = xx.items("kaixin") # 获取指定节点下的所有键值对print(result) |
4、获取指定节点下指定key的值
|
1
2
|
result = xx.get("kaixin","age")print(result) |
5、检查,添加,删除节点
|
1
2
3
4
5
6
7
8
9
10
11
|
# 检查节点是否存在,返回的是布尔值has_sec = xx.has_section("kaixin")print(has_sec)# 添加节点xx.add_section("Tom")xx.write(open("ini","w"))# 删除节点xx.remove_section("Tom")xx.write(open("ini","w")) |
6、检查、删除、设置指定组内的键值对
|
1
2
3
4
5
6
7
8
9
10
11
|
# 检查节点下的key值是否存在,返回的是布尔值has_opt = xx.has_option("kaixin","age")print(has_opt)# 删除键值对xx.remove_option("kaixin","money")xx.write(open("ini","w"))# 设置键值对xx.set("tony","money","10000")xx.write(open("ini","w")) |
hashlib
用于加密相关的操作,代替了md5模块和sha模块,主要提供 SHA1, SHA224, SHA256, SHA384, SHA512 ,MD5 算法
|
1
2
3
4
5
|
import hashlibhash = hashlib.md5(bytes("bingdu",encoding="utf8")) # 创建md5对象,并额外加密hash.update(bytes("123",encoding="utf8")) # 对字符串加密print(hash.hexdigest()) # 取到密文 |
subprocess
可以执行shell命令的相关模块和函数有
- os.system
- os.spawn*
- os.popen* —废弃
- popen2.* —废弃
- commands.* —废弃,3.x中被移除
以上执行shell命令的相关的模块和函数的功能均在 subprocess 模块中实现,并提供了更丰富的功能。
subprocess.Popen(...)
用于执行复杂的系统命令
参数:
- args:shell命令,可以是字符串或者序列类型(如:list,元组)
- bufsize:指定缓冲。0 无缓冲,1 行缓冲,其他 缓冲区大小,负值 系统缓冲
- stdin, stdout, stderr:分别表示程序的标准输入、输出、错误句柄
- preexec_fn:只在Unix平台下有效,用于指定一个可执行对象(callable object),它将在子进程运行之前被调用
- close_sfs:在windows平台下,如果close_fds被设置为True,则新创建的子进程将不会继承父进程的输入、输出、错误管道。
- 所以不能将close_fds设置为True同时重定向子进程的标准输入、输出与错误(stdin, stdout, stderr)。
- shell:同上
- cwd:用于设置子进程的当前目录
- env:用于指定子进程的环境变量。如果env = None,子进程的环境变量将从父进程中继承。
- universal_newlines:不同系统的换行符不同,True -> 同意使用
- startupinfo与createionflags只在windows下有效
- 将被传递给底层的CreateProcess()函数,用于设置子进程的一些属性,如:主窗口的外观,进程的优先级等等
- shell=True: 指定的命令行会通过shell来执行
- stdin : 标准输入
- stdout : 标准输出
- stderr : 标准错误的文件句柄
- PIPE : 管道 ,默认值 为: None, 表示不做重定向,管道可以用来接收数据。
把标准输出放入管道中,屏幕上就不会输出内容。
res=subprocess.Popen("dir", shell=True,stdout=subprocess.PIPE,stdin=subprocess.PIPE,stderr=subprocess.PIPE)   #执行dir命令,交给shell解释器执行,通过标准类型和subprocess.PIPE放入管道中。

>>> res.stdout.read()  #读取管道里面的数据,在程序中,读取也不会输出到屏幕上。

>>> res.stdout.read()   #再read一次,内容就为空,说明读取完成.
b''  #显示为:bytes类型
optparse
Python 有两个内建的模块用于处理命令行参数:
一个是 getopt,《Deep in python》一书中也有提到,只能简单处理 命令行参数;
另一个是 optparse,它功能强大,而且易于使用,可以方便地生成标准的、符合Unix/Posix 规范的命令行说明。
简单流程
首先必须导入模块optparse(这个不多说)
import optparse
# 创建OptionParser类对象
parser = optparse.OptionParser()
# 然后,使用add_option来定义命令行参数(伪代码)
# parser.add_option(opt_str, ...
#                   attr= value,...)
# 每个命令行参数就是由参数名字符串和参数属性组成的。如 -f 或者 –file 分别是长短参数名:
parser.add_option("-f","--file",dest = "filename")
# 最后,一旦你已经定义好了所有的命令行参数,调用 parse_args() 来解析程序的命令行:
options,args = parser.parse_args()

注: 你也可以传递一个命令行参数列表到 parse_args();否则,默认使用 sys.argv[:1]。
parse_args() 返回的两个值:
options,它是一个对象(optpars.Values),保存有命令行参数值。只要知道命令行参数名,如 file,就可以访问其对应的值: options.file 。
args,它是一个由 positional arguments 组成的列表。
struct
学习到socket网络编程这里,对struct有了认识,现在对它进行一些阐释,也可以较为有效的解决粘包问题
struct模块作用:解决bytes和其他二进制数据类型的转换
示例用法:
struct.pack('i',12)
参数说明:
pack函数作用:把任意数据类型变成bytes
i 表示4字节无符号整数。
import struct
struct.pack('i',12) # 用方法pack进行打包,把后面的整形数据,封装成一个bytes类型
b'x0cx00x00x00' # 长度就是4

l=struct.pack('i',12313123)
len(l)
4 #长度就是4
uppack
# 反解
struct.unpack('i',l)
(12313123,)

# 查看类型
l=struct.pack('i',1)
type(l)
<class 'bytes'>  # bytes类型