(本文是参考了---菜鸟教程----的学习笔记)
具有特定属性的HTML元素样式不仅仅是class和id。
----------注意:IE7和IE8需声明!DOCTYPE才支持属性选择器!IE6和更低的版本不支持属性选择器。
一、下面的例子是把包含标题(title)的所有元素变为蓝色:
属性选择器(当当对属性进行选择,值不同也无所谓)
<!DOCTYPE html>
<html lang="en">
<head>
    <meta charset="UTF-8">
    <meta name="viewport" content="width=device-width, initial-scale=1.0">
    <title>Document</title>
    <style>
        [title]{
            color: blue;
        }
    </style>
</head>
<body>
    <h2 title="hahaha">1</h2>
    <p title="haha">2</p>
</body>
</html>
二、属性和值选择器
下面的例子就只是改变了title=‘haha’元素的颜色
<!DOCTYPE html>
<html lang="en">
<head>
    <meta charset="UTF-8">
    <meta name="viewport" content="width=device-width, initial-scale=1.0">
    <title>Document</title>
    <style>
        [title=haha]{
            color: blue;
        }
    </style>
</head>
<body>
    <h2 title="hahaha">1</h2>
    <p title="haha">2</p>
</body>
</html>
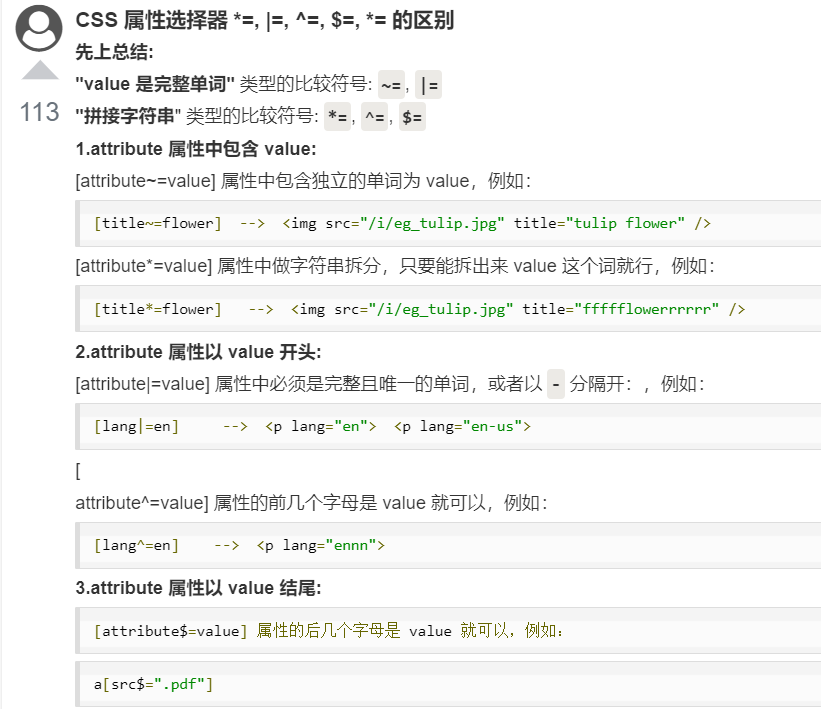
三、属性和值的选择器 - 多值)
(就是title里面可以有多个属性值的,通过符号~的引入就可以只要title这个标签里面有这个值,那么这个元素就可以得到这个样式了)


<!DOCTYPE html>
<html lang="en">
<head>
    <meta charset="UTF-8">
    <meta name="viewport" content="width=device-width, initial-scale=1.0">
    <title>Document</title>
    <style>
        [title~=hello1]{
            color: blue;
        }

        [title~=hello2]{
            color: red;
        }
    </style>
</head>
<body>
    <h2 title="hello1 hello2">1</h2>
    <p title="hello1 hello3">2</p>
    <h2 title="hello2"></h2>
</body>
</html>
下面是包含指定值的lang属性的元素样式的例子,使用(|)分隔属性和值:
实例(这里就是 加入属性值中有 en-。。。。的话就会变蓝的,。。。-en,这个en在后面的话就不行,就是用符号”-“来进行标记的
<!DOCTYPE html>
<html lang="en">
<head>
    <meta charset="UTF-8">
    <meta name="viewport" content="width=device-width, initial-scale=1.0">
    <title>Document</title>
    <style>
        [title~=hello1]{
            color: blue;
        }

        [title~=hello2]{
            color: red;
        }

        [lang|=en]
{
    color:blue;
}
    </style>
</head>
<body>
    <h2 title="hello1 hello2">1</h2>
    <p title="hello1 hello3">2</p>
    <h2 title="hello2"></h2>

    <h2>将适用:</h2>
<p lang="en">Hello!</p>
<p lang="en-us">Hi!</p>
<p lang="en-gb">Ello!</p>
<hr>
<h2>将不适用:</h2>
<p lang="us">Hi!</p>
<p lang="no">Hei!</p>
</body>
</html>
四、表单样式
这个就是因为表单元素,本身的input就有类型,type=”text/button等等“ 然后就可以通过 input【type=”。。“】 来定位到有相同表单功能的元素进行添加样式的
<!DOCTYPE html>
<html lang="en">
<head>
    <meta charset="UTF-8">
    <meta name="viewport" content="width=device-width, initial-scale=1.0">
    <title>Document</title>
    <style>
        input[type="text"]
        {
            width: 150px;
            display: block;
            margin-bottom: 10px;
            background-color: yellow;
        }
        input[type="button"]{
            width: 120px;
            margin-left: 35px;
            display: block;
        }
    </style>
</head>
<body>
    <form action="" name="input">
        Firstname: <input type="text" name="fname" value="hzy" size="20">
        lastname:   <input type="text" name="lname" value="Griffin" size="20">
        <input type="button" value="Example Button">
    </form>
</body>
</html>
菜鸟教程留言中的优质笔记: