以前一直只是oracle数据库的使用者,虽然也安装过数据库,但那都是在windows下安装的,相对简单。
最近想在linux环境下尝试安装一下Oracle数据库,在网上找了一些资料,觉得还是有点难度的,试试吧,万一成功了呢。。。
主要转自博客:https://www.cnblogs.com/muhehe/p/7816808.html
前面按照博主的步骤一步一步操作,很多不知道是为什么要那么做,在安装过程中深刻体会到了linux运维知识的验证缺乏和对oracle的深刻认识
我在操作过程中没有截图,暂且使用原博主的部分截图,请谅解。如果博主看到后不同意,请告知我,我即刻删除。
一,安装环境
VMware Workstation
CentOS Linux 7 (Core)

二、安装Oracle前的准备
1.创建运行oracle数据库的系统用户和用户组
 1 [oracle@localhost ~]$ su root  #切换到root
 2 Password:
 3 [root@localhost]# groupadd oinstall  #创建用户组oinstall
 4 [root@localhost]# groupadd dba  #创建用户组dba
 5 [root@localhost]# useradd -g oinstall -g dba -m oracle  #创建oracle用户,并加入到oinstall和dba用户组
 6 [root@localhost]# passwd oracle  #设置用户oracle的登陆密码,不设置密码,在CentOS的图形登陆界面没法登陆
 7 Changing password for user oracle.
 8 New password:   # 密码
 9 BAD PASSWORD: The password is shorter than 8 characters
10 Retype new password:   # 确认密码
11 passwd: all authentication tokens updated successfully.
12 [root@localhost]# id oracle # 查看新建的oracle用户
13 uid=1001(oracle) gid=1002(dba) groups=1002(dba)
2.创建oracle数据库安装目录
 1 [root@localhost]# cd /.        #进入根目录
 2 [root@localhost]# mkdir -p /data/oracle  #oracle数据库安装目录
 3 [root@localhost]# mkdir -p /data/oraInventory  #oracle数据库配置文件目录
 4 [root@localhost]# mkdir -p /data/database  #oracle数据库软件包解压目录
 5 [root@localhost]# cd /data
 6 [root@localhost data]# ls  #创建完毕检查一下
 7 database oracle oraInventory
 8 [root@localhost data]# chown -R oracle:oinstall /data/oracle  #设置目录所有者为oinstall用户组的oracle用户
 9 [root@localhost data]# chown -R oracle:oinstall /data/oraInventory
10 [root@localhost data]# chown -R oracle:oinstall /data/database
11 [root@localhost data]#
3.修改OS系统标识(oracle默认不支持CentOS系统安装,但是centos其实就是redhat)
1 [root@localhost data]# cat /proc/version
2 Linux version 3.10.0-514.26.2.el7.x86_64 (builder@kbuilder.dev.centos.org) (gcc version 4.8.5 20150623 (Red Hat 4.8.5-11) (GCC) ) #1 SMP Tue Jul 4 15:04:05 UTC 2017
3 [root@localhost data]# cat /etc/redhat-release
4 CentOS Linux release 7.3.1611 (Core)
5 [root@localhost data]# vi /etc/redhat-release #将CentOS Linux release 7.3.1611 (Core)改成redhat-7
6 [root@localhost data]# cat /etc/redhat-release
7 redhat-7
4.安装oracle数据库所需要的软件包
[root@localhost data]# yum -y install binutils* compat-libcap1* compat-libstdc++* gcc* gcc-c++* glibc* glibc-devel* ksh* libaio* libaio-devel* libgcc* libstdc++* libstdc++-devel* libXi* libXtst* make* sysstat* elfutils* unixODBC*
有时候使用yum安装的时候,会提示another app is currently holding the yum lock,这个时候打开另外一个terminal,在root用户下输入
#rm -f /var/run/yum.pid
强制关掉yum进程
5.关闭防火墙
 1 [root@localhost data]# systemctl status firewalld.service    #查看防火墙状态(运行中)
 2 ● firewalld.service - firewalld - dynamic firewall daemon
 3    Loaded: loaded (/usr/lib/systemd/system/firewalld.service; enabled; vendor preset: enabled)
 4    Active: active (running) since Wed 2017-09-13 09:23:08 CST; 25min ago
 5      Docs: man:firewalld(1)
 6  Main PID: 641 (firewalld)
 7    CGroup: /system.slice/firewalld.service
 8            └─641 /usr/bin/python -Es /usr/sbin/firewalld --nofork --nopid
 9
10 Sep 13 09:22:58 localhost.localdomain systemd[1]: Starting firewalld - dynami...
11 Sep 13 09:23:08 localhost.localdomain systemd[1]: Started firewalld - dynamic...
12 Hint: Some lines were ellipsized, use -l to show in full.
13 [root@localhost data]# systemctl stop firewalld.service    #关闭防火墙
14 [root@localhost data]# systemctl status firewalld.service    #查看防火墙状态(已关闭)
15 ● firewalld.service - firewalld - dynamic firewall daemon
16    Loaded: loaded (/usr/lib/systemd/system/firewalld.service; enabled; vendor preset: enabled)
17    Active: inactive (dead) since Wed 2017-09-13 09:48:55 CST; 10s ago
18      Docs: man:firewalld(1)
19   Process: 641 ExecStart=/usr/sbin/firewalld --nofork --nopid $FIREWALLD_ARGS (code=exited, status=0/SUCCESS)
20  Main PID: 641 (code=exited, status=0/SUCCESS)
21
22 Sep 13 09:22:58 localhost.localdomain systemd[1]: Starting firewalld - dynami...
23 Sep 13 09:23:08 localhost.localdomain systemd[1]: Started firewalld - dynamic...
24 Sep 13 09:48:54 localhost.localdomain systemd[1]: Stopping firewalld - dynami...
25 Sep 13 09:48:55 localhost.localdomain systemd[1]: Stopped firewalld - dynamic...
26 Hint: Some lines were ellipsized, use -l to show in full.
27 [root@localhost data]# systemctl disable firewalld.service   #禁止使用防火墙(重启也是禁止的)
28 Removed symlink /etc/systemd/system/dbus-org.fedoraproject.FirewallD1.service.
29 Removed symlink /etc/systemd/system/basic.target.wants/firewalld.service.
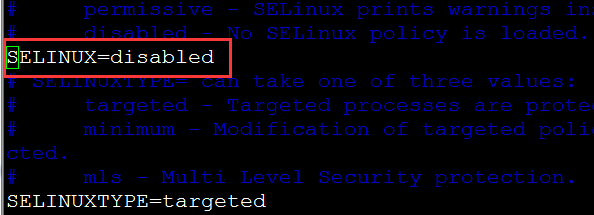
6.关闭selinux(需重启生效)
[root@localhost data]# vi /etc/selinux/config
[root@localhost data]# cat /etc/selinux/config
修改后的结果:
7、修改内核参数
[root@local++host data]# vi /etc/sysctl.conf
添加如下内容:
net.ipv4.icmp_echo_ignore_broadcasts = 1
net.ipv4.conf.all.rp_filter = 1
fs.file-max = 6815744 #设置最大打开文件数
fs.aio-max-nr = 1048576
kernel.shmall = 2097152 #共享内存的总量,8G内存设置:2097152*4k/1024/1024
kernel.shmmax = 2147483648 #最大共享内存的段大小
kernel.shmmni = 4096 #整个系统共享内存端的最大数
kernel.sem = 250 32000 100 128
net.ipv4.ip_local_port_range = 9000 65500 #可使用的IPv4端口范围
net.core.rmem_default = 262144
net.core.rmem_max= 4194304
net.core.wmem_default= 262144
net.core.wmem_max= 1048576
[root@localhost data]# cat /etc/sysctl.conf
修改后的结果:

8、使配置修改内核的参数生效
[root@localhost data]# sysctl -p
9、对oracle用户设置限制,提高软件运行性能
[root@localhost data]# vi /etc/security/limits.conf
添加如下内容:
oracle soft nproc 2047
oracle hard nproc 16384
oracle soft nofile 1024
oracle hard nofile 65536
[root@localhost data]# cat /etc/security/limits.conf
10、配置用户的环境变量
[root@localhost data]# vi /home/oracle/.bash_profile

添加如下内容:
export ORACLE_BASE=/data/oracle #oracle数据库安装目录
export ORACLE_HOME=$ORACLE_BASE/product/11.2.0/db_1 #oracle数据库路径
export ORACLE_SID=orcl #oracle启动数据库实例名
export ORACLE_UNQNAME=orcl
export ORACLE_TERM=xterm #xterm窗口模式安装
export PATH=$ORACLE_HOME/bin:/usr/sbin:$PATH #添加系统环境变量
export LD_LIBRARY_PATH=$ORACLE_HOME/lib:/lib:/usr/lib #添加系统环境变量
export LANG=C #防止安装过程出现乱码
export NLS_LANG=AMERICAN_AMERICA.ZHS16GBK #设置Oracle客户端字符集,必须与Oracle安装时设置的字符集保持一致

[root@localhost data]# cat /home/oracle/.bash_profile
11、使用户的环境变量配置立即生效
[root@localhost data]# source /home/oracle/.bash_profile
12.重启系统,确保所有设置生效
[root@localhost Desktop]# reboot
13.上传安装软件包,并解压两个软件包至/data/database/目录下
oracle@localhost src]$ unzip linux.x64_11gR2_database_1of2.zip -d /data/database/  #解压
#提示unzip命令找不到:
unzip: command not found
#此时需要安装unzip:
oracle@localhost src]$ yum install -y unzip zip
#安装完成,继续解压文件:
oracle@localhost src]$ unzip linux.x64_11gR2_database_1of2.zip -d /data/database/ #解压
[oracle@localhost src]$ unzip linux.x64_11gR2_database_2of2.zip -d /data/database/  #解压
14.进入管理员权限,设置目录所有者为oinstall用户组的oracle用户
[oracle@localhost src]$ su root
Password:
[root@localhost src]# chown -R oracle:oinstall /data/database/database/
[oracle@localhost /]$ cd /data/database/database/
[oracle@localhost database]$ ls
doc  install  response  rpm  runInstaller  sshsetup  stage  welcome.html
15.进入/data/database/database/目录,执行./runInstaller安装
[oracle@localhost database]$ ./runInstaller
Starting Oracle Universal Installer...
安装出现如下提示:
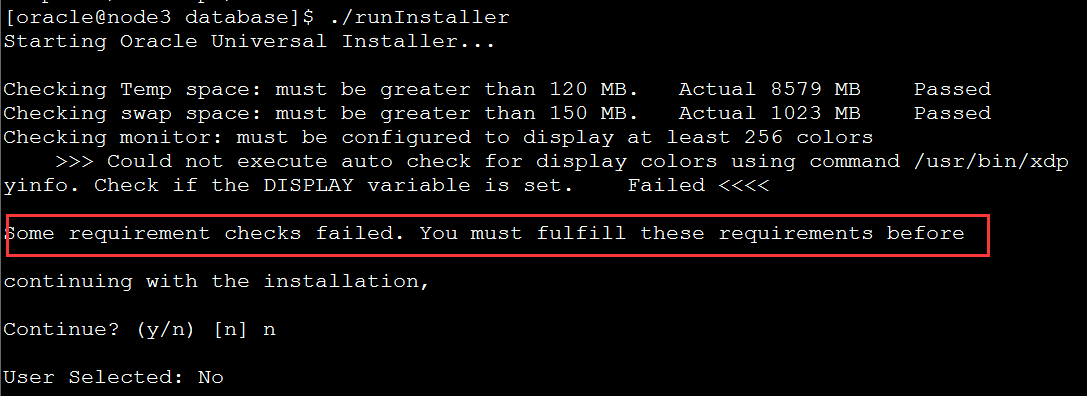
出现上述红色框里面的提示后,经过baidu,有人说需要回到root用户执行“xhost +”,结果提示xhost命令找不到,于是继续百度安装xhost,如下:
 1 [root@node3 ~]# xhost +
 2
 3 -bash: xhost: command not found
 4 [root@node3 ~]# yum whatprovides */xhost
 5 Loaded plugins: fastestmirror
 6 Loading mirror speeds from cached hostfile
 7 * base: mirrors.neusoft.edu.cn
 8 * extras: mirrors.163.com
 9 * updates: mirrors.163.com
10 base/7/x86_64/filelists_db | 7.3 MB 00:00:06
11 extras/7/x86_64/filelists_db | 207 kB 00:00:00
12 updates/7/x86_64/filelists_db | 3.0 MB 00:00:02
13 xorg-x11-server-utils-7.7-20.el7.x86_64 : X.Org X11 X server utilities
14 Repo : base
15 Matched from:
16 Filename : /usr/bin/xhost
17
18
19
20 [root@node3 ~]# yum install -y xorg-x11-server-utils-7.7-20.el7.x86_64
21 Loaded plugins: fastestmirror
22
23 .....略
16、安装完xhost,继续执行xhost命令,仍然报错。继续baidu后发现是要安装xmanager,也有说要安装vncviewer的,反正是一脸懵逼,不知道为什么要安装,继续往下走吧。vncviewer看起来要麻烦一些,先尝试Xmanager吧。
也不知道怎么弄,先下载了一个xmanager5在安装了,然后又在CentOS里面使用yum install xterm安装了xterm。
安装完Xmanager5后的可以看到有8个工具,先使用Xstart连接linux服务器,如图所示,在命令处输入:/usr/bin/xterm -ls -display $DISPLAY

17、点击【运行】按钮后,出现如下问题(人已经要崩溃了,即将放弃。。。)

18、通过baidu发现,报错“已拒绝X11转移申请”的原因是因为X11 forwarding依赖“xorg-x11-xauth”软件包,所以必须先安装“xorg-x11-xauth”软件包。
[root@node3 ~]# yum install xorg-x11-xauth
19、Centos 7 安装GNOME桌面环境
1 #列出可安装的桌面环境
2 [root@local ~]# yum grouplist
3 #安装GNOME及相应桌面管理工具
4 [root@local ~]# yum group info  "Graphical Administration Tools" # 查看安装的包有哪些内容
5 [root@local ~]# yum -y groups install "GNOME DESKTOP" "Graphical Administration Tools"
6 #设置开机启动为GNOME
7 [root@local ~]# systemctl set-default graphical.target
8 #重启
9 [root@local ~]# reboot
20、继续使用Xstart连接linux服务器,如图所示,这次连接成功。执行xhost +也成功了。这次终于看到了熟悉的界面。不容易。。。。
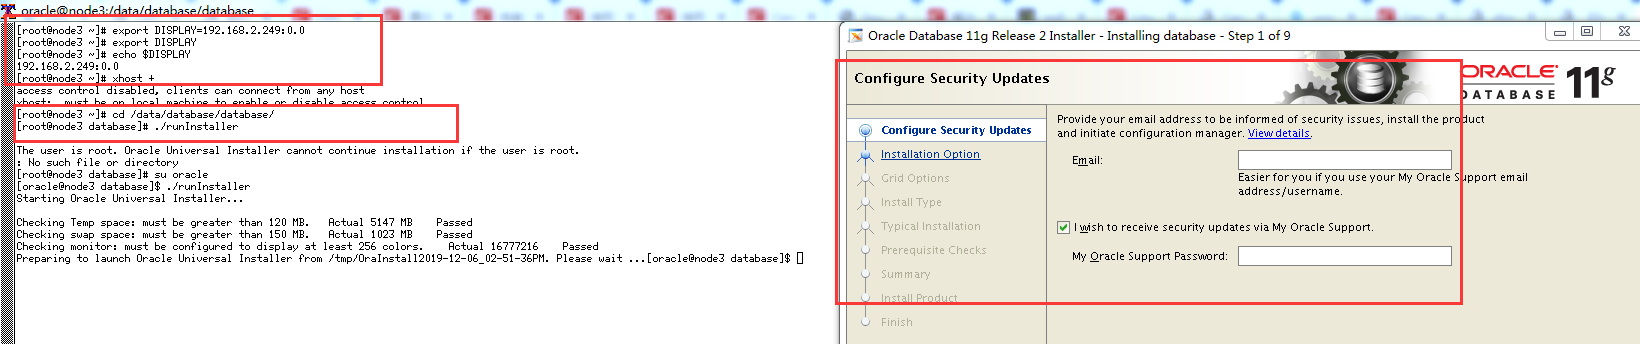
坑爹,又遇到了虚拟机空间不足的问题,继续baidu怎么给虚拟机增加空间。郁闷。。。
三、虚拟机vmware centos7 扩展磁盘空间
1、查看挂载点
[root@node3 ~]# df -h
Filesystem                     Size  Used Avail Use% Mounted on
/dev/mapper/centos_node1-root   18G   14G  4.7G  75% /
devtmpfs                       475M     0  475M   0% /dev
tmpfs                          491M     0  491M   0% /dev/shm
tmpfs                          491M  7.8M  484M   2% /run
tmpfs                          491M     0  491M   0% /sys/fs/cgroup
/dev/sda1                     1014M  190M  825M  19% /boot
tmpfs                           99M     0   99M   0% /run/user/0
2、扩展VMWare硬盘空间
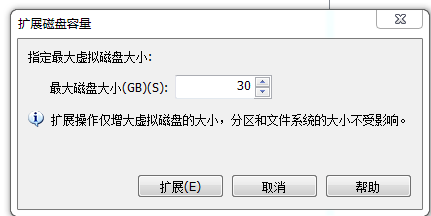
2.1、关闭Vmware 的 Linux系统。注意:注意使用VMware自带的Expand功能不能有Snapshot存在,所以在expand之前先把所有的Snapshot删掉。
2.2、选中虚拟机,右键选中设置,选中硬盘,选择实用工具,选择扩展,在弹出框中输入你想要扩展到多少G的空间。
3、对新增加的硬盘进行分区
 1 [root@node3 ~]# fdisk /dev/sda
 2 Welcome to fdisk (util-linux 2.23.2).
 3
 4 Changes will remain in memory only, until you decide to write them.
 5 Be careful before using the write command.
 6
 7 Command (m for help): p
 8
 9 Disk /dev/sda: 32.2 GB, 32212254720 bytes, 62914560 sectors
10 Units = sectors of 1 * 512 = 512 bytes
11 Sector size (logical/physical): 512 bytes / 512 bytes
12 I/O size (minimum/optimal): 512 bytes / 512 bytes
13 Disk label type: dos
14 Disk identifier: 0x000b71c7
15
16    Device Boot      Start         End      Blocks   Id  System
17 /dev/sda1   *        2048     2099199     1048576   83  Linux
18 /dev/sda2         2099200    20971519     9436160   8e  Linux LVM
19 /dev/sda3        20971520    41943039    10485760   8e  Linux LVM
20
21 Command (m for help): n
22 Partition type:
23    p   primary (3 primary, 0 extended, 1 free)
24    e   extended
25 Select (default e): p
26 Selected partition 4
27 First sector (41943040-62914559, default 41943040):
28 Using default value 41943040
29 Last sector, +sectors or +size{K,M,G} (41943040-62914559, default 62914559):
30 Using default value 62914559
31 Partition 4 of type Linux and of size 10 GiB is set
32
33 Command (m for help): t
34 Partition number (1-4, default 4): 4
35 Hex code (type L to list all codes): 8e
36 Changed type of partition 'Linux' to 'Linux LVM'
37
38 Command (m for help): w
39 The partition table has been altered!
40
41 Calling ioctl() to re-read partition table.
42
43 WARNING: Re-reading the partition table failed with error 16: Device or resource busy.
44 The kernel still uses the old table. The new table will be used at
45 the next reboot or after you run partprobe(8) or kpartx(8)
46 Syncing disks.
47 [root@node3 ~]# shutdown -r now
48
49 Connection closed by foreign host.
4、对新增加的硬盘格式化
 1 [root@node3 ~]# mkfs.ext3 /dev/sda4
 2 mke2fs 1.42.9 (28-Dec-2013)
 3 Filesystem label=
 4 OS type: Linux
 5 Block size=4096 (log=2)
 6 Fragment size=4096 (log=2)
 7 Stride=0 blocks, Stripe width=0 blocks
 8 655360 inodes, 2621440 blocks
 9 131072 blocks (5.00%) reserved for the super user
10 First data block=0
11 Maximum filesystem blocks=2684354560
12 80 block groups
13 32768 blocks per group, 32768 fragments per group
14 8192 inodes per group
15 Superblock backups stored on blocks:
16     32768, 98304, 163840, 229376, 294912, 819200, 884736, 1605632
17
18 Allocating group tables: done
19 Writing inode tables: done
20 Creating journal (32768 blocks): done
21 Writing superblocks and filesystem accounting information: done
5、添加新LVM到已有的LVM组,实现扩容
  1 [root@node3 ~]# lvm
  2 lvm> pvcreate /dev/sda4
  3 WARNING: ext3 signature detected on /dev/sda4 at offset 1080. Wipe it? [y/n]: y
  4   Wiping ext3 signature on /dev/sda4.
  5   Physical volume "/dev/sda4" successfully created.
  6
  7 lvm> vgdisplay -v
  8   --- Volume group ---
  9   VG Name               centos_node1
 10   System ID
 11   Format                lvm2
 12   Metadata Areas        2
 13   Metadata Sequence No  5
 14   VG Access             read/write
 15   VG Status             resizable
 16   MAX LV                0
 17   Cur LV                2
 18   Open LV               2
 19   Max PV                0
 20   Cur PV                2
 21   Act PV                2
 22   VG Size               18.99 GiB
 23   PE Size               4.00 MiB
 24   Total PE              4862
 25   Alloc PE / Size       4838 / <18.90 GiB
 26   Free  PE / Size       24 / 96.00 MiB
 27   VG UUID               ZFeYMu-5Lez-stKS-ez1E-XGX9-uEE7-MQyKin
 28
 29   --- Logical volume ---
 30   LV Path                /dev/centos_node1/swap
 31   LV Name                swap
 32   VG Name                centos_node1
 33   LV UUID                TrBKrg-cwAh-1ClA-gmcN-AuxJ-91Mb-Vz22Ux
 34   LV Write Access        read/write
 35   LV Creation host, time node1, 2019-07-31 10:10:32 +0800
 36   LV Status              available
 37   # open                 2
 38   LV Size                1.00 GiB
 39   Current LE             256
 40   Segments               1
 41   Allocation             inherit
 42   Read ahead sectors     auto
 43   - currently set to     8192
 44   Block device           253:1
 45
 46   --- Logical volume ---
 47   LV Path                /dev/centos_node1/root
 48   LV Name                root
 49   VG Name                centos_node1
 50   LV UUID                ioZ2iz-f4Mv-4zWA-SlaS-lMkD-gc27-XJRJvY
 51   LV Write Access        read/write
 52   LV Creation host, time node1, 2019-07-31 10:10:32 +0800
 53   LV Status              available
 54   # open                 1
 55   LV Size                <17.90 GiB
 56   Current LE             4582
 57   Segments               2
 58   Allocation             inherit
 59   Read ahead sectors     auto
 60   - currently set to     8192
 61   Block device           253:0
 62
 63   --- Physical volumes ---
 64   PV Name               /dev/sda2
 65   PV UUID               z0MY0O-0dum-EmQe-x6e8-EX07-DcGJ-xtl6Q7
 66   PV Status             allocatable
 67   Total PE / Free PE    2303 / 0
 68
 69   PV Name               /dev/sda3
 70   PV UUID               jB2Hw9-QKQ3-Gtpk-yjTV-jlpC-cQCR-npd2HD
 71   PV Status             allocatable
 72   Total PE / Free PE    2559 / 24
 73
 74 lvm> vgextend centos_node1 /dev/sda4
 75   Volume group "centos_node1" successfully extended
 76 lvm> lvextend -l+24 /dev/mapper/centos_node1-root  #这里的24就是“Free  PE / Size”中的24
 77   Size of logical volume centos_node1/root changed from <17.90 GiB (4582 extents) to 17.99 GiB (4606 extents).
 78   Logical volume centos_node1/root successfully resized.
 79 lvm> pvdisplay
 80   --- Physical volume ---
 81   PV Name               /dev/sda2
 82   VG Name               centos_node1
 83   PV Size               <9.00 GiB / not usable 3.00 MiB
 84   Allocatable           yes (but full)
 85   PE Size               4.00 MiB
 86   Total PE              2303
 87   Free PE               0
 88   Allocated PE          2303
 89   PV UUID               z0MY0O-0dum-EmQe-x6e8-EX07-DcGJ-xtl6Q7
 90
 91   --- Physical volume ---
 92   PV Name               /dev/sda3
 93   VG Name               centos_node1
 94   PV Size               10.00 GiB / not usable 4.00 MiB
 95   Allocatable           yes (but full)
 96   PE Size               4.00 MiB
 97   Total PE              2559
 98   Free PE               0
 99   Allocated PE          2559
100   PV UUID               jB2Hw9-QKQ3-Gtpk-yjTV-jlpC-cQCR-npd2HD
101
102   --- Physical volume ---
103   PV Name               /dev/sda4
104   VG Name               centos_node1
105   PV Size               10.00 GiB / not usable 4.00 MiB
106   Allocatable           yes
107   PE Size               4.00 MiB
108   Total PE              2559
109   Free PE               2559
110   Allocated PE          0
111   PV UUID               m79wtL-xcIq-jIQ0-gtJQ-EvCJ-HfQY-9TpD9r
又坑爹了,这里发现空间并未扩展成功。
参考以下两篇博客:
https://www.cnblogs.com/jackydalong/p/3759043.html
https://www.cnblogs.com/doubilaile/p/7783123.html
虽然是搞成功了,但是不知道是为啥,还是很懵逼的状态。回忆了一下当时的操作,可能是没执行pvcreate /dev/sdb3命令创建物理卷,直接就执行命令vgextend testvg /dev/sdb3进行扩展空间造成的。
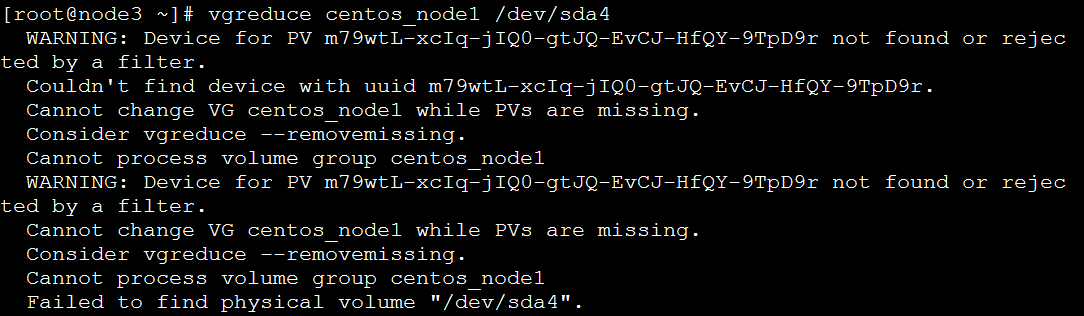
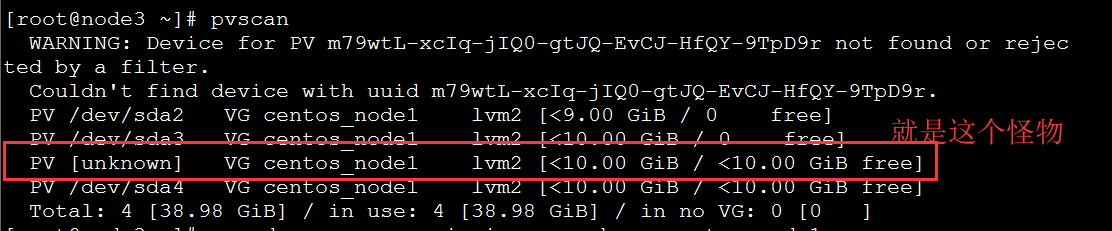
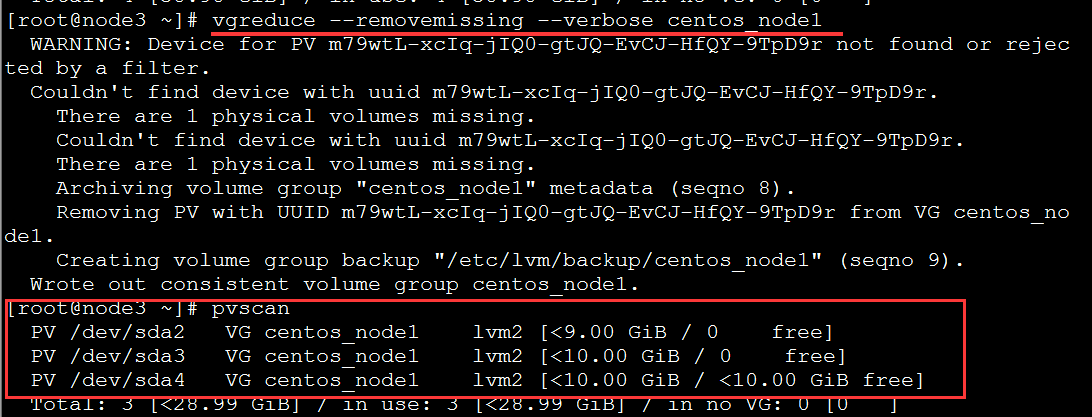
删除物理卷的时候又删除不掉,以下命令是在baidu的过程中打乱仗操作的,仅供参考:


6、给linux文件系统扩容
 1 [root@node3 ~]# xfs_growfs /dev/mapper/centos_node1-root
 2 meta-data=/dev/mapper/centos_node1-root isize=512    agcount=9, agsize=524032 blks
 3          =                       sectsz=512   attr=2, projid32bit=1
 4          =                       crc=1        finobt=0 spinodes=0
 5 data     =                       bsize=4096   blocks=4691968, imaxpct=25
 6          =                       sunit=0      swidth=0 blks
 7 naming   =version 2              bsize=4096   ascii-ci=0 ftype=1
 8 log      =internal               bsize=4096   blocks=2560, version=2
 9          =                       sectsz=512   sunit=0 blks, lazy-count=1
10 realtime =none                   extsz=4096   blocks=0, rtextents=0
11 data blocks changed from 4691968 to 4716544
12 [root@node3 ~]# df -h
13 Filesystem                     Size  Used Avail Use% Mounted on
14 /dev/mapper/centos_node1-root   18G   14G  4.8G  74% /
15 devtmpfs                       475M     0  475M   0% /dev
16 tmpfs                          491M     0  491M   0% /dev/shm
17 tmpfs                          491M  7.8M  484M   2% /run
18 tmpfs                          491M     0  491M   0% /sys/fs/cgroup
19 /dev/sda1                     1014M  190M  825M  19% /boot
20 tmpfs                           99M     0   99M   0% /run/user/0
四、安装oracle
一路纠结到这里,总算是看到曙光了,希望接下来安装oracle一切顺利。。。。阿弥陀佛。。。。
1、切换到oracle用户,进入/data/database/database目录,执行./runInstaller开始安装。

2、终于看到熟悉的界面了,继续。。。
然而,问题再次降临了,这次主要是在安装的时候遇到了两个问题:swap size检查失败和packages检查失败。
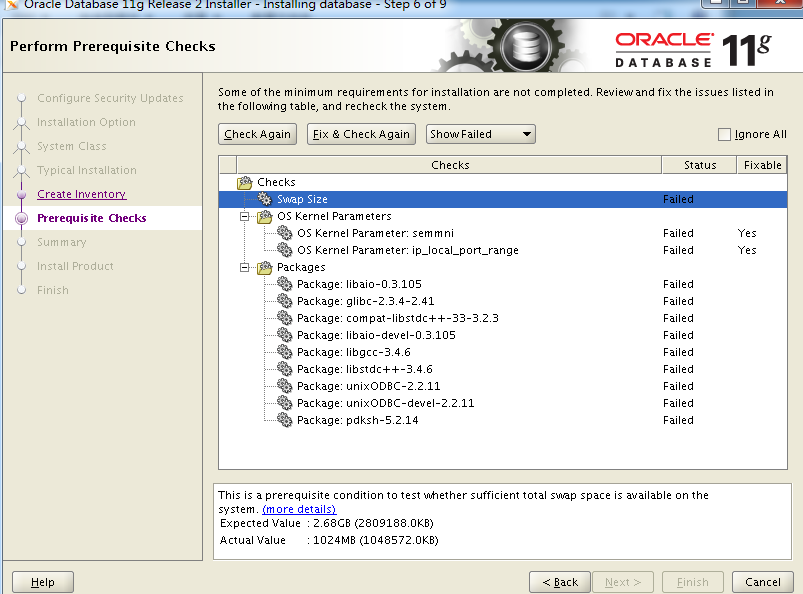
2.1、由错误截图可知,oracle在安装过程中进行检查系统环境的时候,关于swap(交换分区)的大小预期为2.68G,而系统实际上只有1024M。因此我们需要增加大约2G的系统swap才符合oracle的要求。
关于swap size的相关知识点,请参考:https://www.cnblogs.com/kerrycode/p/5246383.html
增加swap size,请参考:https://www.cnblogs.com/liuyisai/p/5333865.html
使用dd命令在/data下面新建一个2G的目录:
[root@node3 ~]# dd if=/dev/zero of=/data/swap bs=1M count=2048
2048+0 records in
2048+0 records out
2147483648 bytes (2.1 GB) copied, 2.38083 s, 902 MB/s
使用mkswap将/data/swap这个文件格式化为swap的文件格式:
[root@node3 ~]# mkswap /data/swap
Setting up swapspace version 1, size = 2097148 KiB
no label, UUID=d9b59f60-b069-457b-b10b-ff6896077db5
使用swapon来将/data/swap启动:
[root@node3 ~]# swapon /data/swap
swapon: /data/swap: insecure permissions 0644, 0600 suggested.
[root@node3 ~]# free -m
              total        used        free      shared  buff/cache   available
Mem:           1828         300          71           9        1457        1338
Swap:          3071           0        3071
[root@node3 ~]# swapon -s
Filename                Type        Size    Used    Priority
/dev/dm-1                                  partition    1048572    0    -2
/data/swap                                 file    2097148    0    -3
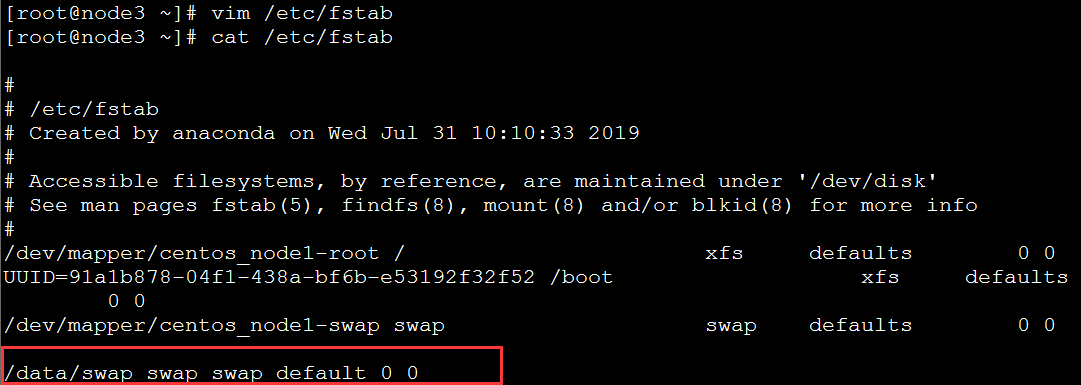
为了能够让swap自动挂载,要修改/etc/fstab文件,在文件末尾加上:/data/swap swap swap default 0 0 ,这样就算重启系统,swap分区就不用手动挂载了。
2.2、依赖包的安装
semmni和下面几个Packages可以选择右上角的“Ignore All”忽略,然后继续后续安装。

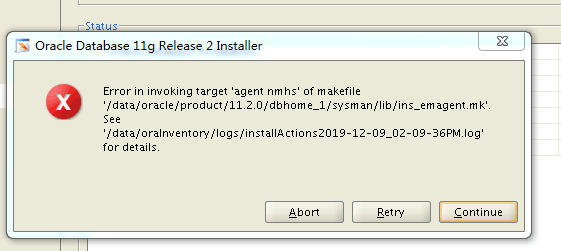
类似下列的错误,也暂时忽略继续安装。
3、安装完成。
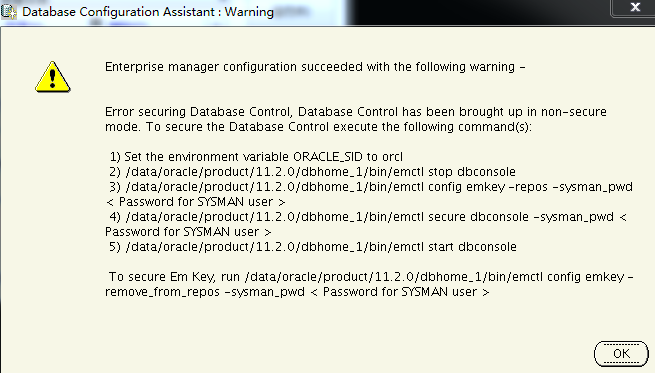
五、数据库配置
1、bash: sqlplus: command not found 解决方法
在root用户下输入如下命令:
[root@node3 ~]# ln -s $ORACLE_HOME/bin/sqlplus /usr/bin
2、
3、
4、
5、
6、
参考文章:https://www.linuxidc.com/Linux/2017-11/148828.htm?tdsourcetag=s_pcqq_aiomsg