一、安装和启动
1.1 安装pytest
1. 键入Ctrl+R,打开cmd,输入命令至python环境下(本机:D:Python27>)
2. 在python环境下运行下面的命令即可安装pytest
#pip install -U pytest
3. 检查安装的pytest的版本信息是否正确
#pytest --version

1.2第一个测试Demo
1. 创建一个只有4行代码的简单函数:
def fun(x):
    return x+1
def test_answer():
    assert fun(3)==5
2. 使用pytest运行,首先需进入到文件所在位置(本机:F:study Interface_automationInterface automation),然后键入命令
#pytest jsonDemo.py
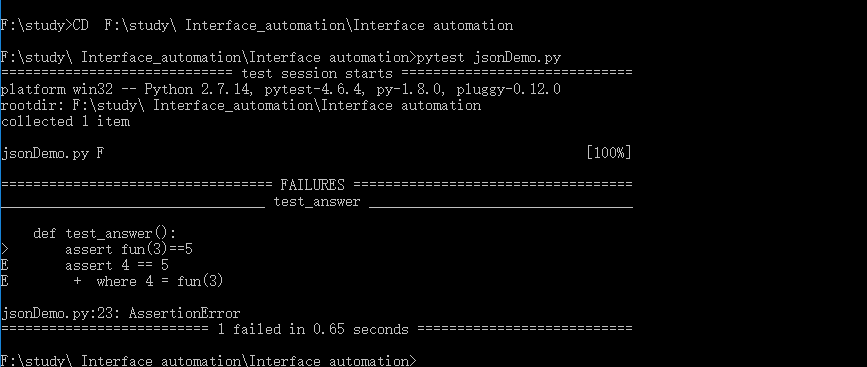
1. 如上图所示,这个结果是失败的,因为func(3)的返回值不是5
1.3运行多个测试
pytest会运行当前目录及子目录下所有以test_*.py和*_test.py命名的文件,文件匹配方式遵循Standard test discovery rules
1.4判断是否发生了指定的异常
1. 使用raises可以判断代码是否抛出了异常:
import pytest
def f():
    raise SystemExit(1)

def test_mytest():
    with pytest.raises(SystemExit):
        f()
2. 使用“quiet”模式来执行这个测试:如下图所示

1.5 将多个测试用例放在一个class中
1. 当需要开发多个测试用例的时候,可以将他们放在同一个class中,pytest可以简单的创建包含多个测试用例的class:
class TestClass(object):
    def test_one(self):
        x="this"
        assert 'h' in x

    def test_two(self):
        x='hello'
        assert hasattr(x,'check')
2. pytest根据Conventions for Python test discovery查找所有的测试用例,所以可以找到所有以**test_**开头的测试函数,我们可以通过文件名来直接运行整个模块:
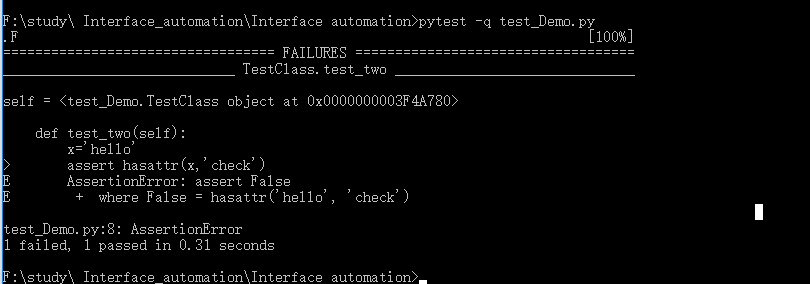
3. 如上图所示,第一个测试用例passed,第二个测试用例failed,可以直观的观察到测试用例中进行判断的中间值,这样可以帮助理解测试用例失败的原因。
1.6 为测试用例创建唯一的临时文件夹
1. pytest提供Builtin fixtures/function arguements来创建任意的资源,比如一个具有唯一的临时文件夹:
def test_needsfiles(tmpdir):
    print tmpdir
    assert 0
2. 如果函数的签名中(函数签名包括函数的参数和返回值,以及参数的封送顺序等等)包含参数tmpdir,pytest就会在执行测试用例之前查找并调用特定的fixture创建所需资源,在本例中,pytest会创建一个unique-per-test-invocation临时文件夹:
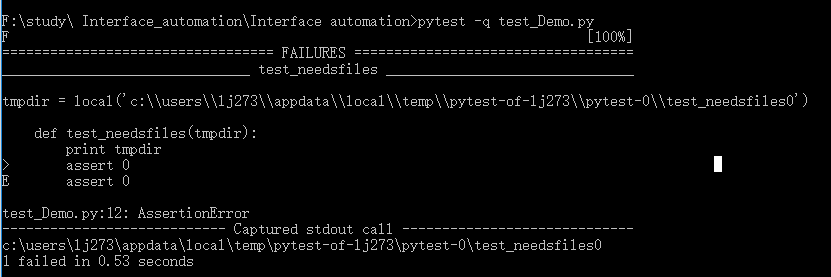
关于tmpdir的更多信息请参好Temporary directories and files通过下面的命令可以查看所有内置的pytest fixture:
键入命令:#pytest --fixtures,如下图所示
