处理用户输入
到目前为止已经看到了如何编写脚本,处理数据、变量和Linux系统上的文件。有时,你编写的脚本还得能够与使用者进行交互。bash shell提供了一些不同的方法来从用户处获得数据,包括命令行参数(添加在命令后的数据)、命令行选项(可修改命令行为的单个字母)以及直接从键盘读取输入的能力。本章将会讨论如何在你的bash shell脚本运用这些方法来从脚本用户处获得数据。
一、命令行参数
向shell脚本传递数据的最基本方法是使用命令行参数。命令行参数允许在运行脚本时向命令行添加数据。
1 $ ./addem 10 30
本例向脚本addem传递了两个命令行参数(10和30)。脚本会通过特殊的变量来处理命令行参数。后面将会介绍如何在bash shell脚本中使用命令行参数。
1.1、读取参数
bash shell会将一些称为位置参数(positional parameter)的特殊变量分配给输入到命令行中的所有参数。这也包括shell所执行的脚本名称。位置参数变量是标准的数字:$0是程序名,$1是第一个参数,$2是第二个参数,依次类推,直到第九个参数$9。
下面是在shell脚本中使用单个命令行参数的简单例子。
 1 $ cat test1.sh
 2 #!/bin/bash
 3 # using one command line parameter
 4 #
 5 factorial=1
 6 for (( number = 1; number <= $1 ; number++ ))
 7 do
 8   factorial=$[ $factorial * $number ]
 9 done
10 echo The factorial of $1 is $factorial
11 $
12 $ ./test1.sh 5
13 The factorial of 5 is 120
14 $
可以在shell脚本中像使用其他变量一样使用$1变量。shell脚本会自动将命令行参数的值分配给变量,不需要你作任何处理。
如果需要输入更多的命令行参数,则每个参数都必须用空格分开。
 1 $ cat test2.sh
 2 #!/bin/bash
 3 # testing two command line parameters
 4 #
 5 total=$[ $1 * $2 ]
 6 echo The first parameter is $1.
 7 echo The second parameter is $2.
 8 echo The total value is $total.
 9 $
10 $ ./test2.sh 2 5
11 The first parameter is 2.
12 The second parameter is 5.
13 The total value is 10.
14 $
shell会将每个参数分配给对应的变量。
在前面的例子中,用到的命令行参数都是数值。也可以在命令行上用文本字符串。
1 $ cat test3.sh
2 #!/bin/bash
3 # testing string parameters
4 #
5 echo Hello $1, glad to meet you.
6 $
7 $ ./test3.sh Rich
8 Hello Rich, glad to meet you.
9 $
shell将输入到命令行的字符串值传给脚本。但碰到含有空格的文本字符串时就会出现问题:
1 $ ./test3.sh Rich Blum
2 Hello Rich, glad to meet you.
3 $
记住,每个参数都是用空格分隔的,所以shell会将空格当成两个值的分隔符。要在参数值中包含空格,必须要用引号(单引号或双引号均可)。
1 $ ./test3.sh 'Rich Blum'
2 Hello Rich Blum, glad to meet you.
3 $
4 $ ./test3.sh "Rich Blum"
5 Hello Rich Blum, glad to meet you.
6 $
说明 将文本字符串作为参数传递时,引号并非数据的一部分。它们只是表明数据的起止位置。
如果脚本需要的命令行参数不止9个,你仍然可以处理,但是需要稍微修改一下变量名。在第9个变量之后,你必须在变量数字周围加上花括号,比如${10}。下面是一个这样的例子。
 1 $ cat test4.sh
 2 #!/bin/bash
 3 # handling lots of parameters
 4 #
 5 total=$[ ${10} * ${11} ]
 6 echo The tenth parameter is ${10}
 7 echo The eleventh parameter is ${11}
 8 echo The total is $total
 9 $
10 $ ./test4.sh 1 2 3 4 5 6 7 8 9 10 11 12
11 The tenth parameter is 10
12 The eleventh parameter is 11
13 The total is 110
14 $
这项技术允许你根据需要向脚本添加任意多的命令行参数。
1.2、读取脚本名
可以用$0参数获取shell在命令行启动的脚本名。这在编写多功能工具时很方便。
 1 $ cat test5.sh
 2 #!/bin/bash
 3 # Testing the $0 parameter
 4 #
 5 echo The zero parameter is set to: $0
 6 #
 7 $
 8 $ bash test5.sh
 9 The zero parameter is set to: test5.sh
10 $
但是这里存在一个潜在的问题。如果使用另一个命令来运行shell脚本,命令会和脚本名混在一起,出现在$0参数中。
1 $ ./test5.sh
2 The zero parameter is set to: ./test5.sh
3 $
这还不是唯一的问题。当传给$0变量的实际字符串不仅仅是脚本名,而是完整的脚本路径时,变量$0就会使用整个路径。
1 $ bash /home/Christine/test5.sh
2 The zero parameter is set to: /home/Christine/test5.sh
3 $
如果你要编写一个根据脚本名来执行不同功能的脚本,就得做点额外工作。你得把脚本的运行路径给剥离掉。另外,还要删除与脚本名混杂在一起的命令。
幸好有个方便的小命令可以帮到我们。basename命令会返回不包含路径的脚本名。
 1 $ cat test5b.sh
 2 #!/bin/bash
 3 # Using basename with the $0 parameter
 4 #
 5 name=$(basename $0)
 6 echo
 7 echo The script name is: $name
 8 #
 9 $ bash /home/Christine/test5b.sh
10 The script name is: test5b.sh
11 $
12 $ ./test5b.sh
13 The script name is: test5b.sh
14 $
现在好多了。可以用这种方法来编写基于脚本名执行不同功能的脚本。这里有个简单的例子。
 1 $ cat test6.sh
 2 #!/bin/bash
 3 # Testing a Multi-function script
 4 #
 5 name=$(basename $0)
 6 #
 7 if [ $name = "addem" ]
 8 then
 9 total=$[ $1 + $2 ]
10 #
11 elif [ $name = "multem" ]
12 then
13 total=$[ $1 * $2 ]
14 fi
15 #
16 echo
17 echo The calculated value is $total
18 #
19 $
20 $ cp test6.sh addem
21 $ chmod u+x addem
22 $
23 $ ln -s test6.sh multem
24 $
25 $ ls -l *em
26 -rwxrw-r--. 1 Christine Christine 224 Jun 30 23:50 addem
27 lrwxrwxrwx. 1 Christine Christine 8 Jun 30 23:50 multem -> test6.sh
28 $
29 $ ./addem 2 5
30 The calculated value is 7
31 $
32 $ ./multem 2 5
33 The calculated value is 10
34 $
本例从test6.sh脚本中创建了两个不同的文件名:一个通过复制文件创建(addem),另一个通过链接创建(multem)。在两种情况下都会先获得脚本的基本名称,然后根据该值执行相应的功能。
1.3、测试参数
在shell脚本中使用命令行参数时要小心些。如果脚本不加参数运行,可能会出问题。
1 $ ./addem 2
2 ./addem: line 8: 2 + : syntax error: operand expected (error
3 token is " ")
4 The calculated value is
5 $
当脚本认为参数变量中会有数据而实际上并没有时,脚本很有可能会产生错误消息。这种写脚本的方法并不可取。在使用参数前一定要检查其中是否存在数据。
 1 $ cat test7.sh
 2 #!/bin/bash
 3 # testing parameters before use
 4 #
 5 if [ -n "$1" ]
 6 then
 7   echo Hello $1, glad to meet you.
 8 else
 9   echo "Sorry, you did not identify yourself. "
10 fi
11 $
12 $ ./test7.sh Rich
13 Hello Rich, glad to meet you.
14 $
15 $ ./test7.sh
16 Sorry, you did not identify yourself.
17 $
在本例中,使用了-n测试来检查命令行参数$1中是否有数据。在下一节中,你会看到还有另一种检查命令行参数的方法。
二、特殊参数变量
在bash shell中有些特殊变量,它们会记录命令行参数。本节将会介绍这些变量及其用法。
2.1、参数统计
如在上一节中看到的,在脚本中使用命令行参数之前应该检查一下命令行参数。对于使用多个命令行参数的脚本来说,这有点麻烦。
你可以统计一下命令行中输入了多少个参数,无需测试每个参数。bash shell为此提供了一个特殊变量。
特殊变量 $# 含有脚本运行时携带的命令行参数的个数。可以在脚本中任何地方使用这个特殊变量,就跟普通变量一样。
 1 $ cat test8.sh
 2 #!/bin/bash
 3 # getting the number of parameters
 4 #
 5 echo There were $# parameters supplied.
 6 $
 7 $ ./test8.sh
 8 There were 0 parameters supplied.
 9 $
10 $ ./test8.sh 1 2 3 4 5
11 There were 5 parameters supplied.
12 $
13 $ ./test8.sh 1 2 3 4 5 6 7 8 9 10
14 There were 10 parameters supplied.
15 $
16 $ ./test8.sh "Rich Blum"
17 There were 1 parameters supplied.
18 $
现在你就能在使用参数前测试参数的总数了。
 1 $ cat test9.sh
 2 #!/bin/bash
 3 # Testing parameters
 4 #
 5 if [ $# -ne 2 ]
 6 then
 7     echo
 8     echo Usage: test9.sh a b
 9     echo
10 else
11     total=$[ $1 + $2 ]
12     echo
13     echo The total is $total
14     echo
15 fi
16 #
17 $
18 $ bash test9.sh
19 Usage: test9.sh a b
20 $ bash test9.sh 10
21 Usage: test9.sh a b
22 $ bash test9.sh 10 15
23 The total is 25
24 $
if-then 语句用 -ne 测试命令行参数数量。如果参数数量不对,会显示一条错误消息告知脚本的正确用法。
这个变量还提供了一个简便方法来获取命令行中最后一个参数,完全不需要知道实际上到底用了多少个参数。不过要实现这一点,得稍微多花点工夫。
如果你仔细考虑过,可能会觉得既然$#变量含有参数的总数,那么变量 ${$#} 就代表了最后一个命令行参数变量。试试看会发生什么。
1 $ cat badtest1.sh
2 #!/bin/bash
3 # testing grabbing last parameter
4 #
5 echo The last parameter was ${$#}
6 $
7 $ ./badtest1.sh 10
8 The last parameter was 15354
9 $
怎么了?显然,出了点问题。它表明你不能在花括号内使用美元符。必须将美元符换成感叹号。很奇怪,但的确管用。
 1 $ cat test10.sh
 2 #!/bin/bash
 3 # Grabbing the last parameter
 4 #
 5 params=$#
 6 echo
 7 echo The last parameter is $params
 8 echo The last parameter is ${!#}
 9 echo
10 #
11 $
12 $ bash test10.sh 1 2 3 4 5
13 The last parameter is 5
14 The last parameter is 5
15 $
16 $ bash test10.sh
17 The last parameter is 0
18 The last parameter is test10.sh
19 $
太好了。这个测试将 $# 变量的值赋给了变量 params,然后也按特殊命令行参数变量的格式使用了该变量。两种方法都没问题。重要的是要注意,当命令行上没有任何参数时,$# 的值为0,params变量的值也一样,但${!#}变量会返回命令行用到的脚本名。
2.2、抓取所有的数据
有时候需要抓取命令行上提供的所有参数。这时候不需要先用 $# 变量来判断命令行上有多少参数,然后再进行遍历,你可以使用一组其他的特殊变量来解决这个问题。
$* 和 $@ 变量可以用来轻松访问所有的参数。这两个变量都能够在单个变量中存储所有的命令行参数。
$* 变量会将命令行上提供的所有参数当作一个单词保存。这个单词包含了命令行中出现的每一个参数值。基本上 $* 变量会将这些参数视为一个整体,而不是多个个体。
另一方面,$@ 变量会将命令行上提供的所有参数当作同一字符串中的多个独立的单词。这样你就能够遍历所有的参数值,得到每个参数。这通常通过 for 命令完成。
这两个变量的工作方式不太容易理解。看个例子,你就能理解二者之间的区别了。
 1 $ cat test11.sh
 2 #!/bin/bash
 3 # testing $* and $@
 4 #
 5 echo
 6 echo "Using the $* method: $*"
 7 echo
 8 echo "Using the $@ method: $@"
 9 $
10 $ ./test11.sh rich barbara katie jessica
11 Using the $* method: rich barbara katie jessica
12 Using the $@ method: rich barbara katie jessica
13 $
注意,从表面上看,两个变量产生的是同样的输出,都显示出了所有命令行参数。
下面的例子给出了二者的差异。
 1 $ cat test12.sh
 2 #!/bin/bash
 3 # testing $* and $@
 4 #
 5 echo
 6 count=1
 7 #
 8 for param in "$*"
 9 do
10     echo "$* Parameter #$count = $param"
11     count=$[ $count + 1 ]
12 done
13 #
14 echo
15 count=1
16 #
17 for param in "$@"
18 do
19     echo "$@ Parameter #$count = $param"
20     count=$[ $count + 1 ]
21 done
22 $
23 $ ./test12.sh rich barbara katie jessica
24 $* Parameter #1 = rich barbara katie jessica
25 $@ Parameter #1 = rich
26 $@ Parameter #2 = barbara
27 $@ Parameter #3 = katie
28 $@ Parameter #4 = jessica
29 $
现在清楚多了。通过使用for命令遍历这两个特殊变量,你能看到它们是如何不同地处理命令行参数的。$*变量会将所有参数当成单个参数,而$@变量会单独处理每个参数。这是遍历命令行参数的一个绝妙方法。
三、移动变量
bash shell工具箱中另一件工具是shift命令。bash shell 的 shift 命令能够用来操作命令行参数。跟字面上的意思一样,shift命令会根据它们的相对位置来移动命令行参数。
在使用 shift 命令时,默认情况下它会将每个参数变量向左移动一个位置。所以,变量 $3 的值会移到 $2 中,变量 $2 的值会移到 $1 中,而变量 $1 的值则会被删除(注意,变量 $0 的值,也就是程序名,不会改变)。
这是遍历命令行参数的另一个好方法,尤其是在你不知道到底有多少参数时。你可以只操作第一个参数,移动参数,然后继续操作第一个参数。
这里有个例子来解释它是如何工作的。
 1 $ cat test13.sh
 2 #!/bin/bash
 3 # demonstrating the shift command
 4 echo
 5 count=1
 6 while [ -n "$1" ]
 7 do
 8     echo "Parameter #$count = $1"
 9     count=$[ $count + 1 ]
10     shift
11 done
12 $
13 $ ./test13.sh rich barbara katie jessica
14 Parameter #1 = rich
15 Parameter #2 = barbara
16 Parameter #3 = katie
17 Parameter #4 = jessica
18 $
这个脚本通过测试第一个参数值的长度执行了一个while循环。当第一个参数的长度为零时,循环结束。测试完第一个参数后,shift命令会将所有参数的位置移动一个位置。
窍门 使用shift命令的时候要小心。如果某个参数被移出,它的值就被丢弃了,无法再恢复。
另外,你也可以一次性移动多个位置,只需要给shift命令提供一个参数,指明要移动的位置数就行了。
 1 $ cat test14.sh
 2 #!/bin/bash
 3 # demonstrating a multi-position shift
 4 #
 5 echo
 6 echo "The original parameters: $*"
 7 shift 2
 8 echo "Here's the new first parameter: $1"
 9 $
10 $ ./test14.sh 1 2 3 4 5
11 The original parameters: 1 2 3 4 5
12 Here's the new first parameter: 3
13 $
通过使用shift命令的参数,就可以轻松地跳过不需要的参数。
四、查找选项
表面上看,命令行选项也没什么特殊的。在命令行上,它们紧跟在脚本名之后,就跟命令行参数一样。实际上,如果愿意,你可以像处理命令行参数一样处理命令行选项。
4.1.1、处理简单选项
在前面的test13.sh脚本中,你看到了如何使用 shift 命令来依次处理脚本程序携带的命令行参数。你也可以用同样的方法来处理命令行选项。
在提取每个单独参数时,用 case 语句来判断某个参数是否为选项。
 1 $ cat test15.sh
 2 #!/bin/bash
 3 # extracting command line options as parameters
 4 #
 5 echo
 6 while [ -n "$1" ]
 7 do
 8     case "$1" in
 9         -a) echo "Found the -a option" ;;
10         -b) echo "Found the -b option" ;;
11         -c) echo "Found the -c option" ;;
12         *) echo "$1 is not an option" ;;
13     esac
14     shift
15 done
16 $
17 $ ./test15.sh -a -b -c -d
18 Found the -a option
19 Found the -b option
20 Found the -c option
21 -d is not an option
22 $
case语句会检查每个参数是不是有效选项。如果是的话,就运行对应case语句中的命令。不管选项按什么顺序出现在命令行上,这种方法都适用。
1 $ ./test15.sh -d -c -a
2 -d is not an option
3 Found the -c option
4 Found the -a option
5 $
case语句在命令行参数中找到一个选项,就处理一个选项。如果命令行上还提供了其他参数,你可以在case语句的通用情况处理部分中处理。
4.1.2、分离参数和选项
你会经常遇到想在shell脚本中同时使用选项和参数的情况。Linux中处理这个问题的标准方式是用特殊字符来将二者分开,该字符会告诉脚本何时选项结束以及普通参数何时开始。
对Linux来说,这个特殊字符是双破折线(--)。shell会用双破折线来表明选项列表结束。在双破折线之后,脚本就可以放心地将剩下的命令行参数当作参数,而不是选项来处理了。
要检查双破折线,只要在case语句中加一项就行了。
 1 $ cat test16.sh
 2 #!/bin/bash
 3 # extracting options and parameters
 4 echo
 5 while [ -n "$1" ]
 6 do
 7     case "$1" in
 8     -a) echo "Found the -a option" ;;
 9     -b) echo "Found the -b option";;
10     -c) echo "Found the -c option" ;;
11     --) shift
12     break ;;
13     *) echo "$1 is not an option";;
14     esac
15     shift
16 done
17 #
18 count=1
19 for param in $@
20 do
21     echo "Parameter #$count: $param"
22     count=$[ $count + 1 ]
23 done
24 $
在遇到双破折线时,脚本用break命令来跳出while循环。由于过早地跳出了循环,我们需要再加一条shift命令来将双破折线移出参数变量。
对于第一个测试,试试用一组普通的选项和参数来运行这个脚本。
1 $ ./test16.sh -c -a -b test1 test2 test3
2 Found the -c option
3 Found the -a option
4 Found the -b option
5 test1 is not an option
6 test2 is not an option
7 test3 is not an option
8 $
结果说明在处理时脚本认为所有的命令行参数都是选项。接下来,进行同样的测试,只是这次会用双破折线来将命令行上的选项和参数划分开来。
1 $ ./test16.sh -c -a -b -- test1 test2 test3
2 Found the -c option
3 Found the -a option
4 Found the -b option
5 Parameter #1: test1
6 Parameter #2: test2
7 Parameter #3: test3
8 $
当脚本遇到双破折线时,它会停止处理选项,并将剩下的参数都当作命令行参数。
4.1.3、处理带值的选项
有些选项会带上一个额外的参数值。在这种情况下,命令行看起来像下面这样。
1 $ ./testing.sh -a test1 -b -c -d test2
当命令行选项要求额外的参数时,脚本必须能检测到并正确处理。下面是如何处理的例子。
 1 $ cat test17.sh
 2 #!/bin/bash
 3 # extracting command line options and values
 4 echo
 5 while [ -n "$1" ]
 6 do
 7     case "$1" in
 8     -a) echo "Found the -a option";;
 9     -b) param="$2"
10         echo "Found the -b option, with parameter value $param"
11         shift ;;
12     -c) echo "Found the -c option";;
13     --) shift
14     break ;;
15     *) echo "$1 is not an option";;
16     esac
17     shift
18 done
19 #
20 count=1
21 for param in "$@"
22 do
23     echo "Parameter #$count: $param"
24     count=$[ $count + 1 ]
25 done
26 $
27 $ ./test17.sh -a -b test1 -d
28 Found the -a option
29 Found the -b option, with parameter value test1
30 -d is not an option
31 $
在这个例子中,case语句定义了三个它要处理的选项。-b选项还需要一个额外的参数值。由于要处理的参数是$1,额外的参数值就应该位于$2(因为所有的参数在处理完之后都会被移出)。只要将参数值从$2变量中提取出来就可以了。当然,因为这个选项占用了两个参数位,所以你还需要使用shift命令多移动一个位置。
只用这些基本的特性,整个过程就能正常工作,不管按什么顺序放置选项(但要记住包含每个选项相应的选项参数)。
1 $ ./test17.sh -b test1 -a -d
2 Found the -b option, with parameter value test1
3 Found the -a option
4 -d is not an option
5 $
现在shell脚本中已经有了处理命令行选项的基本能力,但还有一些限制。比如,如果你想将多个选项放进一个参数中时,它就不能工作了。
1 $ ./test17.sh -ac
2 -ac is not an option
3 $
在Linux中,合并选项是一个很常见的用法,而且如果脚本想要对用户更友好一些,也要给用户提供这种特性。幸好,有另外一种处理选项的方法能够帮忙。
4.1.4、使用getopt 命令
getopt命令是一个在处理命令行选项和参数时非常方便的工具。它能够识别命令行参数,从而在脚本中解析它们时更方便。
4.1.4.1、使用getopt 命令
getopt命令可以接受一系列任意形式的命令行选项和参数,并自动将它们转换成适当的格式。它的命令格式如下:
1 getopt optstring parameters
optstring是这个过程的关键所在。它定义了命令行有效的选项字母,还定义了哪些选项字母需要参数值。
首先,在optstring中列出你要在脚本中用到的每个命令行选项字母。然后,在每个需要参数值的选项字母后加一个冒号。getopt命令会基于你定义的optstring解析提供的参数。
窍门 getopt命令有一个更高级的版本叫作getopts(注意这是复数形式)。getopts命令会在随后部分讲到。因为这两个命令的拼写几乎一模一样,所以很容易搞混。一定要小心!
下面是个getopt如何工作的简单例子。
1 $ getopt ab:cd -a -b test1 -cd test2 test3
2 -a -b test1 -c -d -- test2 test3
3 $
optstring定义了四个有效选项字母:a、b、c和d。冒号(:)被放在了字母b后面,因为b选项需要一个参数值。当getopt命令运行时,它会检查提供的参数列表(-a -b test1 -cd test2 test3),并基于提供的optstring进行解析。注意,它会自动将-cd选项分成两个单独的选项,并插入双破折线来分隔行中的额外参数。
如果指定了一个不在optstring中的选项,默认情况下,getopt命令会产生一条错误消息。
1 $ getopt ab:cd -a -b test1 -cde test2 test3
2 getopt: invalid option -- e
3 -a -b test1 -c -d -- test2 test3
4 $
如果想忽略这条错误消息,可以在命令后加-q选项。
1 $ getopt -q ab:cd -a -b test1 -cde test2 test3
2 -a -b 'test1' -c -d -- 'test2' 'test3'
3 $
注意,getopt命令选项必须出现在optstring之前。现在应该可以在脚本中使用此命令处理命令行选项了。
4.1.4.2、在脚本中使用getopt
可以在脚本中使用getopt来格式化脚本所携带的任何命令行选项或参数,但用起来略微复杂。
方法是用getopt命令生成的格式化后的版本来替换已有的命令行选项和参数。用set命令能够做到。
set命令能够处理shell中的各种变量。
set命令的选项之一是双破折线(--),它会将命令行参数替换成set命令的命令行值。
然后,该方法会将原始脚本的命令行参数传给getopt命令,之后再将getopt命令的输出传给set命令,用getopt格式化后的命令行参数来替换原始的命令行参数,看起来如下所示。
1 set -- $(getopt -q ab:cd "$@")
现在原始的命令行参数变量的值会被getopt命令的输出替换,而getopt已经为我们格式化好了命令行参数。
利用该方法,现在就可以写出能帮我们处理命令行参数的脚本。
 1 $ cat test18.sh
 2 #!/bin/bash
 3 # Extract command line options & values with getopt
 4 #
 5 set -- $(getopt -q ab:cd "$@")
 6 #
 7 echo
 8 while [ -n "$1" ]
 9 do
10     case "$1" in
11     -a) echo "Found the -a option" ;;
12     -b) param="$2"
13     echo "Found the -b option, with parameter value $param"
14     shift ;;
15     -c) echo "Found the -c option" ;;
16     --) shift
17     break ;;
18     *) echo "$1 is not an option";;
19     esac
20     shift
21 done
22 #
23 count=1
24 for param in "$@"
25 do
26 echo "Parameter #$count: $param"
27 count=$[ $count + 1 ]
28 done
29 #
30 $
你会注意到它跟脚本test17.sh一样,唯一不同的是加入了getopt命令来帮助格式化命令行参数。
现在如果运行带有复杂选项的脚本,就可以看出效果更好了。
1 $ ./test18.sh -ac
2 Found the -a option
3 Found the -c option
4 $
当然,之前的功能照样没有问题。
1 $ ./test18.sh -a -b test1 -cd test2 test3 test4
2 Found the -a option
3 Found the -b option, with parameter value 'test1'
4 Found the -c option
5 Parameter #1: 'test2'
6 Parameter #2: 'test3'
7 Parameter #3: 'test4'
8 $
现在看起来相当不错了。但是,在getopt命令中仍然隐藏着一个小问题。看看这个例子。
1 $ ./test18.sh -a -b test1 -cd "test2 test3" test4
2 Found the -a option
3 Found the -b option, with parameter value 'test1'
4 Found the -c option
5 Parameter #1: 'test2
6 Parameter #2: test3'
7 Parameter #3: 'test4'
8 $
getopt命令并不擅长处理带空格和引号的参数值。它会将空格当作参数分隔符,而不是根据双引号将二者当作一个参数。幸而还有另外一个办法能解决这个问题。
4.1.4.3、使用更高级的getopts
getopts命令(注意是复数)内建于bash shell。它跟近亲getopt看起来很像,但多了一些扩展功能。
与getopt不同,前者将命令行上选项和参数处理后只生成一个输出,而getopts命令能够和已有的shell参数变量配合默契。
每次调用它时,它一次只处理命令行上检测到的一个参数。处理完所有的参数后,它会退出并返回一个大于0的退出状态码。这让它非常适合用解析命令行所有参数的循环中。
getopts命令的格式如下:
1 getopts optstring variable
optstring值类似于getopt命令中的那个。有效的选项字母都会列在optstring中,如果选项字母要求有个参数值,就加一个冒号。要去掉错误消息的话,可以在optstring之前加一个冒号。getopts命令将当前参数保存在命令行中定义的variable中。
getopts命令会用到两个环境变量。如果选项需要跟一个参数值,OPTARG环境变量就会保存这个值。OPTIND环境变量保存了参数列表中getopts正在处理的参数位置。这样你就能在处理完选项之后继续处理其他命令行参数了。
让我们看个使用getopts命令的简单例子。
 1 $ cat test19.sh
 2 #!/bin/bash
 3 # simple demonstration of the getopts command
 4 #
 5 echo
 6 while getopts :ab:c opt
 7 do
 8     case "$opt" in
 9     a) echo "Found the -a option" ;;
10     b) echo "Found the -b option, with value $OPTARG";;
11     c) echo "Found the -c option" ;;
12     *) echo "Unknown option: $opt";;
13     esac
14 done
15 $
16 $ ./test19.sh -ab test1 -c
17 Found the -a option
18 Found the -b option, with value test1
19 Found the -c option
20 $
while语句定义了getopts命令,指明了要查找哪些命令行选项,以及每次迭代中存储它们的变量名(opt)。
你会注意到在本例中case语句的用法有些不同。getopts命令解析命令行选项时会移除开头的单破折线,所以在case定义中不用单破折线。
getopts命令有几个好用的功能。对新手来说,可以在参数值中包含空格。
1 $ ./test19.sh -b "test1 test2" -a
2 Found the -b option, with value test1 test2
3 Found the -a option
4 $
另一个好用的功能是将选项字母和参数值放在一起使用,而不用加空格。
1 $ ./test19.sh -abtest1
2 Found the -a option
3 Found the -b option, with value test1
4 $
getopts命令能够从-b选项中正确解析出test1值。除此之外,getopts还能够将命令行上找到的所有未定义的选项统一输出成问号。
1 $ ./test19.sh -d
2 Unknown option: ?
3 $
4 $ ./test19.sh -acde
5 Found the -a option
6 Found the -c option
7 Unknown option: ?
8 Unknown option: ?
9 $
optstring中未定义的选项字母会以问号形式发送给代码。
getopts命令知道何时停止处理选项,并将参数留给你处理。在getopts处理每个选项时,它会将OPTIND环境变量值增一。在getopts完成处理时,你可以使用shift命令和OPTIND值来移动参数。
 1 $ cat test20.sh
 2 #!/bin/bash
 3 # Processing options & parameters with getopts
 4 #
 5 echo
 6 while getopts :ab:cd opt
 7 do
 8     case "$opt" in
 9     a) echo "Found the -a option" ;;
10     b) echo "Found the -b option, with value $OPTARG" ;;
11     c) echo "Found the -c option" ;;
12     d) echo "Found the -d option" ;;
13     *) echo "Unknown option: $opt" ;;
14     esac
15 done
16 #
17 shift $[ $OPTIND - 1 ]
18 #
19 echo
20 count=1
21 for param in "$@"
22 do
23     echo "Parameter $count: $param"
24     count=$[ $count + 1 ]
25 done
26 #
27 $
28 $ ./test20.sh -a -b test1 -d test2 test3 test4
29 Found the -a option
30 Found the -b option, with value test1
31 Found the -d option
32 Parameter 1: test2
33 Parameter 2: test3
34 Parameter 3: test4
35 $
现在你就拥有了一个能在所有shell脚本中使用的全功能命令行选项和参数处理工具。
五、将选项标准化
在创建shell脚本时,显然可以控制具体怎么做。你完全可以决定用哪些字母选项以及它们的用法。
但有些字母选项在Linux世界里已经拥有了某种程度的标准含义。如果你能在shell脚本中支持这些选项,脚本看起来能更友好一些。
下表显示了Linux中用到的一些命令行选项的常用含义。
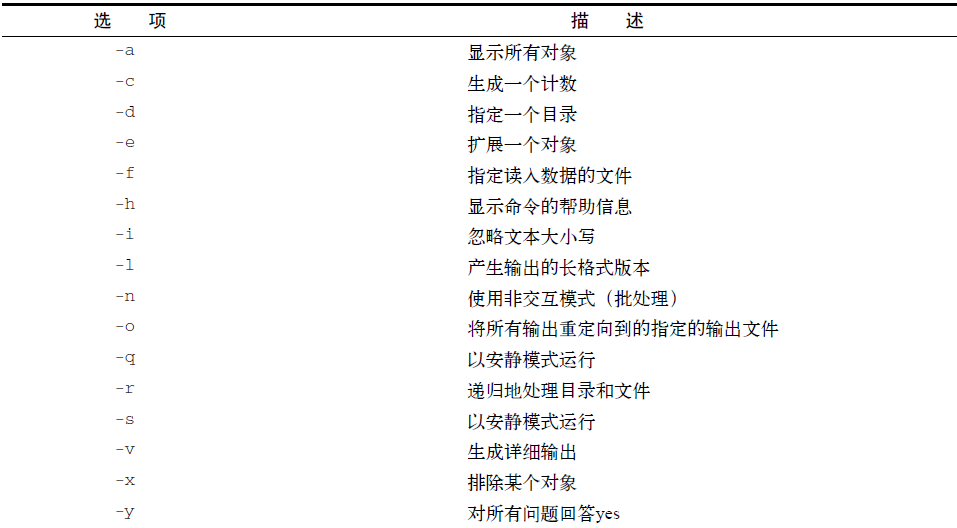
你大概已经知道这些选项中大部分的含义了。如果你的选项也采用同样的含义,这样用户在使用你的脚本时就不用去查手册了。
六、获得用户输入
尽管命令行选项和参数是从脚本用户处获得输入的一种重要方式,但有时脚本的交互性还需要更强一些。比如你想要在脚本运行时问个问题,并等待运行脚本的人来回答。bash shell为此提供了read命令。
6.1、基本的读取
read命令从标准输入(键盘)或另一个文件描述符中接受输入。在收到输入后,read命令会将数据放进一个变量。下面是read命令的最简单用法。
 1 $ cat test21.sh
 2 #!/bin/bash
 3 # testing the read command
 4 #
 5 echo -n "Enter your name: "
 6 read name
 7 echo "Hello $name, welcome to my program. "
 8 #
 9 $
10 $ ./test21.sh
11 Enter your name: Rich Blum
12 Hello Rich Blum, welcome to my program.
13 $
相当简单。注意,生成提示的echo命令使用了-n选项。该选项不会在字符串末尾输出换行符,允许脚本用户紧跟其后输入数据,而不是下一行。这让脚本看起来更像表单。
实际上,read命令包含了-p选项,允许你直接在read命令行指定提示符。
 1 $ cat test22.sh
 2 #!/bin/bash
 3 # testing the read -p option
 4 #
 5 read -p "Please enter your age: " age
 6 days=$[ $age * 365 ]
 7 echo "That makes you over $days days old! "
 8 #
 9 $
10 $ ./test22.sh
11 Please enter your age: 10
12 That makes you over 3650 days old!
13 $
你会注意到,在第一个例子中当有名字输入时,read命令会将姓和名保存在同一个变量中。read命令会将提示符后输入的所有数据分配给单个变量,要么你就指定多个变量。输入的每个数据值都会分配给变量列表中的下一个变量。如果变量数量不够,剩下的数据就全部分配给最后一个变量。
 1 $ cat test23.sh
 2 #!/bin/bash
 3 # entering multiple variables
 4 #
 5 read -p "Enter your name: " first last
 6 echo "Checking data for $last, $first…"
 7 $
 8 $ ./test23.sh
 9 Enter your name: Rich Blum
10 Checking data for Blum, Rich...
11 $
也可以在read命令行中不指定变量。如果是这样,read命令会将它收到的任何数据都放进特殊环境变量REPLY中。
 1 $ cat test24.sh
 2 #!/bin/bash
 3 # Testing the REPLY Environment variable
 4 #
 5 read -p "Enter your name: "
 6 echo
 7 echo Hello $REPLY, welcome to my program.
 8 #
 9 $
10 $ ./test24.sh
11 Enter your name: Christine
12 Hello Christine, welcome to my program.
13 $
REPLY环境变量会保存输入的所有数据,可以在shell脚本中像其他变量一样使用。
6.2、超时
使用read命令时要当心。脚本很可能会一直苦等着脚本用户的输入。如果不管是否有数据输入,脚本都必须继续执行,你可以用-t选项来指定一个计时器。-t选项指定了read命令等待输入的秒数。当计时器过期后,read命令会返回一个非零退出状态码。
 1 $ cat test25.sh
 2 #!/bin/bash
 3 # timing the data entry
 4 #
 5 if read -t 5 -p "Please enter your name: " name
 6 then
 7 echo "Hello $name, welcome to my script"
 8 else
 9 echo
10 echo "Sorry, too slow! "
11 fi
12 $
13 $ ./test25.sh
14 Please enter your name: Rich
15 Hello Rich, welcome to my script
16 $
17 $ ./test25.sh
18 Please enter your name:
19 Sorry, too slow!
20 $
如果计时器过期,read命令会以非零退出状态码退出,可以使用如if-then语句或while循环这种标准的结构化语句来理清所发生的具体情况。在本例中,计时器过期时,if语句不成立,shell会执行else部分的命令。
也可以不对输入过程计时,而是让read命令来统计输入的字符数。当输入的字符达到预设的字符数时,就自动退出,将输入的数据赋给变量。
 1 $ cat test26.sh
 2 #!/bin/bash
 3 # getting just one character of input
 4 #
 5 read -n1 -p "Do you want to continue [Y/N]? " answer
 6 case $answer in
 7 Y | y) echo
 8   echo "fine, continue on…";;
 9 N | n) echo
10   echo OK, goodbye
11 exit;;
12 esac
13 echo "This is the end of the script"
14 $
15 $ ./test26.sh
16 Do you want to continue [Y/N]? Y
17 fine, continue on…
18 This is the end of the script
19 $
20 $ ./test26.sh
21 Do you want to continue [Y/N]? n
22 OK, goodbye
23 $
本例中将-n选项和值1一起使用,告诉read命令在接受单个字符后退出。只要按下单个字符回答后,read命令就会接受输入并将它传给变量,无需按回车键。
6.3、隐藏方式读取
有时你需要从脚本用户处得到输入,但又在屏幕上显示输入信息。其中典型的例子就是输入的密码,但除此之外还有很多其他需要隐藏的数据类型。
-s选项可以避免在read命令中输入的数据出现在显示器上(实际上,数据会被显示,只是read命令会将文本颜色设成跟背景色一样)。这里有个在脚本中使用-s选项的例子。
 1 $ cat test27.sh
 2 #!/bin/bash
 3 # hiding input data from the monitor
 4 #
 5 read -s -p "Enter your password: " pass
 6 echo
 7 echo "Is your password really $pass? "
 8 $
 9 $ ./test27.sh
10 Enter your password:
11 Is your password really T3st1ng?
12 $
输入提示符输入的数据不会出现在屏幕上,但会赋给变量,以便在脚本中使用。
6.4、从文件中读取
最后,也可以用read命令来读取Linux系统上文件里保存的数据。每次调用read命令,它都会从文件中读取一行文本。当文件中再没有内容时,read命令会退出并返回非零退出状态码。
其中最难的部分是将文件中的数据传给read命令。最常见的方法是对文件使用cat命令,将结果通过管道直接传给含有read命令的while命令。下面的例子说明怎么处理。
 1 $ cat test28.sh
 2 #!/bin/bash
 3 # reading data from a file
 4 #
 5 count=1
 6 cat test | while read line
 7 do
 8   echo "Line $count: $line"
 9   count=$[ $count + 1]
10 done
11 echo "Finished processing the file"
12 $
13 $ cat test
14 The quick brown dog jumps over the lazy fox.
15 This is a test, this is only a test.
16 O Romeo, Romeo! Wherefore art thou Romeo?
17 $
18 $ ./test28.sh
19 Line 1: The quick brown dog jumps over the lazy fox.
20 Line 2: This is a test, this is only a test.
21 Line 3: O Romeo, Romeo! Wherefore art thou Romeo?
22 Finished processing the file
23 $
while循环会持续通过read命令处理文件中的行,直到read命令以非零退出状态码退出。
七、小结
本篇描述了3种不同的方法来从脚本用户处获得数据。命令行参数允许用户运行脚本时直接从命令行输入数据。脚本通过位置参数来取回命令行参数并将它们赋给变量。
shift命令通过对位置参数进行轮转的方式来操作命令行参数。就算不知道有多少个参数,这个命令也可以让你轻松遍历参数。
有三个特殊变量可以用来处理命令行参数。shell会将$#变量设为命令行输入的参数总数。$* 变量会将所有参数保存为一个字符串。$@变量将所有变量都保存为单独的词。这些变量在处理长参数列表时非常有用。
除了参数外,脚本用户还可以用命令行选项来给脚本传递信息。命令行选项是前面带有单破折线的单个字母。可以给不同的选项赋值,从而改变脚本的行为。
bash shell提供了三种方式来处理命令行选项。
第一种方式是将它们像命令行参数一样处理。可以利用位置参数变量来遍历选项,在每个选项出现在命令行上时处理它。
另一种处理命令行选项的方式是用getopt命令。该命令会将命令行选项和参数转换成可以在脚本中处理的标准格式。getopt命令允许你指定将哪些字母识别成选项以及哪些选项需要额外的参数值。getopt命令会处理标准的命令行参数并按正确顺序输出选项和参数。
处理命令行选项的最后一种方法是通过getopts命令(注意是复数)。getopts命令提供了处理命令行参数的高级功能。它支持多值的参数,能够识别脚本未定义的选项。
从脚本用户处获得数据的一种交互方法是read命令。read命令支持脚本向用户提问并等待。read命令会将脚本用户输入的数据赋给一个或多个变量,你在脚本中可以使用它们。
read命令有一些选项支持定制脚本的输入数据,比如隐藏输入数据选项、超时选项以及要求输入特定数目字符的选项。