前言:
论文及源代码网址:
https://github.com/ZheC/Realtime_Multi-Person_Pose_Estimation
地址2:
https://github.com/CMU-Perceptual-Computing-Lab/openpose/blob/master/doc/installation.md
1. 一个失败的尝试
首先是跑一个例子试试,使用
https://github.com/CMU-Perceptual-Computing-Lab/openpose/
按照作者的指导,如下:
Training Steps
- Run
cd training; bash getData.shto obtain the COCO images indataset/COCO/images/, keypoints annotations indataset/COCO/annotations/and COCO official toolbox indataset/COCO/coco/.- 这里建议开screen,因为要下载超级久
- Run
getANNO.min matlab to convert the annotation format from json to mat indataset/COCO/mat/. - Run
genCOCOMask.min matlab to obatin the mask images for unlabeled person. You can use 'parfor' in matlab to speed up the code.- 注意修改Matlab程序中的路径,在 im = imread(['dataset/COCO/', img_paths]);的COCO后面加上images/,原程序有点问题
- 这里尝试开启了一下并行运算,速度特别快,将代码中第二个for循环改为parfor i = 1:L,然后使用Matlab的时候,先输入matlabpool open,然后再运行程序。关闭的方法为matlabpool close
- 然后遇到了Subscripted assignment between dissimilar structures.问题,看代码也没有找到问题,参考 [1]
- Run
genJSON('COCO')to generate a json file indataset/COCO/json/folder. The json files contain raw informations needed for training. - Run
python genLMDB.pyto generate your LMDB. (You can also download our LMDB for the COCO dataset (189GB file) by:bash get_lmdb.sh) - Download our modified caffe: caffe_train. Compile pycaffe. It will be merged with caffe_rtpose (for testing) soon.
- Run
python setLayers.py --exp 1to generate the prototxt and shell file for training. - Download VGG-19 model, we use it to initialize the first 10 layers for training.
- Run
bash train_pose.sh 0,1(generated by setLayers.py) to start the training with two gpus.
2. 安装Caffe
这种跑一个例子失败之后,
转而使用最根本的方法从头按照步骤编译,不走捷径:参考下面的网址
因为电脑里已经安装过caffe的依赖环境了,所以把caffe编译一下就可以用了,参考下面的话 [3]
### Install Caffe ###
cd 3rdparty/caffe/
# Select your desired Makefile file (run only one of the next 4 commands)
cp Makefile.config.Ubuntu14_cuda7.example Makefile.config # Ubuntu 14, cuda 7
cp Makefile.config.Ubuntu14_cuda8.example Makefile.config # Ubuntu 14, cuda 8
cp Makefile.config.Ubuntu16_cuda7.example Makefile.config # Ubuntu 16, cuda 7
cp Makefile.config.Ubuntu16_cuda8.example Makefile.config # Ubuntu 16, cuda 8
# Change any custom flag from the resulting Makefile.config (e.g. OpenCV 3, Atlas/OpenBLAS/MKL, etc.)
# Compile Caffe
make all -j${number_of_cpus} && make distribute -j${number_of_cpus}
比如make all -j16(使用16个CPU同时运行)


                           3. 安装 OpenPose
cd ../../models/
bash ./getModels.sh # It just downloads the Caffe trained models
cd ..
# Same file cp command as the one used for Caffe
cp ubuntu/Makefile.config.Ubuntu14_cuda7.example Makefile.config
# Change any custom flag from the resulting Makefile.config (e.g. OpenCV 3, Atlas/OpenBLAS/MKL, etc.)
make all -j${number_of_cpus}
一定要严格按照顺序(实验室服务器用的是zsh,所以注意替换bash为zsh)
如果使用OpenCV 3版本的话,可以通过所有make,但是不能运行实际的例子
按照作者在某个Issue下的回答,应该使用OpenCV2.4,然后折腾很久,见另一篇博客 [7]
然后出现无法make,错误中关键行为这个
../lib/libcaffe.so: undefined reference to cv::imread(cv::String const&, int)'
搜索之后得到解答:[4]
open your Makefile with some text editor, locate line 164 (in my case), add opencv_imgcodecs behind.
 LIBRARIES += glog gflags protobuf leveldb snappy
  lmdb boost_system hdf5_hl hdf5 m
  opencv_core opencv_highgui opencv_imgproc opencv_imgcodecs
在vim里使用
:se nu
然后回车,可以显示行号;使用
/opencv
可以快速定位到第一个出现的opencv字符串的位置
添加后可以make了,然后不出意料的还是不能运行实际的例子:
4. 运行一个例子
实际例子运行方法:[3]
1. Running on Video
# Ubuntu
./build/examples/openpose/openpose.bin --video examples/media/video.avi
# With face and hands
./build/examples/openpose/openpose.bin --video examples/media/video.avi --face --hand
会出现
zsh: abort (core dumped) ./build/examples/openpose/openpose.bin --video examples/media/video.avi
再试试别的运行方法:
3. Running on Images
# Ubuntu
./build/examples/openpose/openpose.bin --image_dir examples/media/
# With face and hands
./build/examples/openpose/openpose.bin --image_dir examples/media/ --face --hand
会出现
Starting pose estimation demo.
Error:
boost::filesystem::directory_iterator::construct: No such file or directory
Coming from:
- src/openpose/utilities/fileSystem.cpp:getFilesOnDirectory():186
- src/openpose/producer/imageDirectoryReader.cpp:getImagePathsOnDirectory():25
- src/openpose/utilities/flagsToOpenPose.cpp:flagsToProducer():133
terminate called after throwing an instance of 'std::runtime_error'
what():
Error:
boost::filesystem::directory_iterator::construct: No such file or directory
Coming from:
- src/openpose/utilities/fileSystem.cpp:getFilesOnDirectory():186
- src/openpose/producer/imageDirectoryReader.cpp:getImagePathsOnDirectory():25
- src/openpose/utilities/flagsToOpenPose.cpp:flagsToProducer():133
zsh: abort (core dumped) ./build/examples/openpose/openpose.bin --image_dir examples/media/
然后搜索后,根据 [5] DuinoDu的回答,去 [6] 里找答案,“install boost from src.”
根据user3715812的回答,输入以下命令行来安装BOOST:
wget -O boost_1_55_0.tar.gz http://sourceforge.net/projects/boost/files/boost/1.55.0/boost_1_55_0.tar.gz/download
tar xzvf boost_1_55_0.tar.gz
cd boost_1_55_0/

./bootstrap.sh --prefix=/usr/local     // 这里改成自己想要安装到的目录
./b2
./b2 install       // 没有SUDO权限但是也可以
然后再去运行
./build/examples/openpose/openpose.bin --image_dir examples/media/
这次的报错和上次不一样了,是
Starting pose estimation demo.
Auto-detecting GPUs... Detected 16 GPU(s), using them all.
Starting thread(s)
: cannot connect to X server
E0819 00:20:53.031266 20765 common.cpp:114] Cannot create Cublas handle. Cublas won't be available.
E0819 00:20:53.031266 20766 common.cpp:114] Cannot create Cublas handle. Cublas won't be available.
E0819 00:20:53.031266 20771 common.cpp:114] Cannot create Cublas handle. Cublas won't be available.
E0819 00:20:53.031266 20773 common.cpp:114] Cannot create Cublas handle. Cublas won't be available.
E0819 00:20:53.031266 20767 common.cpp:114] Cannot create Cublas handle. Cublas won't be available.
E0819 00:20:53.031266 20775 common.cpp:114] Cannot create Cublas handle. Cublas won't be available.
E0819 00:20:53.031266 20776 common.cpp:114] Cannot create Cublas handle. Cublas won't be available.
E0819 00:20:53.031266 20777 common.cpp:114] Cannot create Cublas handle. Cublas won't be available.
E0819 00:20:53.031266 20778 common.cpp:114] Cannot create Cublas handle. Cublas won't be available.
E0819 00:20:53.031266 20765 common.cpp:121] Cannot create Curand generator. Curand won't be available.
E0819 00:20:53.031266 20769 common.cpp:114] Cannot create Cublas handle. Cublas won't be available.
E0819 00:20:53.031266 20768 common.cpp:114] Cannot create Cublas handle. Cublas won't be available.
E0819 00:20:53.031266 20774 common.cpp:114] Cannot create Cublas handle. Cublas won't be available.
E0819 00:20:53.031266 20770 common.cpp:114] Cannot create Cublas handle. Cublas won't be available.
E0819 00:20:53.031266 20779 common.cpp:114] Cannot create Cublas handle. Cublas won't be available.
E0819 00:20:53.031266 20772 common.cpp:114] Cannot create Cublas handle. Cublas won't be available.
E0819 00:20:53.031266 20779 common.cpp:121] Cannot create Curand generator. Curand won't be available.
E0819 00:20:53.031266 20771 common.cpp:121] Cannot create Curand generator. Curand won't be available.
E0819 00:20:53.031266 20773 common.cpp:121] Cannot create Curand generator. Curand won't be available.
F0819 00:20:53.031266 20779 common.cpp:152] Check failed: error == cudaSuccess (29 vs. 0)  driver shutting downF0819 00:20:53.031266 20771 common.cpp:152] Check failed: error == cudaSuccess (29 vs. 0)  driver shutting downF0819 00:20:53.035267 20773 common.cpp:152] Check failed: error == cudaSuccess (29 vs. 0)  driver shutting down
*** Check failure stack trace: ***
E0819 00:20:53.031266 20780 common.cpp:114] Cannot create Cublas handle. Cublas won't be available.
E0819 00:20:53.031266 20778 common.cpp:121] Cannot create Curand generator. Curand won't be available.
E0819 00:20:53.031266 20775 common.cpp:121] Cannot create Curand generator. Curand won't be available.
E0819 00:20:53.031266 20767 common.cpp:121] Cannot create Curand generator. Curand won't be available.
F0819 00:20:53.031266 20779 common.cpp:152] Check failed: error == cudaSuccess (29 vs. 0)  driver shutting downF0819 00:20:53.031266 20771 common.cpp:152] Check failed: error == cudaSuccess (29 vs. 0)  driver shutting downF0819 00:20:53.035267 20773 common.cpp:152] Check failed: error == cudaSuccess (29 vs. 0)  driver shutting downF0819 00:20:53.035267 20778 common.cpp:152] Check failed: error == cudaSuccess (29 vs. 0)  driver shutting downF0819 00:20:53.035267 20775 common.cpp:152] Check failed: error == cudaSuccess (29 vs. 0)  driver shutting downF0819 00:20:53.035267 20767 common.cpp:152] Check failed: error == cudaSuccess (29 vs. 0)  driver shutting down
*** Check failure stack trace: ***
F0819 00:20:53.031266 20765 common.cpp:152] Check failed: error == cudaSuccess (29 vs. 0)  driver shutting down
zsh: abort (core dumped)  ./build/examples/openpose/openpose.bin --image_dir examples/media/
然后在GITHUB 的ISSUE区准备提问的时候,根据提示
Note: add
--logging_level 0to get higher debug information.
在运行的命令行后加上了这个,即:
./build/examples/openpose/openpose.bin --image_dir examples/media/ --logging_level 0
于是得到了较为准确的信息:
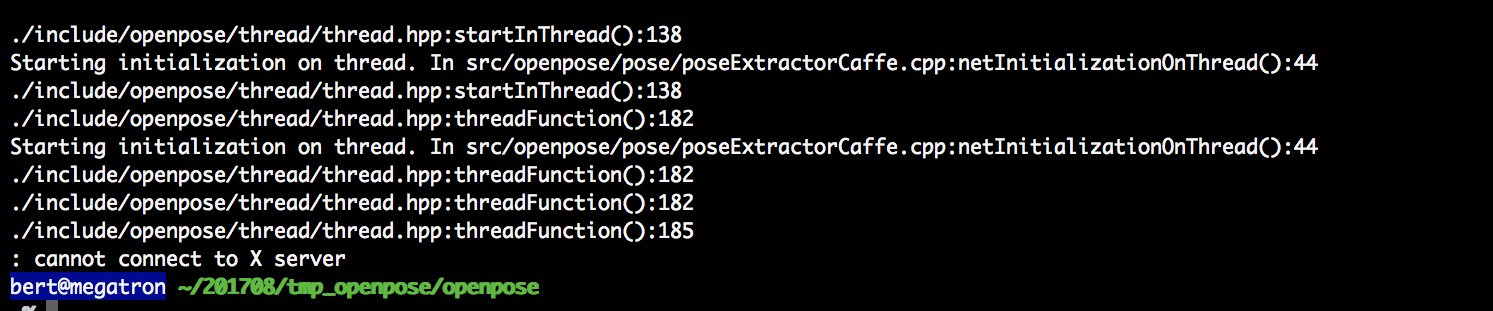
可以理解为又一个图形界面要展示但是出不来 [8](X server相关),
查阅资料后根据 [9] 的xiaoyan的回答:
Add "export DISPLAY=your ip:0.0" in ~/.bashrc, source ~/.bashrc (ip is your host IP, where you wanna display plots or things like that. If you are using Windows, cmd-ipconfig, find your IP).
于是不再出现X server问题了,出现了下图的问题
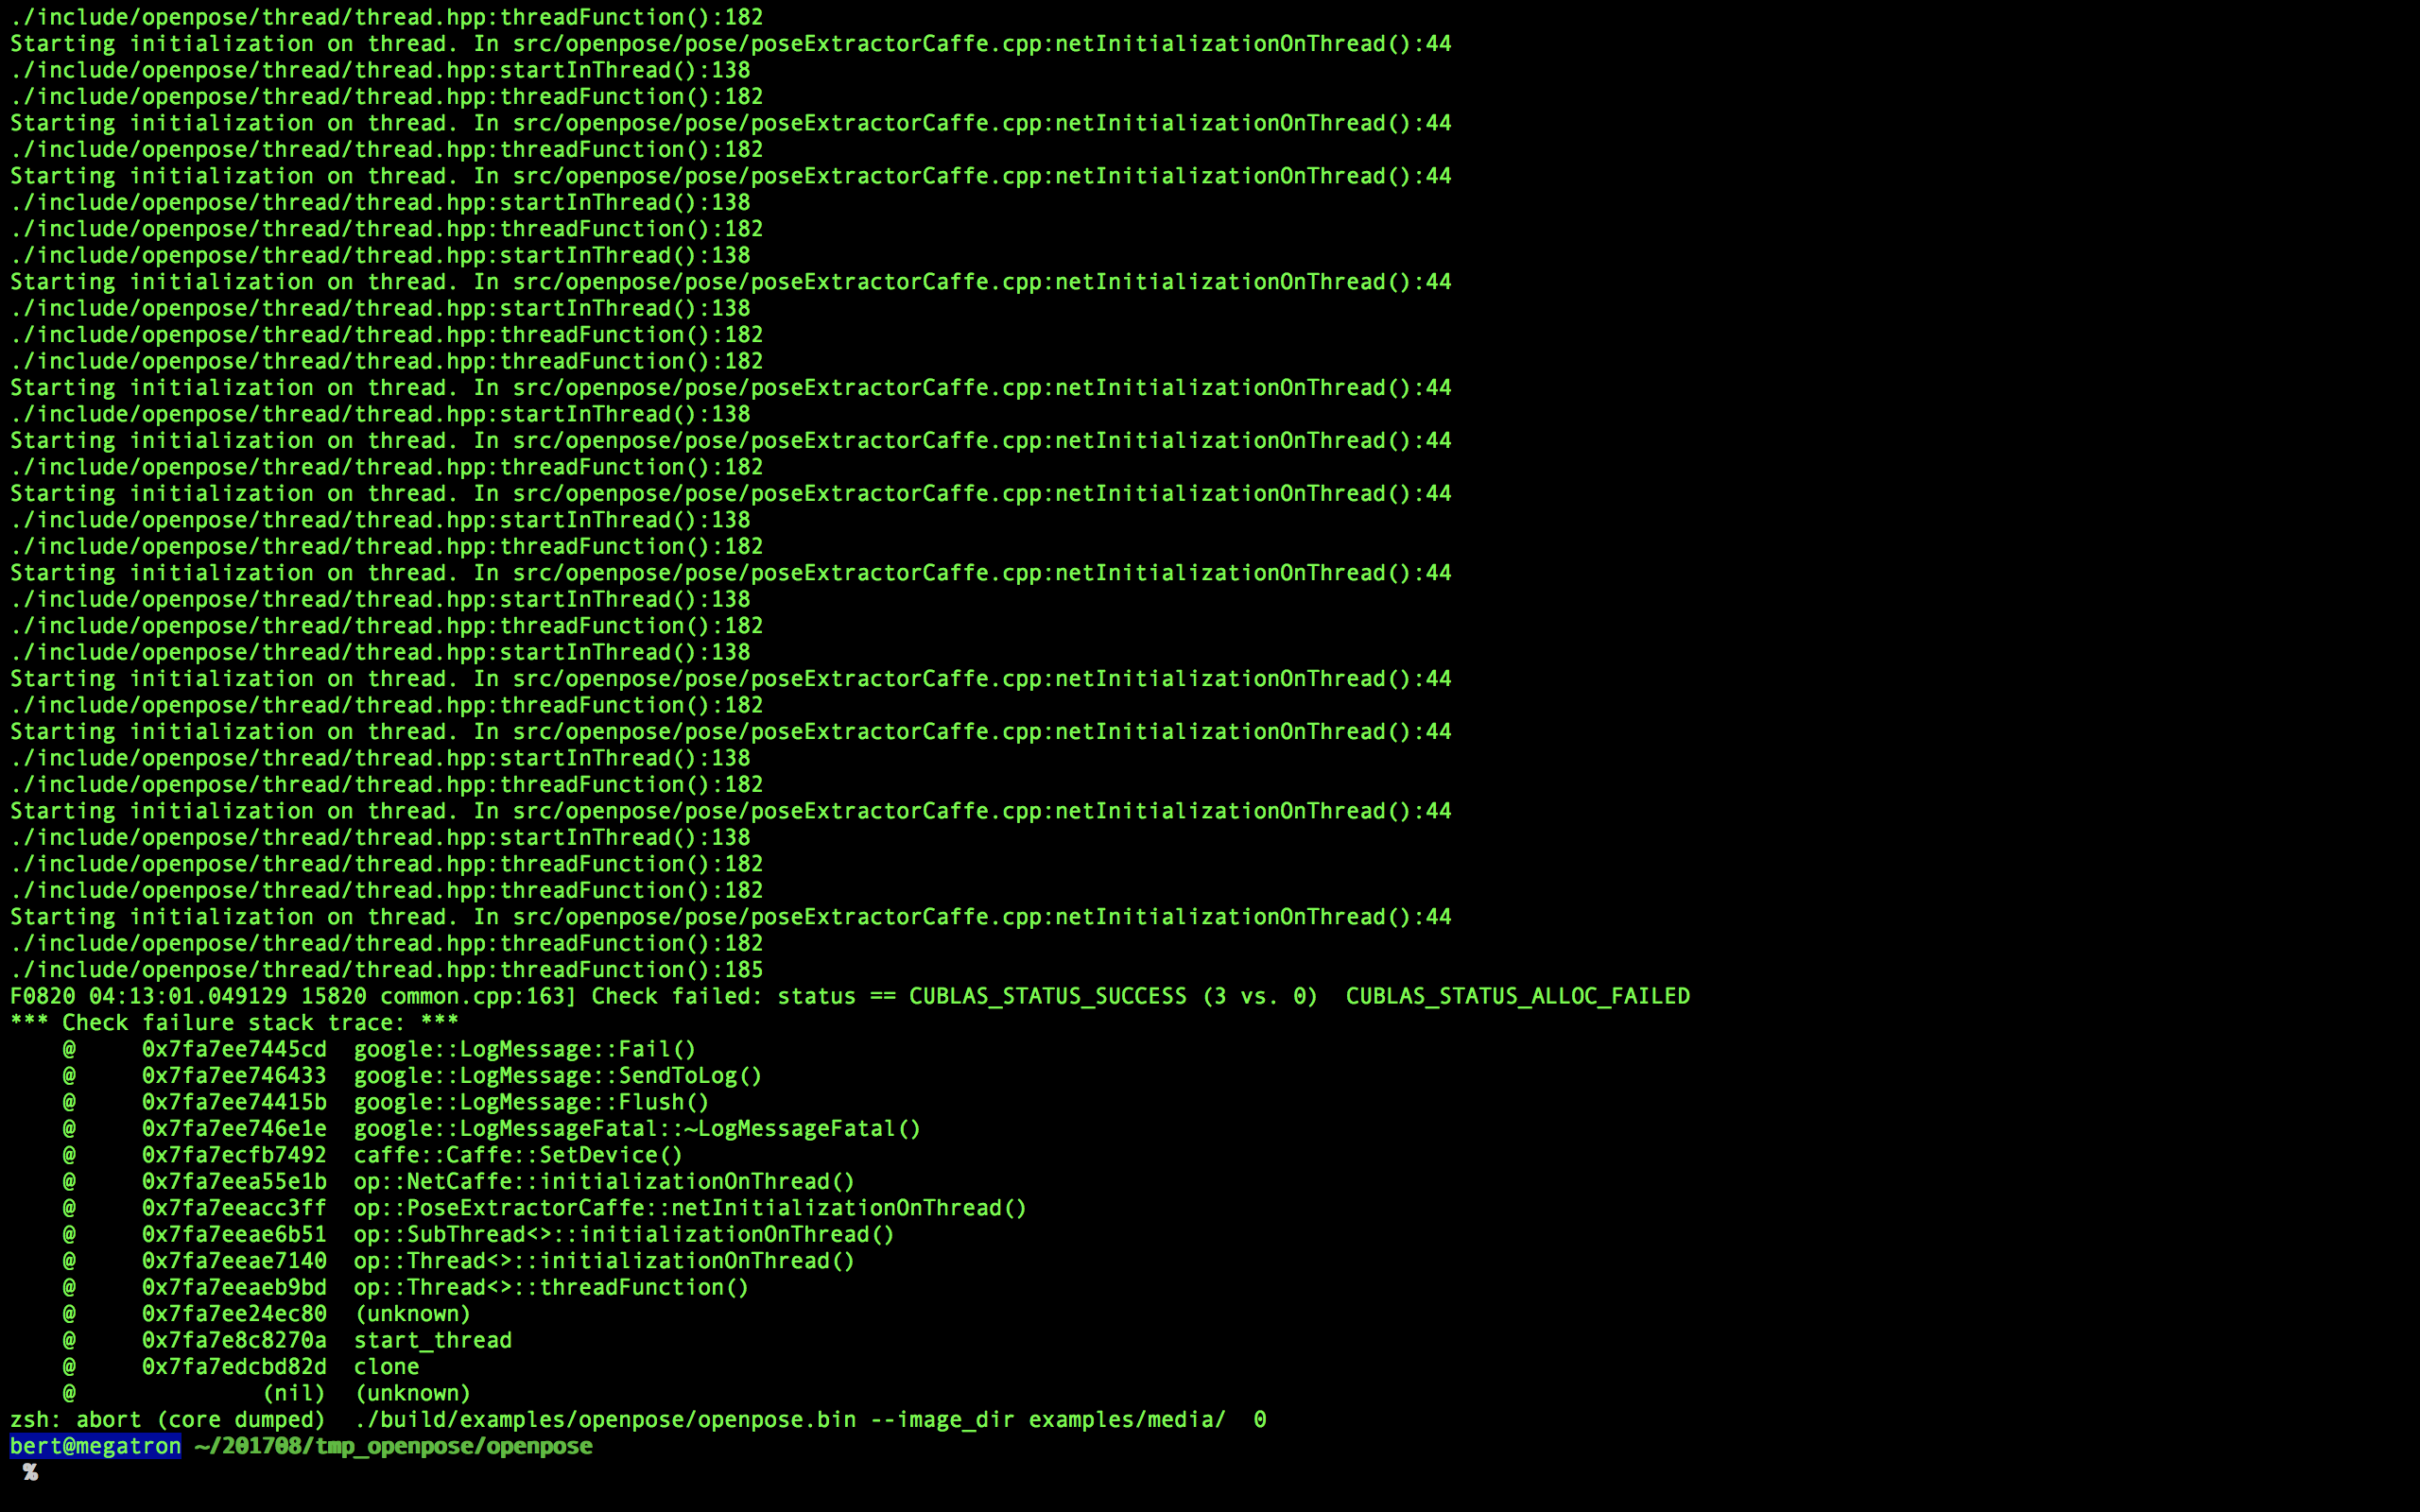
找了好久没找到问题,最后求助了组里的史博士,这里表示非常感谢!!!
原因是这个Demo默认使用所有探测到的CUDA 设备,而实验室的CUDA设备还有很多人在用,这会造成问题(可能是冲突或者资源不够,或者不被允许个人使用这么多个?)
所以在运行的命令行前面要加上一定的限制:
CUDA_VISIBLE_DEVICES=2 ./build/examples/openpose/openpose.bin --net_resolution "160x80" --video examples/media/video.avi
使得被探测到的设备数量只有两个。
然后发现还是运行不了,为什么呢?
因为OS X上的SHELL并不具备显示远程窗口的功能,
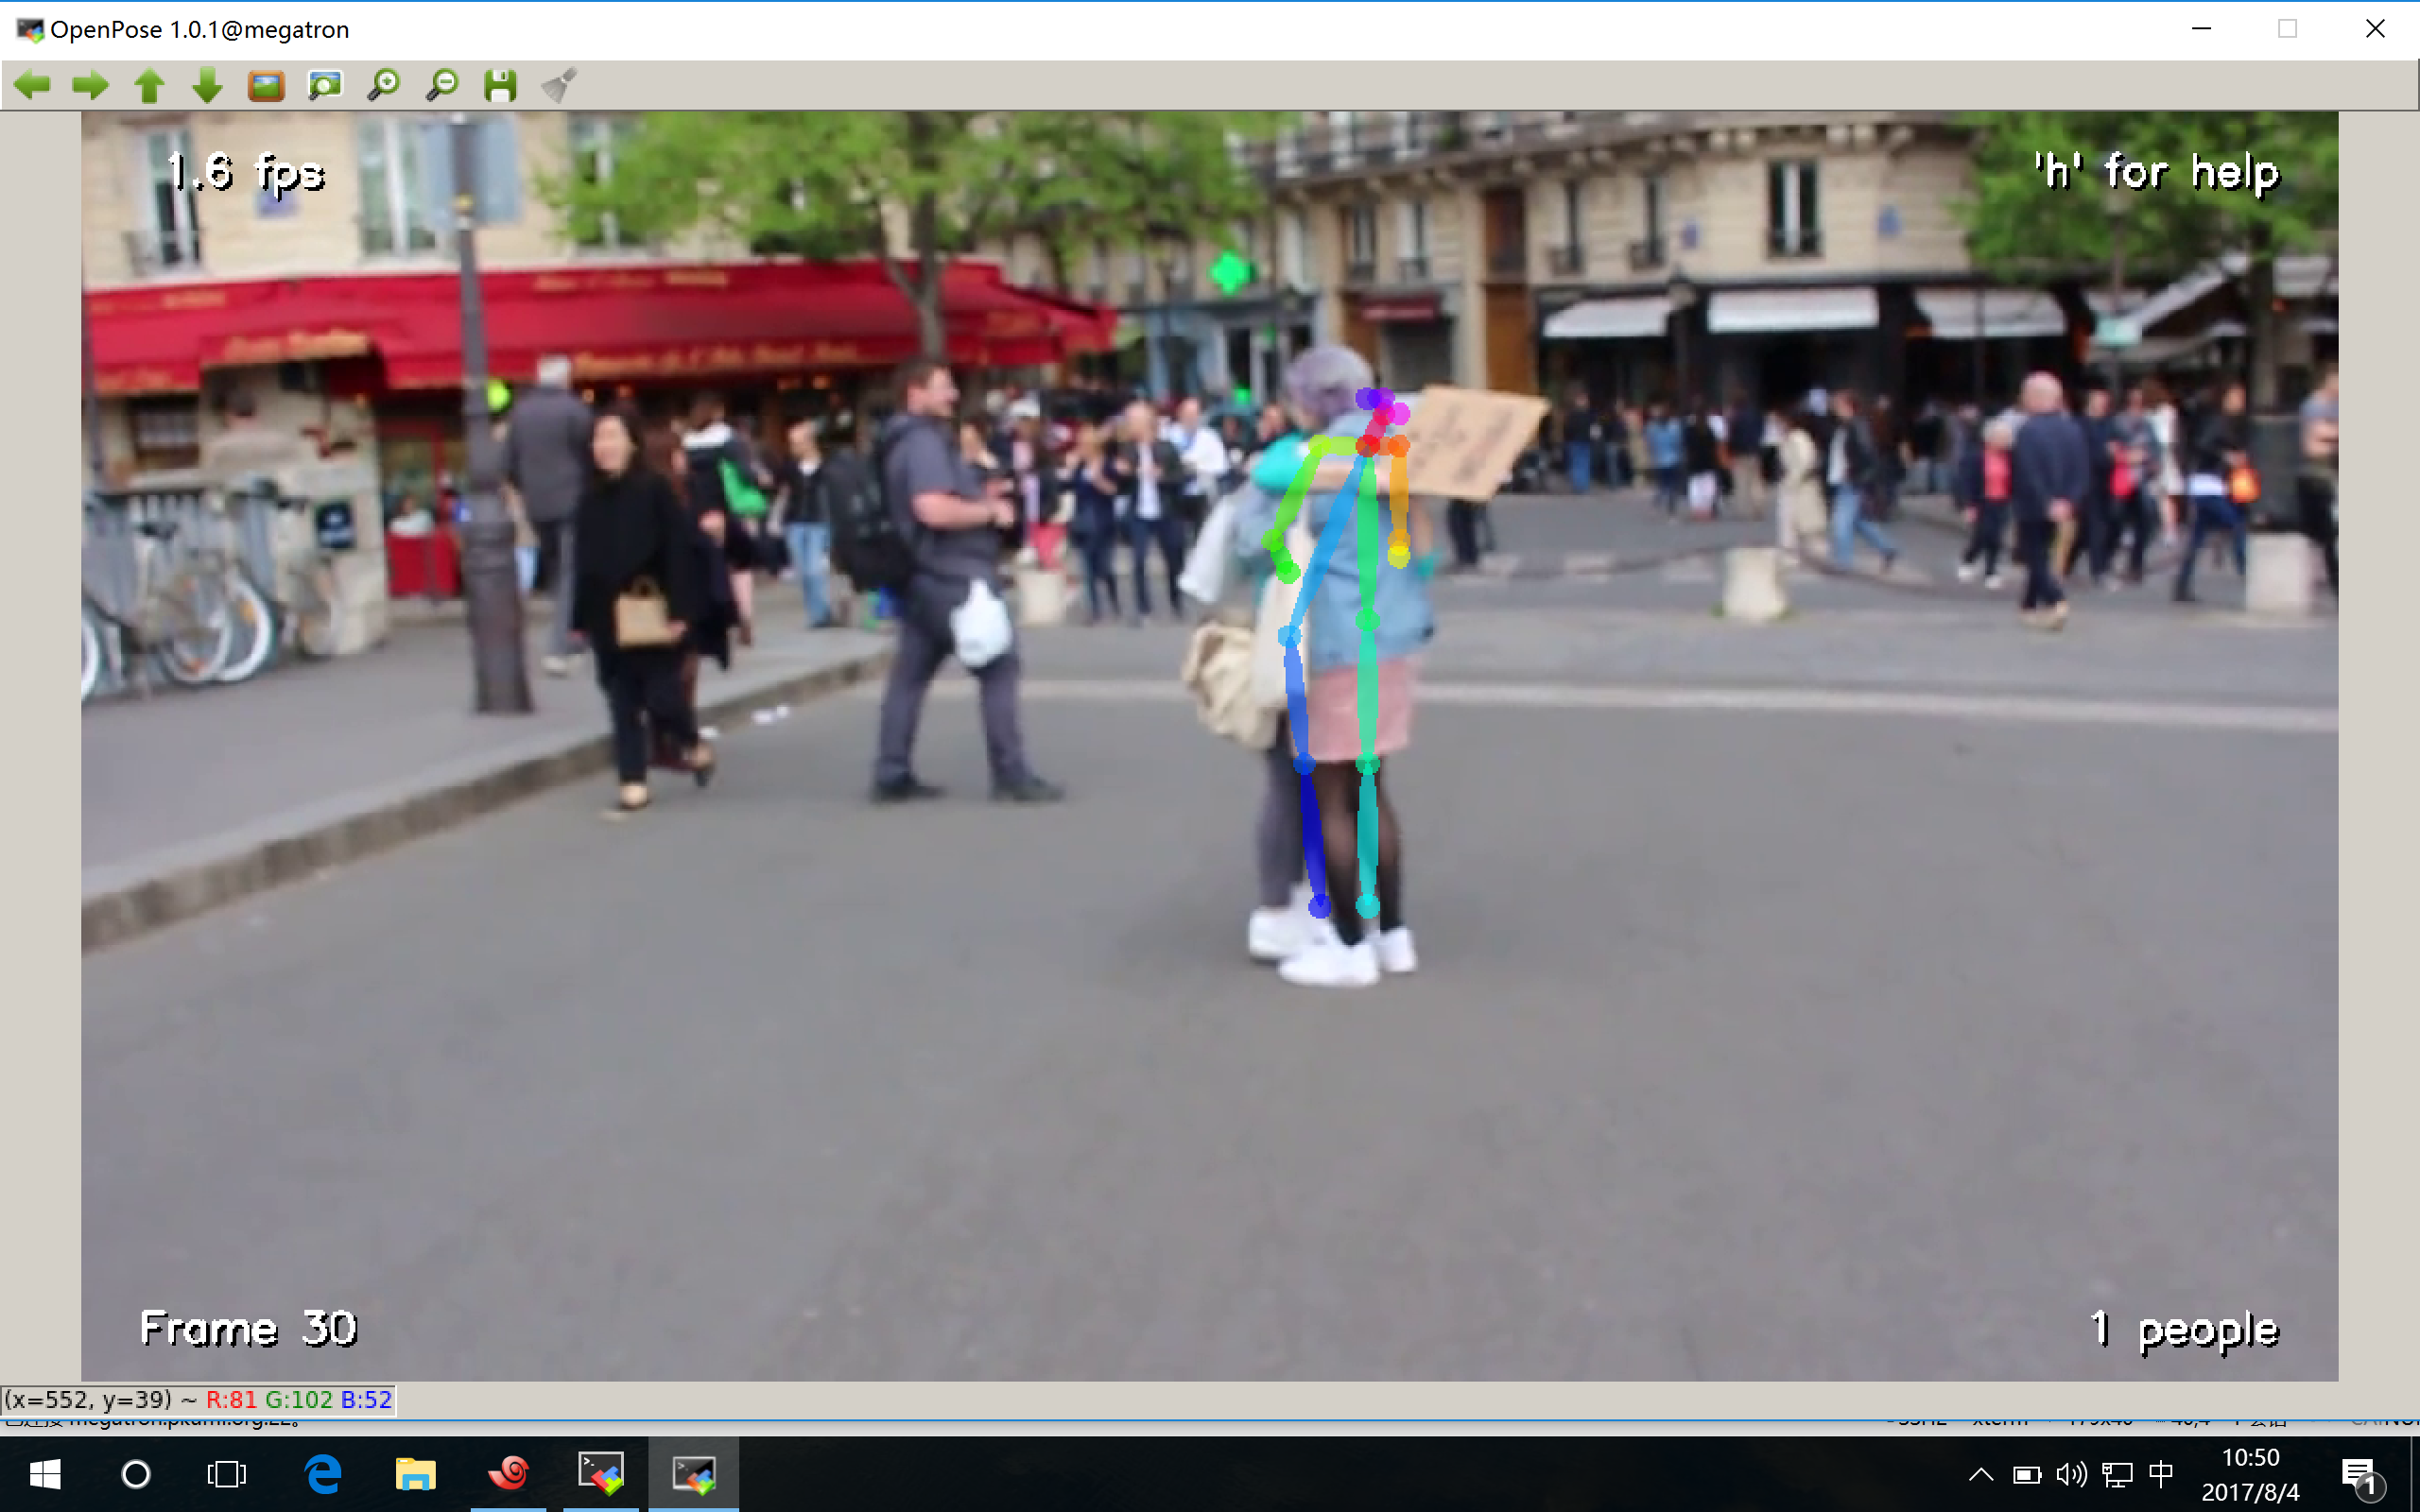
所以在史博士的推荐下使用了MobaXterm(在WIN10下),然后就成功了,因为这个软件直接内置了X server的接口
更新:如果想在Mac上运行,可以参考
[10] http://blog.csdn.net/dobell/article/details/55047811
安装XQuartz,
https://www.xquartz.org
按说明安装好

打开 mac terminal
ssh -X   {用户名}@{远程端ip}; (注意大写的X)
这次就可以了
实际运行截图如下:
你也可以读一下我在GITHUB上的提问:
https://github.com/CMU-Perceptual-Computing-Lab/openpose/issues/184
可能会有帮助
另外:
因为实验室的服务器出于安全考虑不允许使用
sudo pip install
, 所以使用
pip install --user
来替代。[2]
参考文献:
[1] http://www.cnblogs.com/emituofo/archive/2011/11/13/2247523.html
[2] https://stackoverflow.com/questions/31512422/pip-install-r-oserror-errno-13-permission-denied
[3] https://github.com/CMU-Perceptual-Computing-Lab/openpose/blob/master/doc/installation.md
[4] https://github.com/BVLC/caffe/issues/1276
[5] https://github.com/CMU-Perceptual-Computing-Lab/openpose/issues/17
[6] https://stackoverflow.com/questions/12578499/how-to-install-boost-on-ubuntu
[7] http://www.cnblogs.com/QingHuan/p/7278357.html
[8] http://www.cnblogs.com/super119/archive/2010/12/18/1910065.html
[9] https://askubuntu.com/questions/571116/cannot-connect-to-x-server-error