1、3DTouch 简介
- 3DTouch 是 iOS9 + 系统下,在 iPhone6s(iPhone6s Plus)+ 手机上才能够使用的功能。
1.1 3DTouch 基本类型
-
1、主屏幕快速选项(Home Screen Quick Action)
-
通过主屏幕的应用图标,通过 3D 手势呼出一个菜单,在主屏幕上的应用 Icon 处,直接进入应用的相应功能模块。
-
-
2、Peek(展示预览)和 Pop(跳页至预览的界面)
-
是对 App 的一个优化,用户可以通过 3DTouch 手势在 view 上来预览一些预加载信息,这样的设计可以使 App 更加简洁大方,交互性也更强。
-
在使用 3DTouch 时,ViewController 中会有如下三个交互阶段:
-
- 提示用户这里有 3DTouch 的交互,会使交互控件周围模糊。
-
- 继续深按,会出现预览视图。
-
- 通过视图上的交互控件进行进一步交互。
-
-
-
3、Force Properties(力度)
- iOS9 + 为我们提供了一个新的交互参数:力度。我们可以检测某一交互的力度值,来做相应的交互处理。例如,我们可以通过力度来控制快进的快慢,音量增加的快慢等。
2、Xcode 模拟器实现测试
-
插件 SBShortcutMenuSimulator:GitHub
-
打开电脑终端,执行以下命令:
$ git clone https://github.com/DeskConnect/SBShortcutMenuSimulator.git $ cd SBShortcutMenuSimulator $ make -
如果电脑中有多个 Xcode 版本,先做如下操作,如果只有一个 Xcode,则可以跳过。Xcode2.app 是你电脑中 Xcode 的名字,这里如要特别注意,如果名字中有空格,需要修改一下,把空格去掉,否则会影响命令的执行。
$ sudo xcode-select -switch /Applications/Xcode2.app/Contents/Developer/ -
之后在 SBShortcutMenuSimulator 的目录中执行如下操作:
$ xcrun simctl spawn booted launchctl debug system/com.apple.SpringBoard --environment DYLD_INSERT_LIBRARIES=$PWD/SBShortcutMenuSimulator.dylib $ xcrun simctl spawn booted launchctl stop com.apple.SpringBoard -
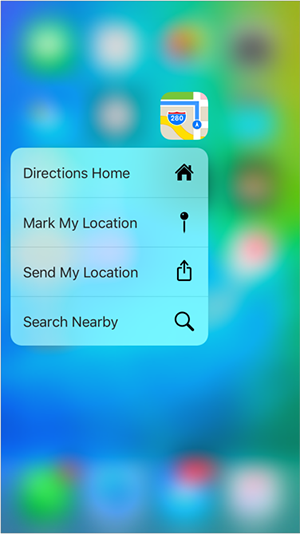
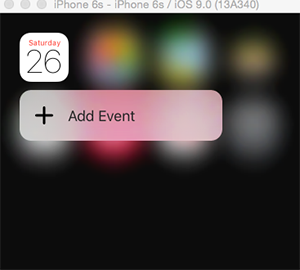
如果没有报错,我们可以通过向指定端口发送消息的方法来在模拟器上模拟3D Touch的效果:
$ echo 'com.apple.mobilecal' | nc 127.0.0.1 8000-
其中 com.apple.mobilecal 是应用的 Bundle ID ,如果要测试我们的应用,将其改为我们应用的 BundleID 即可。上面的示例应用是系统日历,可以看到模拟器的效果如下:
-
3、主屏幕快速选项创建
- 快捷标签最多可以创建 4 个,包括静态的和动态的。每个标签的题目和 icon 最多两行,多出的会用...省略。
3.1 静态标签添加
-
打开我们项目的 Info.plist 文件,添加如下项(选择框中并没有,需要我们手工敲上去)。
	<key>UIApplicationShortcutItems</key>
	<array>
		<dict>
			<key>UIApplicationShortcutItemTitle</key>
			<string>第一个按钮</string>
			<key>UIApplicationShortcutItemType</key>
			<string>com.mycompany.myapp.one</string>
		</dict>
		<dict>
			<key>UIApplicationShortcutItemTitle</key>
			<string>搜索</string>
			<key>UIApplicationShortcutItemType</key>
			<string>com.mycompany.myapp.search</string>
			<key>UIApplicationShortcutItemIconType</key>
			<string>UIApplicationShortcutIconTypeSearch</string>
			<key>UIApplicationShortcutItemSubtitle</key>
			<string>我是副标题</string>
			<key>UIApplicationShortcutItemUserInfo</key>
			<dict>
				<key>key1</key>
			<string>value1</string>
		</dict>
		</dict>
	</array>
-
参数说明
	UIApplicationShortcutItems             // 数组中的元素就是我们的那些快捷选项标签。
	UIApplicationShortcutItemTitle         // 标签标题(必填)
	UIApplicationShortcutItemType          // 标签的唯一标识(必填)
	UIApplicationShortcutItemIconType      // 使用系统图标的类型,如搜索、定位、home等(可选)
	UIApplicationShortcutItemIconFile      // 使用项目中的图片作为标签图标(可选)
	UIApplicationShortcutItemSubtitle      // 标签副标题(可选)
	UIApplicationShortcutItemUserInfo      // 字典信息,如传值使用(可选)

	// 系统风格 icon 的枚举
	UIApplicationShortcutIconTypeCompose   // 编辑的图标
	UIApplicationShortcutIconTypePlay      // 播放图标
	UIApplicationShortcutIconTypePause     // 暂停图标
	UIApplicationShortcutIconTypeAdd       // 添加图标
	UIApplicationShortcutIconTypeLocation  // 定位图标
	UIApplicationShortcutIconTypeSearch    // 搜索图标
	UIApplicationShortcutIconTypeShare     // 分享图标
3.2 动态标签添加
-
在 AppDelegate.m 文件中加如下代码
- (BOOL)application:(UIApplication *)application didFinishLaunchingWithOptions:(NSDictionary *)launchOptions { // 加载主界面 UIStoryboard *storyboard = [UIStoryboard storyboardWithName:@"Main" bundle:nil]; ViewController *mainView = [storyboard instantiateViewControllerWithIdentifier:@"mainController"]; UINavigationController *mainNav = [[UINavigationController alloc] initWithRootViewController:mainView]; self.window.rootViewController = mainNav; [self.window makeKeyAndVisible]; // 创建应用图标上的 3D touch 快捷选项,会和 Info.plist 中静态添加的一起创建 [self creatShortcutItem]; // 如果是从快捷选项标签启动 app,则根据不同标识执行不同操作,然后返回 NO,止处理逻辑被反复回调。 UIApplicationShortcutItem *shortcutItem = [launchOptions valueForKey:UIApplicationLaunchOptionsShortcutItemKey]; if (shortcutItem) { // 判断先前我们设置的快捷选项标签唯一标识,根据不同标识执行不同操作 if ([shortcutItem.type isEqualToString:@"com.mycompany.myapp.one"]) { // 进入第一个按钮界面,执行操作 NSArray *arr = @[@"hello 3D Touch"]; UIActivityViewController *vc = [[UIActivityViewController alloc]initWithActivityItems:arr applicationActivities:nil]; [self.window.rootViewController presentViewController:vc animated:YES completion:^{ }]; } else if ([shortcutItem.type isEqualToString:@"com.mycompany.myapp.search"]) { // 进入搜索界面,执行操作 SearchViewController *childVC = [storyboard instantiateViewControllerWithIdentifier:@"searchController"]; [mainNav pushViewController:childVC animated:NO]; } else if ([shortcutItem.type isEqualToString:@"com.mycompany.myapp.share"]) { // 进入分享界面,执行操作 SharedViewController *childVC = [storyboard instantiateViewControllerWithIdentifier:@"sharedController"]; [mainNav pushViewController:childVC animated:NO]; } return NO; } return YES; } // 创建应用图标上的 3DTouch 快捷选项 - (void)creatShortcutItem { // 创建系统风格的 icon UIApplicationShortcutIcon *icon = [UIApplicationShortcutIcon iconWithType:UIApplicationShortcutIconTypeShare]; // // 创建自定义图标的 icon // UIApplicationShortcutIcon *icon2 = [UIApplicationShortcutIcon iconWithTemplateImageName:@"分享.png"]; // 创建快捷选项 UIApplicationShortcutItem *item = [[UIApplicationShortcutItem alloc] initWithType:@"com.mycompany.myapp.share" localizedTitle:@"分享" localizedSubtitle:@"分享副标题" icon:icon userInfo:nil]; // 添加到快捷选项数组 [UIApplication sharedApplication].shortcutItems = @[item]; } -
相关方法属性说明
	@interface UIApplicationShortcutItem : NSObject <NSCopying, NSMutableCopying>

	// 下面是两个初始化方法 通过设置 type,title 等属性来创建一个标签,这里的 icon 是 UIApplicationShortcutIcon 对象,我们后面再说
	- (instancetype)initWithType:(NSString *)type localizedTitle:(NSString *)localizedTitle
	                                           localizedSubtitle:(nullable NSString *)localizedSubtitle
	                                                        icon:(nullable UIApplicationShortcutIcon *)icon
	                                                    userInfo:(nullable NSDictionary *)userInfo NS_DESIGNATED_INITIALIZER;
	- (instancetype)initWithType:(NSString *)type localizedTitle:(NSString *)localizedTitle;

	// 下面这是一些只读的属性,获取相应的属性值
	@property (nonatomic, copy, readonly) NSString *type;
	@property (nonatomic, copy, readonly) NSString *localizedTitle;
	@property (nullable, nonatomic, copy, readonly) NSString *localizedSubtitle;
	@property (nullable, nonatomic, copy, readonly) UIApplicationShortcutIcon *icon;
	@property (nullable, nonatomic, copy, readonly) NSDictionary<NSString *, id <NSSecureCoding>> *userInfo;
// 这个类继承于 UIApplicationShortcutItem,创建的标签可变 @interface UIMutableApplicationShortcutItem : UIApplicationShortcutItem @property (nonatomic, copy) NSString *type; @property (nonatomic, copy) NSString *localizedTitle; @property (nullable, nonatomic, copy) NSString *localizedSubtitle; @property (nullable, nonatomic, copy) UIApplicationShortcutIcon *icon; @property (nullable, nonatomic, copy) NSDictionary<NSString *, id <NSSecureCoding>> *userInfo;// 这个类创建标签中的 icon @interface UIApplicationShortcutIcon : NSObject <NSCopying> // 创建系统风格的 icon + (instancetype)iconWithType:(UIApplicationShortcutIconType)type; // 创建自定义的图片 icon + (instancetype)iconWithTemplateImageName:(NSString *)templateImageName; -
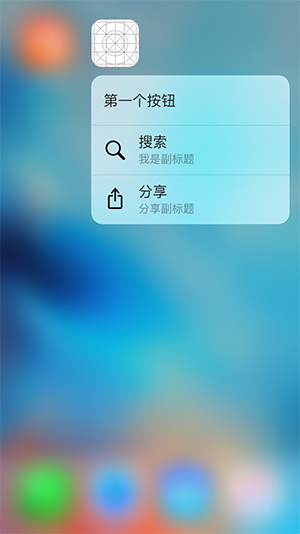
静态标签 + 动态标签 效果
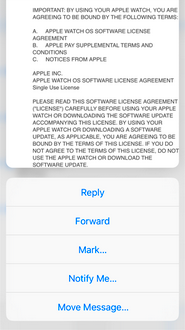
3.3 响应标签的行为
-
如果 App 在后台,通过快捷选项标签进入 App,则调用方法
- (void)application:(UIApplication *)application performActionForShortcutItem:(UIApplicationShortcutItem *)shortcutItem completionHandler:(void (^)(BOOL))completionHandler。 -
如果 App 不在后台已杀死,则处理通过快捷选项标签进入 App 的逻辑在
- (BOOL)application:(UIApplication *)application didFinishLaunchingWithOptions:(NSDictionary *)launchOptions中。在 launchOptions 中有 UIApplicationLaunchOptionsShortcutItemKey 这样一个键,通过它,我们可以区别是否是从标签进入的 App,如果是则处理结束逻辑后,返回 NO,防止处理逻辑被反复回调。 -
在 AppDelegate.m 文件中加如下代码
-
App 在后台响应
- (void)application:(UIApplication *)application performActionForShortcutItem:(UIApplicationShortcutItem *)shortcutItem completionHandler:(void (^)(BOOL))completionHandler { // 加载主界面 UIStoryboard *storyboard = [UIStoryboard storyboardWithName:@"Main" bundle:nil]; ViewController *mainView = [storyboard instantiateViewControllerWithIdentifier:@"mainController"]; UINavigationController *mainNav = [[UINavigationController alloc] initWithRootViewController:mainView]; self.window.rootViewController = mainNav; [self.window makeKeyAndVisible]; // 判断先前我们设置的快捷选项标签唯一标识,根据不同标识执行不同操作 if([shortcutItem.type isEqualToString:@"com.mycompany.myapp.one"]){ // 进入第一个按钮界面,执行操作 NSArray *arr = @[@"hello 3D Touch"]; UIActivityViewController *vc = [[UIActivityViewController alloc]initWithActivityItems:arr applicationActivities:nil]; [self.window.rootViewController presentViewController:vc animated:YES completion:^{ }]; } else if ([shortcutItem.type isEqualToString:@"com.mycompany.myapp.search"]) { // 进入搜索界面,执行操作 SearchViewController *childVC = [storyboard instantiateViewControllerWithIdentifier:@"searchController"]; [mainNav pushViewController:childVC animated:NO]; } else if ([shortcutItem.type isEqualToString:@"com.mycompany.myapp.share"]) { // 进入分享界面,执行操作 SharedViewController *childVC = [storyboard instantiateViewControllerWithIdentifier:@"sharedController"]; [mainNav pushViewController:childVC animated:NO]; } if (completionHandler) { completionHandler(YES); } } -
App 不在后台响应
	- (BOOL)application:(UIApplication *)application didFinishLaunchingWithOptions:(NSDictionary *)launchOptions {

		// 加载主界面
		UIStoryboard *storyboard = [UIStoryboard storyboardWithName:@"Main" bundle:nil];
		ViewController *mainView = [storyboard instantiateViewControllerWithIdentifier:@"mainController"];
		UINavigationController *mainNav = [[UINavigationController alloc] initWithRootViewController:mainView];
		self.window.rootViewController = mainNav;
		[self.window makeKeyAndVisible];

		// 如果是从快捷选项标签启动 app,则根据不同标识执行不同操作,然后返回 NO,止处理逻辑被反复回调。

		UIApplicationShortcutItem *shortcutItem = [launchOptions valueForKey:UIApplicationLaunchOptionsShortcutItemKey];

		// 判断先前我们设置的快捷选项标签唯一标识,根据不同标识执行不同操作
		if (shortcutItem) {

			// 判断先前我们设置的快捷选项标签唯一标识,根据不同标识执行不同操作
			if ([shortcutItem.type isEqualToString:@"com.mycompany.myapp.one"]) {

				// 进入第一个按钮界面,执行操作
				NSArray *arr = @[@"hello 3D Touch"];
				UIActivityViewController *vc = [[UIActivityViewController alloc]initWithActivityItems:arr applicationActivities:nil];
				[self.window.rootViewController presentViewController:vc animated:YES completion:^{

				}];

			} else if ([shortcutItem.type isEqualToString:@"com.mycompany.myapp.search"]) {

				// 进入搜索界面,执行操作
				SearchViewController *childVC = [storyboard instantiateViewControllerWithIdentifier:@"searchController"];
				[mainNav pushViewController:childVC animated:NO];

			} else if ([shortcutItem.type isEqualToString:@"com.mycompany.myapp.share"]) {

				// 进入分享界面,执行操作
				SharedViewController *childVC = [storyboard instantiateViewControllerWithIdentifier:@"sharedController"];
				[mainNav pushViewController:childVC animated:NO];
			}
			return NO;
		}

		return YES;
	}
-
3.4 动态修改快捷标签内容
-
修改UIApplicationShortcutItem
	// 获取第 0 个 shortcutItem
	UIApplicationShortcutItem *shortcutItem0 = [[UIApplication sharedApplication].shortcutItems objectAtIndex:0];

	// 将 shortcutItem0 的类型由 UIApplicationShortcutItem 改为可修改类型 UIMutableApplicationShortcutItem
	UIMutableApplicationShortcutItem * newShortcutItem0 = [shortcutItem0 mutableCopy];

	// 修改 shortcutItem 的标题
	[newShortcutItem0 setLocalizedTitle:@"按钮1"];

	// 将 shortcutItems 数组改为可变数组
	NSMutableArray *newShortcutItems = [[UIApplication sharedApplication].shortcutItems mutableCopy];

	// 替换原 ShortcutItem
	[newShortcutItems replaceObjectAtIndex:0 withObject:newShortcutItem0];

	[UIApplication sharedApplication].shortcutItems = newShortcutItems;
4、Peek 和 Pop 创建
-
1、首先给 view 注册 3DTouch 的 Peek(展示预览)和 Pop(跳页至预览的界面)功能,这里给 cell 注册 3DTouch 的 peek 和 pop 功能。
- (UITableViewCell *)tableView:(UITableView *)tableView cellForRowAtIndexPath:(NSIndexPath *)indexPath { UITableViewCell *cell = [tableView dequeueReusableCellWithIdentifier:@"myCell"]; if (cell == nil) { cell = [[UITableViewCell alloc]initWithStyle:UITableViewCellStyleDefault reuseIdentifier:@"myCell"]; } cell.textLabel.text = _myArray[indexPath.row]; // 判断 3D Touch 是否可用 if (self.traitCollection.forceTouchCapability == UIForceTouchCapabilityAvailable) { NSLog(@"3D Touch 可用!"); // 给 cell 注册 3DTouch 的 peek 和 pop 功能 [self registerForPreviewingWithDelegate:self sourceView:cell]; } else { NSLog(@"3D Touch 无效"); } return cell; } -
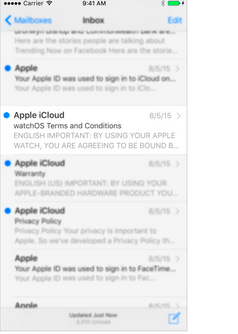
2、遵守协议 UIViewControllerPreviewingDelegate 并实现其方法
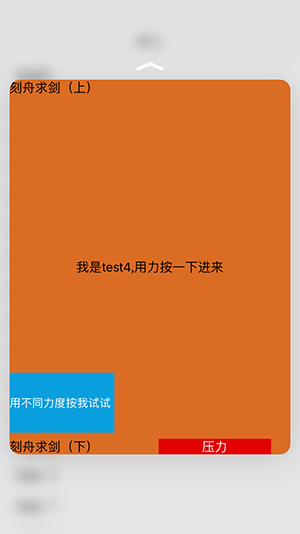
// peek(预览) - (nullable UIViewController *)previewingContext:(id <UIViewControllerPreviewing>)previewingContext viewControllerForLocation:(CGPoint)location { // 获取按压的 cell 所在行,[previewingContext sourceView] 就是按压的那个视图 NSIndexPath *indexPath = [_myTableView indexPathForCell:(UITableViewCell* )[previewingContext sourceView]]; // 设定预览的界面 UIStoryboard *storyboard = [UIStoryboard storyboardWithName:@"Main" bundle:nil]; SearchViewController *childVC = [storyboard instantiateViewControllerWithIdentifier:@"searchController"]; childVC.preferredContentSize = CGSizeMake(0.0f, 500.0f); childVC.str = [NSString stringWithFormat:@"我是%@, 用力按一下进来", _myArray[indexPath.row]]; // 调整不被虚化的范围,按压的那个 cell 不被虚化(轻轻按压时周边会被虚化,再少用力展示预览,再加力跳页至设定界面) CGRect rect = CGRectMake(0, 0, self.view.frame.size.width, 40); previewingContext.sourceRect = rect; // 返回预览界面 return childVC; } // pop(按用点力进入) - (void)previewingContext:(id <UIViewControllerPreviewing>)previewingContext commitViewController:(UIViewController *)viewControllerToCommit { [self showViewController:viewControllerToCommit sender:self]; }-
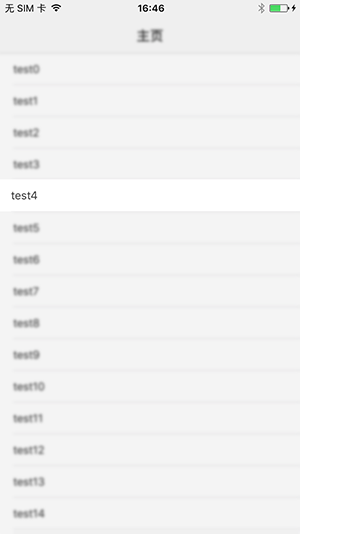
效果图:(当用户按下时 cell 周边会虚化,增加压力达到一定值会弹出设定的预览界面,继续增加力按压会跳页至预览界面)
-
-
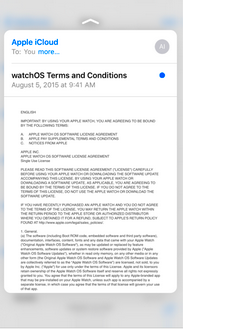
3、打开预览的视图的 .m 文件,这里是 SearchViewController.m 中加上如下代码
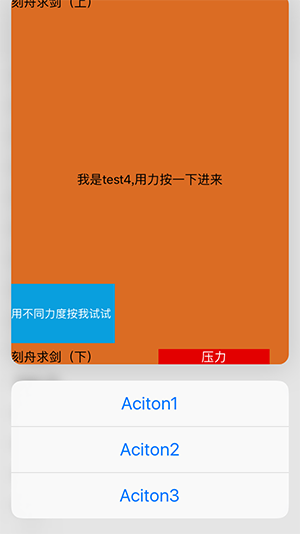
- (NSArray<id<UIPreviewActionItem>> *)previewActionItems { // setup a list of preview actions UIPreviewAction *action1 = [UIPreviewAction actionWithTitle:@"Aciton1" style:UIPreviewActionStyleDefault handler:^(UIPreviewAction * _Nonnull action, UIViewController * _Nonnull previewViewController) { NSLog(@"Aciton1"); }]; UIPreviewAction *action2 = [UIPreviewAction actionWithTitle:@"Aciton2" style:UIPreviewActionStyleDefault handler:^(UIPreviewAction * _Nonnull action, UIViewController * _Nonnull previewViewController) { NSLog(@"Aciton2"); }]; UIPreviewAction *action3 = [UIPreviewAction actionWithTitle:@"Aciton3" style:UIPreviewActionStyleDefault handler:^(UIPreviewAction * _Nonnull action, UIViewController * _Nonnull previewViewController) { NSLog(@"Aciton3"); }]; NSArray *actions = @[action1,action2,action3]; // and return them (return the array of actions instead to see all items ungrouped) return actions; }-
效果图:(当弹出预览时,上滑预览视图,出现预览视图中快捷选项)
-
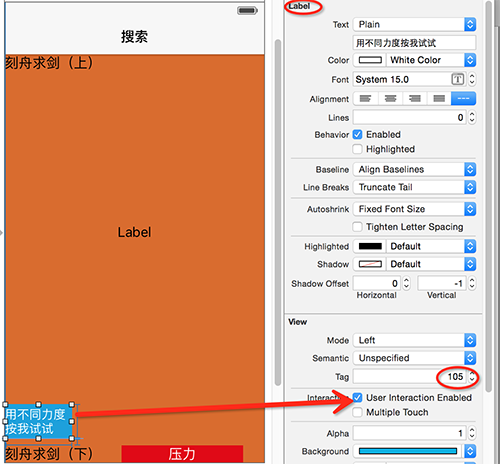
5、3DTouch 压力值的运用
-
直接在 SearchViewController.m 加这个方法即可,按压 SearchViewController 中的任何视图都会调用这个方法。
// 按住移动 or 压力值改变时的回调 - (void)touchesMoved:(NSSet<UITouch *> *)touches withEvent:(UIEvent *)event { NSArray *arrayTouch = [touches allObjects]; UITouch *touch = (UITouch *)[arrayTouch lastObject]; // 通过 tag 确定按压的是哪个 view,注意:如果按压的是 label,将 label 的 userInteractionEnabled 属性设置为 YES if (touch.view.tag == 105) { NSLog(@"move压力 = %f", touch.force); // 红色背景的 label 显示压力值 _lbForce.text = [NSString stringWithFormat:@"压力%f", touch.force]; // 红色背景的 label 上移的高度=压力值*100 _bottom.constant = ((UITouch *)[arrayTouch lastObject]).force * 100; } } -
用不同力度按压那个蓝色背景的 label,随着力度的变化红色背景的 label 会上下移动。