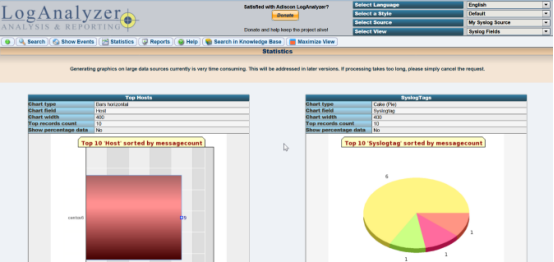
实验目的:以报表图形格式展示数据库,便于观看和理解
实验工具:三台主机(A主机:centos7--配置数据库 B主机:centos6--记录日志 C主机:centos6-1--实现以报表方式展示数据库中的日志)
实验步骤如下:
一、A机器centos7(192.168.152.167):安装并配置对应数据库
①安装数据库包
[root@centos7 ~]# yum install mariadb-server
[root@centos7 ~]# systemctl start mariadb
[root@centos7 ~]# mysql_secure_installation
[root@centos7 ~]# mysql -uroot -p123456 < createDB.sql
②创建数据库用户
[root@centos7 ~]# mysql -uroot -p123456
Welcome to the MariaDB monitor. Commands end with ; or g.
Your MariaDB connection id is 10
Server version: 5.5.52-MariaDB MariaDB Server

Copyright (c) 2000, 2016, Oracle, MariaDB Corporation Ab and others.

Type 'help;' or 'h' for help. Type 'c' to clear the current input statement.

MariaDB [(none)]> show databases;
+--------------------+
| Database |
+--------------------+
| information_schema |
| Syslog |
| mysql |
| performance_schema |
+--------------------+
4 rows in set (0.00 sec)

MariaDB [(none)]> use Syslog;
Reading table information for completion of table and column names
You can turn off this feature to get a quicker startup with -A

Database changed
MariaDB [Syslog]> show tables;
+------------------------+
| Tables_in_Syslog |
+------------------------+
| SystemEvents |
| SystemEventsProperties |
+------------------------+
2 rows in set (0.00 sec)
2 rows in set (0.00 sec)

MariaDB [Syslog]> grant all on Syslog.* to loguser@'192.168.152.166' identified by '123456';
Query OK, 0 rows affected (0.00 sec)
二、centos6(192.168.152.166)准备日志
①安装软件包并修改配置文件
[root@centos6 ~]# yum install rsyslog-mysql
[root@centos6 ~]# scp /usr/share/doc/rsyslog-mysql-5.8.10/createDB.sql 192.168.152.167:
[root@centos6 ~]# vim /etc/rsyslog.conf (配置日志文件)
#*.info;mail.none;authpriv.none;cron.none /var/log/messages
*.info;mail.none;authpriv.none;cron.none :ommysql:192.168.152.167,Syslog,loguser,123456


②重启rsyslog服务
[root@centos6 ~]# service rsyslog restart
Shutting down system logger: [ OK ]
Starting system logger: [ OK ]
测试一下数据是否写入:
[root@centos6 ~]# logger "this is a test log"

三、centos6-1(192.168.152.168)配置
①在rsyslog服务器上准备amp
[root@centos6 ~]# cd /var/www/html/
[root@centos6 /var/www/html]# yum install httpd php php-mysql php-gd
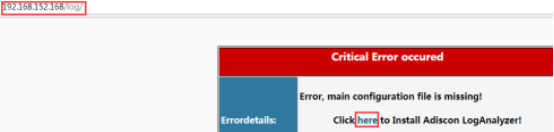
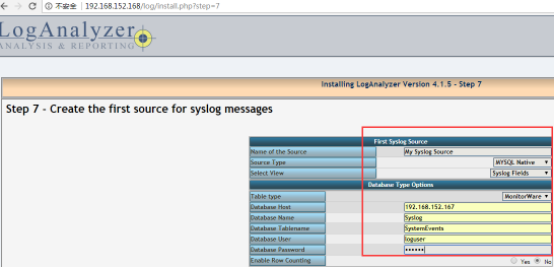
②安装并配置loganalyzer
[root@centos6 /var/www/html]# tar xvf loganalyzer-4.1.5.tar.gz
[root@centos6 /var/www/html/loganalyzer-4.1.5]# cp -r src/ /var/www/html/log
[root@centos6 /var/www/html/loganalyzer-4.1.5]# cd /var/www/html/log
[root@centos6 /var/www/html/log]# touch config.php
[root@centos6 /var/www/html/log]# chmod 666 config.php
[root@centos6 /var/www/html/log]# service httpd restart
四、最终搭建效果如下图
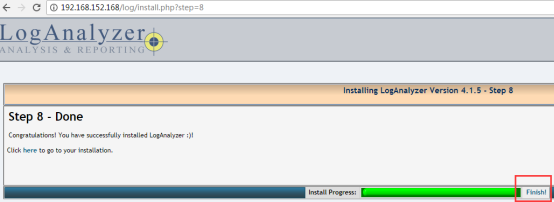
点击finish
小编原本是在centos7上搭建的基于php-fpm的