实验一、基于basic的用户验证
实验目的:允许特定用户访问特定的资源,比如本次实验里的/secret文件夹里的内容
方法一:编写配置文件
步骤如下:
1、可以先在主站点/var/www/html下新建一个secret文件夹
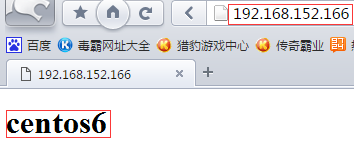
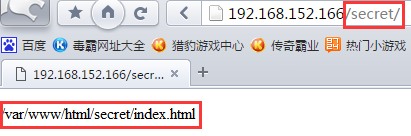
[root@centos6 /var/www/html]# mkdir secret
[root@centos6 /var/www/html]# echo /var/www/html/secret/index.html > secret/index.html
[root@centos6 /var/www/html]# cat index.html
<h1>centos6</h1>   主站点,任何用户都能访问
[root@centos6 /var/www/html]# cd secret/
[root@centos6 /var/www/html/secret]# ls
index.html
[root@centos6 /var/www/html/secret]# cat index.html
/var/www/html/secret/index.html  秘密文件,被指定的用户才能访问
2、编写配置文件
[root@centos6 /etc/httpd/conf.d]# vim test.conf
<directory /var/www/html/secret>
authname "secret DIR"
authtype basic
authuserfile /etc/httpd/conf.d/.httpusers
require user http1 http2  没有http3用户哦~
</directory>
3、为用户设定口令
[root@centos6 /etc/httpd/conf.d]# htpasswd -c /etc/httpd/conf.d/.httpusers http1   -c:自动创建文件,仅应该在文件不存在时使用
[root@centos6 /etc/httpd/conf.d]# htpasswd -s /etc/httpd/conf.d/.httpusers http2   -s:sha格式加密
[root@centos6 /etc/httpd/conf.d]# htpasswd -m /etc/httpd/conf.d/.httpusers http3   -m:md5格式加密
[root@centos6 /etc/httpd/conf.d]# cat /etc/httpd/conf.d/.httpusers
4、重新加载服务
[root@centos6 /etc/httpd/conf.d]# service httpd reload
5、测试
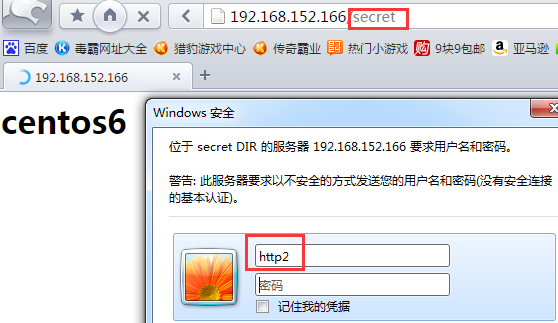
①无需登录,直接访问主站点
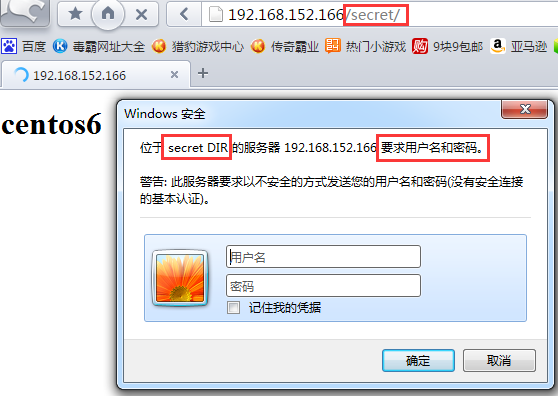
②访问/secret文件夹,跳出登录页面
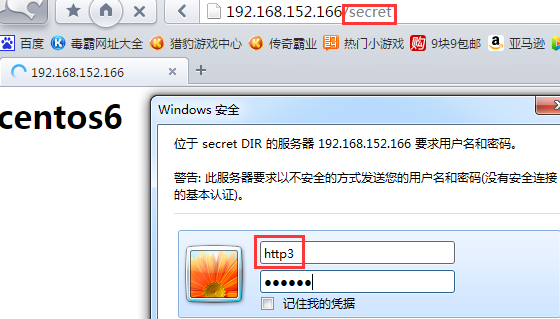
③用户http3无法访问/secret目录,若它能访问,修改配置文件内容如下
[root@centos6 /etc/httpd/conf.d]# vim test.conf
<directory /var/www/html/secret>
authname "secret DIR"
authtype basic
authuserfile /etc/httpd/conf.d/.httpusers
require valid-user
</directory>
修改完成后保存退出记得重新加载一下服务哦~
④用户http3再次登录,访问成功

方法二:编写.htaccess文件
步骤如下:
1、在被访问的目录下创建.htaccess文件
[root@centos6 /var/www/html]# cd secret/
[root@centos6 /var/www/html/secret]# ls
index.html
[root@centos6 /var/www/html/secret]# vim .htaccess
2、在配置文件中编写使.htaccess文件生效的内容(允许验证)
[root@centos6 /etc/httpd/conf.d]# vim test.conf
<directory /var/www/html/secret>
allowoverride authconfig
</directory>
3、重新加载服务
[root@centos6 /etc/httpd/conf.d]# service httpd reload
4、测试

实验二、基于组账号进行验证
实验目的:将一些允许访问的用户放到组里面,这样更加灵活方便管理
步骤如下:
1、编写组文件
[root@centos6 /etc/httpd/conf.d]# vim .htgroups
httpgroup1:http1 http2
httpgroup2:http1 http3
2、编写配置文件
[root@centos6 /var/www/html/secret]# vim .htaccess
authname "secret DIR"
authtype basic
authuserfile /etc/httpd/conf.d/.httpusers
authgroupfile /etc/httpd/conf.d/.htgroups
require group httpgroup2  允许组2里的成员访问
3、测试
①http3用户能访问,因为它在允许访问的httpgroup2里
②http2用户不能访问,因为它不在允许访问的httpgroup2里
实验三、关于虚拟主机的实现
有三种实现方案:
基于ip:为每个虚拟主机准备至少一个ip地址
基于port:为每个虚拟主机使用至少一个独立的port
基于FQDN:为每个虚拟主机使用至少一个FQDN
方案一、基于IP
步骤如下:
1、准备3个网页的工作目录
[root@centos6 /app]# mkdir site1
[root@centos6 /app]# mkdir site2
[root@centos6 /app]# mkdir site3
[root@centos6 /app]# echo /app/site1/index.html > site1/index.html
[root@centos6 /app]# echo /app/site2/index.html > site2/index.html
[root@centos6 /app]# echo /app/site3/index.html > site3/index.html
2、准备3个地址
[root@centos6 /app]# ip add a 192.168.152.10/24 dev eth0
[root@centos6 /app]# ip add a 192.168.152.20/24 dev eth0
[root@centos6 /app]# ip add a 192.168.152.30/24 dev eth0
[root@centos6 /app]# ip a
1: lo: <LOOPBACK,UP,LOWER_UP> mtu 65536 qdisc noqueue state UNKNOWN
    link/loopback 00:00:00:00:00:00 brd 00:00:00:00:00:00
    inet 127.0.0.1/8 scope host lo
    inet6 ::1/128 scope host
       valid_lft forever preferred_lft forever
2: eth0: <BROADCAST,MULTICAST,UP,LOWER_UP> mtu 1500 qdisc pfifo_fast state UP qlen 1000
    link/ether 00:0c:29:ca:13:d3 brd ff:ff:ff:ff:ff:ff
    inet 172.17.252.166/16 brd 172.17.255.255 scope global eth0
    inet 192.168.152.10/24 scope global eth0
    inet 192.168.152.20/24 scope global secondary eth0
    inet 192.168.152.30/24 scope global secondary eth0
3、修改配置文件,将IP地址与网站一一对应
[root@centos6 /etc/httpd/conf.d]# vim test.conf
<virtualhost 192.168.152.10:80>
   documentroot /app/site1
</virtualhost>

<virtualhost 192.168.152.20:80>
   documentroot /app/site2
</virtualhost>

<virtualhost 192.168.152.30:80>
   documentroot /app/site3
</virtualhost>
4、重新加载服务
[root@centos6 /etc/httpd/conf.d]# service httpd reload
5、测试(地址)
[root@centos7 ~]# curl http://192.168.152.10
/app/site1/index.html
[root@centos7 ~]# curl http://192.168.152.20
/app/site2/index.html
[root@centos7 ~]# curl http://192.168.152.30
/app/site3/index.html
方案二、基于port
步骤如下:
1、在方案一的步骤下修改配置文件
[root@centos6 /etc/httpd/conf.d]# vim test.conf
listen 81
listen 82
listen 83
<virtualhost *:81>
   documentroot /app/site1
</virtualhost>

<virtualhost *:82>
   documentroot /app/site2
</virtualhost>

<virtualhost *:83>
   documentroot /app/site3
</virtualhost>
2、重新启动网络服务以及重新加载httpd服务,这样的话方案一临时配置的三个地址就会失效,因为此方案是基于端口实现的,无需那么多地址
[root@centos6 /etc/httpd/conf.d]# service network restart
[root@centos6 /etc/httpd/conf.d]# service httpd reload
3、centos7测试(端口)
[root@centos7 ~]# curl http://192.168.152.166:81
/app/site1/index.html
[root@centos7 ~]# curl http://192.168.152.166:82
/app/site2/index.html
[root@centos7 ~]# curl http://192.168.152.166:83
/app/site3/index.html
方案三、基于FQDN,通过FQDN名称去访问
步骤如下:
1、模拟DNS解析
[root@centos7 ~]# vim /etc/hosts
192.168.152.166 www.a.com www.b.com www.c.com
2、修改配置文件
[root@centos6 /etc/httpd/conf.d]# vim test.conf
NamevirtualHost *:80  httpd2的版本想要基于FQDN实现虚拟机,必须加此行
<virtualhost *:80>
   documentroot /app/site1
   servername www.a.com
   errorlog logs/a.com.errlog
   customlog logs/a.com.accesslog combined  combined用于定义日志格式
</virtualhost>

<virtualhost *:80>
   documentroot /app/site2
   servername www.b.com
   errorlog logs/b.com.errlog
   customlog logs/b.com.accesslog combined
</virtualhost>

<virtualhost *:80>
   documentroot /app/site3
   servername www.c.com
   errorlog logs/c.com.errlog
   customlog logs/c.com.accesslog combined
</virtualhost>
3、重新加载服务
[root@centos6 /etc/httpd/conf.d]# service httpd reload
4、测试
[root@centos7 ~]# curl http://www.a.com
/app/site1/index.html
[root@centos7 ~]# curl http://www.b.com
/app/site2/index.html
[root@centos7 ~]# curl http://www.c.com
/app/site3/index.html
访问日志查看
[root@centos6 /etc/httpd/conf.d]# tail /var/log/httpd/a.com.accesslog -f
192.168.152.167 - - [18/Oct/2017:05:29:27 +0800] "GET / HTTP/1.1" 200 22 "-" "curl/7.29.0"
敲黑板!
基于FQDN实现虚拟主机的方案用的较多,要掌握哦~