启动android studio创建一个新项目
  public  void  sendMessage(View view){
        Intent intent=new Intent(this,DispalyMessageActivity.class);
        EditText text =(EditText) findViewById(R.id.edit_message);
        String message=text.getText().toString();
        intent.putExtra(EXTRA_MESSAGE,message);
        startActivity(intent);
    }
添加按钮响应函数 sendMessage view中绑定的响应函数必须为公开无返回值 带有一个View参数的函数 通过View注入可以拿到View上的数据
Intent 对象常用语启动一个新的activity
findViewById 通过view中的id获取到控件对象 这与js获取input类似
通过getText 获取到输入框文本内容
intent.putExtra 将数据保存到intent对象中 这里EXTRA_MESSAGE 是当前类中定义的一个常量
startActivity用语启动一个activity
<?xml version="1.0" encoding="utf-8"?>
<LinearLayout xmlns:android="http://schemas.android.com/apk/res/android"
    xmlns:app="http://schemas.android.com/apk/res-auto"
    xmlns:tools="http://schemas.android.com/tools"
    android:orientation="horizontal"
    android:layout_width="match_parent"
    android:layout_height="match_parent"
    app:layout_behavior="@string/appbar_scrolling_view_behavior"
    tools:showIn="@layout/activity_my"
    android:id="@+id/content">
    <EditText
        android:layout_width="0dp"
        android:layout_weight="1"
        android:layout_height="wrap_content"
        android:hint="@string/edit_message"
        android:id="@+id/edit_message"/>
    <Button
        android:layout_width="wrap_content"
        android:layout_height="wrap_content"
        android:text="@string/button_message"
        android:onClick="sendMessage"/>


</LinearLayout>

<LinearLayout xmlns:android="http://schemas.android.com/apk/res/android"
xmlns:app="http://schemas.android.com/apk/res-auto"
xmlns:tools="http://schemas.android.com/tools"
android:orientation="horizontal"
android:layout_width="match_parent"
android:layout_height="match_parent"
app:layout_behavior="@string/appbar_scrolling_view_behavior"
tools:showIn="@layout/activity_my"
android:id="@+id/content">
<EditText
    android:layout_width="0dp"
    android:layout_weight="1"
    android:layout_height="wrap_content"
    android:hint="@string/edit_message"
    android:id="@+id/edit_message"/>
<Button
    android:layout_width="wrap_content"
    android:layout_height="wrap_content"
    android:text="@string/button_message"
    android:onClick="sendMessage"/>

</LinearLayout>
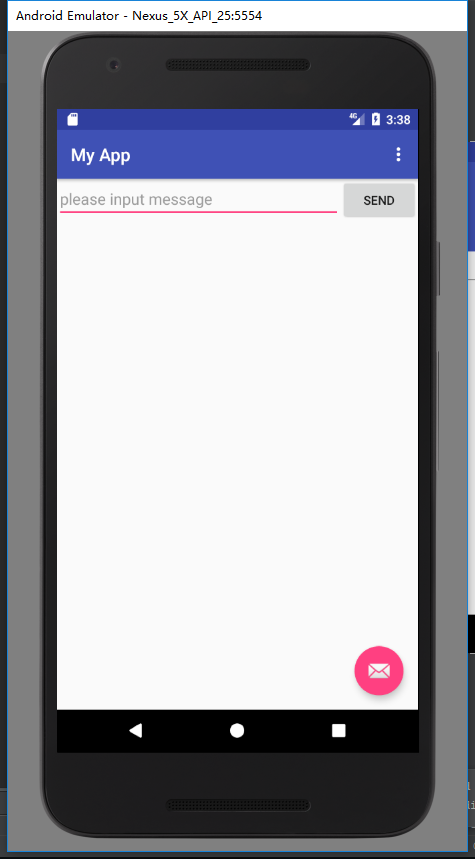
启动效果 这时点击send将跳转到一个新的activity
添加一个activity
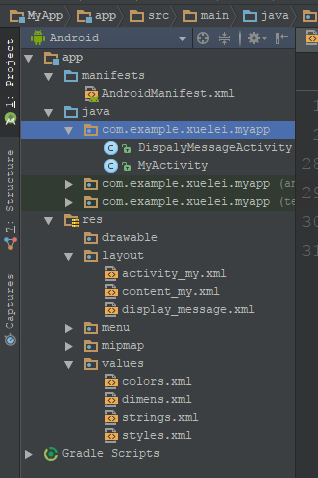
在myactivity下添加一个class并且继承AppCompatActivity
重写 onCreate方法
protected void onCreate(Bundle savedInstanceState) {
        super.onCreate(savedInstanceState);
        setContentView(R.layout.display_message);
        getSupportActionBar().setDisplayHomeAsUpEnabled(true);

        Intent intent = getIntent();
        String message = intent.getStringExtra(MyActivity.EXTRA_MESSAGE);
        TextView textView = new TextView(this);
        textView.setTextSize(80);
        textView.setText(message);
        textView.setWidth(100);

        RelativeLayout layout = (RelativeLayout) findViewById(R.id.content);
        layout.addView(textView);
    }
这通过getIntent获取到intent对象
获取其中保存的message数据
创建一个TextView对象
通过id获取到View 并向该View动态添加一个textView空间
<?xml version="1.0" encoding="utf-8"?>
<RelativeLayout xmlns:android="http://schemas.android.com/apk/res/android"
    android:id="@+id/content"
    android:layout_width="match_parent"
    android:layout_height="match_parent">

    </RelativeLayout>
在AndroidManifest(清单)中注册该View
<?xml version="1.0" encoding="utf-8"?>
<manifest xmlns:android="http://schemas.android.com/apk/res/android"
    package="com.example.xuelei.myapp">

    <application
        android:allowBackup="true"
        android:icon="@mipmap/ic_launcher"
        android:label="@string/app_name"
        android:roundIcon="@mipmap/ic_launcher_round"
        android:supportsRtl="true"
        android:theme="@style/AppTheme">
        <activity
            android:name=".MyActivity"
            android:label="@string/app_name"
            android:theme="@style/AppTheme.NoActionBar">
            <intent-filter>
                <action android:name="android.intent.action.MAIN" />

                <category android:name="android.intent.category.LAUNCHER" />
            </intent-filter>
        </activity>
        <activity
            android:name="com.example.xuelei.myapp.DispalyMessageActivity"
            android:label="@string/title_activity_display_message"
            android:parentActivityName="com.example.xuelei.myapp.MyActivity" >
            <meta-data
                android:name="android.support.PARENT_ACTIVITY"
                android:value="com.example.xuelei.myapp.MyActivity"/>
        </activity>

    </application>

</manifest>
添加一个activity name 该class的完全限定名 包名+类名
lable 设置该activity显示的lable名称
parentActivityName 指定父窗口对象 包名+类名
meta-data  这个名字值是额外的任意的可以提供给父组件的数据。一个组件元素能够包含任意数量的meta-data子元素。它们所有的值都会被收集在Bundle对象中并且使其可以作为组件的 PackageItemInfo.metaData 字段。
     一般的值可以通过value属性来指定,但是如果要指定一个资源id作为一个值,那么就要用resource属性来代替。在这里用于获取 myactivity这个对象
这样就完成一个activity的跳转了