一、回顾
1、nginx模块
a、http反代模块:ngx_http_proxy_module
proxy_pass
b、fastcgi反对模块:ngx_http_fastcgi_module
fastcgi_pass
c、上述两个模块都可以使用缓存,对应的缓存逻辑为:
(1)、定义缓存
proxy_cache_path
fastcgi_cache_path
(2)、调用缓存
proxy_cache
fastcgi_cache
2、负载均衡集群
a、硬件:F5 BigIP,NetScaler,A10
b、软件:
四层调度:lvs,nginx(stream module),haproxy(mode tcp)
七层调度:nginx(http_upstream module),haproxy(mode http),httpd,ats,...
c、session sticky:会话粘性
lvs:sh,persistence :持久连接功能,即将某个请求持续绑定到某个主机上,是基于源地址绑定的。
Coookie:
d、session replication:会话集群,指的是他自己是除了负载均衡的后端主机之外,我们把所有的后端主机再专门额外做一个集群,这个集群主要是让后端这些主机之间复制会话,任何一个后端主机创建的会话或对会话做出的修改都要通过集群同步给同一集群内的其他主机,我们可以通过组播的方式,但是如果组播繁忙的话那么网络也会拥塞,因此不适用较大规模集群。
e、session server:会话服务器,由一个高性能的存储给每一个后端服务器提供session,比如memcached,redis,不过因为其为单点,因此可以做相应的集群。

二、Nginx(4)
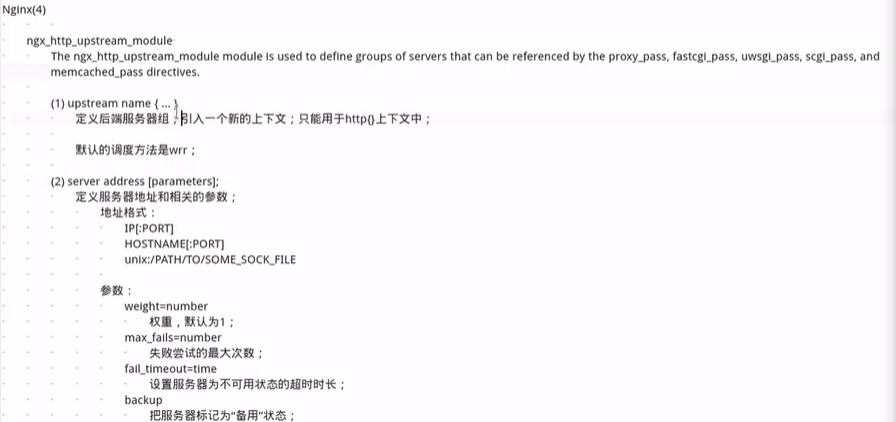
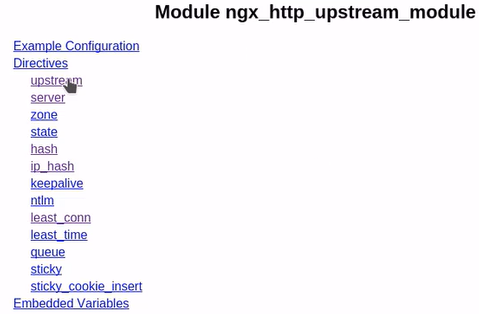
1、ngx_http_upstream_module

2、我们现在来配置相应的集群,前端有一个nginx Server,后端有两个web服务器做负载均衡功能。此时我们需要先在nginx Server中定义一个组,包含后端的两个web服务器。
a、nginx的ngx_http_upstream_module自带健康检测功能,即后端服务器出现问题upstream会自动从定义的组里将其摘除。这个模块如果你编译的时候编译了就可以直接使用了。这个模块最核心的指令叫做upstream,upstream会引入一个新的上下文,并且其只能用在http中,upstream是用来定义组的,调用组的时候在 localtion的 proxy_pass中调用。
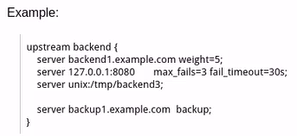
b、定义举例
3、具体集群配置
a、定义服务器角色(在服务器中分别安装httpd):
(1)、后端主机1:192.168.10.41
[root@localhost ~]# cat /var/www/html/index.html
upstream server1:192.168.10.41
[root@localhost ~]# systemctl start httpd
[root@localhost ~]# curl 192.168.10.41
upstream server1:192.168.10.41
(2)、后端主机2:192.168.10.42
[root@localhost ~]# cat /var/www/html/index.html
upstream server2:192.168.10.42
[root@localhost ~]# systemctl start httpd
[root@localhost ~]# curl 192.168.10.42
upstream server2:192.168.10.42
(3)、前端nginx代理主机:192.168.10.43。(理论上来说我们此主机应该有两张网卡,一张网卡接收前端请求,然后将请求反代并负载均衡至后端服务器,此处我们为节约时间所以只给代理主机设置一张网卡)

b、在nginx主机中定义upstream server
(1)、在/etc/nginx/nginx.conf中定义upstream server,名称为websrvs
[root@localhost conf.d]# cat /etc/nginx/nginx.conf |grep -Ev "^$|^#|^[[:space:]]*#"
user nginx;
worker_processes auto;
error_log /var/log/nginx/error.log;
pid /run/nginx.pid;
include /usr/share/nginx/modules/*.conf;
events {
    worker_connections 1024;
}
http {
    log_format  main  '$remote_addr - $remote_user [$time_local] "$request" '
                      '$status $body_bytes_sent "$http_referer" '
                      '"$http_user_agent" "$http_x_forwarded_for"';
    access_log  /var/log/nginx/access.log  main;
    sendfile            on;
    tcp_nopush          on;
    tcp_nodelay         on;
    keepalive_timeout   65;
    types_hash_max_size 2048;
    include             /etc/nginx/mime.types;
    default_type        application/octet-stream;
    include /etc/nginx/conf.d/*.conf;
    upstream websrvs {
    server 192.168.10.41;
    server 192.168.10.42;
}
    server {
        listen       80 default_server;
        listen       [::]:80 default_server;
        server_name  _;
        root         /usr/share/nginx/html;
        include /etc/nginx/default.d/*.conf;
        location / {
        }
        error_page 404 /404.html;
        location = /404.html {
        }
        error_page 500 502 503 504 /50x.html;
        location = /50x.html {
        }
    }
}
(2)、配置/etc/nginx/conf.d/ilinux.conf文件使用websrvs
[root@localhost conf.d]# cat /etc/nginx/conf.d/ilinux.conf
server {
    listen 80;
    server_name www.ilinux.io;
    location / {
        root /data/nginx/html;
        proxy_pass http://websrvs;
}
}
(3)、启动nginx并访问
[root@localhost conf.d]# nginx -s reload
[root@localhost conf.d]#
[root@localhost conf.d]# cat /etc/hosts
127.0.0.1   localhost localhost.localdomain localhost4 localhost4.localdomain4
::1         localhost localhost.localdomain localhost6 localhost6.localdomain6
192.168.10.43 www.ilinux.io
[root@localhost conf.d]# curl www.ilinux.io
upstream server1:192.168.10.41
[root@localhost conf.d]# curl www.ilinux.io
upstream server2:192.168.10.42
[root@localhost conf.d]# curl www.ilinux.io
upstream server1:192.168.10.41
[root@localhost conf.d]# curl www.ilinux.io
upstream server2:192.168.10.42
c、server指令的几个参数
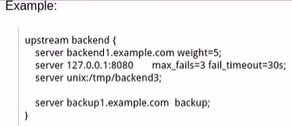
(1)、weight = number :默认是轮循,如果给了权重就成加权轮循了,所有的server默认权重都是1。
[root@localhost conf.d]# cat /etc/nginx/nginx.conf |grep -Ev "^$|^#|^[[:space:]]*#"
user nginx;
worker_processes auto;
error_log /var/log/nginx/error.log;
pid /run/nginx.pid;
include /usr/share/nginx/modules/*.conf;
events {
    worker_connections 1024;
}
http {
    log_format  main  '$remote_addr - $remote_user [$time_local] "$request" '
                      '$status $body_bytes_sent "$http_referer" '
                      '"$http_user_agent" "$http_x_forwarded_for"';
    access_log  /var/log/nginx/access.log  main;
    sendfile            on;
    tcp_nopush          on;
    tcp_nodelay         on;
    keepalive_timeout   65;
    types_hash_max_size 2048;
    include             /etc/nginx/mime.types;
    default_type        application/octet-stream;
    include /etc/nginx/conf.d/*.conf;
    upstream websrvs {
    server 192.168.10.41:80 weight=2;
    server 192.168.10.42:80;
}
    server {
        listen       80 default_server;
        listen       [::]:80 default_server;
        server_name  _;
        root         /usr/share/nginx/html;
        include /etc/nginx/default.d/*.conf;
        location / {
        }
        error_page 404 /404.html;
        location = /404.html {
        }
        error_page 500 502 503 504 /50x.html;
        location = /50x.html {
        }
    }
}
[root@localhost conf.d]# nginx -s reload
[root@localhost conf.d]# curl www.ilinux.io
upstream server1:192.168.10.41
[root@localhost conf.d]# curl www.ilinux.io
upstream server2:192.168.10.42
[root@localhost conf.d]# curl www.ilinux.io
upstream server1:192.168.10.41
[root@localhost conf.d]# curl www.ilinux.io
upstream server1:192.168.10.41
[root@localhost conf.d]# curl www.ilinux.io
upstream server2:192.168.10.42
(2)、max_conns=number :每个服务器的最大并发连接数。即假如我们前端服务器收到的请求并发量很大,比如收到6000个并发,假如权重为2:1的话第一个服务器会收到4000,第二个服务器会收到2000,那么如果第一个服务器只能承载2000,第二个服务器只能承载1000呢?我们就得让多余的排队,因此我们就要告诉前端服务器一次最多调度给后端服务器多少,这就是在每个服务器上定义max_conns的用处了。
(3)、max_fails=number 用来作为健康状态检测。他不需要自己定义健康状态检测方式,他会自己做传输层检测,比如每隔多少时间检测一次,并且还有fail_timeout=time,即检测一次多少时间内没有响应我们就认为是失败的,默认是10秒,可以自己设置短一点。一共失败多少次就将此服务器标记为不可用,max_fails=number即表示一共失败多少次,默认是1次,可以将次数调高一点。如果max_fails=0就表示不做健康状态检测了。
当探测到后端主机又健康后又会将后端主机加入至server中。
[root@localhost conf.d]# cat /etc/nginx/nginx.conf |grep -Ev "^$|^#|^[[:space:]]*#"
user nginx;
worker_processes auto;
error_log /var/log/nginx/error.log;
pid /run/nginx.pid;
include /usr/share/nginx/modules/*.conf;
events {
    worker_connections 1024;
}
http {
    log_format  main  '$remote_addr - $remote_user [$time_local] "$request" '
                      '$status $body_bytes_sent "$http_referer" '
                      '"$http_user_agent" "$http_x_forwarded_for"';
    access_log  /var/log/nginx/access.log  main;
    sendfile            on;
    tcp_nopush          on;
    tcp_nodelay         on;
    keepalive_timeout   65;
    types_hash_max_size 2048;
    include             /etc/nginx/mime.types;
    default_type        application/octet-stream;
    include /etc/nginx/conf.d/*.conf;
    upstream websrvs {
    server 192.168.10.41:80 weight=2;
    server 192.168.10.42:80 fail_timeout=1 max_fails=3; #失败超时时间为1秒,允许失败3次。
}
    server {
        listen       80 default_server;
        listen       [::]:80 default_server;
        server_name  _;
        root         /usr/share/nginx/html;
        include /etc/nginx/default.d/*.conf;
        location / {
        }
        error_page 404 /404.html;
        location = /404.html {
        }
        error_page 500 502 503 504 /50x.html;
        location = /50x.html {
        }
    }
}
(4)、backup:如果我们两个server都挂了怎么办呢?那么我们可以让其访问到本地的资源,那么如果我们把本地的资源加入至server中平时的访问也会被调度,因此此时我们可以在此server后面加上backup参数,即备用的意思,这样其他两个server挂了就会访问到此server。例如此处我们添加的server为127.0.0.1:80 backup;
首先我们添加配置文件
[root@localhost html]# cat /usr/share/nginx/html/index.html
sorry,please dengyihuierfagnwen!
[root@localhost html]# cat /etc/nginx/nginx.conf |grep -Ev "^$|^#|^[[:space:]]*#"
user nginx;
worker_processes auto;
error_log /var/log/nginx/error.log;
pid /run/nginx.pid;
include /usr/share/nginx/modules/*.conf;
events {
    worker_connections 1024;
}
http {
    log_format  main  '$remote_addr - $remote_user [$time_local] "$request" '
                      '$status $body_bytes_sent "$http_referer" '
                      '"$http_user_agent" "$http_x_forwarded_for"';
    access_log  /var/log/nginx/access.log  main;
    sendfile            on;
    tcp_nopush          on;
    tcp_nodelay         on;
    keepalive_timeout   65;
    types_hash_max_size 2048;
    include             /etc/nginx/mime.types;
    default_type        application/octet-stream;
    include /etc/nginx/conf.d/*.conf;
    upstream websrvs {
    server 192.168.10.41:80 weight=2;
    server 192.168.10.42:80 fail_timeout=1 max_fails=3; #失败超时时间为1秒,允许失败3次。
    server 127.0.0.1:80 backup;
}
    server {
        listen       80 default_server;
        listen       [::]:80 default_server;
        server_name  _;
        root         /usr/share/nginx/html;
        include /etc/nginx/default.d/*.conf;
        location / {
        }
        error_page 404 /404.html;
        location = /404.html {
        }
        error_page 500 502 503 504 /50x.html;
        location = /50x.html {
        }
    }
}
关掉我们两台后端主机的服务然后进行访问
[root@localhost html]# curl www.ilinux.io
sorry,please dengyihuierfagnwen!
(5)、down:我们可以人为标记某台服务器下线,就可以用down参数,即出于维护的目的将服务器下线。
[root@localhost html]# cat /etc/nginx/nginx.conf |grep -Ev "^$|^#|^[[:space:]]*#"
user nginx;
worker_processes auto;
error_log /var/log/nginx/error.log;
pid /run/nginx.pid;
include /usr/share/nginx/modules/*.conf;
events {
    worker_connections 1024;
}
http {
    log_format  main  '$remote_addr - $remote_user [$time_local] "$request" '
                      '$status $body_bytes_sent "$http_referer" '
                      '"$http_user_agent" "$http_x_forwarded_for"';
    access_log  /var/log/nginx/access.log  main;
    sendfile            on;
    tcp_nopush          on;
    tcp_nodelay         on;
    keepalive_timeout   65;
    types_hash_max_size 2048;
    include             /etc/nginx/mime.types;
    default_type        application/octet-stream;
    include /etc/nginx/conf.d/*.conf;
    upstream websrvs {
    server 192.168.10.41:80 weight=2 down;
    server 192.168.10.42:80 fail_timeout=1 max_fails=3; #失败超时时间为1秒,允许失败3次。
    server 127.0.0.1:80 backup;
}
    server {
        listen       80 default_server;
        listen       [::]:80 default_server;
        server_name  _;
        root         /usr/share/nginx/html;
        include /etc/nginx/default.d/*.conf;
        location / {
        }
        error_page 404 /404.html;
        location = /404.html {
        }
        error_page 500 502 503 504 /50x.html;
        location = /50x.html {
        }
    }
}
d、server的几种调度算法
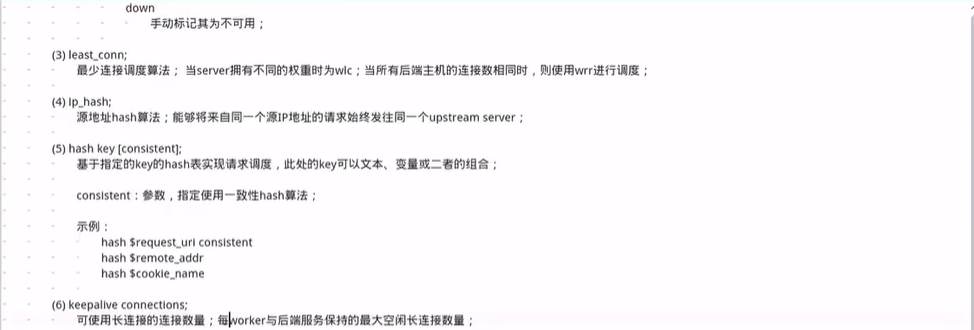
(1)、ip_hash;将来自同一个IP的请求调度到固定的后端server,也就是lvs的sh算法。使用此方式的话就不能使用backup了。
[root@localhost html]# cat /etc/nginx/nginx.conf |grep -Ev "^$|^#|^[[:space:]]*#"
user nginx;
worker_processes auto;
error_log /var/log/nginx/error.log;
pid /run/nginx.pid;
include /usr/share/nginx/modules/*.conf;
events {
    worker_connections 1024;
}
http {
    log_format  main  '$remote_addr - $remote_user [$time_local] "$request" '
                      '$status $body_bytes_sent "$http_referer" '
                      '"$http_user_agent" "$http_x_forwarded_for"';
    access_log  /var/log/nginx/access.log  main;
    sendfile            on;
    tcp_nopush          on;
    tcp_nodelay         on;
    keepalive_timeout   65;
    types_hash_max_size 2048;
    include             /etc/nginx/mime.types;
    default_type        application/octet-stream;
    include /etc/nginx/conf.d/*.conf;
    upstream websrvs {
    ip_hash;
    server 192.168.10.41:80 weight=2 down;
    server 192.168.10.42:80 fail_timeout=1 max_fails=3; #失败超时时间为1秒,允许失败3次。
    #server 127.0.0.1:80 backup;
}
    server {
        listen       80 default_server;
        listen       [::]:80 default_server;
        server_name  _;
        root         /usr/share/nginx/html;
        include /etc/nginx/default.d/*.conf;
        location / {
        }
        error_page 404 /404.html;
        location = /404.html {
        }
        error_page 500 502 503 504 /50x.html;
        location = /50x.html {
        }
    }
}
[root@localhost html]# nginx -s reload
[root@localhost html]# curl www.ilinux.io
upstream server2:192.168.10.42
[root@localhost html]# curl www.ilinux.io
upstream server2:192.168.10.42
[root@localhost html]# curl www.ilinux.io
upstream server2:192.168.10.42
(2)、hash
i、ip_hash相当于hash $remote_addr

ii、hash $request_uri;表示把对同一个uri的请求绑定到同一个后端服务器上来。即我们前面说过的dh算法,即提高缓存命中率。
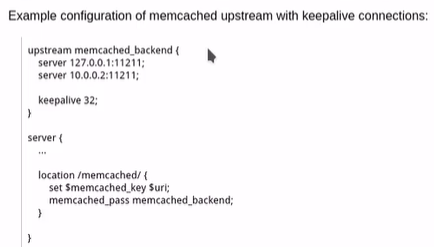
(3)、keepalive:我们前端的nginx是要扮演成客户端向后端服务器发送请求的,那么假如我们有8万个并发请求,那么我们前端的nginx服务器就要有8万个随机端口才行,而实际是没有那么多的,因此我们就需要我们的nginx服务器与后端服务器保持连接,与后端服务器建立连接以后就保持住不断开,即无论来自哪个客户端的请求,只要是请求的后端这个服务器我们都使用这一个连接,端口也不变。如果不保持连接那么每次都还要三次握手,如果保持连接的话三次握手都省了。此处保持连接的意思是他给后端服务器组一共维持多少个长连接。他没有默认值。我们如果定义keepalive为32那么表示与后端服务器组维持32个长连接。我们此处是指每个work维持32个长连接,如果我们启动了4个work那么就是4*32个长连接。
(4)、least_conn:即lc算法。具体见lvs中lc算法的解释。
三、总结