一、Nginx的程序架构
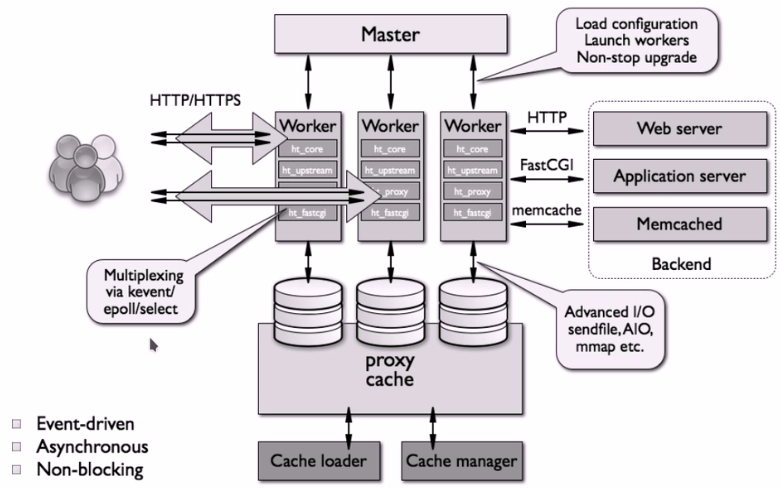
我们从图中可以看到,我们nginx有master,负责管理子进程worker,对nginx的worker来讲,每一个work都可以处理多个用户请求,他们是基于http或https来处理用户请求的。我们图中描述的是nginx作为反代时的一种情况,我们可以看到接收到用户请求后他会反代给后端的web server,或通过FastCGI协议反代给我们后端的fpm server,或者通过memcache协议反代给后端的memcache server。 为什么一个进程可以响应多个请求呢?我们可以看到,在网络IO方面他通过kevent,epoll,select来处理网络的多路管理。并且在收到用户请求以后nginx自己还可以实现管理缓存,这就意味着后端服务器的响应内容我们可以先缓存在nginx本地,而后再给客户端响应,随后第二个客户端请求再进来的时候我们可以看看缓存中是否有,如果有的话我们就直接从本地缓存直接返回了,这就实现了加速访问。而为了管理缓存空间,nginx需要两个线程来管理,第一个是Cache loader,第二个是Cache manager。
整个nginx大体利用了这几个特性,首先是Event-driven,即事件驱动,然后是Asynchronous,即异步。最后是Non-blocking,即非阻塞模型
对于磁盘IO来讲,他可以支持Advanced I/O,即高级IO,sendfile,AIO(异步IO),mmap etc即内存映射,我们对于内存映射可以这样来理解,我们说过一个数据要想被访问首先第一步要先从磁盘到内核内存,然后从内核内存到进程内存,即有两次的复制过程,而我们的内存映射是指直接从内存中开辟出一段空间来,数据在磁盘上直接映射到内存空间中来,然后进程就可以访问了而不用复制了。其实这是内核的功能,只是说nginx支持这种功能来实现文件访问。
1、master/worker模型,worker负责处理用户请求,master负责装载配置文件,管理worker进程和平滑升级。
a、一个master进程
(1)、负责加载和分析配置文件,管理worker进程,平滑升级
b、一个或多个worker进程
(2)、处理并响应用户请求
c、缓存相关的进程:
(1)、cache loader:载入缓存对象
(2)、cache manager:管理缓存对象
2、特性:异步,事件驱动和非阻塞
a、并发请求处理:通过kevent/epoll/select,/dev/poll,我们主要通过epoll,只有主机不支持epoll的时候才使用select
b、文件IO,高级IO sendfile,异步,mmap
3、nginx模块:高度模块化,但其模块早期不支持DSO机制;近期版本支持动态装载和卸载
a、模块分类:
(1)、核心模块:core module
(2)、标准模块:
1)、HTTP modules:
standard HTTP modules
Optional HTTP modules
2)、Mail modules
3)、Stream modules,叫流模块,他的功能主要实现传输层负载均衡。即传输层代理。
(3)、3rd party modules,即三方模块
4、nginx的功能
a、静态的web资源服务器;(图片服务器,或js/css/html/txt等静态资源服务器)
b、结合FastCGI/uwSGI/SCGI等协议反代动态资源请求,httpd结合php是可以把php作为模块的,但是nginx是不行的,php没有作为nginx模块的用法,所以我们要想实现nmp就只有一种方式,php工作为fpm。即nginx可以作为fpm的反向代理。
c、http/https协议的反向代理
d、imap4/pop3协议的反向代理
e、tcp/udp协议的请求转发
二、nginx的安装配置
1、官方的预制包
http://nginx.org/packages/centos/7/x86_64/RPMS/
2、编译安装
yum groupinstall "Development Tools" "Server Platform Development"
yum install -y pcre-devel openssl-devel zlib-devel (pcre-devel支持更强大的正则的引擎,zlib-devel是一个网络通信压缩库,要支持压缩传输功能就需要安装此包)
useradd -r nginx
./configure --prefix=/usr/local/nginx --conf-path=/etc/nginx/nginx.conf --error-log-path=/var/log/error.log --http-log-path=/var/log/nginx/access.log --pid-path=/var/run/nginx.pid --lock-path=/var/run/nginx.lock --user=nginx --group=nginx --with-http_ssl_module --with-http_v2_module --with-http_dav_module --with-http_stub_status_module --with-threads --with-file-alo
--with-http_dav_module:支持http dav功能,也叫分布式版本协作,即支持put和delete方法的模块,这个其实是不安全的,一般没有需要就不装他
--with-http_stub_status_module:nginx的状态页是通过此模块来实现的
--with-threads:线程池管理线程,比默认的线程管理方式,即work process单个线程管理多少个请求更加高效,即基于线程池来实现用户管理的模块
--with-file-alo:异步IO模块
make && make install
3、程序环境
a、配置文件的组成部分
(1)、主配置文件:nginx.conf
include conf.d/*.conf
(2)、fastcgi,uwsgi,scgi等协议相关的配置文件
(3)、mime.types:支持的mime类型
b、主程序文件:/usr/sbin/nginx
[root@node3 /]# nginx -h
nginx version: nginx/1.12.2
Usage: nginx [-?hvVtTq] [-s signal] [-c filename] [-p prefix] [-g directives]

Options:
  -?,-h         : this help
  -v            : show version and exit
  -V            : show version and configure options then exit #查看编译时的选项,非常有用
  -t            : test configuration and exit
  -T            : test configuration, dump it and exit
  -q            : suppress non-error messages during configuration testing
  -s signal     : send signal to a master process: stop, quit, reopen, reload #传递信号
  -p prefix     : set prefix path (default: /usr/share/nginx/)
  -c filename   : set configuration file (default: /etc/nginx/nginx.conf)
  -g directives : set global directives out of configuration file
[root@node3 /]# nginx -V
nginx version: nginx/1.12.2
built by gcc 4.8.5 20150623 (Red Hat 4.8.5-36) (GCC)
built with OpenSSL 1.0.2k-fips  26 Jan 2017
TLS SNI support enabled
configure arguments: --prefix=/usr/share/nginx --sbin-path=/usr/sbin/nginx --modules-path=/usr/lib64/nginx/modules --conf-path=/etc/nginx/nginx.conf --error-log-path=/var/log/nginx/error.lo
g --http-log-path=/var/log/nginx/access.log --http-client-body-temp-path=/var/lib/nginx/tmp/client_body --http-proxy-temp-path=/var/lib/nginx/tmp/proxy --http-fastcgi-temp-path=/var/lib/nginx/tmp/fastcgi --http-uwsgi-temp-path=/var/lib/nginx/tmp/uwsgi --http-scgi-temp-path=/var/lib/nginx/tmp/scgi --pid-path=/run/nginx.pid --lock-path=/run/lock/subsys/nginx --user=nginx --group=nginx --with-file-aio --with-ipv6 --with-http_auth_request_module --with-http_ssl_module --with-http_v2_module --with-http_realip_module --with-http_addition_module --with-http_xslt_module=dynamic --with-http_image_filter_module=dynamic --with-http_geoip_module=dynamic --with-http_sub_module --with-http_dav_module --with-http_flv_module --with-http_mp4_module --with-http_gunzip_module --with-http_gzip_static_module --with-http_random_index_module --with-http_secure_link_module --with-http_degradation_module --with-http_slice_module --with-http_stub_status_module --with-http_perl_module=dynamic --with-mail=dynamic --with-mail_ssl_module --with-pcre --with-pcre-jit --with-stream=dynamic --with-stream_ssl_module --with-google_perftools_module --with-debug --with-cc-opt='-O2 -g -pipe -Wall -Wp,-D_FORTIFY_SOURCE=2 -fexceptions -fstack-protector-strong --param=ssp-buffer-size=4 -grecord-gcc-switches -specs=/usr/lib/rpm/redhat/redhat-hardened-cc1 -m64 -mtune=generic' --with-ld-opt='-Wl,-z,relro -specs=/usr/lib/rpm/redhat/redhat-hardened-ld -Wl,-E'
c、启动服务
Unit File:nginx.service
4、配置
a、主配置文件的配置指令
(1)、directive value [value2 ...];
(2)、注意:
1)、指令必须以分号结尾
2)、支持使用配置变量
内建变量:由Nginx模块引入,可直接引用
自定义变量:由用户使用set命令定义
set variable_name value
引用变量:$variable_name
b、主配置文件结构
main block:主配置段,也即全局配置段
event{
...
}:事件驱动相关的配置
http {
...
}:http/https协议相关的配置段
mail {
...
}
stream {
...
}
c、http协议相关的配置结构。nginx没有中心主机的概念,所以全部配置成虚拟主机,即server。
http {
...
...:各server的公共配置,就不用在server中重复写
server {
...
listen
server_name
root :指定站点根目录
alias :路径别名
location [OPERATOR] URL {
...
if CONDITION {
...
}
}:location用来指明对某一个或某一类URL的资源访问属性的定义。并且还可以基于条件来做。
}
}
c、配置文件详解
(1)、主配置文件
[root@node3 html]# cat /etc/nginx/nginx.conf
# For more information on configuration, see:
#   * Official English Documentation: http://nginx.org/en/docs/
#   * Official Russian Documentation: http://nginx.org/ru/docs/

user nginx; #进程以哪个用户的身份运行
worker_processes auto; #配置工作进程数,即工作进程数,auto表示自动,探测你服务器有几颗cpu他就启动几个进程
error_log /var/log/nginx/error.log; #错误日志
pid /run/nginx.pid;

# Load dynamic modules. See /usr/share/nginx/README.dynamic.
include /usr/share/nginx/modules/*.conf; #对于当前的nginx有很多可动态装载的模块,这些模块怎么装载装载哪些,就在此目录下的.conf结尾的配置文件中

events { #配置事件驱动模型,我们知道事件驱动可以实现单进程响应多个请求,那么我们单进程响应多少个请求呢?就是我们下面配置的1024个,那么我们当前主机可以响应多少个请求呢?就是我们上面的worker_
processes的数量乘以worker_connections的数量,我们是2个cpu所以一共能响应2*1024即2028个请求,如果我们觉得响应的请求太少了我们可以配置我们下面的worker_connections来进行优化    worker_connections 1024;
}

http { #用来配置我们的http服务。下面一个server就是一个虚拟主机,而server前面的这些就是我们所有的虚拟主机共享的配置
    log_format  main  '$remote_addr - $remote_user [$time_local] "$request" '
                      '$status $body_bytes_sent "$http_referer" '
                      '"$http_user_agent" "$http_x_forwarded_for"';  #访问日志的日志格式,remote_addr表示客户端地址,remote_user表示远程用户,即basic认证时提供的用户名,如果没有的话就是-,t
ime_local表示本地时间,request表示请求,即请求报文的起始行(method,URL,协议版本),status表示响应码,body_bytes_sent表示body部分的字节数,http_referer表示引用,即从哪个网页跳转过来的,http_user_agent表示客户端代理,即什么浏览器,http_x_forwarded_for表示代理服务器在代理转发时会加一个所谓的真正的服务端请求地址是谁的,就叫http_x_forwarded_for
    access_log  /var/log/nginx/access.log  main; #访问日志的文件路径和调用的日志格式,这个main即引用的我们上面定义的main日志格式。

    sendfile            on; #发送文件,即当客户端用户请求以后如果是静态资源的话首先请求到达内核空间,然后到达用户空间给我们的进程,即我们的nginx进程,进程收到请求后分析发现要加载这个文件,
因此io请求由我们的磁盘加载文件,这个文件要先进入内核空间,然后再回到用户空间,然后由我们用户空间构建响应报文,这个响应报文封装完以后再进入内核空间然后再发给客户端,这个就比较麻烦,那么怎么办呢?我们可以在内核中不用再往用户空间复制了,直接扔给用户端就行了。即在内核中直接封装响应报文直接就反馈给客户端了。这就是sendfile机制,即可以提升性能的一种机制。    tcp_nopush          on;#类似于sendfile
    tcp_nodelay         on;#类似于sendfile
    keepalive_timeout   65; #保持连接启用了,并且超时时长为65秒钟。
    types_hash_max_size 2048;

    include             /etc/nginx/mime.types; #把mime.types这个文件包含进来让nginx知道自己支持哪些中mime类型。
    default_type        application/octet-stream; #默认把每一个文件都识别成8进制的数据流

    # Load modular configuration files from the /etc/nginx/conf.d directory.
    # See http://nginx.org/en/docs/ngx_core_module.html#include
    # for more information.
    include /etc/nginx/conf.d/*.conf; #包含此路径下的所有的.conf结尾的配置文件。

    server { #默认的虚拟主机
        listen       80 default_server; #默认虚拟主机,即如果我们要基于主机名做虚拟主机,当你访问的主机名与任何一个定义的servername都不一样的时候要怎么办呢?那就会是你所有的虚拟主机的第一个
,如果我们不想让第一个来响应而是我们自己认为有一个合适的当默认的那就设置默认虚拟主机,因此对于nginx来讲后面加一个default_server就表示所有匹配不到的虚拟主机都有我来响应。        listen       [::]:80 default_server;#这是ipv6的地址和端口
        server_name  _; #对于默认的虚拟主机来讲他是下划线,可以用来匹配所有匹配不到的主机名
        root         /usr/share/nginx/html; #默认网页根路径

        # Load configuration files for the default server block.
        include /etc/nginx/default.d/*.conf;

        location / { #用来指明我们的个人设置
        }

        error_page 404 /404.html; #用来自定义404的错误页
            location = /40x.html {
        }

        error_page 500 502 503 504 /50x.html; #用来定义相应的状态码的错误页
            location = /50x.html {
        }
    }

# Settings for a TLS enabled server. #https的设置
#
#    server {
#        listen       443 ssl http2 default_server;
#        listen       [::]:443 ssl http2 default_server;
#        server_name  _;
#        root         /usr/share/nginx/html;
#
#        ssl_certificate "/etc/pki/nginx/server.crt";
#        ssl_certificate_key "/etc/pki/nginx/private/server.key";
#        ssl_session_cache shared:SSL:1m;
#        ssl_session_timeout  10m;
#        ssl_ciphers HIGH:!aNULL:!MD5;
#        ssl_prefer_server_ciphers on;
#
#        # Load configuration files for the default server block.
#        include /etc/nginx/default.d/*.conf;
#
#        location / {
#        }
#
#        error_page 404 /404.html;
#            location = /40x.html {
#        }
#
#        error_page 500 502 503 504 /50x.html;
#            location = /50x.html {
#        }
#    }

}
三、实验
1、配置虚拟主机
a、首先我们创建一个文件夹用来存放网页并创建一个测试页
[root@node3 html]# mkdir -pv /data/nginx/vhost1
mkdir: created directory ‘/data’
mkdir: created directory ‘/data/nginx’
mkdir: created directory ‘/data/nginx/vhost1’
[root@node3 html]# echo "Nginx Vhost 1" > /data/nginx/vhost1/index.html
b、然后我们来编辑配置文件,在/etc/nginx/conf.d目录下编辑,然后我们发现就算默认server已经监听了80端口我们虚拟主机依然可以使用80端口,并且能够访问。
[root@node3 conf.d]# cat /etc/nginx/conf.d/vhost1.conf
server {
    listen 80;
    server_name www.wohaoshuai3.com;
    root /data/nginx/vhost1;
}
[root@node3 conf.d]# nginx -t #检查语法错误
nginx: the configuration file /etc/nginx/nginx.conf syntax is ok
nginx: configuration file /etc/nginx/nginx.conf test is successful
[root@node3 conf.d]# nginx -s reload
[root@node3 conf.d]# curl www.wohaoshuai3.com
Nginx Vhost 1
[root@node3 conf.d]# cat /etc/hosts
127.0.0.1   localhost localhost.localdomain localhost4 localhost4.localdomain4
::1         localhost localhost.localdomain localhost6 localhost6.localdomain6
192.168.10.13 node1.wohaoshuai.com
192.168.10.14 node2.wohaoshuai.com
192.168.10.15 node3.wohaoshuai.com
192.168.10.15 www.wohaoshuai3.com
四、Nginx配置指令
1、main配置段常见的配置指令
a、分类:
(1)、正常运行必备的配置
(2)、优化性能相关的配置
(3)、用于调试及定位问题相关的配置
(4)、事件驱动相关的配置
b、正常运行必备的配置
(1)、user
Syntax: user uer [group];
Default:user nobody nobody;
Context:main
Defines user and group credentials used by worker processes,if group is omitted,a group whose name equals that of user is used
(2)、pid /PATH/TO/PID_FILE
指定存储nginx主进程进程号码的文件路径
(3)、include file | mask
指明包含进来的其它配置文件片段
(4)、load_module file;
指明要装载的动态模块
c、性能优化相关的配置
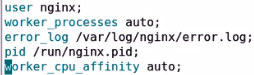
(1)、worker_processes number | auto;
worker进程的数量;通常应该为当前主机的cpu的物理核心数
(2)、worker_cpu_affinity cpumask ...;即直接把进程绑定在某个CPU上。我们cpu有一级缓存二级缓存等,如果直接把一个进程绑定在一个cpu上那么他每次都能命中,这样的话就不用cpu来回切换调度也就不用加载其它cpu的缓存了。如果当前主机主要是为了运行nginx的他就非常有效,如果还运行了其它进程,比如mysql之类的就不要这样做了。
worker_cpu_affinity auto [cpumask];
CPU MASK:
00000001:0号CPU
00000010:1号CPU
....
(3)、worker_priority number
指定worker进程的nice值,设定worker进程优先级
(4)、worker_rlimit_nofile number;
worker进程所能够打开的文件数量上限
d、调试,定位问题
(1)、daemon on|off
是否以守护进程方式运行Nginx
(2)、master_process on|off
是否以master/worker模型运行nginx;默认为on
(3)、error_log file [level];
e、事件驱动相关的配置
(1)、events{...}
(2)、worker_connections number
每个worker进程所能够打开的最大并发连接数数量
worker_processes * worker_connections
(3)、use method
指明并发连接请求的处理方法
use epoll
(4)、accept_mutex on | off
处理新的连接请求的方法;on意味着由各worker轮流处理新请求,Off意味着每个新请求的到达都会通知所有的worker进程
f、http协议的相关配置
(1)
http {
......
server {
...
server_name
root
location [OPERATOR] /url/ {
...
}
}
server {
...
}
}
(2)、与套接字相关的配置
1)、server {...}
配置一个虚拟主机
server {
listen address [:PORT] | PORT;
server_name SERVER_NAME;
root /PATH/TO/DOCUMENT_ROOT;
}
2)、 listen PORT | address[:port] | unix:/PATH/TO/SOCKET_FILE
listen address[:port] [default_server] [ssl] [http2 | spdy] [backlog=number] [rcvbuf=size] [sndbuf=size]
default_server:设定为默认虚拟主机
ssl:限制仅能够通过ssl连接提供服务
backlog=number:后援队列长度
rcvbuf=size:接收缓冲区大小
sndbuf=size:发送缓冲区大小
3)、server_name name ...;
指明虚拟主机的主机名称;后可跟多个由空白字符分隔的字符串
支持*通配任意长度的任意字符;server_name *.wohaoshuai.com www.wohaoshuai.*
支持~起始的字符做正则表达式模式匹配;server_name ~^wwwd+.wohaoshuai.com$
匹配机制:
首先是字符串精确匹配
左侧*通配符
右侧*通配符
正则表达式
练习:定义四个虚拟机,混合使用三种类型的虚拟主机,仅开放给来自于本地网络中的主机访问
4)、tcp_nodelay on | off
在keepalived模式下的连接是否启用TCP_NODELAY选项
5)、sendfile on | off
是否启用sendfile功能
(3)、定义路径相关的配置
1)、root path
设置web资源路径映射;用于指明用户请求的url所定义的本地文件系统上的文档所在目录路径;可用的位置:http,server,location,if in location
2)、location [= | ~ | ~* | ^~] url {...}
在一个server中location配置段可存在多个,用于实现从url到文件系统的路径映射;nginx会根据用户请求的URL来检查定义的所有location,并找出一个最佳匹配,而后应用其配置
=:对URL做精确匹配,例如,http://www.wohaoshuai.com/,http://www.wohaoshuai.com/index.html
location = / {
...
}
~:对URL做正则表达式模式匹配,区分字符大小写
~*:对URL做正则表达式模式匹配,不区分字符大小写
^~:对URL的左半部分做匹配检查,不区分字符大小写
不带符号:匹配起始于此url的所有的url
匹配优先级:=,^~,~/~*,不带符号
root /vhost/www/htdocs/
http://www.wohaoshuai.com/index.html --> /vhosts/www/htdocs/index.html
server {
root /vhosts/www/htdocs/
location /admin/ {
root /webapps/app1/data/
}
}
3)、alias path;
定义路径别名,文档映射的另一种机制;仅能用于location上下文。
注意:location中使用root指令和alias指令的意义不同
root,给定的路径对应于location中的/url/左侧的/;
alias,给定的路径对应于location中的/url/右侧的/;
4)、index file ...
默认资源:http,server,location;
5)、error_page code ... [=[response]] url;
Defines the URL that will be shown for the specified errors
6)、try_files file ... url
(4)、定义客户端请求的相关配置
1)、keepalive_timeout timeout [header_timeout];
设定保持连接的超时时长,0表示禁止长连接;默认为75s
2)、keepalive_requests number
在一次长连接上所允许请求的资源的最大数量,默认为100
3)、keepalive_disable none | browser ...;
对哪种浏览器禁用长连接
4)、send_timeout time;
向客户端发送响应报文的超时时长,此处,是指两次写操作之间的间隔时长
5)、client_body_buffer_size size;
用于接收客户端请求报文的body部分的缓冲区大小;默认为16k;超出此大小时,其将被暂存到磁盘上的由client_body_temp_path指令所定义的位置
6)、client_body_temp_path path[level1 [level2 [level3]]]
设定用于存储客户端请求报文的body部分的临时存储路径及子目录结构和数量
16进制的数字
client_body_temp_path path /var/tmp/client_body 2 1 1
1:表示用一位16进制数字表示一级子目录:0-f
2:表示用2位16进制数字表示二级子目录:00-ff
2:表示用2位16进制数字表示三级子目录:00-ff
(5)、对客户端进行限制的相关配置
1)、limit_rate rate;
限制响应给客户端的传输速率,单位是bytes/second,0表示无限制
2)、limit_except method ... {...}
限制对指定的请求方法之外的其它方法的使用客户端
limit_except GET {
allow 192.168.10.0/24;
deny all;
}