一、iptables扩展模块(续)
1、state扩展
a、The "state" extension is a subset of the "conntrack" module."state" allows access to the connection tracking state for this packet。state模块是conntrack模块的子集。我们可以基于连接追踪功能查看报文当前所处的状态。即假如我们一次web请求如果使用短连接的话,我们一个客户端来一次访问先三次握手,获取完资源后再四次断开,过一会儿等客户端再来访问时我们的服务器知不知道这个家伙曾经来访问过呢?我们抛开http协议不谈,只谈网络层和传输层,我们服务器有没有办法追踪此前这个连接客户端是否曾经访问过呢?这个是没有办法的,默认情况下我们客户端断开再次连接后我们服务器端会以新的连接来对待它。
因此我们的连接追踪可以理解为在内存中内核中开辟一片空间记录曾经哪个连接来访问过,比如TCP,UDP,ICMP等来访问时我们会先去查我们内存中的这个表中是否有这个连接访问过。这个就叫连接追踪表。因为内存中空间是有限的,所以对我们的连接的记录和连接数量大小是有限制的。所以在并发访问量很大的时候不建议开启。
b、[1] --state state
(1)、INVALID,ESTABLISHED,NEW,RELATED or UNTARCKED.
(2)、NEW:新连接请求。第一次请求还没有记录的时候叫NEW。
(3)、ESTABLISHED:已建立的连接。建立连接后并且记录了的。
(4)、INVALID:无法识别的连接
(5)、RELATED:相关联的连接,当前连接是一个新请求,但附属于某个已存在的连接
(6)、UNTRACKED:未追踪的连接;
(7)、state扩展:
1)、内核模块装载
nf_conntrack
nf_conntrack_ipv4
2)、手动装载
nf_conntrack_ftp
c、追踪到的连接
(1)、/proc/net/nf_conntrack
[root@node3 ~]# cat /proc/net/nf_conntrack
ipv4     2 tcp      6 299 ESTABLISHED src=192.168.10.200 dst=192.168.10.15 sport=1373 dport=22 src=192.168.10.15 dst=192.168.10.200 sport=22 dport=1373 [ASSURED] mark=0 zone=0 use=2
ipv4     2 tcp      6 430451 ESTABLISHED src=192.168.10.15 dst=192.168.10.200 sport=22 dport=11359 src=192.168.10.200 dst=192.168.10.15 sport=11359 dport=22 [ASSURED] mark=0 zone=0 use=2
d、调整可记录的连接数的最大值
(1)、/proc/sys/net/nf_conntrack_max
[root@node3 ~]# cat /proc/sys/net/nf_conntrack_max
65536
e、超时时长
(1)、/proc/sys/net/netfilter/*timeout*
[root@node3 ~]# ls /proc/sys/net/netfilter/
nf_conntrack_acct                   nf_conntrack_events                      nf_conntrack_sctp_timeout_heartbeat_acked    nf_conntrack_tcp_timeout_last_ack
nf_conntrack_buckets                nf_conntrack_events_retry_timeout        nf_conntrack_sctp_timeout_heartbeat_sent     nf_conntrack_tcp_timeout_max_retrans
nf_conntrack_checksum               nf_conntrack_expect_max                  nf_conntrack_sctp_timeout_shutdown_ack_sent  nf_conntrack_tcp_timeout_syn_recv
nf_conntrack_count                  nf_conntrack_generic_timeout             nf_conntrack_sctp_timeout_shutdown_recd      nf_conntrack_tcp_timeout_syn_sent
nf_conntrack_dccp_loose             nf_conntrack_helper                      nf_conntrack_sctp_timeout_shutdown_sent      nf_conntrack_tcp_timeout_time_wait
nf_conntrack_dccp_timeout_closereq  nf_conntrack_icmp_timeout                nf_conntrack_tcp_be_liberal                  nf_conntrack_tcp_timeout_unacknowledged
nf_conntrack_dccp_timeout_closing   nf_conntrack_log_invalid                 nf_conntrack_tcp_loose                       nf_conntrack_timestamp
nf_conntrack_dccp_timeout_open      nf_conntrack_max                         nf_conntrack_tcp_max_retrans                 nf_conntrack_udp_timeout
nf_conntrack_dccp_timeout_partopen  nf_conntrack_sctp_timeout_closed         nf_conntrack_tcp_timeout_close               nf_conntrack_udp_timeout_stream
nf_conntrack_dccp_timeout_request   nf_conntrack_sctp_timeout_cookie_echoed  nf_conntrack_tcp_timeout_close_wait          nf_log
nf_conntrack_dccp_timeout_respond   nf_conntrack_sctp_timeout_cookie_wait    nf_conntrack_tcp_timeout_established
nf_conntrack_dccp_timeout_timewait  nf_conntrack_sctp_timeout_established    nf_conntrack_tcp_timeout_fin_wait
f、实例
(1)、我们现在先清空我们的防火墙
iptables -F
(2)、现在我们来放行本机的tcp端口。既然我们本机是服务器,那么别人第一次请求就是状态全为NEW的,任何一个服务的第一次NEW访问的时候是我们允许访问的服务的时候就放行。其它的统统不放行。
[root@node3 ~]# iptables -A INPUT -d 192.168.10.15 -p tcp -m multiport --dports 22,23,80,139,445,3306 -m state --state NEW -j ACCEPT
(3)、然和插入一条新规则,刚刚我们的规则为NEW,还有很多ESTABLISHED待放行的,只要目标是本机的,不管是什么协议和端口,只要状态是ESTABLISHED都放行。
[root@node3 ~]# iptables -I INPUT -d 192.168.10.15 -m state --state ESTABLISHED -j ACCEPT
[root@node3 ~]# iptables --line-numbers -vnL INPUT
Chain INPUT (policy ACCEPT 9 packets, 702 bytes)
num   pkts bytes target     prot opt in     out     source               destination
1       59  4232 ACCEPT     all  --  *      *       0.0.0.0/0            192.168.10.15        state ESTABLISHED
2        0     0 ACCEPT     tcp  --  *      *       0.0.0.0/0            192.168.10.15        multiport dports 22,23,80,139,445,3306 state NEW
(4)、我们出来的也一样,只要是本机发出去的相应报文,只要状态为ESTABLISHED的都放行。
[root@node3 ~]# iptables -A OUTPUT -s 192.168.10.15 -m state --state ESTABLISHED -j ACCEPT
[root@node3 ~]# iptables --line-numbers -vnL OUTPUT
Chain OUTPUT (policy ACCEPT 0 packets, 0 bytes)
num   pkts bytes target     prot opt in     out     source               destination
1       36  3240 ACCEPT     all  --  *      *       192.168.10.15        0.0.0.0/0            state ESTABLISHED
(5)、现在我们就可以将我们的默认规则设置为REJECT了
[root@node3 ~]# iptables -A INPUT -d 192.168.10.15 -j REJECT
[root@node3 ~]# iptables -A OUTPUT -s 192.168.10.15 -j REJECT
[root@node3 ~]# iptables --line-numbers -vnL
Chain INPUT (policy ACCEPT 12 packets, 936 bytes)
num   pkts bytes target     prot opt in     out     source               destination
1      504 36728 ACCEPT     all  --  *      *       0.0.0.0/0            192.168.10.15        state ESTABLISHED
2        0     0 ACCEPT     tcp  --  *      *       0.0.0.0/0            192.168.10.15        multiport dports 22,23,80,139,445,3306 state NEW
3        0     0 REJECT     all  --  *      *       0.0.0.0/0            192.168.10.15        reject-with icmp-port-unreachable

Chain FORWARD (policy DROP 0 packets, 0 bytes)
num   pkts bytes target     prot opt in     out     source               destination

Chain OUTPUT (policy ACCEPT 0 packets, 0 bytes)
num   pkts bytes target     prot opt in     out     source               destination
1      209 19056 ACCEPT     all  --  *      *       192.168.10.15        0.0.0.0/0            state ESTABLISHED
2        0     0 REJECT     all  --  *      *       192.168.10.15        0.0.0.0/0            reject-with icmp-port-unreachable
(6)、然后我们可以发现我们的ssh还可以正常访问,并且我们的telnet也可以访问
(7)、我们还可以把UDP的137,138端口给其开放出来,我们只需要开启我们的INPUT即可,我们只需放行NEW的,ESTABLISHED默认的都放行过了。然后我们就可以访问samba服务了
[root@node3 ~]# iptables -I INPUT 2 -d 192.168.10.15 -p udp --dport 137:138 -m state --state NEW -j ACCEPT
[root@node3 ~]# iptables --line-numbers -vnL
Chain INPUT (policy ACCEPT 3 packets, 234 bytes)
num   pkts bytes target     prot opt in     out     source               destination
1      740 54757 ACCEPT     all  --  *      *       0.0.0.0/0            192.168.10.15        state ESTABLISHED
2        0     0 ACCEPT     udp  --  *      *       0.0.0.0/0            192.168.10.15        udp dpts:137:138 state NEW
3        1    52 ACCEPT     tcp  --  *      *       0.0.0.0/0            192.168.10.15        multiport dports 22,23,80,139,445,3306 state NEW
4        0     0 REJECT     all  --  *      *       0.0.0.0/0            192.168.10.15        reject-with icmp-port-unreachable

Chain FORWARD (policy DROP 0 packets, 0 bytes)
num   pkts bytes target     prot opt in     out     source               destination

Chain OUTPUT (policy ACCEPT 0 packets, 0 bytes)
num   pkts bytes target     prot opt in     out     source               destination
1      372 38114 ACCEPT     all  --  *      *       192.168.10.15        0.0.0.0/0            state ESTABLISHED
2        8   788 REJECT     all  --  *      *       192.168.10.15        0.0.0.0/0            reject-with icmp-port-unreachable
(8)、现在我们来开放时间同步服务器的访问(注意是我们访问别人的时间服务器)
[root@node3 ~]# iptables -I OUTPUT 2 -s 192.168.10.15 -p udp -m multiport --dports 123,323 -j ACCEPT
[root@node3 ~]# iptables --line-numbers -vnL
Chain INPUT (policy ACCEPT 1 packets, 78 bytes)
num   pkts bytes target     prot opt in     out     source               destination
1      952 70405 ACCEPT     all  --  *      *       0.0.0.0/0            192.168.10.15        state ESTABLISHED
2        0     0 ACCEPT     udp  --  *      *       0.0.0.0/0            192.168.10.15        udp dpts:137:138 state NEW
3        1    52 ACCEPT     tcp  --  *      *       0.0.0.0/0            192.168.10.15        multiport dports 22,23,80,139,445,3306 state NEW
4        0     0 REJECT     all  --  *      *       0.0.0.0/0            192.168.10.15        reject-with icmp-port-unreachable

Chain FORWARD (policy DROP 0 packets, 0 bytes)
num   pkts bytes target     prot opt in     out     source               destination

Chain OUTPUT (policy ACCEPT 0 packets, 0 bytes)
num   pkts bytes target     prot opt in     out     source               destination
1      518 52410 ACCEPT     all  --  *      *       192.168.10.15        0.0.0.0/0            state ESTABLISHED
2        0     0 ACCEPT     udp  --  *      *       192.168.10.15        0.0.0.0/0            multiport dports 123,323
3        8   788 REJECT     all  --  *      *       192.168.10.15        0.0.0.0/0            reject-with icmp-port-unreachable
[root@node3 ~]# iptables -R OUTPUT 2 -s 192.168.10.15 -p udp -m multiport --dports 123,323 -m state --state NEW  -j ACCEPT
[root@node3 ~]# iptables --line-numbers -vnL
Chain INPUT (policy ACCEPT 2 packets, 72 bytes)
num   pkts bytes target     prot opt in     out     source               destination
1     1097 81909 ACCEPT     all  --  *      *       0.0.0.0/0            192.168.10.15        state ESTABLISHED
2        0     0 ACCEPT     udp  --  *      *       0.0.0.0/0            192.168.10.15        udp dpts:137:138 state NEW
3        1    52 ACCEPT     tcp  --  *      *       0.0.0.0/0            192.168.10.15        multiport dports 22,23,80,139,445,3306 state NEW
4        0     0 REJECT     all  --  *      *       0.0.0.0/0            192.168.10.15        reject-with icmp-port-unreachable

Chain FORWARD (policy DROP 0 packets, 0 bytes)
num   pkts bytes target     prot opt in     out     source               destination

Chain OUTPUT (policy ACCEPT 0 packets, 0 bytes)
num   pkts bytes target     prot opt in     out     source               destination
1      632 64842 ACCEPT     all  --  *      *       192.168.10.15        0.0.0.0/0            state ESTABLISHED
2        0     0 ACCEPT     udp  --  *      *       192.168.10.15        0.0.0.0/0            multiport dports 123,323 state NEW
3        8   788 REJECT     all  --  *      *       192.168.10.15        0.0.0.0/0            reject-with icmp-port-unreachable
(9)、我们要开放ftp服务访问,即21号端口。
1)、我们首先装载追踪ftp连接的内核模块 nf_conntrack_ftp
[root@node3 ~]# modprobe nf_conntrack_ftp
[root@node3 ~]# lsmod |grep nf_conntrack_ftp
nf_conntrack_ftp       18638  0
nf_conntrack          133387  4 xt_connlimit,xt_conntrack,nf_conntrack_ftp,nf_conntrack_ipv4
2)、我们现在来改造一下相应的规则
[root@node3 ~]# iptables -R INPUT 3 -d 192.168.10.15 -p tcp -m multiport --dports 21:23,80,139,445,3306 -m state --state NEW -j ACCEPT
[root@node3 ~]# iptables --line-numbers -vnL
Chain INPUT (policy ACCEPT 0 packets, 0 bytes)
num   pkts bytes target     prot opt in     out     source               destination
1     1437  106K ACCEPT     all  --  *      *       0.0.0.0/0            192.168.10.15        state ESTABLISHED
2        0     0 ACCEPT     udp  --  *      *       0.0.0.0/0            192.168.10.15        udp dpts:137:138 state NEW
3        0     0 ACCEPT     tcp  --  *      *       0.0.0.0/0            192.168.10.15        multiport dports 21:23,80,139,445,3306 state NEW
4        0     0 REJECT     all  --  *      *       0.0.0.0/0            192.168.10.15        reject-with icmp-port-unreachable

Chain FORWARD (policy DROP 0 packets, 0 bytes)
num   pkts bytes target     prot opt in     out     source               destination

Chain OUTPUT (policy ACCEPT 0 packets, 0 bytes)
num   pkts bytes target     prot opt in     out     source               destination
1      867 87774 ACCEPT     all  --  *      *       192.168.10.15        0.0.0.0/0            state ESTABLISHED
2        0     0 ACCEPT     udp  --  *      *       192.168.10.15        0.0.0.0/0            multiport dports 123,323 state NEW
3        8   788 REJECT     all  --  *      *       192.168.10.15        0.0.0.0/0            reject-with icmp-port-unreachable
[root@node3 ~]#
3)、INPUT中放行ESTABLISHED和RELATED的流量
[root@node3 ~]# iptables -R INPUT 1 -d 192.168.10.15 -m state --state ESTABLISHED,RELATED -j ACCEPT
[root@node3 ~]# iptables --line-numbers -vnL
Chain INPUT (policy ACCEPT 0 packets, 0 bytes)
num   pkts bytes target     prot opt in     out     source               destination
1        5   356 ACCEPT     all  --  *      *       0.0.0.0/0            192.168.10.15        state RELATED,ESTABLISHED
2        0     0 ACCEPT     udp  --  *      *       0.0.0.0/0            192.168.10.15        udp dpts:137:138 state NEW
3        0     0 ACCEPT     tcp  --  *      *       0.0.0.0/0            192.168.10.15        multiport dports 21:23,80,139,445,3306 state NEW
4        0     0 REJECT     all  --  *      *       0.0.0.0/0            192.168.10.15        reject-with icmp-port-unreachable

Chain FORWARD (policy DROP 0 packets, 0 bytes)
num   pkts bytes target     prot opt in     out     source               destination

Chain OUTPUT (policy ACCEPT 0 packets, 0 bytes)
num   pkts bytes target     prot opt in     out     source               destination
1      967 98178 ACCEPT     all  --  *      *       192.168.10.15        0.0.0.0/0            state ESTABLISHED
2        0     0 ACCEPT     udp  --  *      *       192.168.10.15        0.0.0.0/0            multiport dports 123,323 state NEW
3        8   788 REJECT     all  --  *      *       192.168.10.15        0.0.0.0/0            reject-with icmp-port-unreachable
(10)、然后我们发现可以访问ftp了
二、iptables处理动作(跳转目标)
1、-j targetname [per-target-options]
2、target类型
a、简单target:
(1)、ACCEPT,DROP
b、扩展target:
(1)、REJECT
1)、This is used to send back an error packet in response to the matched packet:otherwise it is equlvalent to DROP so it is a terminating TARGET,ending rule traversal
2)、--reject-whith type
The type given can be icmp-net-unreachable,icmp-host-unreachable,icmp-port-unreachable,icmp-proto-unreach-able,icmp-net-prohibited,icmp-host-prohibited,or icmp-admin-prohibited(*),which return the appropriate ICMP error message(icmp-port-unreachable is the default)。这儿的意思是我们可以编造很多理由来拒绝,我们默认的是icmp端口不可达,我么还可以编造比如网络不可达,主机不可达,端口不可达,协议不可达,网络被禁止等等,我们可以跟上描述中的相应选项来设定。
(2)、LOG:记录日志,默认他会把日志记录到/var/log/message上去。
1)、Turn on kernel logging of matching packets
2)、--log-level:记录日志级别
3)、--log-prefix:记录日志前缀
4)、我们在23号端口放行之前加上对23号的日志访问功能
[root@node3 ~]# iptables --line-numbers -vnL INPUT
Chain INPUT (policy ACCEPT 1818 packets, 121K bytes)
num   pkts bytes target     prot opt in     out     source               destination
1      227 16816 ACCEPT     all  --  *      *       0.0.0.0/0            192.168.10.15        state RELATED,ESTABLISHED
2        0     0 ACCEPT     udp  --  *      *       0.0.0.0/0            192.168.10.15        udp dpts:137:138 state NEW
3        0     0 ACCEPT     tcp  --  *      *       0.0.0.0/0            192.168.10.15        multiport dports 21:23,80,139,445,3306 state NEW
4        0     0 REJECT     all  --  *      *       0.0.0.0/0            192.168.10.15        reject-with icmp-port-unreachable
[root@node3 ~]# iptables -I INPUT 3 -d 192.168.10.15 -p tcp --dport 23 -m state --state NEW -j LOG
[root@node3 ~]# iptables --line-numbers -vnL INPUT
Chain INPUT (policy ACCEPT 0 packets, 0 bytes)
num   pkts bytes target     prot opt in     out     source               destination
1      354 26248 ACCEPT     all  --  *      *       0.0.0.0/0            192.168.10.15        state RELATED,ESTABLISHED
2        0     0 ACCEPT     udp  --  *      *       0.0.0.0/0            192.168.10.15        udp dpts:137:138 state NEW
3        0     0 LOG        tcp  --  *      *       0.0.0.0/0            192.168.10.15        tcp dpt:23 state NEW LOG flags 0 level 4
4        0     0 ACCEPT     tcp  --  *      *       0.0.0.0/0            192.168.10.15        multiport dports 21:23,80,139,445,3306 state NEW
5        0     0 REJECT     all  --  *      *       0.0.0.0/0            192.168.10.15        reject-with icmp-port-unreachable
5)、我们试着加上前缀
[root@node3 ~]# iptables -R INPUT 3 -d 192.168.10.15 -p tcp --dport 23 -m state --state NEW -j LOG --log-prefix "access telnet"
[root@node3 ~]# iptables --line-numbers -vnL INPUT
Chain INPUT (policy ACCEPT 1 packets, 78 bytes)
num   pkts bytes target     prot opt in     out     source               destination
1      610 45456 ACCEPT     all  --  *      *       0.0.0.0/0            192.168.10.15        state RELATED,ESTABLISHED
2        0     0 ACCEPT     udp  --  *      *       0.0.0.0/0            192.168.10.15        udp dpts:137:138 state NEW
3        0     0 LOG        tcp  --  *      *       0.0.0.0/0            192.168.10.15        tcp dpt:23 state NEW LOG flags 0 level 4 prefix "access telnet"
4        0     0 ACCEPT     tcp  --  *      *       0.0.0.0/0            192.168.10.15        multiport dports 21:23,80,139,445,3306 state NEW
5        0     0 REJECT     all  --  *      *       0.0.0.0/0            192.168.10.15        reject-with icmp-port-unreachable
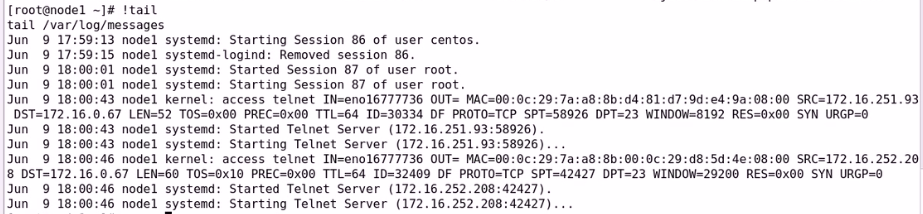
6)、然后我们看相应的日志
(3)、RETURN:
返回调用者;一般在自定义链上使用
c、自定义链作为target
(1)、我们现在定义本机所有的ping请求入栈的都在一个自己定义的链上来定义
1)、先定义链
[root@node3 ~]# iptables -N in_ping_rules
2)、我们在链上定义相应的规则
[root@node3 ~]# iptables -A in_ping_rules -d 192.168.10.15 -p icmp --icmp-type 8 -j ACCEPT
[root@node3 ~]# iptables --line-numbers -vnL in_ping_rules
Chain in_ping_rules (0 references)
num   pkts bytes target     prot opt in     out     source               destination
1        0     0 ACCEPT     icmp --  *      *       0.0.0.0/0            192.168.10.15        icmptype 8
3)、现在我们在链上定义不允许192.168.10.8来ping我们的主机
[root@node3 ~]# iptables -I in_ping_rules -d 192.168.10.15 -s 192.168.10.8 -p icmp -j REJECT
[root@node3 ~]# iptables --line-numbers -vnL in_ping_rules
Chain in_ping_rules (0 references)
num   pkts bytes target     prot opt in     out     source               destination
1        0     0 REJECT     icmp --  *      *       192.168.10.8         192.168.10.15        reject-with icmp-port-unreachable
2        0     0 ACCEPT     icmp --  *      *       0.0.0.0/0            192.168.10.15        icmptype 8
4)、此时我们定义的链和规则还没有发挥作用,我们要使用链来调用它他才会生效。我们现在在INPUT上将此链加入到第五条来调用。此时我们可以看到我们的in_ping_rules链为1 references,即可以开始使用了
[root@node3 ~]# iptables -I INPUT 5 -d 192.168.10.15 -p icmp -j in_ping_rules
[root@node3 ~]# iptables --line-numbers -vnL
Chain INPUT (policy ACCEPT 6 packets, 468 bytes)
num   pkts bytes target     prot opt in     out     source               destination
1     1129 83056 ACCEPT     all  --  *      *       0.0.0.0/0            192.168.10.15        state RELATED,ESTABLISHED
2        0     0 ACCEPT     udp  --  *      *       0.0.0.0/0            192.168.10.15        udp dpts:137:138 state NEW
3        0     0 LOG        tcp  --  *      *       0.0.0.0/0            192.168.10.15        tcp dpt:23 state NEW LOG flags 0 level 4 prefix "access telnet"
4        0     0 ACCEPT     tcp  --  *      *       0.0.0.0/0            192.168.10.15        multiport dports 21:23,80,139,445,3306 state NEW
5        0     0 in_ping_rules  icmp --  *      *       0.0.0.0/0            192.168.10.15
6        0     0 REJECT     all  --  *      *       0.0.0.0/0            192.168.10.15        reject-with icmp-port-unreachable

Chain FORWARD (policy DROP 0 packets, 0 bytes)
num   pkts bytes target     prot opt in     out     source               destination

Chain OUTPUT (policy ACCEPT 0 packets, 0 bytes)
num   pkts bytes target     prot opt in     out     source               destination
1     1778  172K ACCEPT     all  --  *      *       192.168.10.15        0.0.0.0/0            state ESTABLISHED
2        0     0 ACCEPT     udp  --  *      *       192.168.10.15        0.0.0.0/0            multiport dports 123,323 state NEW
3        8   788 REJECT     all  --  *      *       192.168.10.15        0.0.0.0/0            reject-with icmp-port-unreachable

Chain in_ping_rules (1 references)
num   pkts bytes target     prot opt in     out     source               destination
1        0     0 REJECT     icmp --  *      *       192.168.10.8         192.168.10.15        reject-with icmp-port-unreachable
2        0     0 ACCEPT     icmp --  *      *       0.0.0.0/0            192.168.10.15        icmptype 8
5)、此时我们可以发现我们其它主机就能ping通我们的192.168.10.15了,之所以我们OUTPUT没有放行是因为我们的ESTABLISHED是万能的。但是对于192.168.10.8就不能ping通,因为我们是设置了拒绝策略的。
6)、我们自定义的链如果被引用了就是删不掉的。并且如果链中定义了规则也是无法删掉的。
i、我们先来删除我们的in_ping_rules,发现无法删除
[root@node3 ~]# iptables -X in_ping_rules
iptables: Too many links.
ii、然后我们删除我们INPUT上的引用再删除发现还是无法删除
[root@node3 ~]# iptables -D INPUT 5
[root@node3 ~]# iptables -X in_ping_rules
iptables: Directory not empty.
iii、然后我们情况我们in_ping_rules链中的规则发现就可以删除了
[root@node3 ~]# iptables -F in_ping_rules
[root@node3 ~]# iptables -X in_ping_rules
三、保存和载入规则
1、保存:iptables-save > /PATH/TO/SOME_RULE_FILE
[root@node3 ~]# iptables-save > /etc/sysconfig/iptables-20200609-v1
[root@node3 ~]# cat /etc/sysconfig/iptables-20200609-v1
# Generated by iptables-save v1.4.21 on Fri Jun  5 19:36:14 2020
*filter
:INPUT ACCEPT [35:2142]
:FORWARD DROP [0:0]
:OUTPUT ACCEPT [0:0]
-A INPUT -d 192.168.10.15/32 -m state --state RELATED,ESTABLISHED -j ACCEPT
-A INPUT -d 192.168.10.15/32 -p udp -m udp --dport 137:138 -m state --state NEW -j ACCEPT
-A INPUT -d 192.168.10.15/32 -p tcp -m tcp --dport 23 -m state --state NEW -j LOG --log-prefix "access telnet"
-A INPUT -d 192.168.10.15/32 -p tcp -m multiport --dports 21:23,80,139,445,3306 -m state --state NEW -j ACCEPT
-A INPUT -d 192.168.10.15/32 -j REJECT --reject-with icmp-port-unreachable
-A OUTPUT -s 192.168.10.15/32 -m state --state ESTABLISHED -j ACCEPT
-A OUTPUT -s 192.168.10.15/32 -p udp -m multiport --dports 123,323 -m state --state NEW -j ACCEPT
-A OUTPUT -s 192.168.10.15/32 -j REJECT --reject-with icmp-port-unreachable
COMMIT
# Completed on Fri Jun  5 19:36:14 2020
2、重载:iptables-restore < /PATH/FROM/SOME_RULE_FILE,但是有一个功能他做不到,即模块装载,因此我们还需要自己装载模块。
[root@node3 ~]# iptables-restore < /etc/sysconfig/iptables-20200609-v1
(1)、-n,--noflush:不清楚原有规则。重载时会冲掉原有规则,即用文件中的规则清空原有的内存中的规则,如果不清空只是追加进去就使用-n。这个一般开发者才会这样用
(2)、-t,--test:仅分析生成规则集,但不提交
3、CentOS6中:
a、保存规则
(1)、service iptables save
(2)、保存规则于/etc/sysconfig/iptables文件,覆盖保存
b、重载规则
(1)、service iptables restart
(2)、默认重载 /etc/sysconfig/iptables文件中的规则
c、配置文件:/etc/sysconfig/iptables-config
4、CentOS7
a、自定义Unit File,进行iptables-restore
b、firewalld服务
c、自定义脚本
5、规则优化的思路
a、使用自定义链管理特定应用的相关规则,模块化管理规则
b、优先放行双方向状态为ESTABLISHED的报文
c、服务于不同类别的功能的规则,匹配到报文可能性更大的放前面
d、服务于同一类别的功能的规则,匹配条件较严格的放在前面
e、设置默认策略,白名单机制
(1)、iptables -P,不建议
(2)、建议在规则的最后定义规则作为默认策略