20172303 2018-2019-1 《程序设计与数据结构》实验二报告
- 课程:《程序设计与数据结构》
- 班级: 1723
- 姓名: 范雯琪
- 学号:20172303
- 实验教师:王志强
- 助教:张师瑜/张之睿
- 实验日期:2018年11月5日
- 必修/选修: 必修
实验内容
本次实验主要是关于树的应用, 涉及了二叉树、决策树、表达式树、二叉查找树、红黑树五种树的类型,是对最近学习内容第十章和第十一章的一个总结。
节点一
- 参考教材P212,完成链树LinkedBinaryTree的实现(getRight,contains,toString,preorder,postorder),用JUnit或自己编写驱动类对自己实现的LinkedBinaryTree进行测试。
节点二
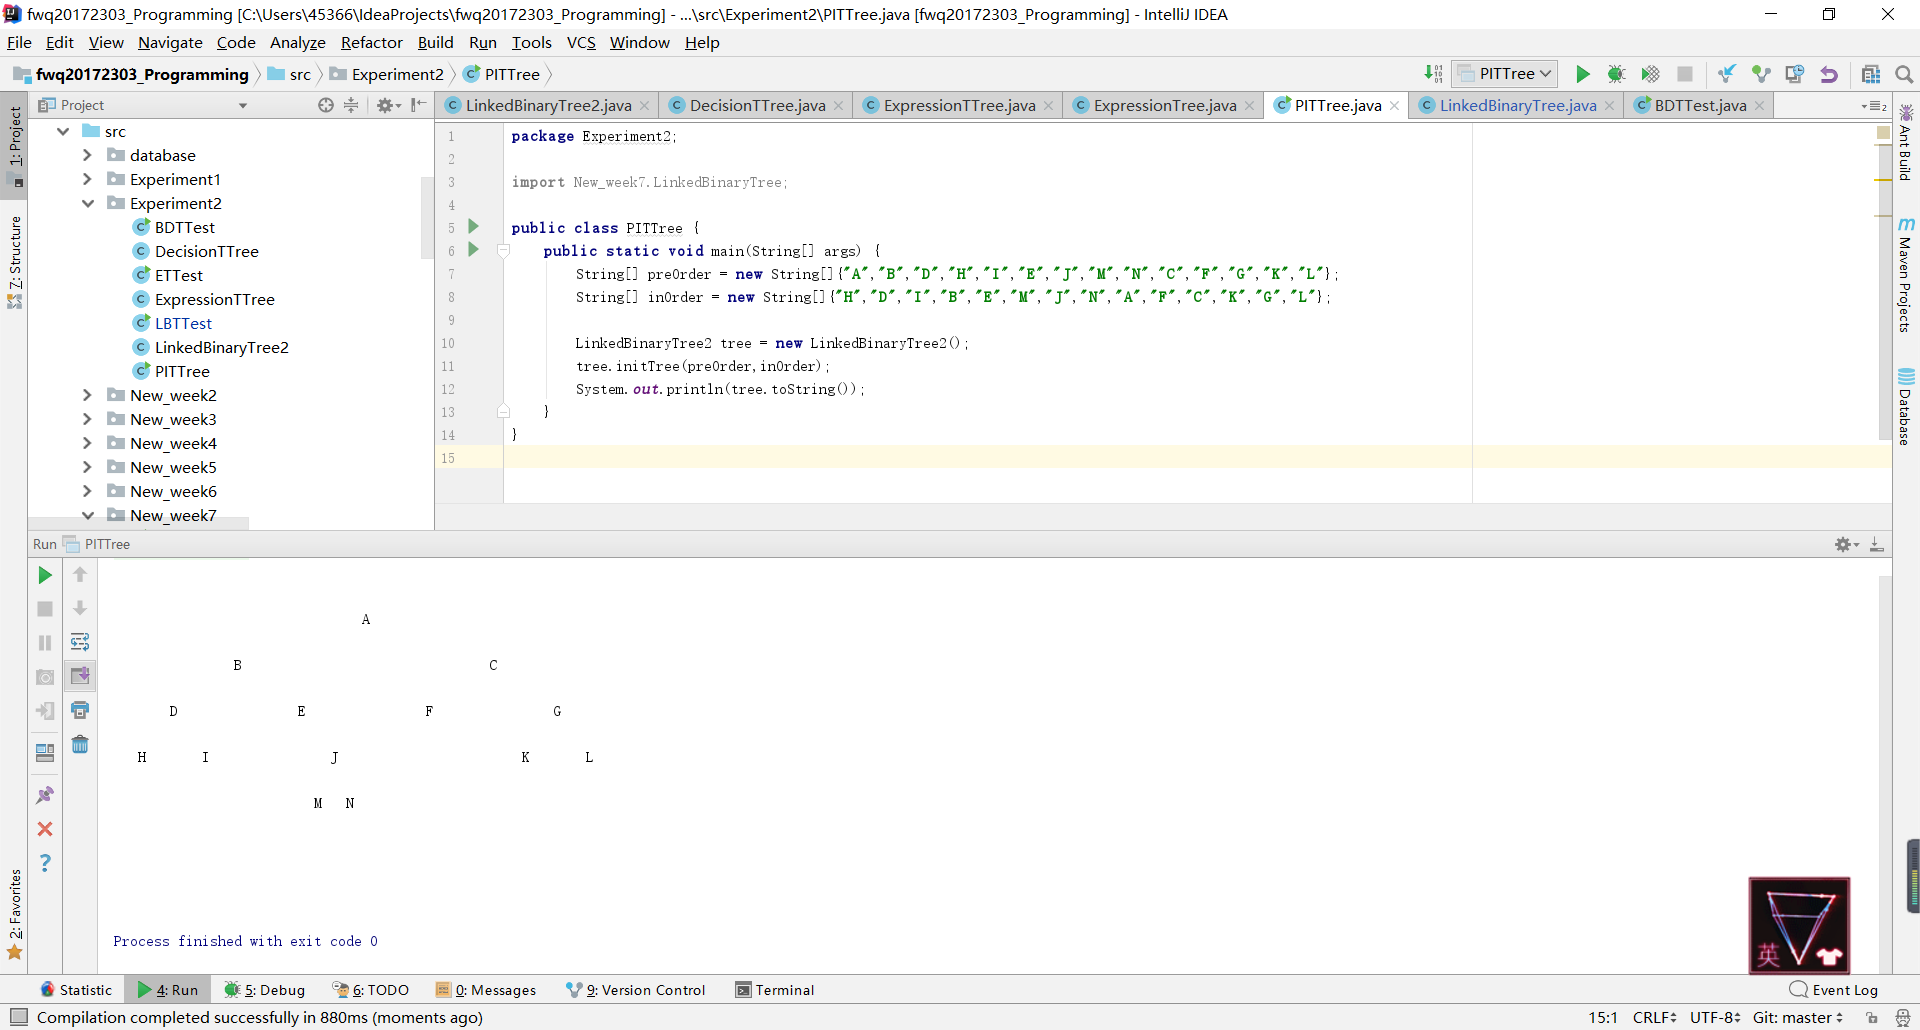
- 基于LinkedBinaryTree,实现基于(中序,先序)序列构造唯一一棵二㕚树的功能,比如给出先序ABDHIEJMNCFGKL和中序HDIBEMJNAFCKGL,构造出附图中的树,用JUnit或自己编写驱动类对自己实现的功能进行测试。

节点三
- 自己设计并实现一颗决策树。
节点四
- 输入中缀表达式,使用树将中缀表达式转换为后缀表达式,并输出后缀表达式和计算结果(如果没有用树,则为0分)。
节点五
- 完成PP11.3。
节点六
- 参考Java Collections API源码分析对Java中的红黑树(TreeMap,HashMap)进行源码分析,并在实验报告中体现分析结果。
实验过程及结果
节点一——实现二叉树
- getRight:
getRight操作用于返回根的右子树。当树为空时,抛出错误,当树不为空时,通过递归返回根的右子树。
public LinkedBinaryTree2<T> getRight()
    {
        if(root == null) {
            throw new EmptyCollectionException("BinaryTree");
        }
        LinkedBinaryTree2<T> result = new LinkedBinaryTree2<>();
        result.root = root.getRight();
        return result;
    }
- contains:
contains操作的实现有两种方法:一种是直接借用find方法,另一种是重新写一个。- 方法一:借用
find方法,find方法的作用是在二叉树中找到指定目标元素,则返回对该元素的引用,所以当该元素的引用与查找的元素相同时返回true,否则返回false。
public boolean contains(T targetElement) { if (find(targetElement) == targetElement){return true;} else {return false;} }- 方法二:重新写一个。具体解释放在代码当中。
public boolean contains(T targetElement) { BinaryTreeNode node = root; BinaryTreeNode temp = root; //找到的情况有三种:查找元素就是根,查找元素位于右子树,查找元素位于左子树。 //除了这三种情况下其余情况都找不到元素,因此初始设置为false boolean result = false; //当树为空时,返回false if (node == null){ result = false; } //当查找元素就是根时,返回true if (node.getElement().equals(targetElement)){ result = true; } //对右子树进行遍历(在右子树不为空的情况下)找到元素则返回true,否则对根的左子树进行遍历 while (node.right != null){ if (node.right.getElement().equals(targetElement)){ result = true; break; } else { node = node.right; } } //对根的左子树进行遍历,找到元素则返回true,否则返回false while (temp.left.getElement().equals(targetElement)){ if (temp.left.getElement().equals(targetElement)){ result = true; break; } else { temp = temp.left; } } return result; } - 方法一:借用
- toString:
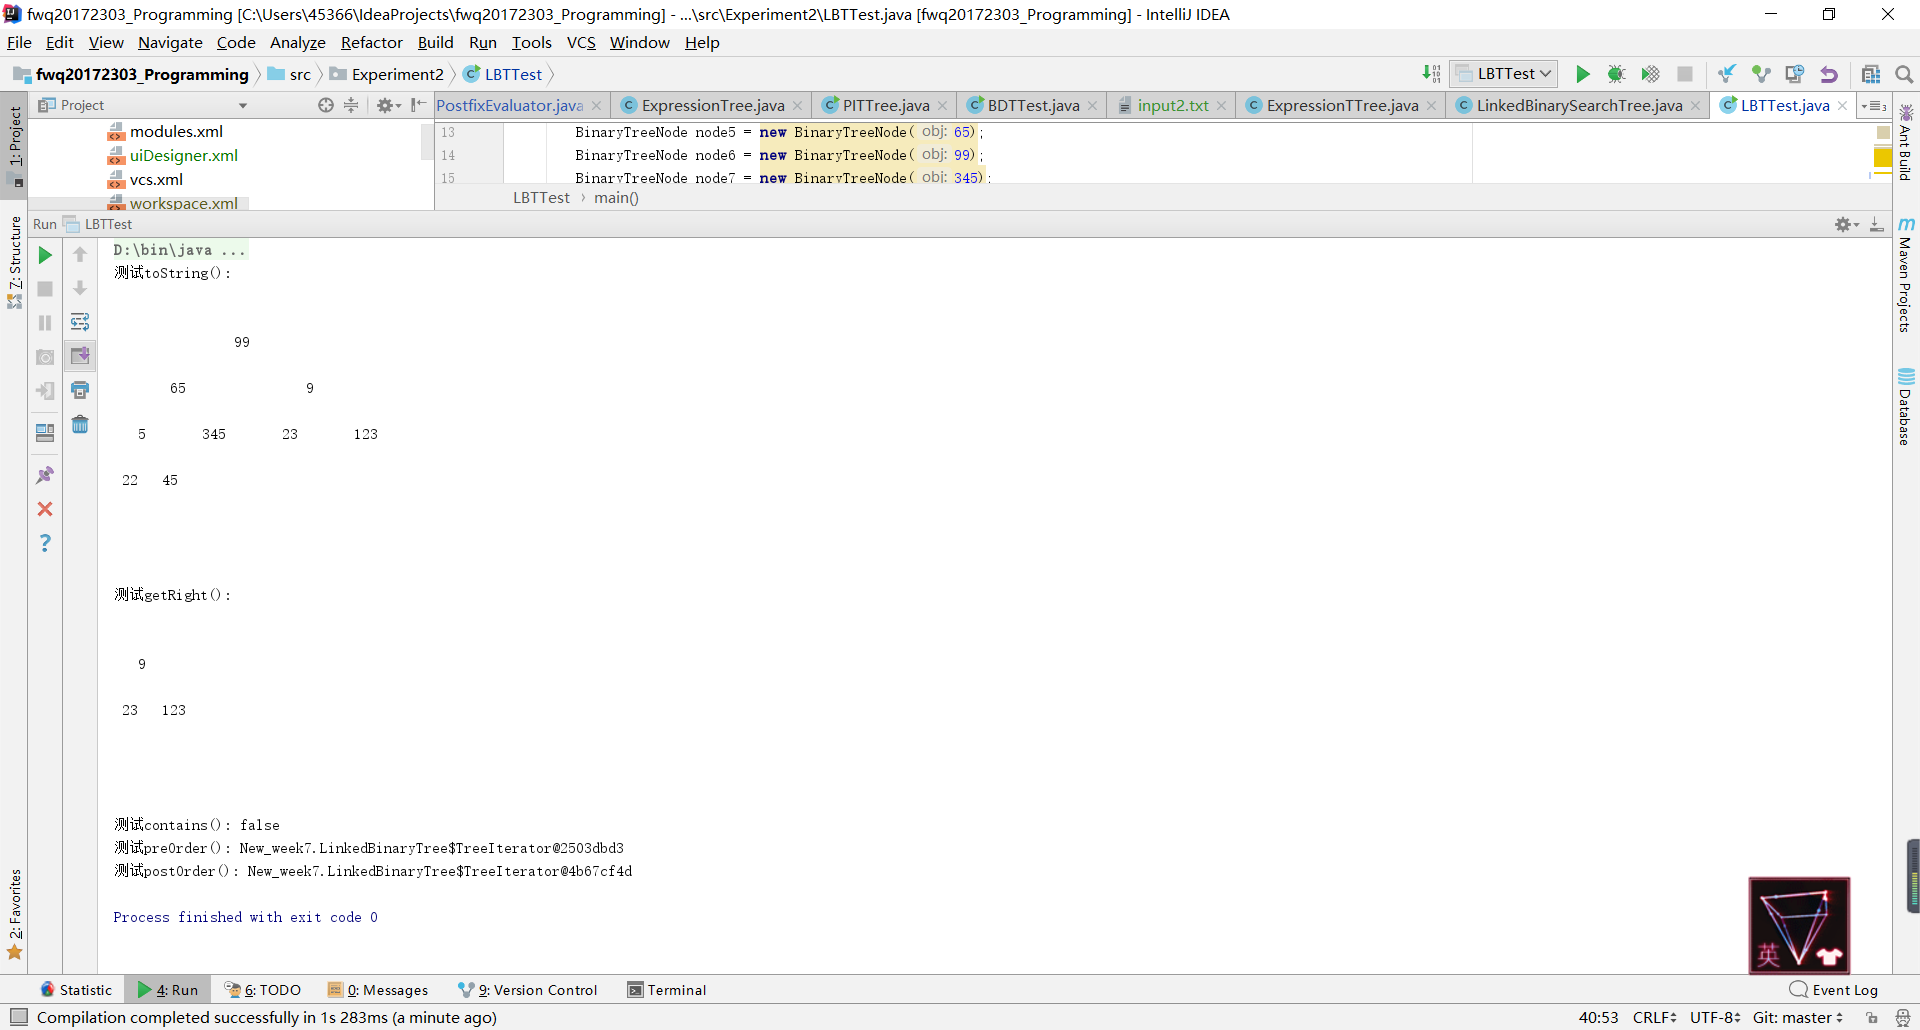
toString方法我借用了ExpressionTree类中的PrintTree方法,具体内容曾在第七周博客中说过。 - preorder:
preorder方法由于有inOrder方法的参考所以挺好写的,修改一下三条代码(三条代码分别代码访问根、访问右孩子和访问左孩子)的顺序即可,使用了递归。在输出时为了方便输出我重新写了一个ArrayUnorderedList类的公有方法,直接输出列表,要比用迭代器输出方便一些。
public ArrayUnorderedList preOrder(){
    ArrayUnorderedList<T> tempList = new ArrayUnorderedList<T>();
    preOrder(root,tempList);
    return tempList;
}

protected void preOrder(BinaryTreeNode<T> node,
                            ArrayUnorderedList<T> tempList)
{
    if (node != null){
        //从根节点开始,先访问左孩子,再访问右孩子
        tempList.addToRear(node.getElement());
        preOrder(node.getLeft(),tempList);
        preOrder(node.getRight(),tempList);
    }
}
- postOrder:
postOrder方法与preorder方法类似,唯一的区别是后序遍历先访问左孩子,再访问右孩子,最后访问根结点,代码和上面差不多就不放了。
测试结果

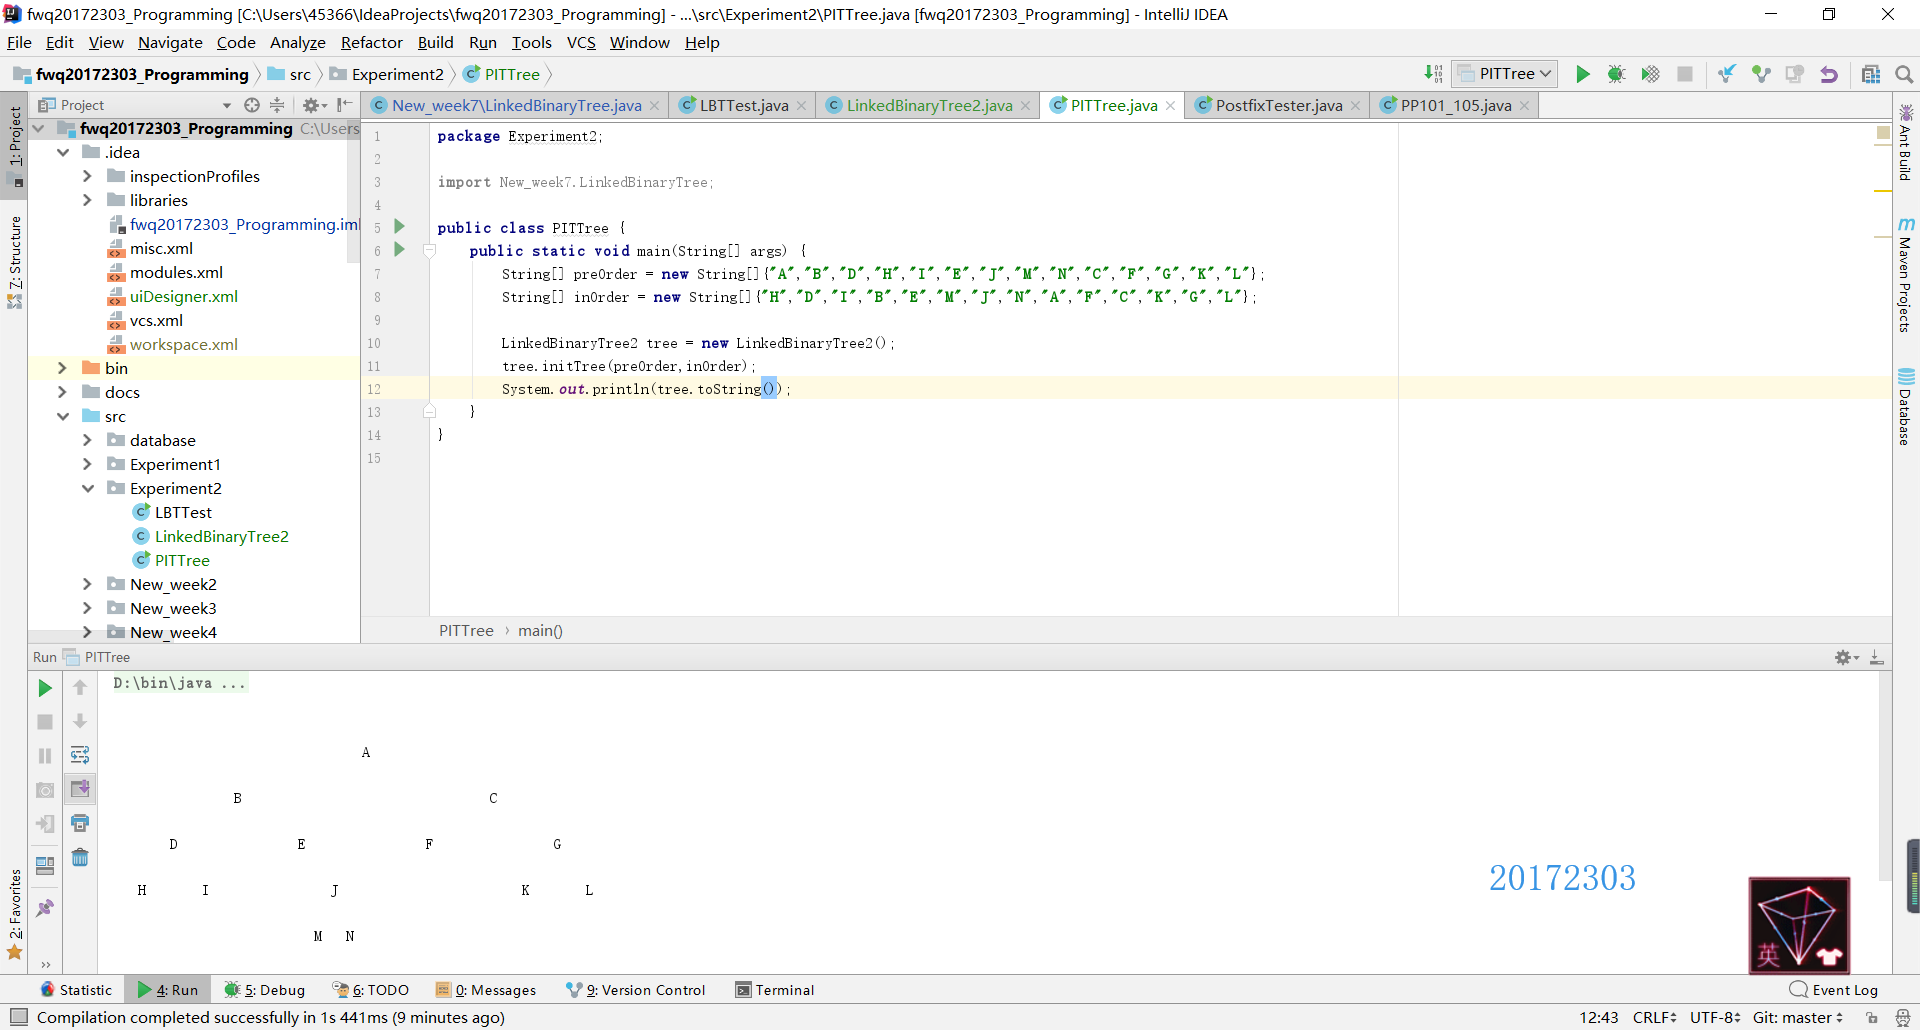
节点二——中序先序序列构造二叉树
- 已知先序遍历和中序遍历得到二叉树有三个步骤:
- (1)找到根结点。因为先序遍历按照先访问根结点再访问左右孩子的顺序进行的,所以先序遍历的第一个结点就是二叉树的根。
- (2)区分左右子树。在确定了根结点之后,在中序遍历结果中,根结点之前的就是左子树,根结点之后的就是右子树。如果跟结点前边或后边为空,那么该方向子树为空;如果根节点前边和后边都为空,那么根节点已经为叶子节点。
- (3)分别对左右子树再重复第一、二步直至完全构造出该树。
- 在清楚了构造的步骤之后,实现就比较简单了,在实现的过程中用了递归的方法。
public void initTree(String[] preOrder,String[] inOrder){
    BinaryTreeNode temp = initTree(preOrder,0,preOrder.length-1,inOrder,0,inOrder.length-1);
    root = temp;
}

private BinaryTreeNode initTree(String[] preOrder,int prefirst,int prelast,String[] inOrder,int infirst,int inlast){
    if(prefirst > prelast || infirst > inlast){
        return null;
    }
    String rootData = preOrder[prefirst];
    BinaryTreeNode head = new BinaryTreeNode(rootData);
    //找到根结点
    int rootIndex = findroot(inOrder,rootData,infirst,inlast);
    //构建左子树
    BinaryTreeNode left = initTree(preOrder,prefirst + 1,prefirst + rootIndex - infirst,inOrder,infirst,rootIndex-1);
    //构建右子树
    BinaryTreeNode right = initTree(preOrder,prefirst + rootIndex - infirst + 1,prelast,inOrder,rootIndex+1,inlast);
    head.left = left;
    head.right = right;
    return head;
}
//寻找根结点在中序遍历数组中的位置
public int findroot(String[] a, String x, int first, int last){
    for(int i = first;i<=last; i++){
        if(a[i] == x){
            return i;
        }
    }
    return -1;
}
测试结果
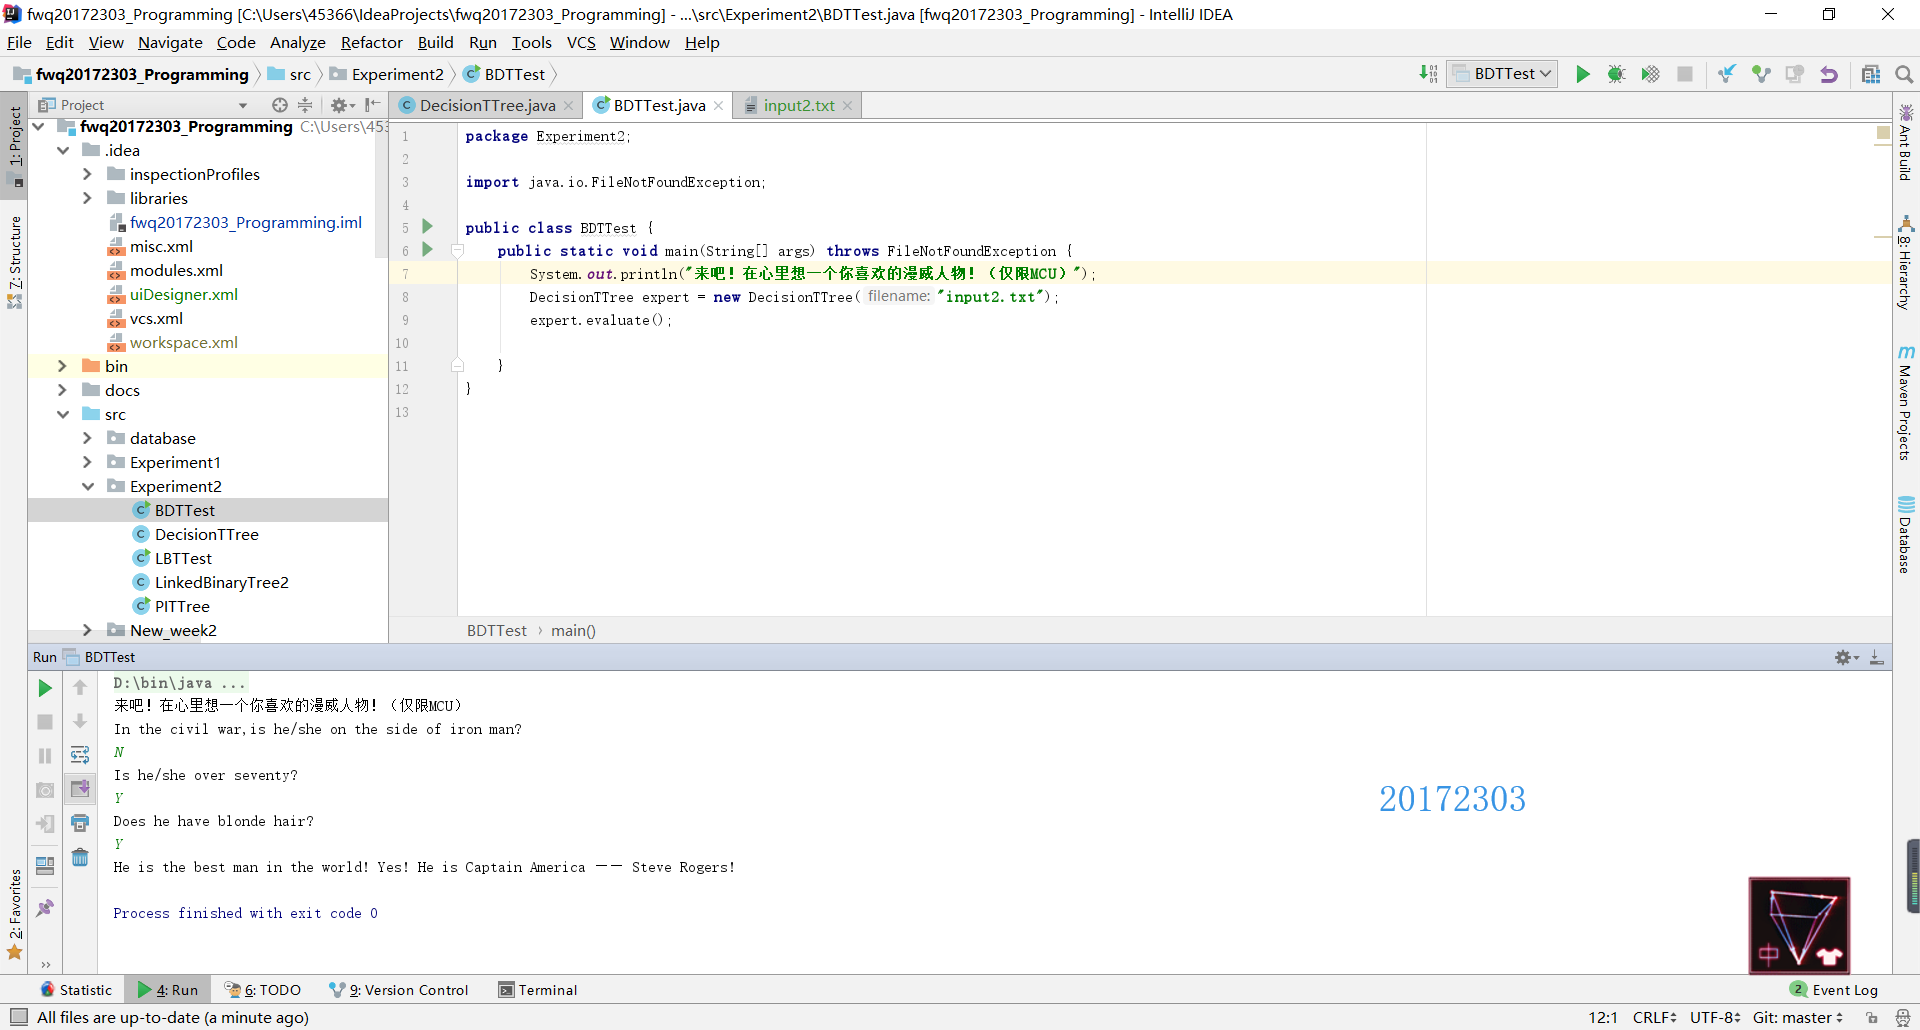
节点三——决策树
- 节点三的实现借助了第十章背部疼痛诊断器的相关内容,其关键部分是
DecisionTree类的实现。DecisionTree的构造函数从文件中读取字符串元素。存储在树结点中。然后创建新的结点,将之前定义的结点(或子树)作为内部结点的子结点。
public DecisionTTree(String filename) throws FileNotFoundException { //读取字符串 File inputFile = new File(filename); Scanner scan = new Scanner(inputFile); int numberNodes = scan.nextInt(); scan.nextLine(); int root = 0, left, right; //存储在根结点中 List<LinkedBinaryTree<String>> nodes = new ArrayList<LinkedBinaryTree<String>>(); for (int i = 0; i < numberNodes; i++) { nodes.add(i,new LinkedBinaryTree<String>(scan.nextLine())); } //建立子树 while (scan.hasNext()) { root = scan.nextInt(); left = scan.nextInt(); right = scan.nextInt(); scan.nextLine(); nodes.set(root, new LinkedBinaryTree<String>((nodes.get(root)).getRootElement(), nodes.get(left), nodes.get(right))); } tree = nodes.get(root); }evaluate方法从根结点开始处理,用current表示正在处理的结点。在循环中,如果用户的答案为N,则更新current使之指向左孩子,如果用户的答案为Y,则更新current使之指向右孩子,循环直至current为叶子结点时结束,结束后返回current的根结点的引用。
public void evaluate()
{
    LinkedBinaryTree<String> current = tree;
    Scanner scan = new Scanner(System.in);

    while (current.size() > 1)
    {
        System.out.println (current.getRootElement());
        if (scan.nextLine().equalsIgnoreCase("N")) {
            current = current.getLeft();
        } else {
            current = current.getRight();
        }
    }

    System.out.println (current.getRootElement());
}
测试结果
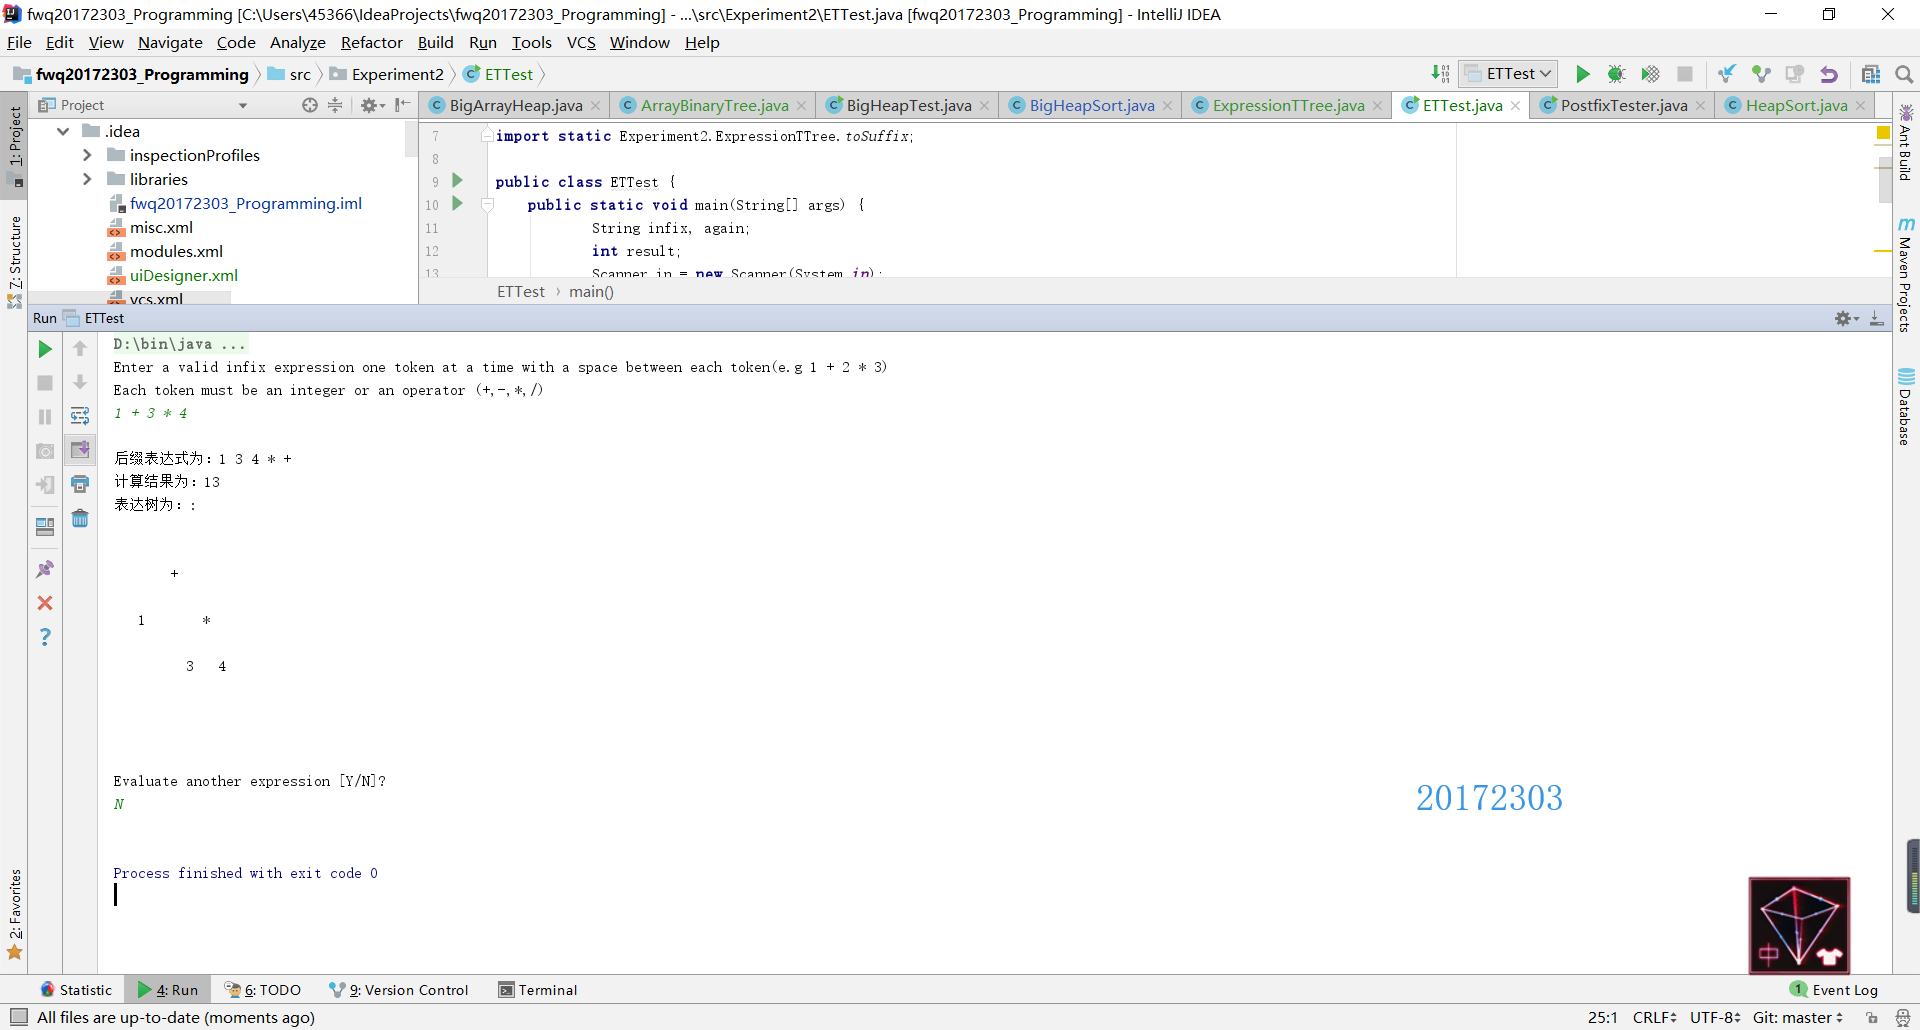
节点四——表达式树
- 这个测试我认为是所有测试中最难的一个, 尤其是关于如何使用树实现这一部分,考虑了很久都没有思路,后来重新翻看课本第十章表达式树部分的内容,才有了思路,发现不是光用树就能实现的,像上学期的四则运算一样,这个也是要先建立两个栈来存放操作符和操作数的。具体的解释在下面的代码中都有。
public static String  toSuffix(String infix) {
    String result = "";
    //将字符串转换为数组
    String[] array = infix.split("\s+");
    //存放操作数
    Stack<LinkedBinaryTree> num = new Stack();
    //存放操作符
    Stack<LinkedBinaryTree> op = new Stack();

    for (int a = 0; a < array.length; a++) {
        //如果是操作数,开始循环
        if (array[a].equals("+") || array[a].equals("-") || array[a].equals("*") || array[a].equals("/")) {
            if (op.empty()) {
                //如果栈是空的,将数组中的元素建立新树结点并压入操作符栈
                op.push(new LinkedBinaryTree<>(array[a]));
            } else {
                //如果栈顶元素为+或-且数组的元素为*或/时,将元素建立新树结点并压入操作符栈
                if ((op.peek().root.element).equals("+") || (op.peek().root.element).equals("-") && array[a].equals("*") || array[a].equals("/")) {
                    op.push(new LinkedBinaryTree(array[a]));
                } else {
                //将操作数栈中的两个元素作为左右孩子,操作符栈中的元素作为根建立新树
                    LinkedBinaryTree right = num.pop();
                    LinkedBinaryTree left = num.pop();
                    LinkedBinaryTree temp = new LinkedBinaryTree(op.pop().root.element, left, right);
                    //将树压入操作数栈,并将数组中的元素建立新树结点并压入操作符栈
                    num.push(temp);
                    op.push(new LinkedBinaryTree(array[a]));
                }
            }
        } else {
            //将数组元素建立新树结点并压入操作数栈
            num.push(new LinkedBinaryTree<>(array[a]));
        }
    }
    while (!op.empty()) {
        LinkedBinaryTree right = num.pop();
        LinkedBinaryTree left = num.pop();
        LinkedBinaryTree temp = new LinkedBinaryTree(op.pop().root.element, left, right);
        num.push(temp);
    }
    //输出后缀表达式
    Iterator itr=num.pop().iteratorPostOrder();
    while (itr.hasNext()){
        result+=itr.next()+" ";
    }
    return result;
}
测试结果
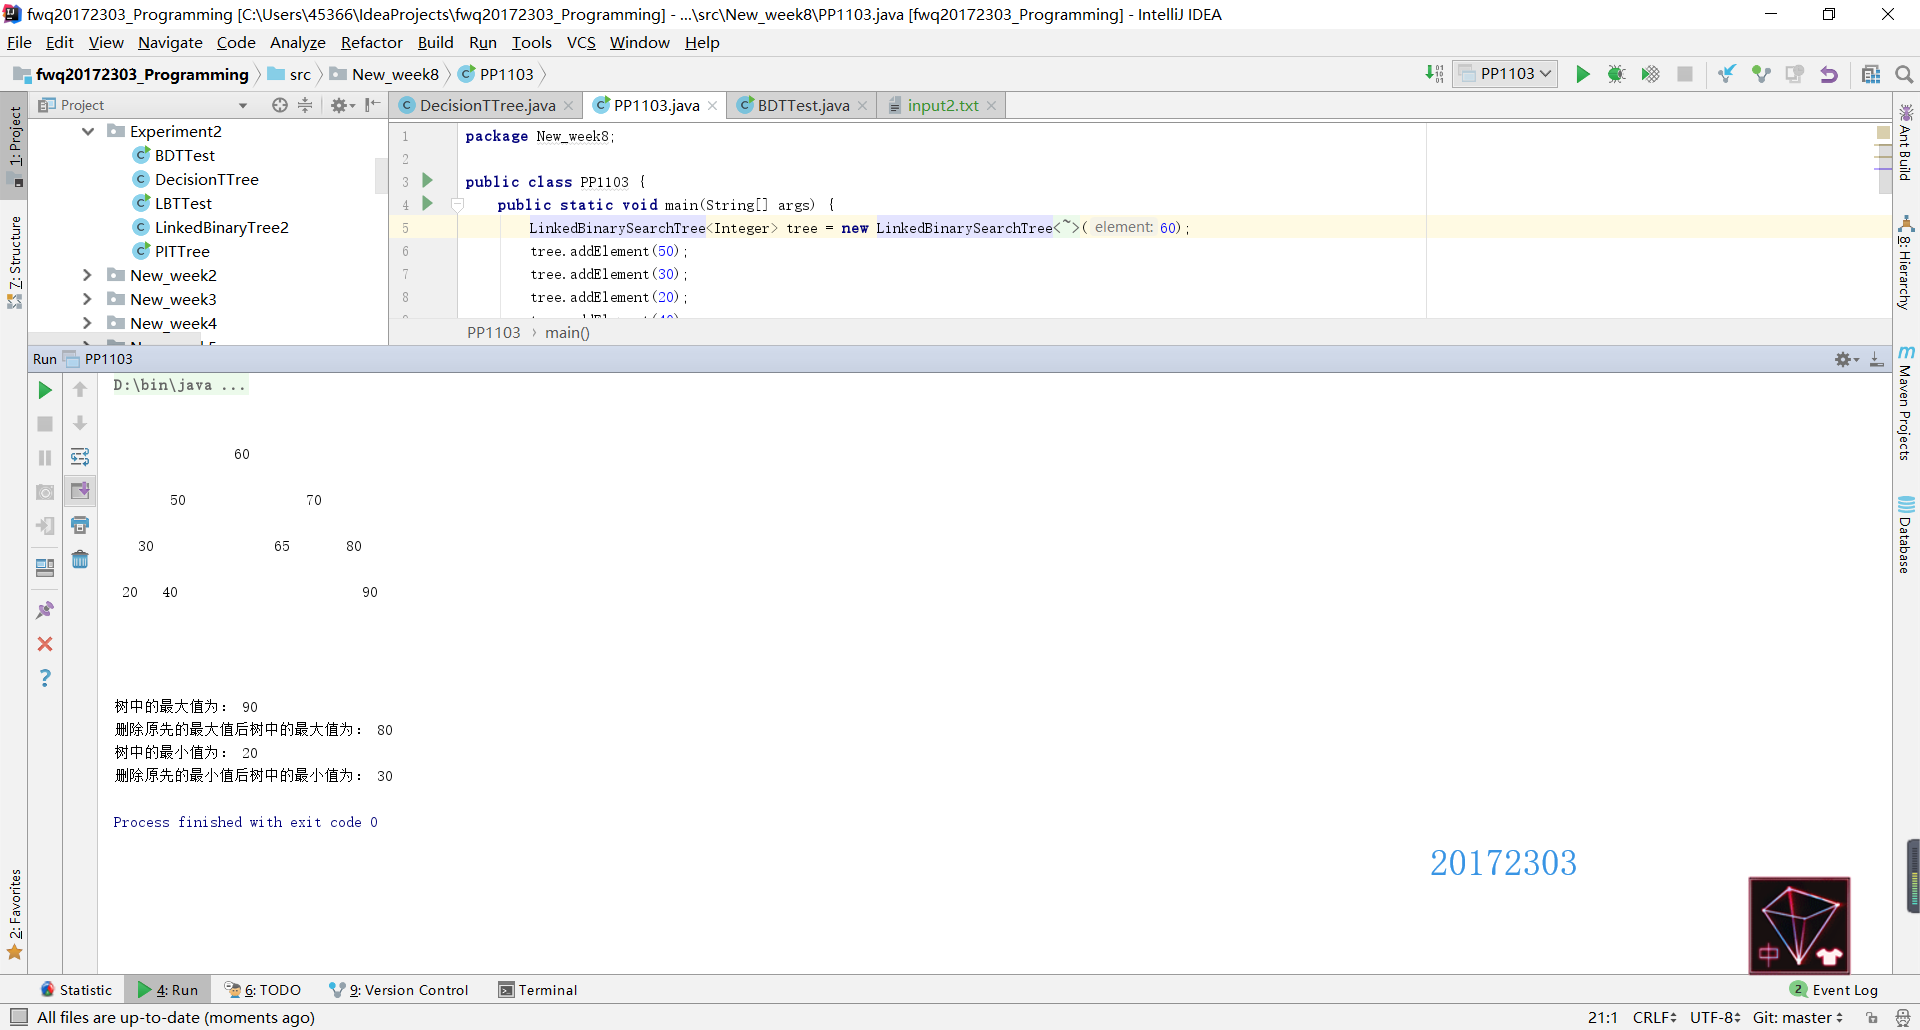
节点五——二叉查找树
- 因为书上给出了
removeMin的实现方法,二叉查找树有一个特殊的性质就是最小的元素存储在树的左边,最大的元素存储在树的右边。因此实现removeMax方法只需要把removeMin方法中所有的left和right对调即可。二叉查找树的删除操作有三种情况,要依据这三种情况来实现代码,我在第七周博客教材内容总结中已经分析过了,就不在这里贴代码了。 - 实现了
removeMin和removeMax后,其实findMin和findMax就很简单了,因为在实现删除操作时首先先要找到最大/最小值,因此只要把找到之后的步骤删掉,返回找到的最大值或最小值的元素即可。
public T findMin() throws EmptyCollectionException
    {
        T result;
        if (isEmpty()){
            throw new EmptyCollectionException("LinkedBinarySearchTree");
        }
        else {
            if (root.left == null){
                result = root.element;
            }
            else {
                BinaryTreeNode<T> parent = root;
                BinaryTreeNode<T> current = root.left;
                while (current.left != null){
                    parent = current;
                    current = current.left;
                }
                result = current.element;
            }
        }
        return result;
    }


public T findMax() throws EmptyCollectionException
{
    T result;

    if (isEmpty()){
        throw new EmptyCollectionException("LinkedBinarySearchTree");
        }
    else {
        if (root.right == null){
            result = root.element;
        }
        else {
            BinaryTreeNode<T> parent = root;
            BinaryTreeNode<T> current = root.right;
            while (current.right != null){
                parent = current;
                current = current.right;
            }
            result = current.element;
        }
    }
    return result;
}
测试结果
节点六——红黑树分析
- 在jdk1.8版本后,java对HashMap做了改进,在链表长度大于8的时候,将后面的数据存在红黑树中,以加快检索速度。而TreeMap的实现原理就是红黑树,因此分析红黑树时我们要分析HashMap和TreeMap的源码。
HashMap
- HashMap是一种基于哈希表(hash table)实现的map,哈希表(也叫关联数组)一种通用的数据结构,大多数的现代语言都原生支持,其概念也比较简单:key经过hash函数作用后得到一个槽(buckets或slots)的索引(index),槽中保存着我们想要获取的值,如下图所示:

- HashMap的方法较多,此处选择构造函数、get操作和remove操作进行分析。
- 构造函数
- HashMap遵循集合框架的约束,提供了一个参数为空的构造函数和有一个参数且参数类型为Map的构造函数。除此之外,还提供了两个构造函数,用于设置HashMap的容量(capacity)与平衡因子(loadFactor)(平衡因子=|右子树高度-左子树高度|)。
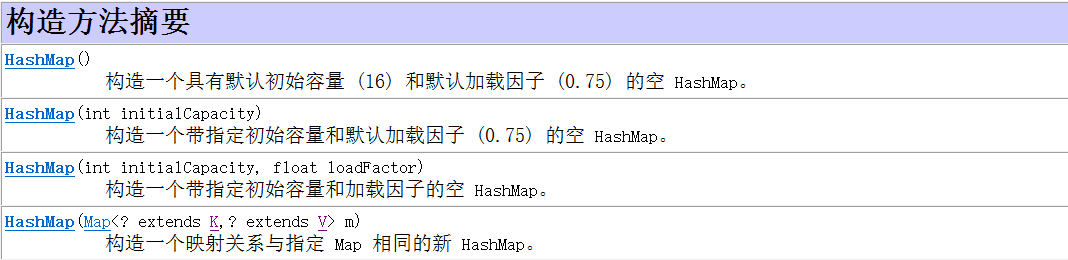
public HashMap(int initialCapacity, float loadFactor) { if (initialCapacity < 0) throw new IllegalArgumentException("Illegal initial capacity: " + initialCapacity); if (initialCapacity > MAXIMUM_CAPACITY) initialCapacity = MAXIMUM_CAPACITY; if (loadFactor <= 0 || Float.isNaN(loadFactor)) throw new IllegalArgumentException("Illegal load factor: " + loadFactor); this.loadFactor = loadFactor; threshold = initialCapacity; init(); } public HashMap(int initialCapacity) { this(initialCapacity, DEFAULT_LOAD_FACTOR); } public HashMap() { this(DEFAULT_INITIAL_CAPACITY, DEFAULT_LOAD_FACTOR); } - HashMap遵循集合框架的约束,提供了一个参数为空的构造函数和有一个参数且参数类型为Map的构造函数。除此之外,还提供了两个构造函数,用于设置HashMap的容量(capacity)与平衡因子(loadFactor)(平衡因子=|右子树高度-左子树高度|)。
- get操作
- get操作用于返回指定键所映射的值;如果对于该键来说,此映射不包含任何映射关系,则返回null。
- 这里需要说明两个东西:Entry——Entry实现了单向链表的功能,用next成员变量来级连起来。table[ ]——HashMap内部维护了一个为数组类型的Entry变量table,用来保存添加进来的Entry对象。
public V get(Object key) { //当key为空时,返回null if (key == null) return getForNullKey(); Entry<K,V> entry = getEntry(key); return null == entry ? null : entry.getValue(); } private V getForNullKey() { if (size == 0) { return null; } //key为null的Entry用于放在table[0]中,但是在table[0]冲突链中的Entry的key不一定为null,因此,需要遍历冲突链,查找key是否存在 for (Entry<K,V> e = table[0]; e != null; e = e.next) { if (e.key == null) return e.value; } return null; } final Entry<K,V> getEntry(Object key) { if (size == 0) { return null; } int hash = (key == null) ? 0 : hash(key); //首先定位到索引在table中的位置 //然后遍历冲突链,查找key是否存在 for (Entry<K,V> e = table[indexFor(hash, table.length)]; e != null; e = e.next) { Object k; if (e.hash == hash && ((k = e.key) == key || (key != null && key.equals(k)))) return e; } return null; } - remove操作
- remove操作用于在指定键存在的情况下,从此映射中移除指定键的映射关系。
public V remove(Object key) { Entry<K,V> e = removeEntryForKey(key); //当指定键key存在时,返回key的value。 return (e == null ? null : e.value); } final Entry<K,V> removeEntryForKey(Object key) { if (size == 0) { return null; } int hash = (key == null) ? 0 : hash(key); int i = indexFor(hash, table.length); //这里用了两个Entry对象,相当于两个指针,为的是防止出现链表指向为空,即冲突链断裂的情况 Entry<K,V> prev = table[i]; Entry<K,V> e = prev; //当table[i]中存在冲突链时,开始遍历里面的元素 while (e != null) { Entry<K,V> next = e.next; Object k; if (e.hash == hash && ((k = e.key) == key || (key != null && key.equals(k)))) { modCount++; size--; if (prev == e) //当冲突链只有一个Entry时 table[i] = next; else prev.next = next; e.recordRemoval(this); return e; } prev = e; e = next; } return e; } - HashMap中的红黑树位于HashMap内部类TreeNode<K,V>的定义,它继承了LinkedHashMap.Entry<K,V>,包括了左旋右旋等操作。
static final class TreeNode<K,V> extends LinkedHashMap.Entry<K,V> {
    //设置红黑树父节点(链)
    TreeNode<K,V> parent;  // red-black tree links
    //设置左节点
    TreeNode<K,V> left;
    //设置右节点
    TreeNode<K,V> right;
    //设置前置节点
    TreeNode<K,V> prev;    // needed to unlink next upon deletion
    //设置红黑标志
    boolean red;

    //构造函数
    TreeNode(int hash, K key, V val, Node<K,V> next) {
        super(hash, key, val, next);
    }

    //返回根节点
    final TreeNode<K,V> root() {
        for (TreeNode<K,V> r = this, p;;) {
            if ((p = r.parent) == null)
                return r;
            r = p;
        }
    }
    //与红黑树相关的操作(此处略)
treeify和untreeify- 树化和反树化(链表化),树化。当哈希桶中的链表长度超过阈值(默认为8)的话,就会对链表进行树化。当节点删除时,红黑树的大小低于阈值(默认为8),退化成链表。
final void treeify(Node<K,V>[] tab) {
TreeNode<K,V> root = null;
//循环整理
for (TreeNode<K,V> x = this, next; x != null; x = next) {
    //取出下一个链表节点
    next = (TreeNode<K,V>)x.next;
    //将x节点的左右节点设置为null
    x.left = x.right = null;
    //判断当前红黑树是否有根节点
    if (root == null) {
        x.parent = null;
        //设置颜色为黑色(根节点为黑色)
        x.red = false;
        //将x节点设置为根节点
        root = x;
    }
    //若当前红黑树存在根节点
    else {
        //获取x节点的key
        K k = x.key;
        //获取x节点的hash
        int h = x.hash;
        //key的class
        Class<?> kc = null;
        //这一部分不是看得很懂,大概是从根节点遍历,将x节点插入到红黑树中
        //dir应该指的是树的子树的方向,-1为左侧,1为右侧
        for (TreeNode<K,V> p = root;;) {
            int dir, ph;
            K pk = p.key;
            if ((ph = p.hash) > h)
                dir = -1;
            else if (ph < h)
                dir = 1;
            else if ((kc == null &&
                      (kc = comparableClassFor(k)) == null) ||
                     (dir = compareComparables(kc, k, pk)) == 0)
                dir = tieBreakOrder(k, pk);

            TreeNode<K,V> xp = p;
            if ((p = (dir <= 0) ? p.left : p.right) == null) {
                x.parent = xp;
                if (dir <= 0)
                    xp.left = x;
                    xp.right = x;
                root = balanceInsertion(root, x);
                break;
            }
        }
    }
}
//确保哈希桶指定位置存储的节点是红黑树的根节点
moveRootToFront(tab, root);
}

final Node<K,V> untreeify(HashMap<K,V> map) {
Node<K,V> hd = null, tl = null;
//循环,将红黑树转成链表
for (Node<K,V> q = this; q != null; q = q.next) {
    //构造一个普通链表节点
    Node<K,V> p = map.replacementNode(q, null);
    if (tl == null)
        hd = p;
    else
        tl.next = p;
    tl = p;
}
return hd;
}
TreeMap
- TreeMap是用红黑树作为基础实现的,该映射根据其键的自然顺序进行排序,或者根据创建映射时提供的Comparator进行排序,具体取决于使用的构造方法。
- TreeMap的基本操作containsKey、get、put和remove的时间复杂度是 log(n) ,这些操作的原理都与红黑树的删除、添加、检索操作的原理相同
- put操作
- put操作实现了将 Entry 放入二叉查找树中,其中Entry代表内部结点。
public V put(K key, V value) { Entry<K,V> t = root; // 当根结点为空时 if (t == null) { // 将新的key-value创建一个结点,并将该结点作为根结点 root = new Entry<K,V>(key, value, null); modCount++; return null; } int cmp; //设置一个父结点 Entry<K,V> parent; Comparator<? super K> cpr = comparator; // 如果cpr不为空,即表明采用定制排序 if (cpr != null) { do { // 将t的值赋给根结点 parent = t; // 拿新插入key和t的key进行比较 cmp = cpr.compare(key, t.key); // 如果新插入的key小于t的key,t等于t左边的结点 if (cmp < 0) t = t.left; // 如果新插入的key大于t的key,t等于t右边的结点 else if (cmp > 0) t = t.right; // 如果两个 key 相等,新的 value 覆盖原有的 value, // 并返回原有的 value else return t.setValue(value); } while (t != null); } else { //如果t的key为空,抛出错误 if (key == null) throw new NullPointerException(); Comparable<? super K> k = (Comparable<? super K>) key; do { // 与上述操作相同 parent = t; cmp = k.compareTo(t.key); if (cmp < 0) t = t.left; else if (cmp > 0) t = t.right; else return t.setValue(value); } while (t != null); } // 将新插入的节点作为parent节点的子节点 Entry<K,V> e = new Entry<K,V>(key, value, parent); // 如果新插入 key 小于 parent 的 key,则 e 作为 parent 的左子节点 if (cmp < 0) parent.left = e; // 如果新插入 key 小于 parent 的 key,则 e 作为 parent 的右子节点 else parent.right = e; // 修复红黑树 fixAfterInsertion(e); size++; modCount++; return null; } - remove操作
- remove操作用于删除树中的指定结点。
private void deleteEntry(Entry<K,V> p) { modCount++; size--; // 如果被删除结点的左子树、右子树都不为空 if (p.left != null && p.right != null) { //用p结点的后继结点代替p Entry<K,V> s = successor (p); p.key = s.key; p.value = s.value; p = s; } // 如果p的左结点存在,则用replacement代表左结点,否则代表右结点 Entry<K,V> replacement = (p.left != null ? p.left : p.right); if (replacement != null) { replacement.parent = p.parent; // 如果p没有父结点,则 replacemment 变成父结点 if (p.parent == null) root = replacement; // 如果 p 结点是其父结点的左孩子,则用replacement进行赋值 else if (p == p.parent.left) p.parent.left = replacement; // 如果 p 结点是其父结点的右孩子,操作同上 else p.parent.right = replacement; p.left = p.right = p.parent = null; // 修复红黑树 if (p.color == BLACK) fixAfterDeletion(replacement); } // 如果 p 结点没有父结点,设置根结点为空 else if (p.parent == null) { root = null; } else { if (p.color == BLACK) // 修复红黑树 fixAfterDeletion(p); if (p.parent != null) { // 如果 p 是其父结点的左孩子 if (p == p.parent.left) p.parent.left = null; // 如果 p 是其父结点的右孩子 else if (p == p.parent.right) p.parent.right = null; p.parent = null; } } } - get操作
- 当TreeMap根据key来取出value时,使用get操作,而这个get操作是通过getEntry()方法实现的。
public V get(Object key)
 {
    // 根据指定key取出对应的Entry
    Entry>K,V< p = getEntry(key);
    // 返回该Entry所包含的value
    return (p==null ? null : p.value);
 }

 final Entry<K,V> getEntry(Object key)
 {
    // 如果comparator不为null,表明程序采用定制排序
    if (comparator != null)
        // 返回对于的key
        return getEntryUsingComparator(key);
    // 如果key为空,抛出异常
    if (key == null)
        throw new NullPointerException();
    // 将key强制类型转换为Comparable
    Comparable<? super K> k = (Comparable<? super K>) key;
    // 从根结点开始
    Entry<K,V> p = root;
    while (p != null)
    {
        // 用key与当前结点的key进行比较
        int cmp = k.compareTo(p.key);
        // 如果key小于当前结点的key,继续到当前结点的左子树中进行检索
        if (cmp < 0)
            p = p.left;
        // 如果 key大于当前结点的key,继续到当前结点的右子树中进行检索
        else if (cmp > 0)
            p = p.right;
        else
            return p;
    }
    return null;
 }
实验过程中遇到的问题和解决过程
- 问题1:在实现节点一的时候,输出的并不是遍历结果而是地址
- 问题1解决方法:说实话这就是一个第十章没学好的残留问题,当时学的时候我就没有把这一部分补充完整,对于迭代器的使用也不熟练,完成节点一的过程中,我想到的解决方法是重新写了一个
ArrayUnorderedList类的公有方法,将该无序列表直接输出(代码在节点一的过程中有)。后来实验结束后询问同学学会了将迭代器方法的遍历结果输出。
//以后序遍历为例
String result = "";
Iterator itr = tree.iteratorPostOrder();
    while (itr.hasNext()){
        result += itr.next() + " ";
    }
return result;
- 问题2:在实现节点二的时候无法输出构造好的树。

- 问题2解决方法:通过Debug,首先确定树是构造好的,没有出现树为空的情况。

- 那么问题就应该是出在
toString方法中,后来发现原因出在了root上,在toString方法中,root从一开始就是空的,并没有获取到我构造的树的根结点。

- 然后我尝试在
ReturnBinaryTree类中加入了一个获取根的方法,结果最后输出的是根的地址。

- 最后参考了余坤澎同学的代码,把
ReturnBinaryTree类中的方法放的toString所在的LinkedBinaryTree类中,因为此时它能够获取到构造的树的根节点,因此就能正常输出了。
- 问题3:在实现决策树的过程中,文件里的内容为什么以这样的顺序排列?
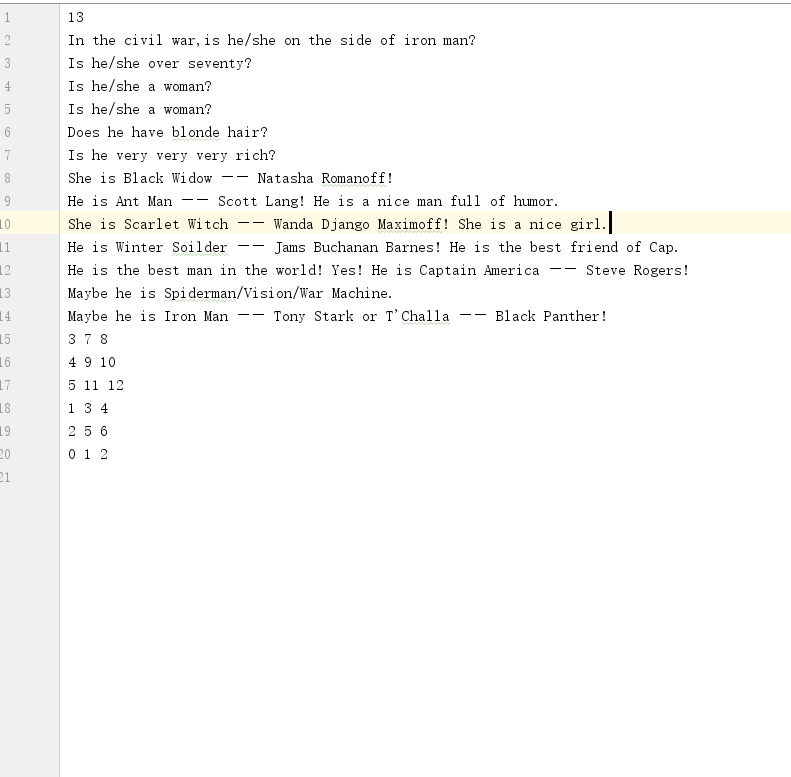
- 问题3解决方法:这个要结合
DecisionTree类来看,首先第一行的13代表了这颗决策树中的节点个数,所以在DecisionTree类中的int numberNodes = scan.nextInt();一句其实就是获取文件的第一行记录节点个数的值。接下来文件中按照层序遍历的顺序将二叉树中的元素一一列出来,最后文件中的几行数字其实代表了每个结点及其左右孩子的位置(仍然按照层序遍历的顺序),并且是从最后一层不是叶子结点的那一层的结点开始,比如[3,7,8]就代表了层序遍历中第3个元素的左孩子为第7个元素,右孩子为第8个元素。 - 我刚开始把根结点设置成第1个元素发现怎么都对不上,后来发现这里定义了根结点为第0个元素,所以最后一个元素为第12个元素而不是第13个。

其他(感悟、思考等)
- 其实本次实验整体上来说还是比较简单的,唯一有难度的可能只有节点四和节点六。在这个过程中帮我复习了很多,而且逼着我去解决了一些曾经在教材学习中不愿面对的问题,nice~~