背景:
博客是用springboot写的,启动的时候只需要java -jar启动即可,突然想到可以多启动几台,然后用nginx做一个负载均衡,有没有用不说,权当练手了。
环境:
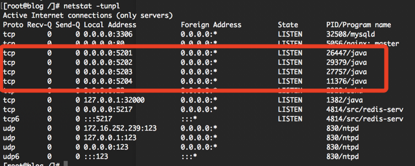
springboot写的博客项目,在服务器上启动 4 个实例,端口号分别是 5201、 5202、5203、5204,如下:
另外,springboot打包的时候,可以将代码和依赖以及配置文件分开打包, 这样可以直接修改配置文件,而且可以减小应用jar的大小,不用每次修改代码 后都上传依赖包,打包后的目录结构如下:
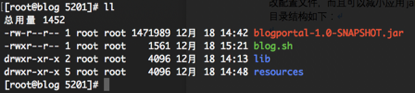
其中blogportal-1.0-SNAPSHOT.jar为项目代码,可以看到只有 1.4M,lib为依赖包目录,resources为配置文件目录,blog.sh是项目启动脚本,执行./blog.sh start即可启动项目。启动脚本从网上找的,之后自己改了一下以配合负载均衡使用,脚本出处暂时找不到了,脚本代码如下:


 1 #!/bin/bash
 2
 3 env_args="-Xms128m -Xmx128m"
 4 sleeptime=0
 5 arglen=$#
 6
 7 # get my-blog pid
 8 get_pid(){
 9     pname="`find . -name 'blog*.jar'`"
10     pname=${pname:3}
11     # pid=`ps -ef | grep ${pname} | grep -v grep | awk '{print $2}'`
12     pid=`lsof -i:5201 | awk '{print $2}'`
13     echo "$pid"
14 }
15
16 startup(){
17     pid=$(get_pid)
18     if [ "$pid" != "" ]
19     then
20         echo "Blog already startup!"
21     else
22         jar_path=`find . -name 'blog*.jar'`
23         echo "jarfile=$jar_path"
24         cmd="java $1 -jar $jar_path > ./blog.out < /dev/null &"
25         echo "cmd: $cmd"
26         java $1 -jar ${jar_path} > ./blog.out < /dev/null &
27         show_log
28     fi
29 }
30
31 shut_down(){
32     pid=$(get_pid)
33     if [ "$pid" != "" ]
34     then
35         kill -9 ${pid}
36         echo "Blog is stop!"
37     else
38         echo "Blog already stop!"
39     fi
40 }
41
42 show_log(){
43     tail -f blog.out
44 }
45
46 show_help(){
47     echo -e "
	欢迎使用Blog"
48     echo -e "
Usage: sh blog.sh start|stop|reload|status|log"
49     exit
50 }
51
52 show_status(){
53     pid=$(get_pid)
54     if [ "$pid" != "" ]
55     then
56         echo "Blog is running with pid: $pid"
57     else
58         echo "Blog is stop!"
59     fi
60 }
61
62 if [ ${arglen} -eq 0 ]
63  then
64     show_help
65 else
66     if [ "$2" != "" ]
67     then
68         env_args="$2"
69     fi
70     case "$1" in
71         "start")
72             startup "$env_args"
73             ;;
74         "stop")
75             shut_down
76             ;;
77         "reload")
78             echo "reload"
79             ;;
80         "status")
81             show_status
82             ;;
83         "log")
84             show_log
85             ;;
86     esac
87 fi
springboot 将代码与依赖和配置文件分开打包
在pox.xm文件中添加如下内容:
 1 <plugins>
 2         <plugin>
 3             <groupId>org.apache.maven.plugins</groupId>
 4             <artifactId>maven-compiler-plugin</artifactId>
 5             <configuration>
 6                 <source>1.8</source>
 7                 <target>1.8</target>
 8             </configuration>
 9         </plugin>
10
11         <plugin>
12             <groupId>org.apache.maven.plugins</groupId>
13             <artifactId>maven-jar-plugin</artifactId>
14             <configuration>
15                 <archive>
16                     <manifest>
17                         <addClasspath>true</addClasspath>
18                         <classpathPrefix>lib/</classpathPrefix>
19                         <useUniqueVersions>false</useUniqueVersions>
20                         <mainClass>com.skyer.app.Application</mainClass>
21                     </manifest>
22                     <manifestEntries>
23                         <Class-Path>./resources/</Class-Path>
24                     </manifestEntries>
25                 </archive>
26                 <outputDirectory>${project.build.directory}</outputDirectory>
27             </configuration>
28         </plugin>
29
30         <plugin>
31             <groupId>org.apache.maven.plugins</groupId>
32             <artifactId>maven-dependency-plugin</artifactId>
33             <executions>
34                 <execution>
35                     <id>copy-dependencies</id>
36                     <phase>package</phase>
37                     <goals>
38                         <goal>copy-dependencies</goal>
39                     </goals>
40                     <configuration>
41                         <outputDirectory>
42                             ${project.build.directory}/lib/
43                         </outputDirectory>
44                     </configuration>
45                 </execution>
46             </executions>
47         </plugin>
48
49         <plugin>
50             <artifactId>maven-resources-plugin</artifactId>
51             <executions>
52                 <execution>
53                     <id>copy-resources</id>
54                     <phase>package</phase>
55                     <goals>
56                         <goal>copy-resources</goal>
57                     </goals>
58                     <configuration>
59                         <resources>
60                             <resource>
61                                 <directory>src/main/resources</directory>                             </resource>
62                             <resource>
63                                 <directory>src/main/java</directory>
64                             </resource>
65                         </resources>
66                         <outputDirectory>${project.build.directory}/resources</outputDirectory>
67                     </configuration>
68                 </execution>
69             </executions>
70         </plugin>
71
72         <plugin>
73     <groupId>org.springframework.boot</groupId>
74     <artifactId>spring-boot-maven-plugin</artifactId>
75             <configuration>
76                 <includes>
77                     <include>
78                         <groupId>null</groupId>
79                         <artifactId>null</artifactId>
80                     </include>
81                 </includes>
82                 <layout>ZIP</layout>
83                 <addResources>true</addResources>
84                 <outputDirectory>${project.build.directory}</outputDirectory>
85             </configuration>
86             <executions>
87                 <execution>
88                     <goals>
89                         <goal>repackage</goal>
90                     </goals>
91                 </execution>
92             </executions>
93         </plugin>
94 </plugins>
其中<mainClass>com.skyer.app.Application</mainClass>为项目启动的入口。
安装nginx
1. 下载nginx
http://nginx.org
2. 上传到服务器,解压,进入nginx根目录
cd nginx-1.10.2
3. 创建安装目录
mkdir /usr/local/nginx
4. 安装nginx的依赖包
yum install -y gcc-c++ pcre-devel zlib-devel
5. 检查并指定安装
./configure --prefix=/usr/local/nginx
6. 预编译
make
7. 编译安装
make install
8. 启动
sbin/nginx
9. 检查
ps -ef | grep nginx
10. 停止
sbin/nginx -s stop
配置 nginx
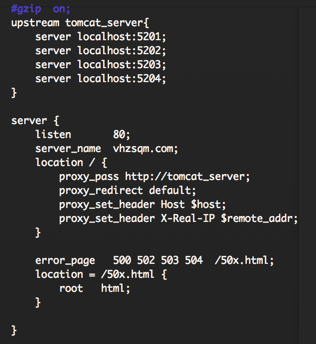
去到nginx目录cd /usr/local/nginx编辑conf下的ngxin.conf文件,修改http标签下的内容如下,其中timcat_server里边配置启动的 4 台机器以及端口号。
启动测试
通过观察日志,可以发现请求随机落在了 4 台机器中的一台,虽然没有感觉 到速度有多大提升,但好歹也巩固了下知识,权当练手。