axios中只能使用get和post方法来进行请求数据,没有提供jsonp等方法进行跨域访问数据
下面我们来解决axios的跨域问题!
创建好vue-cli项目
依赖axios
npm install axios -D
配置:
为什么要配置一下呢 因为在vue文件中不能直接引入 axios来使用
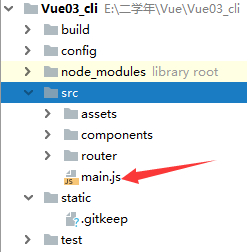
找到src/main.js
引入 axios
import axios from 'axios/dist/axios.js'
设置 axios 为vue示例的全局方法
Vue.prototype.$http = axios
// The Vue build version to load with the `import` command
// (runtime-only or standalone) has been set in webpack.base.conf with an alias.
import Vue from 'vue'
import router from './router'
import 'jquery/dist/jquery.min.js'
import 'bootstrap/dist/css/bootstrap.min.css'
import 'bootstrap/dist/js/bootstrap.min.js'
import axios from 'axios/dist/axios.js'
Vue.config.productionTip = false
Vue.prototype.$http = axios
/* eslint-disable no-new */
new Vue({
  el: '#app',
  router
  // components: {}
})
就这样 我们先来试试看看能不能跨域请求
http://api.qingyunke.com/api.php?key=free&appid=0&msg=“你的问题”
<template>
  <div>
    <div>
      <h2>菲菲智能聊天机器人为您服务!!!</h2>
      <label>请输入问题:</label>
      <input type="text" v-model="msg"/>
    </div>
    <p v-text="tips"></p>
  </div>
</template>

<script>
export default {

  name: 'Robot',
  data () {
    return {
      msg: '',
      tips: '菲菲智能聊天机器人等待您的提问!!'
    }
  },
  watch: {
    msg: function () {
      this.tips = '请以 ? 结束提问噢!'
      this.getRobot()
    }
  },
  methods: {
    getRobot: function () {
      // 判断最后一个字符是否是?
      if (this.msg.endsWith('?')) {
        this.tips = '稍等....'
        let than = this
      //跨域请求
        this.$http.get('http://api.qingyunke.com/api.php?key=free&appid=0&msg="+this.msg+"')
          .then(function (response) {
            than.tips = response.data.content
          })
          .catch(function (error) {
            console.log(error)
          })
      }
    }
  }
}
</script>

<style scoped>

</style>
这个时候,我满怀期待的等待着返回值,但是,结果却不如人意

下面我们来解决这个问题
如果要使用axios直接进行跨域访问是不可以的,这是就需要配置代理了,为什么要配置代理呢?
原因就是因为客户端请求服务端的数据是存在跨域问题的,而服务器和服务器之间可以相互请求数据,是没有跨域的概念(如果服务器没有设置禁止跨域的权限问题),也就是说,我们可以配置一个代理的服务器可以请求另一个服务器中的数据,然后把请求出来的数据返回到我们的代理服务器中,代理服务器再返回数据给我们的客户端,这样我们就可以实现跨域访问数据啦。
如果不理解可以看依据看下图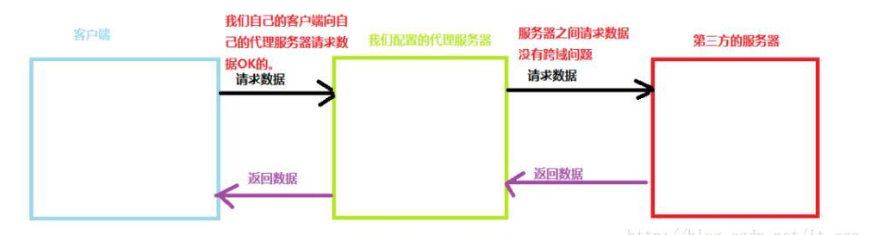
第一步:http-proxy-middleware中间件作为代理
npm install -S http-proxy-middleware
第二步:配置
找到config/index.js
proxyTable: { // 在这里配置如下代码
      '/api': {
        target:'http://api.qingyunke.com/api.php', // 你请求的第三方接口
        changeOrigin:true, // 在本地会创建一个虚拟服务端,然后发送请求的数据,并同时接收请求的数据,这样服务端和服务端进行数据的交互就不会有跨域问题
        pathRewrite:{  // 路径重写,
          '^/api': '/api'  // 替换target中的请求地址,也就是说以后你在请求http://api.qingyunke.com/api.php这个地址的时候直接写成/api即可。
        }
      }
'use strict'
// Template version: 1.3.1
// see http://vuejs-templates.github.io/webpack for documentation.

const path = require('path')

module.exports = {
  dev: {
    // Paths
    assetsSubDirectory: 'static',
    assetsPublicPath: '/',
    proxyTable: { // 在这里配置如下代码
      '/api': {
        target:'http://api.qingyunke.com/api.php', // 你请求的第三方接口
        changeOrigin:true, // 在本地会创建一个虚拟服务端,然后发送请求的数据,并同时接收请求的数据,这样服务端和服务端进行数据的交互就不会有跨域问题
        pathRewrite:{  // 路径重写,
          '^/api': '/api'  // 替换target中的请求地址,也就是说以后你在请求http://api.qingyunke.com/api.php这个地址的时候直接写成/api即可。
        }
      }
    },

    // Various Dev Server settings
    host: 'localhost', // can be overwritten by process.env.HOST
    port: 8080, // can be overwritten by process.env.PORT, if port is in use, a free one will be determined
    autoOpenBrowser: false,
    errorOverlay: true,
    notifyOnErrors: true,
    poll: false, // https://webpack.js.org/configuration/dev-server/#devserver-watchoptions-

    // Use Eslint Loader?
    // If true, your code will be linted during bundling and
    // linting errors and warnings will be shown in the console.
    useEslint: true,
    // If true, eslint errors and warnings will also be shown in the error overlay
    // in the browser.
    showEslintErrorsInOverlay: false,

    /**
     * Source Maps
     */

    // https://webpack.js.org/configuration/devtool/#development
    devtool: 'cheap-module-eval-source-map',

    // If you have problems debugging vue-files in devtools,
    // set this to false - it *may* help
    // https://vue-loader.vuejs.org/en/options.html#cachebusting
    cacheBusting: true,

    cssSourceMap: true
  },

  build: {
    // Template for index.html
    index: path.resolve(__dirname, '../dist/index.html'),

    // Paths
    assetsRoot: path.resolve(__dirname, '../dist'),
    assetsSubDirectory: 'static',
    assetsPublicPath: '/',

    /**
     * Source Maps
     */

    productionSourceMap: true,
    // https://webpack.js.org/configuration/devtool/#production
    devtool: '#source-map',

    // Gzip off by default as many popular static hosts such as
    // Surge or Netlify already gzip all static assets for you.
    // Before setting to `true`, make sure to:
    // npm install --save-dev compression-webpack-plugin
    productionGzip: false,
    productionGzipExtensions: ['js', 'css'],

    // Run the build command with an extra argument to
    // View the bundle analyzer report after build finishes:
    // `npm run build --report`
    // Set to `true` or `false` to always turn it on or off
    bundleAnalyzerReport: process.env.npm_config_report
  }
}
配置好后再去试试跨域
<template>
  <div>
    <div>
      <h2>菲菲智能聊天机器人为您服务!!!</h2>
      <label>请输入问题:</label>
      <input type="text" v-model="msg"/>
    </div>
    <p v-text="tips"></p>
  </div>
</template>

<script>
export default {

  name: 'Robot',
  data () {
    return {
      msg: '',
      tips: '菲菲智能聊天机器人等待您的提问!!'
    }
  },
  watch: {
    msg: function () {
      this.tips = '请以 ? 结束提问噢!'
      this.getRobot()
    }
  },
  methods: {
    getRobot: function () {
      // 判断最后一个字符是否是?
      if (this.msg.endsWith('?')) {
        this.tips = '稍等....'
        let than = this
        let url = '/api?key=free&appid=0&msg=' + this.msg + '' // 这里就是刚才的config/index.js中的/api
        this.$http.get(url)
          .then(function (response) {
            than.tips = response.data.content
          })
          .catch(function (error) {
            console.log(error)
          })
      }
    }
  }
}
</script>

<style scoped>

</style>
结果:

就这样 axios就跨域成功了!!!