一个学期即将过去,我们也迎来了2018年。这个学期,首次接触了web网站开发建设,不仅是这门课程,还有另外一门用idea的gradle框架来制作网页。
很显然,用python语言的flask框架更加简单易懂。Python不需要像Java语言一样设置类的类型,也没有gradle框架那么多的各层依赖,所以说Python更加容易上手。
初次接触网页开发,对我来说就像是打开了新世界的大门,无论是前端还是后端都有它有意思的地方,每次你写的网页成功实现你想要的效果的时候,都会有一种成就感。这种成就感也许也是做这一行的人继续坐下去的动力之一吧。
下面是我的Python+Flask+MysqL的web建设技术过程。
Python+Flask+MysqL的web建设技术过程
1 建立flask框架项目
首先是flask安装(这里默认已经安装好python了),这里我们学习的项目只是简单的用pip install flask的语句安装了flask库,如果你碰到多个项目并且有不同的python版本或外部依赖库,可以参考:http://docs.jinkan.org/docs/flask/installation.html
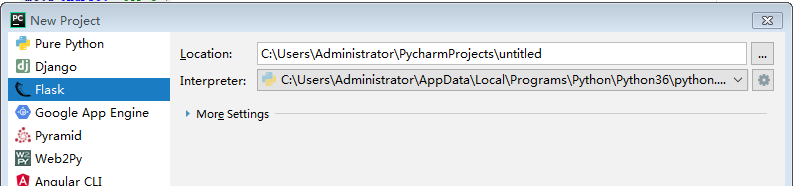
开发工具上使用了pycharm作为工具,建立项目首先新建项目,选择flask框架进行构建。
2 导航及CSS
在网页前端开发的过程中,我引用了bootstrap的前端架构(其实只用了一些组件)。具体的bootstrap学习可以参考菜鸟教程:http://www.runoob.com/bootstrap/bootstrap-tutorial.html
首先先建立前端html页面,页面导航通过标签<nav>进行编写。
<!-- 顶部导航 -->
<nav class="navbar navbar-default" role="navigation">
    <div class="navsize">
        <ul class="nav nav-tabs">
            <li class="active"><a href="#">首页</a></li>
            <li><a href="#">论坛</a></li>
            <li><a href="#">客户端</a></li>
            <li><a href="#">投稿</a></li>

            <ul class="nav navbar-nav navbar-right"><li><a href="#"><span class="glyphicon glyphicon-user"></span> 注册</a></li>
                    <li><a href="#"><span class="glyphicon glyphicon-log-in"></span> 登录</a></li></ul>

            <form class="navbar-form navbar-right" role="search" action="{{ url_for("search") }}" method="get">

                <div class="form-group">
                    <input type="text" class="form-control" name="q" placeholder="Search">
                </div>
                <button type="submit" class="btn btn-default">
                    搜索
                </button>
            </form>
        </ul>
    </div>
</nav>
.navsize{
    width: 80%;
     margin:0 auto;
}
效果:

3 图片导航CSS实例
首先要学会使用div等块级元素标签来放置我们的网页元素,并会使用CSS选择器进行网页的开发。
这里先了解一下CSS的盒子模型:
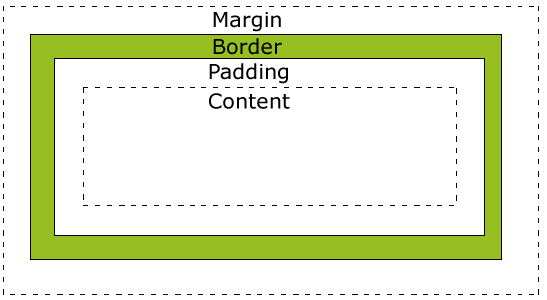
margin:盒子的最外层,一般用于设置与其他元素的间隔距离
border:盒子的边框层,可以根据自己的需要设置是否可见及大小、颜色等
padding:盒子放置的内容与边框的中间层,可用于设置隔开内容及边框
content:盒子放置的内容层
图片导航实例:
<div>
    <div class="img">
        <a href="http://www.gzcc.cn"><img src="http://old.bz55.com/uploads/allimg/150316/140-150316134616.jpg"></a>
        <div class="desc"><a href="http://www.gzcc.cn">第一张图片</a></div>
    </div>
</div>
<div class="clearfloat">
    <img src="http://old.bz55.com/uploads/allimg/150316/140-150316134616.jpg">
    <img src="http://www.pp3.cn/uploads/201701/2017011709.jpg">
    <img src="http://old.bz55.com/uploads/allimg/150316/140-150316134610.jpg">
    <img src="http://old.bz55.com/uploads/allimg/150316/140-150316134613.jpg">
</div>
div.img{
    width: 180px;
    border:1px solid #eeeeee;
    float: left;
    margin:5px;
}

div.img img{
width: 100%;
    height: auto;

}
div.desc{
    text-align: center;
    padding: 5px;
}

div.clearfloat{
    clear: both;
}

div.img:hover{
    border: 1px solid blue;
}
上面CSS语句中:
float:left是设置块级元素不换行并且向左边浮动,会根据浏览器大小进行浮动
clear:both是用于清除该块级元素与同一级上一个块级元素之间的浮动
hover:鼠标在该元素上时的样式,用于与鼠标不在元素上时的样式作为对比,形成一种动态效果
效果:

4 使用JS对登录、注册操作进行表单验证
JavaScript是现在各种网站十分常用的网页技术,动态的加载及相应请求等。
这里以登录及注册为例,可以用JavaScript来要求页面上登录账号及注册账号的输入,对数据的使用及存入数据库进行初步规范。
下面是登录功能的js代码:
function Login(){
   var un=document.getElementById("id");
   var us=document.getElementById("password");
   var er=document.getElementById("error_box");
   er.innerHTML = "<br>";
   if(un.value.length<6||un.value.length>20){
      er.innerHTML="用户名必须在6-20个字符之间";
      return false;
   }else if((un.value.charCodeAt(0))>=48 && un.value.charCodeAt(0)<=57){
      er.innerHTML = "首字母不能为数字"
      return false;
   }else for(var i=0;i<un.value.length;i++){
       if((un.value.charCodeAt(i)<48)||(un.value.charCodeAt(i)>57)&&(un.value.charCodeAt(i)<97)&&(un.value.charCodeAt(i)>122)){
           er.innerHTML="用户名只能为数字和字母"
           return false;
       }
   }
   if(us.value.length<6||us.value.length>20){
     er.innerHTML="密码必须在6-20个字符之间";
     return false;
   }
 return true;
}
<input type="submit" class="btn btn-default" onclick="return Login()" value="登陆"></input>
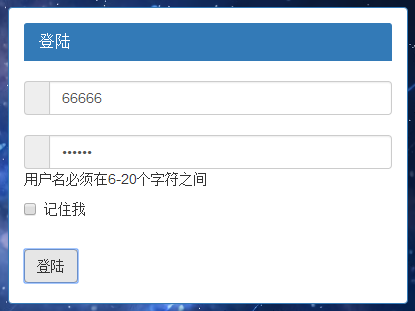
在登录按钮中引用js函数进行应用,这里注意一个问题,需要在函数名前面增加return,否则即使输入的数据有误,js文件虽然会执行,但并不会拦截在登录页面,而是依旧会跳转到登录后的界面,注册功能甚至会直接把数据存进数据库中。这个问题我在idea中并没有碰到,而在这个项目中却会出现,原因我现在也不是很清楚,初步判断应该是后面添加的一些功能与其起了冲突,或者flask框架的一些不同。
效果图:
5 父模板制作
我们在编写多个页面的时候,会发现有许多地方是会用到一样的设计的,比如导航就是每页都有并且是一样的。
我们可以将其中相同的地方抽取出来,做一个父模板,然后让子页面继承父模板,就不需要多写许多相同的代码,减少了工作量,也使得代码更加简洁。
下面是我的父模板:
<!DOCTYPE html>
<html lang="en">
<head>
    <meta charset="UTF-8">
    <title>{% block title %}{% endblock %}</title>
    <!-- 引入 Bootstrap -->
    <link href="https://maxcdn.bootstrapcdn.com/bootstrap/3.3.7/css/bootstrap.min.css" rel="stylesheet">
    <link href="{{ url_for("static",filename="CSS/bass.css") }}" type="text/css" rel="stylesheet" charset="UTF-8">
    {% block head %}{% endblock %}
</head>
<body class="bgimg">
<!-- 顶部导航 -->
<nav class="navbar navbar-default" role="navigation">
    <div class="navsize">


        <ul class="nav nav-tabs">
            <li class="active"><a href={{ url_for("index") }}>首页</a></li>
            <li><a href="#">论坛</a></li>
            <li><a href="#">客户端</a></li>
            <li><a href={{ url_for("tougao") }}>投稿</a></li>

            <ul class="nav navbar-nav navbar-right">
                {% if username %}
                    <li><a href="{{ url_for('author',user_id=useraction.id,tag=1) }}"><span
                            class="glyphicon glyphicon-user"></span> {{ username }}</a></li>
                    <li><a href={{ url_for("logout") }}><span class="glyphicon glyphicon-log-out"></span> 注销</a></li>
                {% else %}
                    <li><a href={{ url_for("register") }}><span class="glyphicon glyphicon-user"></span> 注册</a></li>
                    <li><a href={{ url_for("login") }}><span class="glyphicon glyphicon-log-in"></span> 登录</a></li>
                {% endif %}
            </ul>

            <form class="navbar-form navbar-right" role="search" action="{{ url_for("search") }}" method="get">

                <div class="form-group">
                    <input type="text" class="form-control" name="q" placeholder="Search">
                </div>
                <button type="submit" class="btn btn-default">
                    搜索
                </button>
            </form>
        </ul>
    </div>
    </div>
    </div>
</nav>


<div class="body">
    {% block main %}{% endblock %}
</div>


<!-- 底部导航 -->
<nav class="navbar navbar-default navbar-fixed-bottom" role="navigation">
    <div class="navsize">

    <ul class="nav navbar-nav">
        <li class="active"><a href="#">友情链接</a></li>
        <li><a href="#">联系我们</a></li>
        <li><a href="#">加入我们</a></li>
        <li><a href="#">关于我们</a></li>
    </ul>
    <ul class="nav navbar-nav navbar-right">
        <li><a href="#"> 帮助中心</a></li>
        <li><a href={{ url_for('fankui') }}> 反馈中心</a></li>
    </ul>
    </div>

</nav>
</body>
</html>
子页面:
{% extends 'base.html' %}

{% block title %}
反馈中心
{% endblock %}

{% block main %}
    <div class="divtouming">
    <div class="panel panel-default" style=" 800px">
        <div class="panel-body">
            <form class="form-horizontal" role="form">
                <div class="form-group">
                    <label for="fankuititle" class="col-sm-2 control-label">反馈原因</label>
                    <div class="col-sm-10">
                        <input type="text" class="form-control" id="fankuititle">
                    </div>
                </div>
                <div class="form-group">
                    <label for="fankuitext" class="col-sm-2 control-label">详情</label>
                    <div class="col-sm-10">
                        <textarea id="fankuitext" rows="5" cols="87"></textarea>
                    </div>
                </div>
                <div class="form-group">
                    <div class="col-sm-offset-2 col-sm-10">
                        <button type="submit" class="btn btn-default">提交</button>
                    </div>
                </div>
            </form>
        </div>
    </div></div>
{% endblock %}
在父模板中,通过添加 {% block title %}{% endblock %} 标签来连接父模板与子页面的关系,父模板中的 {% block title %}{% endblock %} 标签位置就是子页面的继承父模板后的代码插入位置。父模板的继承用 {% extends 'base.html' %} 这样的标签来继承。
并且也可以看到将后端的数据渲染到模板中则是使用 {{name}} 这样的形式,里面是变量名,用两个花括号包着。
6 flask项目开始
下面是一个简单的开始项目(后端):
from flask import Flask,render_template
url_for('static',filename='js/login.js')
app = Flask(__name__)


@app.route('/')
def index():
    return render_template("base.html")

@app.route('/login')
def login():
    return render_template("login.html")

@app.route('/regis')
def register():
    return render_template("Zhuce.html")

if __name__ == '__main__':
    app.run(debug=True)
app = Flask(__name__) 即初始化一个flask实例对象。
app.run(debug=True) 将debug模式打开,是程序员测试时用的模式,真正使用项目的时候需要把这个模式关掉。

@app.route("/")  在运行实体上绑定URL路由
render_template("Zhuce.html") 返回一个模板文件

url_for('static',filename='js/login.js') 获取“static”文件夹下的静态资源
7 连接mysql数据库,创建用户模型
首先,需要安装好python+flask、MySQL。然后需要根据python的版本下载好MySQL和python的中间件。
下载中间件后用 pip install filename的方法将文件安装到python的Script文件夹中,然后创建一个数据库。
另外写一个config.py的配置文件,写入下面两行代码:
SQLALCHEMY_DATABASE_URI = 'mysql+pymysql://root:数据库密码@数据库地址:3306/数据库名称?charset=utf8'
SQLALCHEMY_TRACK_MODIFICATIONS = False
然后在主py文件中导入config文件并初始化对象:
import config
from flask import Flask,render_template
from flask_sqlalchemy import SQLAlchemy

app = Flask(__name__)
app.config.from_object(config)
db=SQLAlchemy(app)
开始创建用户模型,即在数据库中创建表格:
class User(db.Model):
    __tablename__='user'
    id = db.Column(db.Integer,primary_key=True,autoincrement=True)
    username=db.Column(db.String(20),nullable=False)
    password=db.Column(db.String(20),nullable=False)

db.create_all()
db.create_all()用来执行db的建表操作
8 通过用户模型对数据库进行增删该查
class User(db.Model):
    __tablename__='user'
    id = db.Column(db.Integer,primary_key=True,autoincrement=True)
    username=db.Column(db.String(20),nullable=False)
    password=db.Column(db.String(20),nullable=False)

#创建表格
db.create_all()

#数据查询方法
User.query.filter(User.username == 'mis1114').first()

#数据添加方法
 user=User(username='mis777789',password='g6666')
 db.session.add(user)
 db.session.commit()

# 数据的修改方法
 user = User.query.filter(User.username=='mis777789').first
 user.password='0.0.0.0'
 db.session.commit()

# 数据的删除方法
user = User.query.filter(User.username=='mis777789').first()
db.session.delete(user)
db.session.commit()
9 完成注册及登陆功能
- js文件: onclick函数return True时才提交表单,return False时不提交表单。
- html文件:
- <form>中设置 action和method="post"
- <input> 中设置 name
- 主py文件中:
- from flask import request, redirect, url_for
- @app.route('/regist/', methods=['GET', 'POST’])
注册:
@app.route('/regis',methods=['GET','POST'])
def register():
    if request.method=='GET':

        return render_template('Zhuce.html')
    else:

        username=request.form.get('zcid')#与html页面名字相同
        password=request.form.get('zcpassword')
        user=User.query.filter(User.username==username).first()
        if user:
            return 'exit'
        else:
            user=User(username=username,password=password)
            db.session.add(user)
            db.session.commit()
            return redirect(url_for('login'))
登陆:
从flask中导入session,在config配置中加入SECRET_KEY=os.urandom(24),将登陆的用户存入session对象中。
@app.route('/login',methods=['GET','POST'])
def login():
    if request.method == 'GET':
        return render_template('login.html')
    else:
        username = request.form.get('id')  # 与html页面名字相同
        password = request.form.get('password')
        user = User.query.filter(User.username == username,User.password==password).first()
        if user:
            sessions['username']=username
            sessions.permanent=True
            return redirect(url_for('index'))
        else:
            return '用户不存在'
登陆与注册的HTML页面:
<form class="bs-example bs-example-form" role="form" action="{{ url_for('login') }}" method="post">
10 登陆之后更新导航
在父模板中使用IF函数判断是否有登陆对象:
        <ul class="nav navbar-nav navbar-right">
            {% if username %}
                <li><a href="#"><span class="glyphicon glyphicon-user"></span> {{ username }}</a></li>
                <li><a href={{ url_for("logout") }}><span class="glyphicon glyphicon-log-in"></span> 注销</a></li>
            {% else %}
                <li><a href={{ url_for("register") }}><span class="glyphicon glyphicon-user"></span> 注册</a></li>
                <li><a href={{ url_for("login") }}><span class="glyphicon glyphicon-log-in"></span> 登录</a></li>
            {% endif %}
        </ul>
主py文件中,通过使用上下文处理器,将获取的session中的值以字典的形式返回页面:
@app.context_processor
def mycontext():
    username=session.get('user')
    if username:
        return {'username':username}
    else:
        return {}
11 发布功能
登陆装饰器:
def log(func):#参数类型为函数
    @wraps(func)
    def wrapper(*args,**kwargs):
        if session.get('user'):
            return func(*args,**kwargs)
        else:
            return redirect(url_for('login'))
    return wrapper
装饰器应用:
应用装饰器,要求在发布前进行登录,登录后可发布。
@app.route('/tougao',methods=['GET','POST'])
@log
def tougao():
完成发布功能:
@app.route('/tougao',methods=['GET','POST'])
@log
def tougao():
    if request.method=='GET':
         return render_template('tougao.html')
    else:
        title=request.form.get('tougaotitle')
        content=request.form.get('tougaotext')
        id=User.query.filter(User.username==session.get('user')).first().id
        tougao=Tougao(title=title,content=content,userid=id)
        db.session.add(tougao)
        db.session.commit()
        return redirect(url_for('index'))
12 首页列表显示全部问答
首页HTML代码:
<div class="container">
        <div class="row clearfix">
            <div class="col-md-2 column">
            </div>
            <div class="col-md-6 column">
            <ul>
                {% for item in touGao %}
                <a href="" class="list-group-item list-group-item-light">
                    <li>
                        <div class="page-header">
                         <h3>{{ item.title }}</h3>
                         <p><span class="glyphicon glyphicon-user">{{ item.author.username }}</span> <span class="glyphicon glyphicon-time">{{ item.time }}</span></p>
                        </div>
                        <p>{{ item.content}}</p>
                    </li>
                </a>
                {% endfor %}
            </ul>
            </div>
            <div class="col-md-4 column">
            </div>
        </div>
    </div>
主py文件:
@app.route('/')
def index():
    context={
        'touGao':Tougao.query.order_by('-time').all()
    }
    return render_template("index.html",**context)
13从首页投稿到文章详情页
主PY文件写视图函数,带id参数。
@app.route('/pinglun/<question_id>')
def detial(question_id):
    quest=Question.query.filter(Question.id==question_id).first()
    return render_template('commentdetail.html',que=quest)
首页标题的标签做带参数的链接。
<a href="{{ url_for('commentdetail',question_id=foo.id) }}">{{ foo.title}}</a>
在详情页将数据的显示在恰当的位置。
{% for foo in question %}
    <li class="list-group-item">
        <span class="glyphicon glyphicon-leaf" aria-hidden="true"></span>
        <a href="{{ url_for('commentdetail',question_id=foo.id) }}">{{ foo.title}}</a>
        <p style="...">{{ foo.detail}}</p>
        <span class="glyphicon glyphicon-leaf" aria-hidden="true"></span>
        <span class="badge">{{ foo.creat_time}}</span>

    </li>
 {% endfor %}
建立评论的对象关系映射:
class Question(db.Model):
    __tablename__ = 'comment'
    id =db.Column(db.Integer,primary_key=True,autoincrement=True)
    author_id=db.Column(db.Integer,db.ForeignKey('uesr.id'))
    question_id=db.Column(db.Integer,db.ForeignKey('question.id'))
    creat_time=db.Column(db.DateTime,default=datetime.now)
    detail=db.Column(db.Text,nullable=False)
    question =db.relationship('Question',backref=db.backref('comments'))
    author=db.relationship('User',backref=db.backref('comments'))
14 完成评论功能
定义评论的视图函数,读取前端页面数据,保存到数据库中。
@app.route('/pinglun',methods=['POST'])
@log
def pinglun():
    pl=request.form.get('pingluntext')
    tougao_id=request.form.get('tougaoid')
    user_id=User.query.filter(User.username==session.get('user')).first().id
    pinglun=Pinglun(userid=user_id,tougaoid=tougao_id,content=pl)
    db.session.add(pinglun)
    db.session.commit()
    context={
        'pingLun':Pinglun.query.order_by('-time').all()
    }
    return render_template(url_for('digital',tougao_id=tougao_id),**context)
显示所有评论:
{% extends "base.html" %}
{% block title %}标题{% endblock %}

{% block main %}
    <div class="container">
    <div class="row clearfix">
        <div class="col-md-12 column divcolor" >

            <div class="page-header">
                <h1>
                    {{ quest.title }}
                </h1>
                    <small><a href="{{ url_for('author',user_id=quest.author.id) }}"><span class="glyphicon glyphicon-user">{{ quest.author.username }}</span></a> <span class="glyphicon glyphicon-time">{{ quest.time }}</span></small>
            </div>

            <p>
                {{ quest.content }}
            </p>
            <hr>

            <form class="form-horizontal" role="form"  action="{{ url_for('pinglun') }}" method="post">
                <div class="form-group">
                    <label for="toutaotext" class="col-sm-2 control-label">评论</label>
                    <div class="col-sm-10">
                        <textarea id="pingluntext" rows="5" cols="100" name="pingluntext"></textarea>
                        <input name="tougaoid" type="hidden" value="{{ quest.id }}"  id="tougaoid">
                    </div>
                </div>
                <div class="form-group">
                    <div class="col-sm-offset-2 col-sm-10">
                        <button type="submit" class="btn btn-success">评论</button>
                    </div>
                </div>
            </form>
        <h4>评论({{ quest.pinglun|length }}):</h4>


                <ul>
                    {% for pl in quest.pinglun %}
                        <li class="list-group-item">
                            <p><a href="{{ url_for('author',user_id=pl.author.id) }}"><span class="glyphicon glyphicon-user"></span>{{ pl.author.username }}</a></p>
                             <p class="text-right"><span class="label label-default">{{ pl.time }}</span></p>
                            <h4>{{ pl.content }}</h4>
                        </li>
                    {% endfor %}
                </ul>

        </div>
    </div>
</div>
{% endblock %}
15 个人中心页标签导航
新页面authorbase.html,用<ul ><li role="presentation"> 实现标签页导航。
<ul class="nav nav-tabs">
<li role="presentation"><a href="#">Home</a></li>
<li role="presentation"><a href="#">Profile</a></li>
<li role="presentation"><a href="#">Messages</a></li>
</ul>
authorbase.html继承base.html。重写title,head,main块.将上述<ul>放在main块中.定义新的块user。
让上次作业完成的个人中心页面,继承user.html,原个人中心就自动有了标签页导航。
制作个人中心的三个子页面,重写authorbase.html中定义的user块。
authorbase:
{% extends "base.html" %} {% block head %}{% endblock %} {% block main %} <div class="container"> <div class="row clearfix divcolor"> <div class="col-md-8 column"> <h2>{{ user.username }}</h2> <p>投稿总数:{{ tougao|length }} 评论数量:{{ pinglun|length }}</p> <hr> <ul class="nav nav-pills" role="tablist"> <li class="active"><a href="#">全部投稿</a></li> <li><a href="#">全部评论</a></li> <li><a href="#">用户信息</a></li> </ul> <br> {% block author %}{% endblock %} </div> <div class="col-md-4 column"> </div> </div> </div> {% endblock %}
author1:
{% extends "authorbase.html" %}
{% block title %}个人中心{% endblock %}

{% block head %}{% endblock %}

{% block author %}
            <div>
                <ul>
                {% for tg in tougao %}
                <a href="{{ url_for('digital',tougao_id=tg.id) }}" class="list-group-item list-group-item-light">
                    <li>
                        <div class="page-header">
                         <h3>{{ tg.title }}</h3>
                         <p><span class="glyphicon glyphicon-user">{{ tg.author.username }}</span> <span class="glyphicon glyphicon-time">{{ tg.time }}</span></p>
                        </div>
                    </li>
                </a>
                {% endfor %}
            </ul>
            </div>
{% endblock %}
像上面这个继承authorbase编写三个不同的子网页,然后写一个视图函数带标签页面参数tag,从而达到点击点击不同按钮有不同的页面的效果。
@app.route('/author/<user_id>/<tag>')
def author(user_id,tag):
    user=User.query.filter(User.id==user_id).first()
    context={
        'user':user,
        'tougao':user.tougao,
        'pinglun':user.pinglun
    }
    if tag=='1':
        return render_template('author1.html', **context)
    elif tag=='2':
        return render_template('author2.html', **context)
    else:
        return render_template('author3.html', **context)
导航标签链接增加tag参数:
<small><a href="{{ url_for('author',user_id=quest.author.id,tag=1) }}"><span class="glyphicon glyphicon-user">{{ quest.author.username }}</span></a> <span class="glyphicon glyphicon-time">{{ quest.time }}</span></small>
有链接到个人中心页面的url增加tag参数:
<a href="{{ url_for('usercenter',user_id = session.get('userid'), tag=1) }}">{{ session.get('user') }}</a>
16 实现搜索功能
准备视图函数search():
from sqlalchemy import or_

@app.route("/search")
def search():
    q=request.args.get("q")
    tg=Tougao.query.filter(
        or_(
            Tougao.title.contains(q),
            Tougao.content.contains(q)
        )
    ).order_by("-time")
    return render_template("index.html",touGao=tg)
修改base.html 中搜索输入框所在的:
        <form class="navbar-form navbar-right" role="search" action="{{ url_for("search") }}" method="get">

            <div class="form-group">
                <input type="text" class="form-control" name="q" placeholder="Search">
            </div>
            <button type="submit" class="btn btn-default">
                搜索
            </button>
        </form>
17 密码保护
1.更新User对象,设置对内的_password
class User(db.Model):
    __tablename__='user'
    id = db.Column(db.Integer,primary_key=True,autoincrement=True)
    username=db.Column(db.String(20),nullable=False)
    _password=db.Column(db.String(200),nullable=False)
2.编写对外的password
from werkzeug.security import generate_password_hash, check_password_hash

    @property

    def password(self):  #外部使用,取值

        return self._password


    @password.setter

    def password(self, row_password):#外部使用,赋值

        self._password = generate_password_hash(row_password)
3.密码验证方法:
    def check_password(self, row_password): #密码验证

        result = check_password_hash(self._password,row_password)

        return result
4.登录验证:
        password1 = request.form.get('password')

        user = User.query.filter(User.username == username).first()

        if user:

            if user.check_password(password1):