使用NIO完成网络通信的三个核心:
1、通道(Channel):负责连接
java.nio.channels.Channel接口:
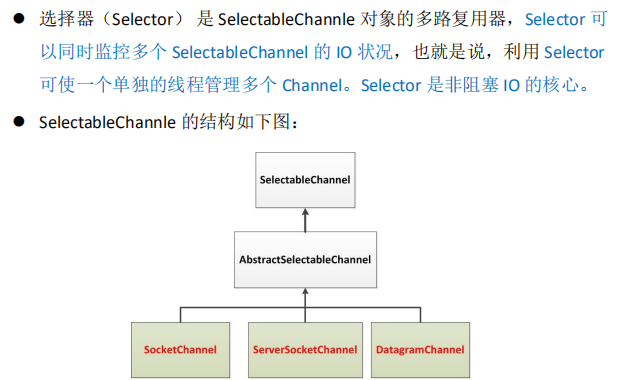
SelectableChannel抽象类:有一下几个实现类
SocketChannel TCP
ServerSocketChannel TCP
DategramChannel UDP
Pipe.SinkChannel
Pipe.SourceChannel
2、缓冲区(Buffer):负责数据的存取
3、选择器(Selector):式SelectableChannel的多路复用器,用于监控SelectableChannel的IO状况
代码实例:
    //服务端
    @Test
    public void server() throws IOException{

        //1、获取异常
        ServerSocketChannel serverSocketChannel = ServerSocketChannel.open();

        //2、绑定连接
        serverSocketChannel.bind(new InetSocketAddress(8081));

        //3、获取客户端连接的通道
        SocketChannel sockChannel = serverSocketChannel.accept();

        //4、分配指定大小的缓冲区
        ByteBuffer buf = ByteBuffer.allocate(1024);

        //5、接收客户端的数据保存到本地
        FileChannel outChannel = FileChannel.open(Paths.get("d:\aaa.jpg"), StandardOpenOption.WRITE
                            ,StandardOpenOption.CREATE,StandardOpenOption.READ);

        while(sockChannel.read(buf) != -1){
            buf.flip();
            outChannel.write(buf);
            buf.clear();
        }

        serverSocketChannel.close();
        outChannel.close();
        sockChannel.close();
    }
    //客户端
    @Test
    public void client(){

        //1、获取通道
        SocketChannel socketChannel = null;

        FileChannel inChannel = null;
        try {
            socketChannel = SocketChannel.open(new InetSocketAddress("127.0.0.1", 8081));

            //2、分配指定大小的缓冲区
            ByteBuffer buf = ByteBuffer.allocate(1024);

            //3、读取本地文件,并且发送
            inChannel = FileChannel.open(Paths.get("d:\a.jpg"), StandardOpenOption.READ);

            while(inChannel.read(buf) != -1){
                buf.flip();
                socketChannel.write(buf);
                buf.clear();
            }
        } catch (IOException e) {
            e.printStackTrace();
        }finally {
                try {
                    socketChannel.close();
                } catch (IOException e) {
                    // TODO Auto-generated catch block
                    e.printStackTrace();
                }
                try {
                    inChannel.close();
                } catch (IOException e) {
                    // TODO Auto-generated catch block
                    e.printStackTrace();
                }
        }
    }
先开启服务端在开启客户端:

阻塞式测试:(服务端给客户端回复响应信息)
@Test
    public void server() throws IOException{

        //1、获取异常
        ServerSocketChannel serverSocketChannel = ServerSocketChannel.open();

        //2、绑定连接
        serverSocketChannel.bind(new InetSocketAddress(8081));

        //3、获取客户端连接的通道
        SocketChannel sockChannel = serverSocketChannel.accept();

        //4、分配指定大小的缓冲区
        ByteBuffer buf = ByteBuffer.allocate(1024);

        //5、接收客户端的数据保存到本地
        FileChannel outChannel = FileChannel.open(Paths.get("d:\aaaa.jpg"), StandardOpenOption.WRITE
                            ,StandardOpenOption.CREATE,StandardOpenOption.READ);

        while(sockChannel.read(buf) != -1){
            buf.flip();
            outChannel.write(buf);
            buf.clear();
        }

        //发送反馈信息
        buf.put("服务端接收图片成功".getBytes());
        buf.flip();
        sockChannel.write(buf);

        serverSocketChannel.close();
        outChannel.close();
        sockChannel.close();
    }
客户端:
    //客户端
    @Test
    public void client(){
        //1、获取通道
        SocketChannel socketChannel = null;
        FileChannel inChannel = null;
        try {
            socketChannel = SocketChannel.open(new InetSocketAddress("127.0.0.1", 8081));

            //2、分配指定大小的缓冲区
            ByteBuffer buf = ByteBuffer.allocate(1024);

            //3、读取本地文件,并且发送
            inChannel = FileChannel.open(Paths.get("d:\a.jpg"), StandardOpenOption.READ);

            while(inChannel.read(buf) != -1){
                buf.flip();
                socketChannel.write(buf);
                buf.clear();
            }

            //接收服务端的反馈
            int len = 0;
            while((len = socketChannel.read(buf)) != -1){
                buf.flip();
                System.out.println(new String(buf.array(),0,len));
                buf.clear();
            }

        } catch (IOException e) {
            e.printStackTrace();
        }finally {
                try {
                    socketChannel.close();
                } catch (IOException e) {
                    // TODO Auto-generated catch block
                    e.printStackTrace();
                }
                try {
                    inChannel.close();
                } catch (IOException e) {
                    // TODO Auto-generated catch block
                    e.printStackTrace();
                }
        }
    }
此时运行服务端和客户端
会发现处于阻塞状态
并无相关的信息进行打印


此时的解决方案:客户端告诉服务端我已经发送数据完成:
在客户端中进行添加代码:
            //3、读取本地文件,并且发送
            inChannel = FileChannel.open(Paths.get("d:\a.jpg"), StandardOpenOption.READ);

            while(inChannel.read(buf) != -1){
                buf.flip();
                socketChannel.write(buf);
                buf.clear();
            }
            //告诉服务端数据已发送
            socketChannel.shutdownOutput();
此时是可以接收到服务端的反馈信息

非阻塞式
服务端:
//服务端
    @Test
    public void server() throws IOException{
        //1、获取通道
        ServerSocketChannel ssChannel = ServerSocketChannel.open();

        //2、切换非阻塞模式
        ssChannel.configureBlocking(false);

        //3、绑定连接
        ssChannel.bind(new InetSocketAddress(8081));

        //4、获取选择器
        Selector selector = Selector.open();

        //5、将通道注册到选择器上,指定监听事件
        //SelectionKey.OP_ACCEPT:接收
        ssChannel.register(selector, SelectionKey.OP_ACCEPT);

        //6、轮询式的获取选择器上已经准备就绪的事件
        while(selector.select() > 0){
            //7、获取当前选择器中所有注册的“悬着键”
            Iterator<SelectionKey> it =   selector.selectedKeys().iterator();

            //8、迭代获取
            while(it.hasNext()){
                //9、获取准备就绪的事件
                SelectionKey sk = it.next();

                //10、判断是什么事件准备就绪
                if(sk.isAcceptable()){
                    //接收就绪就获取客户端的连接
                    SocketChannel sChannel = ssChannel.accept();
                    //切换非阻塞模式
                    sChannel.configureBlocking(false);
                    //将该通道注册到选择器上
                    sChannel.register(selector, SelectionKey.OP_READ);
                }else if(sk.isReadable()){
                    //判断是都是读就绪状态
                    SocketChannel sChannel = (SocketChannel) sk.channel();
                    //读取数据
                    ByteBuffer buf = ByteBuffer.allocate(1024);
                    int len = 0;
                    while((len = sChannel.read(buf)) > 0){
                        buf.flip();
                        System.out.println(new String(buf.array(),0,len));
                        buf.clear();
                    }
                }
            }
            //取消选择键  SelectionKey sk = it.next();
            it.remove();
        }
    }
客户端:
//客户端
    @Test
    public void client() throws IOException{
        //1、获取通道
        SocketChannel sChannel = SocketChannel.open(new InetSocketAddress("127.0.0.1",8081));

        //2、切换非阻塞模式
        sChannel.configureBlocking(false);

        //3、指定大小的缓冲区
        ByteBuffer buf = ByteBuffer.allocate(1024);

        //4、发送数据给服务端
        buf.put(new Date().toString().getBytes());

        buf.flip();

        sChannel.write(buf);
        buf.clear();

        //5、关闭通道
        sChannel.close();


    }
先运行服务端在运行客户端:
选择器
选择器的应用


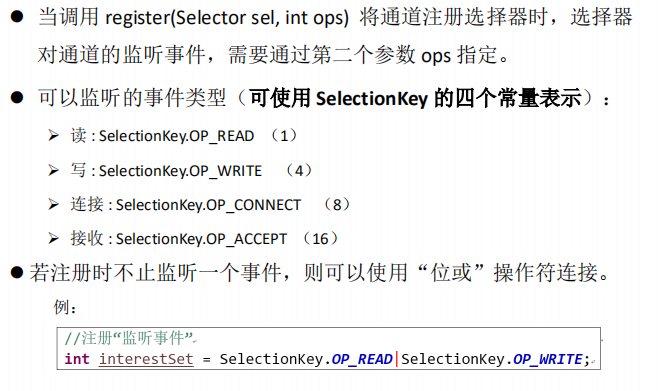
SelectionKey

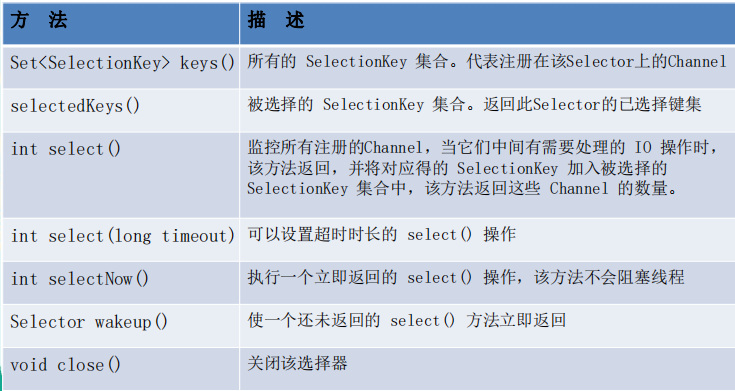
Selector的常用方法
SocketChannel

