1.跳转至员工添加页面
上文的添加按钮:
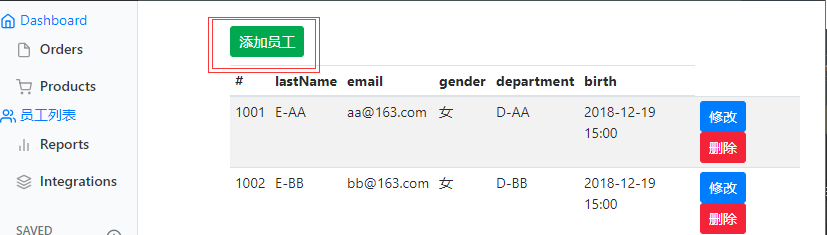
list.html
<h2><a class="btn btn-sm btn-success" href="emp" th:href="@{/emp}">添加员工</a></h2>
跳转页面controller的实现
//跳转到添加员工的页面
@GetMapping("/emp")
public  String  toAddPage(Model model){
    //去添加页面之前要查出部门的可选值,以便在添加时候进行选择

    Collection<Department> departments = departmentDao.getDepartments();
    model.addAttribute("depts",departments);
    return "emp/add";
}
add.html添加页面
<!--添加员工的表单 -->
<form th:action="@{/emp}" method="post">
   <!--发送put请求修改员工数据-->
   <!--
   1、SpringMVC中配置HiddenHttpMethodFilter;(SpringBoot自动配置好的)
   2、页面创建一个post表单
   3、创建一个input项,name="_method";值就是我们指定的请求方式
   -->
   <input type="hidden" name="_method" value="put" th:if="${emp!=null}"/>
   <input type="hidden" name="id" th:if="${emp!=null}" th:value="${emp.id}">
   <div class="form-group">
      <label>LastName</label>
      <input name="lastName" type="text" class="form-control" placeholder="zhangsan" th:value="${emp!=null}?${emp.lastName}">
   </div>
   <div class="form-group">
      <label>Email</label>
      <input name="email" type="email" class="form-control" placeholder="zhangsan@atguigu.com" th:value="${emp!=null}?${emp.email}">
   </div>
   <div class="form-group">
      <label>Gender</label><br/>
      <div class="form-check form-check-inline">
         <input class="form-check-input" type="radio" name="gender" value="1" th:checked="${emp!=null}?${emp.gender==1}">
         <label class="form-check-label">男</label>
      </div>
      <div class="form-check form-check-inline">
         <input class="form-check-input" type="radio" name="gender" value="0" th:checked="${emp!=null}?${emp.gender==0}">
         <label class="form-check-label">女</label>
      </div>
   </div>
   <div class="form-group">
      <label>department</label>
      <!--提交的是部门的id-->
      <select class="form-control" name="department.id">
         <option th:each="dept:${depts}" th:text="${dept.departmentName}"
         th:value="${dept.id}">1</option>
      </select>
   </div>
   <div class="form-group">
      <label>Birth</label>
      <input name="birth" type="text" class="form-control" placeholder="zhangsan" th:value="${emp!=null}?${#dates.format(emp.birth, 'yyyy-MM-dd HH:mm')}">
   </div>
   <button type="submit" class="btn btn-primary" th:text="${emp!=null}?'修改':'添加'">添加</button>
</form>
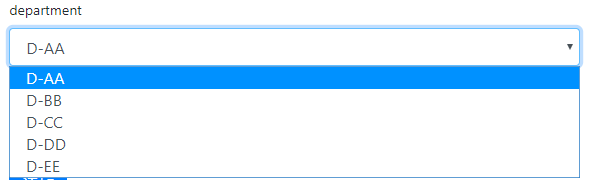
此时对于department的选择框会根据数据进行显示相应的内容.....
2.员工数据添加
有上面的add.html可知,添加发送的是emp请求格式为post
实现controller
//添加员工
//springmvc自动将请求入参和对象的属性意义绑定
//要求就是请求参数的名字和对象的属性值一一对应
@PostMapping("/emp")
public  String addEmp(Employee employee){

    System.out.println(employee);

    //保存员工数据
    employeeDao.save(employee);

    //redirect:重定向
    //forward:转发
    return "redirect:/emps";
}
添加员工页面:
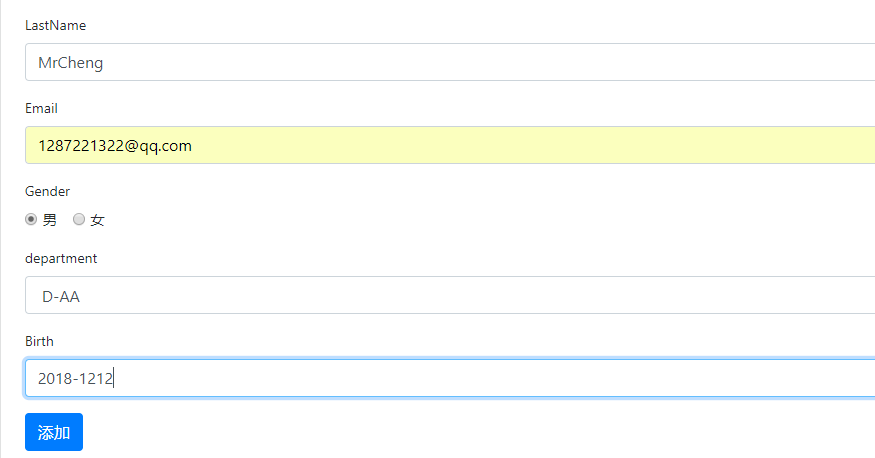
后台数据打印:
Employee{id=null, lastName='MrCheng', email='1287221322@qq.com', gender=1, department=Department
[id=101, departmentName=null], birth=Wed Dec 12 00:00:00 CST 2018}
添加成功之后的页面:
注意:时间问题
默认的时间类型是:YYYY/MM/dd
即:2018/12/12
如果想要修改其类型只需要在配置文件中
spring.mvc.date-format=yyyy-MM-dd

即可修改其默认的配置!!!