此文章是基于 搭建Jquery+SpringMVC+Spring+Hibernate+MySQL平台
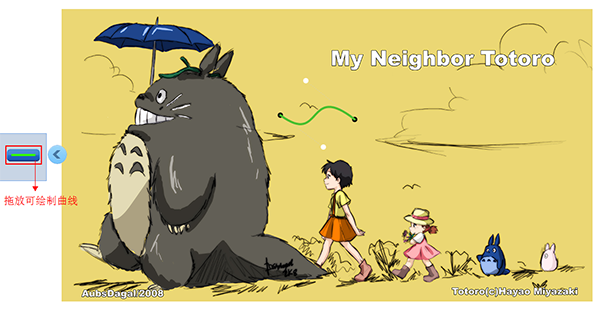
功能:图片的拖动、曲线的拖放和绘制
一. Jquery插件介绍
1. raphael-min.js 绘制曲线的Jquery插件,版本2.1.4
二. 相关文件介绍
1. dragDrop.jsp:主界面


<!DOCTYPE html PUBLIC "-//W3C//DTD XHTML 1.0 Transitional//EN">
<%@ page language="java" contentType="text/html; charset=UTF-8" pageEncoding="UTF-8"%>
<html>
 <head>
    <meta http-equiv="Content-Type" content="text/html; charset=UTF-8">
    <title>图片拖放和曲线拖动</title>
    <%@ include file="/common/basePath.jsp"%>
    <link href="content/css/demo/dragDrop.css" rel="stylesheet" type="text/css" />
 </head>
 <body>
    <div id="holder"></div>

    <div id="backImgDiv" style="left: 0px; top: 0px;" title="可移动">
        <img id="backImg" src="content/images/dragDrop/backImg.png"/>
    </div>

    <div id="leftSideBar" style="z-index: 3;">

        <div id="leftSideBarContents">
            <div id="leftSideBarContentsInner">
                <div id="dragLine" style="top:30px;left:15px;position:absolute;filter:alpha(opacity=100);opacity:1;">
                    <img src="content/images/dragDrop/greenLine.png" />
                </div>
            </div>
        </div>

        <span id="leftSideBarTab" style="cursor: pointer;position:absolute;top:20px;">
            <img id="leftSideBarImg" src="content/images/dragDrop/open.png" alt="工具栏" title="工具栏" />
        </span>
    </div>

    <script type="text/javascript" src="content/js/jquery/jquery-1.8.1.min.js"></script>
    <script type="text/javascript" src="content/js/core/utils.js"></script>
    <script type="text/javascript" src="content/js/core/common.js"></script>

    <script type="text/javascript" src="content/js/jquery-plugin/raphael/2.1.4/raphael-min.js"></script>
    <script type="text/javascript" src="viewModel/iot/dragDrop/moveDiv.js"></script>
    <script type="text/javascript" src="viewModel/iot/dragDrop/dragDrop.js"></script>
    <script type="text/javascript" src="viewModel/iot/dragDrop/curver.js"></script>
    <script type="text/javascript" src="viewModel/iot/dragDrop/leftBar.js"></script>

 </body>
</html>
2. moveDiv.js:实现图片的拖动功能
//判断是否可移动背景
isMoveBack = false;

//鼠标X坐标与DIV的Left坐标的差
leftSpace = 0;

//鼠标Y坐标与DIV的Top坐标的差
topSpace = 0;

//曲线第一个点相对左上角的距离
point1Left = [];
point1Top = [];

divId = null;

$(document).mousedown(function(e){
    // 兼容火狐和IE
    if((e.target && e.target.id == 'backImg') ||
        (e.srcElement && e.srcElement.id == 'backImg') ||
            (e.target && e.target.parentElement && e.target.parentElement.id == 'holder')){
        divId = "backImgDiv";

        // 通知浏览器不要执行与事件关联的默认动作
        if(e.preventDefault)
            e.preventDefault();
        else
            e.returnvalue = false;

        var backImgLeft = $('#'+divId).offset().left;
        var backImgTop = $('#'+divId).offset().top;

        leftSpace = e.clientX - backImgLeft;
        topSpace = e.clientY - backImgTop;

        if(("undefined" != typeof controls) && controls.length>0){
            for(var i=0;i<controls.length;i++){
                point1Left[i] = e.clientX - controls[i][1].attr("cx");
                point1Top[i] = e.clientY - controls[i][1].attr("cy");
            }
        }

        isMoveBack = true;
    }
});

$(document).mouseup(function(e){
    if(isMoveLine){
        dragLineOnmouseup(e);
    }else if(isMoveBack){
        backImgOnmouseup(e);
    }
});

$(document).mousemove(function(e){
    if(isMoveLine){
        dragLineOnmousemove(e);
    }else if(isMoveBack){
        backImgOnmousemove(e);
    }
});

function backImgOnmouseup(e){
    divId = null;
    isMoveBack = false;
}

function backImgOnmousemove(e){
    if(divId == 'backImgDiv'){
        $('#'+divId).offset({left:e.clientX - leftSpace, top:e.clientY - topSpace});

        if(("undefined" != typeof controls) && controls.length>0){
            for(var i=0;i<controls.length;i++){
                controls[i][0].update(e.clientX - point1Left[i], e.clientY - point1Top[i], true);
            }
        }
    }
}
3. dragDrop.js:实现曲线的拖放功能
dragLine = new DragDrop("dragLine");

// 随鼠标移动的DragDiv
followDragDiv = null;

// 鼠标偏移DragDiv水平和垂直方向的距离
mouseDivX = 0;
mouseDivY = 0;

sideBarLeft = 0;
sideBarTop = 0;

isMoveLine = false;

function DragDrop(divId){
    $('#'+divId).mousedown(function(e){
        // 通知浏览器不要执行与事件关联的默认动作
        if(e.preventDefault)
            e.preventDefault();
        else
            e.returnvalue = false;

        sideBarLeft = $('#leftSideBar').offset().left;
        sideBarTop = $('#leftSideBar').offset().top;

        var downPos = com.getMousePos(e);
        mouseDivX = downPos.x - this.offsetLeft - sideBarLeft;
        mouseDivY = downPos.y - this.offsetTop - sideBarTop;

        followDragDiv = document.createElement("div");
        followDragDiv.style.cssText = this.style.cssText;
        followDragDiv.style.width = this.offsetWidth;
        followDragDiv.style.height = this.offsetHeight;
        followDragDiv.style.left = this.offsetLeft + sideBarLeft + "px";
        followDragDiv.style.top = this.offsetTop + sideBarTop + "px";
        followDragDiv.style.zIndex = 3;
        followDragDiv.innerHTML = this.innerHTML;
        $(document.body).append(followDragDiv);

        setOpacity(followDragDiv, 50);
        isMoveLine = true;
    });
}

function setOpacity(dragDiv, n){
    var ieVer = parseInt(com.getIeVersion());
    if (com.isIE && 5<ieVer && ieVer<10 ) {
        dragDiv.filters.alpha.opacity = n;
    } else {
        dragDiv.style.opacity = n / 100;
    }
}

function dragLineOnmouseup(e){
    isMoveLine = false;
    mouseDivX = 0;
    mouseDivY = 0;
    sideBarLeft = 0;
    sideBarTop = 0;
    followDragDiv.outerHTML = "";
    followDragDiv = null;

    var upPos = com.getMousePos(e);

    new Curver(upPos.x-(0.5*50), upPos.y, upPos.x-(0.5*50-20), upPos.y, upPos.x-(0.5*50-30), upPos.y, upPos.x-(0.5*50-50), upPos.y, "hsb(.3, .75, .75)", 0, 1);
}

function dragLineOnmousemove(e){
    if (isMoveLine) {
        var movePos = com.getMousePos(e);
        var dragArea = { maxLeft: 0, maxRight: $(window)[0].innerWidth - $(followDragDiv).width(), maxTop: 0, maxBottom: $(window)[0].innerHeight - $(followDragDiv).height() };
        followDragDiv.style.left = Math.max(Math.min(movePos.x - mouseDivX, dragArea.maxRight), dragArea.maxLeft) + "px";
        followDragDiv.style.top = Math.max(Math.min(movePos.y - mouseDivY, dragArea.maxBottom), dragArea.maxTop) + "px";
    }
}
4. curver.js:实现曲线的绘制功能
$(document).ready(function(){
    controls = [];
    selectControlId = null;

    windowHeight = $(window)[0].innerHeight;
    windowWidth = $(window)[0].innerWidth;
    r = Raphael("holder", windowWidth, windowHeight);

    discattrWhite = {fill: "#fff", stroke: "none"};
    discattrBlack = {fill: "#000", stroke: "none"};
});

$(window).resize(function(){
    windowHeight = $(window)[0].innerHeight;
    windowWidth = $(window)[0].innerWidth;

    r.setSize(windowWidth, windowHeight);
});

function Curver(x, y, ax, ay, bx, by, zx, zy, color, startPoint, endPoint) {
    this.init = function () {
        var path = [["M", x, y], ["C", ax, ay, bx, by, zx, zy]],
            path2 = [["M", x, y], ["L", ax, ay], ["M", bx, by], ["L", zx, zy]];
        var posi = controls.length;
        controls[posi] = r.set(
            r.path(path2).attr({stroke: "#ccc", "stroke-dasharray": ". "}),
            r.circle(x, y, 5).attr(discattrBlack),
            r.circle(ax, ay, 5).attr(discattrWhite),
            r.circle(bx, by, 5).attr(discattrWhite),
            r.circle(zx, zy, 5).attr(discattrBlack),
            r.path(path).attr({stroke: color || Raphael.getColor(), "stroke-width": 4, "stroke-linecap": "round"})
        );
        controls[posi][0].startPoint = startPoint;
        controls[posi][0].endPoint = endPoint;
        controls[posi][0].arrIndex = posi;
        controls[posi][0].update = function (x, y, isOffset) {
            if(isOffset){
                x = x - controls[this.arrIndex][1].attr("cx");
                y = y - controls[this.arrIndex][1].attr("cy");
            }
            controls[this.arrIndex][1].update(x, y);
            controls[this.arrIndex][4].update(x, y);
        };
        controls[posi][1].arrIndex = posi;
        controls[posi][1].update = function (x, y) {
            var X = this.attr("cx") + x,
                Y = this.attr("cy") + y;
            this.attr({cx: X, cy: Y});
            path[0][1] = X;
            path[0][2] = Y;
            path2[0][1] = X;
            path2[0][2] = Y;
            controls[this.arrIndex][2].update(x, y);
        };
        controls[posi][2].arrIndex = posi;
        controls[posi][2].update = function (x, y) {
            var X = this.attr("cx") + x,
                Y = this.attr("cy") + y;
            this.attr({cx: X, cy: Y});
            path[1][1] = X;
            path[1][2] = Y;
            path2[1][1] = X;
            path2[1][2] = Y;
            controls[this.arrIndex][5].attr({path: path});
            controls[this.arrIndex][0].attr({path: path2});
        };
        controls[posi][3].arrIndex = posi;
        controls[posi][3].update = function (x, y) {
            var X = this.attr("cx") + x,
                Y = this.attr("cy") + y;
            this.attr({cx: X, cy: Y});
            path[1][3] = X;
            path[1][4] = Y;
            path2[2][1] = X;
            path2[2][2] = Y;
            controls[this.arrIndex][5].attr({path: path});
            controls[this.arrIndex][0].attr({path: path2});
        };
        controls[posi][4].arrIndex = posi;
        controls[posi][4].update = function (x, y) {
            var X = this.attr("cx") + x,
                Y = this.attr("cy") + y;
            this.attr({cx: X, cy: Y});
            path[1][5] = X;
            path[1][6] = Y;
            path2[3][1] = X;
            path2[3][2] = Y;
            controls[this.arrIndex][3].update(x, y);
        };
        controls[posi][5].arrIndex = posi;
        controls[posi][5].update = function (x, y) {
            controls[this.arrIndex][0].update(x,y);
        };
        controls[posi].drag(this.move, this.up, false);
        controls[posi].click(function(){
            selectControlId = this.arrIndex;
        });
        controls[posi].mouseover(function(e){
            this[0].style.cursor = 'pointer';
        });
        controls[posi].mousemove(function(e){});
        controls[posi].mouseout(function(e){
            this[0].style.cursor = 'default';
        });
    }

    this.move = function(dx, dy) {
        this.update(dx - (this.dx || 0), dy - (this.dy || 0));
        this.dx = dx;
        this.dy = dy;
    }

    this.up = function() {
        this.dx = this.dy = 0;
    }

    this.init();
}
5. leftBar.js:实现左边工具条的隐藏和显示
$(document).ready(function(){
    $('#leftSideBar').css('top', $(window)[0].innerHeight/2 - $('#leftSideBarContents').height()/2);
    var leftSideBarStatus = 'close';
    $('#leftSideBarTab').click(function () {
        if(leftSideBarStatus=='open'){
            leftSideBarClose();
            leftSideBarStatus = 'close';
        }else{
            leftSideBarOpen();
            leftSideBarStatus = 'open';
        }

        return false;
    });
});

function leftSideBarClose() {
    $('#leftSideBarImg')[0].src = 'content/images/dragDrop/open.png';
    $('#leftSideBar').animate({
        left: '-90px'
    }, 300);
}

function leftSideBarOpen() {
    $('#leftSideBarImg')[0].src = 'content/images/dragDrop/close.png';
    $('#leftSideBar').delay(50).animate({
            left: '0px'
        }, 300);
}
三. 效果图: http://localhost:8080/ims/view/iot/dragDrop.jsp