/*
 * Copyright (C) 2017, Lentin Joseph and Qbotics Labs Inc.
 * Email id : qboticslabs@gmail.com
 * Redistribution and use in source and binary forms, with or without
 * modification, are permitted provided that the following conditions are met:
 *   * Redistributions of source code must retain the above copyright notice,
 *     this list of conditions and the following disclaimer.
 *   * Redistributions in binary form must reproduce the above copyright
 *     notice, this list of conditions and the following disclaimer in the
 *     documentation and/or other materials provided with the distribution.
 *   * Neither the names of Stanford University or Willow Garage, Inc. nor the names of its
 *     contributors may be used to endorse or promote products derived from
 *     this software without specific prior written permission.
 *
 * THIS SOFTWARE IS PROVIDED BY THE COPYRIGHT HOLDERS AND CONTRIBUTORS "AS IS"
 * AND ANY EXPRESS OR IMPLIED WARRANTIES, INCLUDING, BUT NOT LIMITED TO, THE
 * IMPLIED WARRANTIES OF MERCHANTABILITY AND FITNESS FOR A PARTICULAR PURPOSE
 * ARE DISCLAIMED. IN NO EVENT SHALL THE COPYRIGHT OWNER OR CONTRIBUTORS BE
 * LIABLE FOR ANY DIRECT, INDIRECT, INCIDENTAL, SPECIAL, EXEMPLARY, OR
 * CONSEQUENTIAL DAMAGES (INCLUDING, BUT NOT LIMITED TO, PROCUREMENT OF
 * SUBSTITUTE GOODS OR SERVICES; LOSS OF USE, DATA, OR PROFITS; OR BUSINESS
 * INTERRUPTION) HOWEVER CAUSED AND ON ANY THEORY OF LIABILITY, WHETHER IN
 * CONTRACT, STRICT LIABILITY, OR TORT (INCLUDING NEGLIGENCE OR OTHERWISE)
 * ARISING IN ANY WAY OUT OF THE USE OF THIS SOFTWARE, EVEN IF ADVISED OF THE
 * POSSIBILITY OF SUCH DAMAGE.
* This code will track the faces using ROS
*/


//ROS headers
#include <ros/ros.h>
#include <image_transport/image_transport.h>
#include <cv_bridge/cv_bridge.h>
#include <sensor_msgs/image_encodings.h>

//Open-CV headers
#include "opencv2/opencv.hpp"
#include <opencv2/imgproc/imgproc.hpp>
#include <opencv2/highgui/highgui.hpp>
//#include "opencv2/objdetect.hpp"

//Centroid message headers
#include <face_tracker_pkg/centroid.h>

//OpenCV window name
static const std::string OPENCV_WINDOW = "raw_image_window";
static const std::string OPENCV_WINDOW_1 = "face_detector";


using namespace std;
using namespace cv;

class Face_Detector
{
  ros::NodeHandle nh_;
  image_transport::ImageTransport it_;
  image_transport::Subscriber image_sub_;
  image_transport::Publisher image_pub_;

  ros::Publisher face_centroid_pub;

  face_tracker_pkg::centroid face_centroid;

  string input_image_topic, output_image_topic, haar_file_face;
  int face_tracking, display_original_image, display_tracking_image, center_offset, screenmaxx;


public:
  Face_Detector()
    : it_(nh_)
  {


  //Loading Default values


  input_image_topic = "/usb_cam/image_raw";
  output_image_topic = "/face_detector/raw_image";
  haar_file_face = "/home/robot/face.xml";
  face_tracking = 1;
  display_original_image = 1;
  display_tracking_image = 1;
  screenmaxx = 640;
  center_offset = 100;

  //Accessing parameters from track.yaml

  try{
  nh_.getParam("image_input_topic", input_image_topic);
  nh_.getParam("face_detected_image_topic", output_image_topic);
  nh_.getParam("haar_file_face", haar_file_face);
  nh_.getParam("face_tracking", face_tracking);
  nh_.getParam("display_original_image", display_original_image);
  nh_.getParam("display_tracking_image", display_tracking_image);
  nh_.getParam("center_offset", center_offset);
  nh_.getParam("screenmaxx", screenmaxx);

  ROS_INFO("Successfully Loaded tracking parameters");
  }

  catch(int e)
  {

      ROS_WARN("Parameters are not properly loaded from file, loading defaults");

  }

    // Subscribe to input video feed and publish output video feed
    image_sub_ = it_.subscribe(input_image_topic, 1,
      &Face_Detector::imageCb, this);
    image_pub_ = it_.advertise(output_image_topic, 1);

    face_centroid_pub = nh_.advertise<face_tracker_pkg::centroid>("/face_centroid",10);


  }

  ~Face_Detector()
  {
    if( display_original_image == 1 or display_tracking_image == 1)
    	cv::destroyWindow(OPENCV_WINDOW);
  }

  void imageCb(const sensor_msgs::ImageConstPtr& msg)
  {

    cv_bridge::CvImagePtr cv_ptr;
    namespace enc = sensor_msgs::image_encodings;

    try
    {
      cv_ptr = cv_bridge::toCvCopy(msg, sensor_msgs::image_encodings::BGR8);
    }
    catch (cv_bridge::Exception& e)
    {
      ROS_ERROR("cv_bridge exception: %s", e.what());
      return;
    }


	    string cascadeName = haar_file_face;
            CascadeClassifier cascade;
	    if( !cascade.load( cascadeName ) )
	    {
		cerr << "ERROR: Could not load classifier cascade" << endl;

	    }


	    if (display_original_image == 1){
		imshow("Original Image", cv_ptr->image);
	    }

            detectAndDraw( cv_ptr->image, cascade );

            image_pub_.publish(cv_ptr->toImageMsg());

            waitKey(30);

}

void detectAndDraw( Mat& img, CascadeClassifier& cascade)
{
    double t = 0;
    double scale = 1;
    vector<Rect> faces, faces2;
    const static Scalar colors[] =
    {
        Scalar(255,0,0),
        Scalar(255,128,0),
        Scalar(255,255,0),
        Scalar(0,255,0),
        Scalar(0,128,255),
        Scalar(0,255,255),
        Scalar(0,0,255),
        Scalar(255,0,255)
    };
    Mat gray, smallImg;

    cvtColor( img, gray, COLOR_BGR2GRAY );
    double fx = 1 / scale ;
    resize( gray, smallImg, Size(), fx, fx, INTER_LINEAR );
    equalizeHist( smallImg, smallImg );

    t = (double)cvGetTickCount();
    cascade.detectMultiScale( smallImg, faces,
        1.1, 15, 0
        |CASCADE_SCALE_IMAGE,
        Size(30, 30) );

    t = (double)cvGetTickCount() - t;

    for ( size_t i = 0; i < faces.size(); i++ )
    {
        Rect r = faces[i];
        Mat smallImgROI;
        vector<Rect> nestedObjects;
        Point center;
        Scalar color = colors[i%8];
        int radius;

        double aspect_ratio = (double)r.width/r.height;
        if( 0.75 < aspect_ratio && aspect_ratio < 1.3 )
        {
            center.x = cvRound((r.x + r.width*0.5)*scale);
            center.y = cvRound((r.y + r.height*0.5)*scale);
            radius = cvRound((r.width + r.height)*0.25*scale);
            circle( img, center, radius, color, 3, 8, 0 );

   	    face_centroid.x = center.x;
   	    face_centroid.y = center.y;


            //Publishing centroid of detected face
  	    face_centroid_pub.publish(face_centroid);

        }
        else
            rectangle( img, cvPoint(cvRound(r.x*scale), cvRound(r.y*scale)),
                       cvPoint(cvRound((r.x + r.width-1)*scale), cvRound((r.y + r.height-1)*scale)),
                       color, 3, 8, 0);

    }

    //Adding lines and left | right sections

    Point pt1, pt2,pt3,pt4,pt5,pt6;

    //Center line
    pt1.x = screenmaxx / 2;
    pt1.y = 0;

    pt2.x = screenmaxx / 2;
    pt2.y = 480;


    //Left center threshold
    pt3.x = (screenmaxx / 2) - center_offset;
    pt3.y = 0;

    pt4.x = (screenmaxx / 2) - center_offset;
    pt4.y = 480;

    //Right center threshold
    pt5.x = (screenmaxx / 2) + center_offset;
    pt5.y = 0;

    pt6.x = (screenmaxx / 2) + center_offset;
    pt6.y = 480;

    line(img,  pt1,  pt2, Scalar(0, 0, 255),0.2);
    line(img,  pt3,  pt4, Scalar(0, 255, 0),0.2);
    line(img,  pt5,  pt6, Scalar(0, 255, 0),0.2);


    putText(img, "Left", cvPoint(50,240), FONT_HERSHEY_SIMPLEX, 1, cvScalar(255,0,0), 2, CV_AA);
    putText(img, "Center", cvPoint(280,240), FONT_HERSHEY_SIMPLEX, 1, cvScalar(0,0,255), 2, CV_AA);
    putText(img, "Right", cvPoint(480,240), FONT_HERSHEY_SIMPLEX, 1, cvScalar(255,0,0), 2, CV_AA);

    if (display_tracking_image == 1){
    	imshow( "Face tracker", img );
     }
}

};

int main(int argc, char** argv)
{
  ros::init(argc, argv, "Face tracker");
  Face_Detector ic;
  ros::spin();
  return 0;
}
做面部识别需要摄像头一个, 我用的罗技C310.
首先先决是装opencv, 如果一开始选择的桌面完全版的indigo, opencv默认就装好了.
然后是usb_cam, 通过git上面的usb_cam拉下来就可以了, 记得建一个dependecies的workspace, 然后把需要的包都丢进去, 编译完要source devel/setup.bash一下.
$ git clone https://github.com/bosch-ros-pkg/usb_cam.git
没想到还是博世写的.
然后是解压缩:
$ sudo apt-get install v4l-utils
由于我的笔记本自带一个简单的屏幕顶摄像头, 所以这个罗技就是/dev/ideo2, 下面的launch都要修改以下设备名才行.
即插即用, 用cheese可以看看摄像头可用不.
用usb_cam这个节点看看能否获取摄像头图像, 这里有个问题, 不知道为什么, 一旦ctrl+c停止程序了, 需要插拔摄像头节点才能获取设备,不知道是不是open/close的方法不对.
$ rosrun usb_cam usb_cam-test.launch
接着就是重点了, 建一个包
$ catkin_create_pkg face_tracker_pkg roscpp rospy std_msgs message_generation
接着是脸部识别的定义文件(谁有更好的翻译), 这个文件为face_tracker_pkg/data/face.xml, 里面定义了一些有关脸部的信息, 如果你的脸跟这些信息match, 那就会当作脸了(车牌识别也是这个意思), 然后它会通过一个topic返回一个xy值说明你的脸中心点在图像的哪个位置.
现在分析一下核心的cpp:
首先是引入:
//ROS headers
#include <ros/ros.h>
#include <image_transport/image_transport.h>
#include <cv_bridge/cv_bridge.h>
#include <sensor_msgs/image_encodings.h>

//Open-CV headers
#include "opencv2/opencv.hpp"
#include <opencv2/imgproc/imgproc.hpp>
#include <opencv2/highgui/highgui.hpp>
//#include "opencv2/objdetect.hpp"

//Centroid message headers
#include <face_tracker_pkg/centroid.h>
引入了头文件, 包括OpenCV, 跟msg文件的头.
这个centroid.msg, 其实就是一个int32 x, 一个int32 y, 用于输出脸的中心点的在视口的位置.
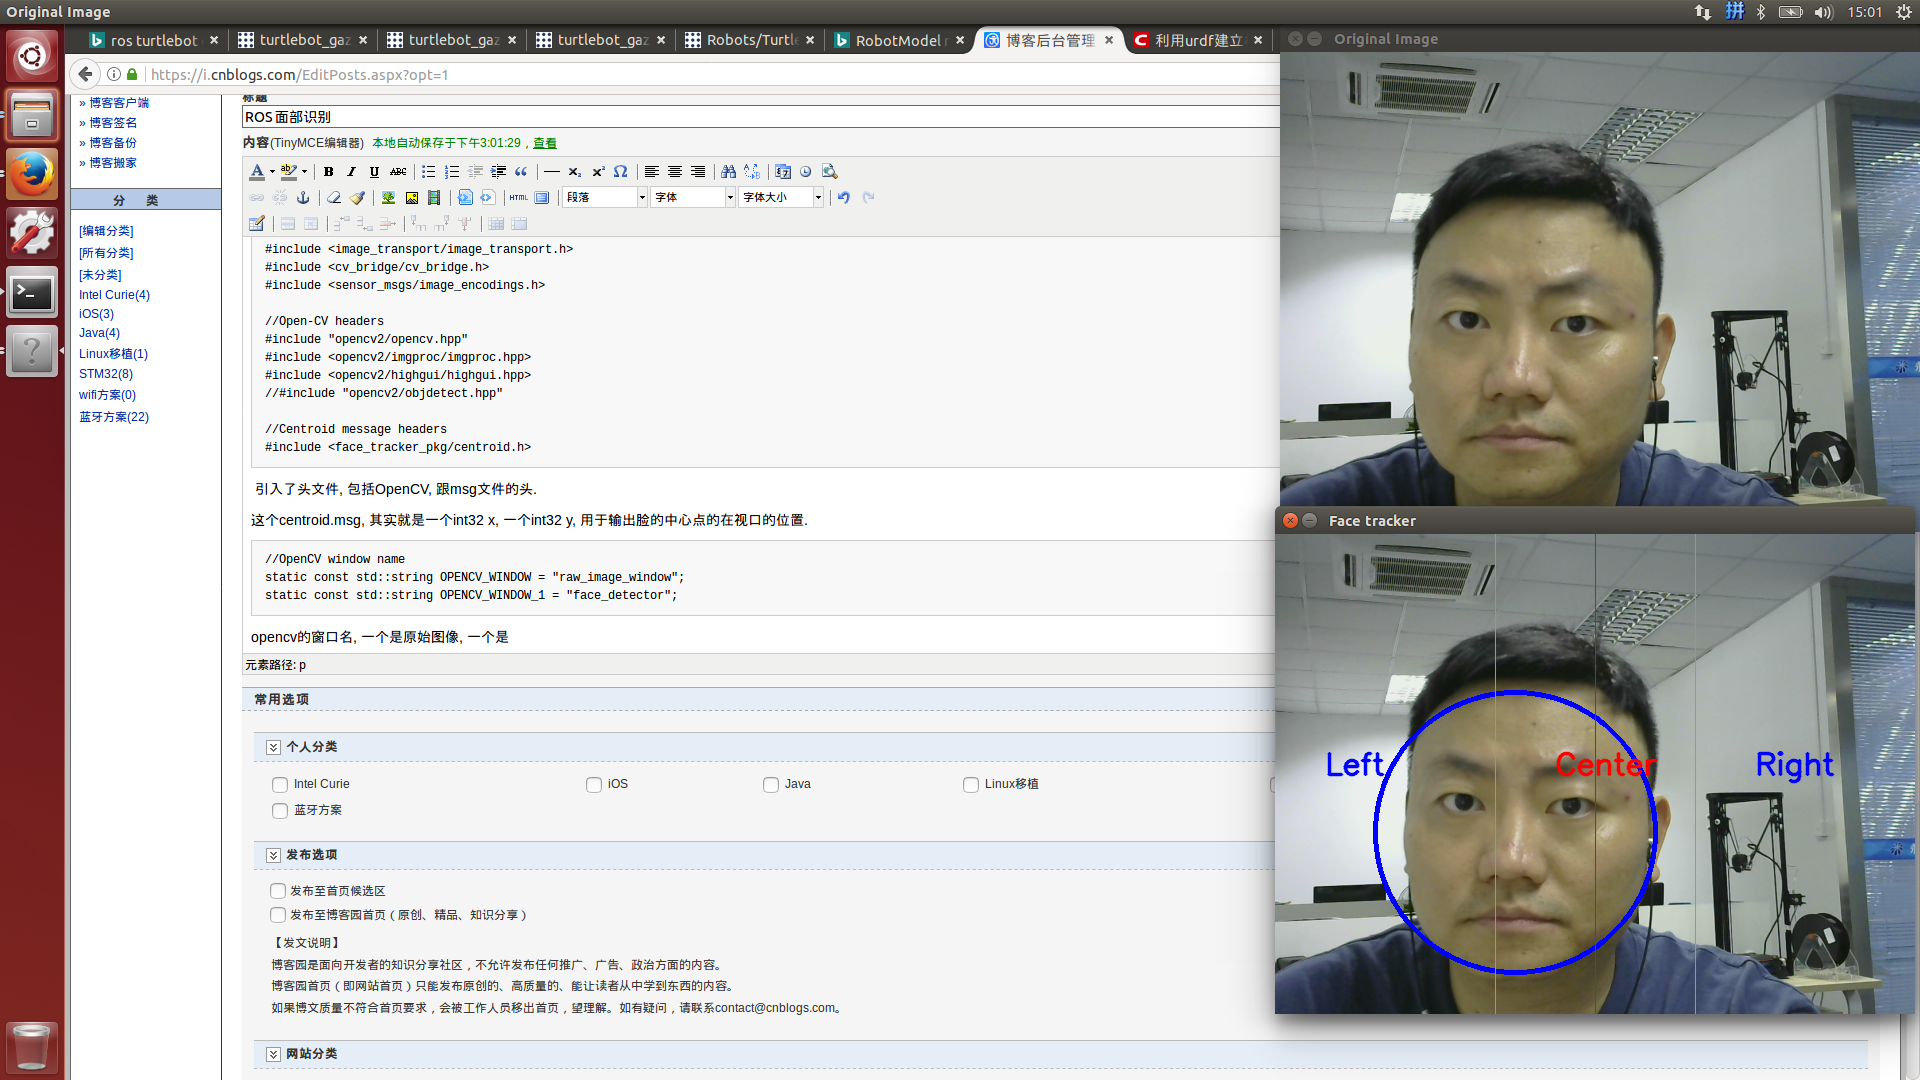
//OpenCV window name
static const std::string OPENCV_WINDOW = "raw_image_window";
static const std::string OPENCV_WINDOW_1 = "face_detector";
opencv的窗口名, 一个是原始图像, 一个是做了识别之后的窗口, 如前面显示的.
class Face_Detector
{
  ros::NodeHandle nh_;
  image_transport::ImageTransport it_;
  image_transport::Subscriber image_sub_;
  image_transport::Publisher image_pub_;

  ros::Publisher face_centroid_pub;

  face_tracker_pkg::centroid face_centroid;

  string input_image_topic, output_image_topic, haar_file_face;
  int face_tracking, display_original_image, display_tracking_image, center_offset, screenmaxx;

...
这个类就是用于识别的.
变量有
NodeHandle, 这个ROS的句柄, 无论如何都有.
然后是三个图像数据传输的: image_transport::ImageTransport, Subsriber, Publisher, 就是从dev/ideo1传输过来的数据.
然后是centroid的Publisher, 用于传输识别后的脸的位置.
然后是输入输出的topic的名字, 以及haar的文件位置.
以及图像的几个int变量.
public:
  Face_Detector(): it_(nh_){

  //Loading Default values

  input_image_topic = "/usb_cam/image_raw";
  output_image_topic = "/face_detector/raw_image";
  haar_file_face = "/home/robot/face.xml";
  face_tracking = 1;
  display_original_image = 1;
  display_tracking_image = 1;
  screenmaxx = 640;
  center_offset = 100;

  try{
  nh_.getParam("image_input_topic", input_image_topic);
  nh_.getParam("face_detected_image_topic", output_image_topic);
  nh_.getParam("haar_file_face", haar_file_face);
  nh_.getParam("face_tracking", face_tracking);
  nh_.getParam("display_original_image", display_original_image);
  nh_.getParam("display_tracking_image", display_tracking_image);
  nh_.getParam("center_offset", center_offset);
  nh_.getParam("screenmaxx", screenmaxx);

  ROS_INFO("Successfully Loaded tracking parameters");
  }

  catch(int e)
  {
      ROS_WARN("Parameters are not properly loaded from file, loading defaults");
  }

    // Subscribe to input video feed and publish output video feed
      image_sub_ = it_.subscribe(input_image_topic, 1,  &Face_Detector::imageCb, this);
      image_pub_ = it_.advertise(output_image_topic, 1);
      face_centroid_pub = nh_.advertise<face_tracker_pkg::centroid>("/face_centroid",10);
  }
然后是一个构造方法, 初始化
重点是subscribe了input_image_topic, 然后指定一个callback: imageCb, 然后advertise了输出的image, 就是识别之后.
然后也是advertise了脸的中心点的topic: centroid
void imageCb(const sensor_msgs::ImageConstPtr& msg)
{

    cv_bridge::CvImagePtr cv_ptr;
    namespace enc = sensor_msgs::image_encodings;

    try
    {
      cv_ptr = cv_bridge::toCvCopy(msg, sensor_msgs::image_encodings::BGR8);
    }
    catch (cv_bridge::Exception& e)
    {
      ROS_ERROR("cv_bridge exception: %s", e.what());
      return;
    }

	    string cascadeName = haar_file_face;
            CascadeClassifier cascade;
	    if( !cascade.load( cascadeName ) )
	    {
		cerr << "ERROR: Could not load classifier cascade" << endl;
	    }

	    if (display_original_image == 1){
		imshow("Original Image", cv_ptr->image);
	    }

            detectAndDraw( cv_ptr->image, cascade );

            image_pub_.publish(cv_ptr->toImageMsg());

            waitKey(30);
}
接着是, 收到image之后回调重点是拿到cv_ptr = cv_bridge::toCvCopy(msg, sensor_msgs::image_encodings::BGR8); dectectAndDraw(cv_ptr->image, cascade),
识别过程中, 先把图像转成灰色的:
    Mat gray, smallImg;

    cvtColor( img, gray, COLOR_BGR2GRAY );
    double fx = 1 / scale ;
    resize( gray, smallImg, Size(), fx, fx, INTER_LINEAR );
    equalizeHist( smallImg, smallImg );

    t = (double)cvGetTickCount();
    cascade.detectMultiScale( smallImg, faces, 1.1, 15, 0|CASCADE_SCALE_IMAGE, Size(30, 30) );
然后拿你的脸跟face定义里面的脸挨个对比.
然后画三条线, 并且加入一些字符, 左中右一类.
有关opencv的东西, 估计要学一个礼拜...略有小成...
track.yaml文件包含了一些ROS的参数,
比如输入的topic, haar文件位置, 是否显示原来的画面, 是否显示之后的画面.
start_tracking.launch文件:
<launch>

<!-- Launching USB CAM launch files and Dynamixel controllers -->

  <include file="$(find face_tracker_pkg)/launch/start_usb_cam.launch"/>
  <!--<include file="$(find face_tracker_control)/launch/start_dynamixel.launch"/>  -->

<!-- Starting face tracker node -->
   <rosparam file="$(find face_tracker_pkg)/config/track.yaml" command="load"/>
   <node name="face_tracker" pkg="face_tracker_pkg" type="face_tracker_node" output="screen" />

</launch>
start_usb_cam.launch
<launch>
  <node name="usb_cam" pkg="usb_cam" type="usb_cam_node" output="screen" >
    <param name="video_device" value="/dev/video1" />
    <param name="image_width" value="640" />
    <param name="image_height" value="480" />
    <param name="pixel_format" value="yuyv" />
    <param name="camera_frame_id" value="usb_cam" />
    <param name="auto_focus" value="false" />
    <param name="io_method" value="mmap"/>
  </node>

</launch>
所以是先启动节点为usb_cam, 然后载入track.yaml,
启动方法:
$ roslaunch face_tracker_pkg start_tracking.launch