注解Annotation的IoC:从@Autowired到@Component
2017-01-23
1 什么是注解
2 不使用注解示例
2.1 com.springioc.animal.Monkey
2.2 com.springioc.animal.Tiger
2.3 com.springioc.bean.Zoo
2.4 com.springioc.main.AppMain
2.5 Beans.xml
3 使用注解@Autowired示例
3.1 对成员变量使用@Autowired
3.2 将 @Autowired 注解标注在 Setter 方法上
3.3 将 @Autowired 注解标注在构造函数上
3.4 @Autowired(required = false)
4 使用注解@Resource示例
5 使用注解@Component示例
5.1 示例
5.2 component scan过滤方式
5.3 @Component、@Controller、@Repository,@Service
参考
1 什么是注解
传统的Spring做法是使用.xml文件来对bean进行注入。
注解配置相对于 XML 配置具有很多的优势:
- 它可以充分利用 Java 的反射机制获取类结构信息,这些信息可以有效减少配置的工作。如使用 JPA 注解配置 ORM 映射时,我们就不需要指定 PO 的属性名、类型等信息,如果关系表字段和 PO 属性名、类型都一致,您甚至无需编写任务属性映射信息——因为这些信息都可以通过 Java 反射机制获取。
- 注解和 Java 代码位于一个文件中,而 XML 配置采用独立的配置文件,大多数配置信息在程序开发完成后都不会调整,如果配置信息和 Java 代码放在一起,有助于增强程序的内聚性。而采用独立的 XML 配置文件,程序员在编写一个功能时,往往需要在程序文件和配置文件中不停切换,这种思维上的不连贯会降低开发效率。
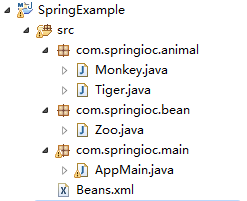
2 不使用注解示例
目录结构如下:
2.1 com.springioc.animal.Monkey
package com.springioc.animal;

public class Monkey {
    private String monkeyName = "LaoEr";

    public String toString() {
        return "MonkeyName:" + monkeyName;
    }
}
2.2 com.springioc.animal.Tiger
package com.springioc.animal;

public class Tiger {
    private String tigerName = "LaoDa";

    public String toString() {
        return "TigerName:" + tigerName;
    }
}
2.3 com.springioc.bean.Zoo
package com.springioc.bean;

import com.springioc.animal.*;

public class Zoo {
    private Tiger tiger;
    private Monkey monkey;

    public void setTiger(Tiger tiger) {
        this.tiger = tiger;
    }

    public void setMonkey(Monkey monkey) {
        this.monkey = monkey;
    }

    public Tiger getTiger() {
        return tiger;
    }

    public Monkey getMonkey() {
        return monkey;
    }

    public String toString() {
        return tiger + "
" + monkey;
    }
}
2.4 com.springioc.main.AppMain
package com.springioc.main;

import org.springframework.context.ApplicationContext;
import org.springframework.context.support.ClassPathXmlApplicationContext;

import com.springioc.bean.Zoo;

public class AppMain {
    public static void main(String[] args) {
        ApplicationContext context = new ClassPathXmlApplicationContext("Beans.xml");
        Zoo zoo = (Zoo) context.getBean("zoo");
        System.out.println(zoo.toString());
    }
}
2.5 Beans.xml
<?xml version="1.0" encoding="UTF-8"?>
<beans xmlns:xsi="http://www.w3.org/2001/XMLSchema-instance"
    xmlns="http://www.springframework.org/schema/beans"
    xmlns:context="http://www.springframework.org/schema/context"
    xsi:schemaLocation="http://www.springframework.org/schema/beans
        http://www.springframework.org/schema/beans/spring-beans-4.2.xsd
        http://www.springframework.org/schema/context
        http://www.springframework.org/schema/context/spring-context-4.2.xsd"
    default-autowire="byType">

    <bean id="zoo" class="com.springioc.bean.Zoo" >
        <property name="tiger" ref="tiger" />
        <property name="monkey" ref="monkey" />
    </bean>

    <bean id="tiger" class="com.springioc.animal.Tiger" />
    <bean id="monkey" class="com.springioc.animal.Monkey" />
</beans>
运行结果:
TigerName:LaoDa
MonkeyName:LaoEr
3 使用注解@Autowired示例
Spring 2.5 引入了 @Autowired 注解,它可以对类成员变量、方法及构造函数进行标注,完成自动装配的工作。
3.1 对成员变量使用@Autowired
对Zoo类的两个变量tiger和monkey使用注解Autowired,可以删除Set方法
package com.springioc.bean;

import org.springframework.beans.factory.annotation.Autowired;

import com.springioc.animal.*;

public class Zoo {
    @Autowired
    private Tiger tiger;
    @Autowired
    private Monkey monkey;
    public String toString() {
        return tiger + "
" + monkey;
    }
}
Beans.xml
Beans.xml文件中删除zoo的property,增加(注册)AutowiredAnnotationBeanPostProcessor处理器
<?xml version="1.0" encoding="UTF-8"?>
<beans xmlns:xsi="http://www.w3.org/2001/XMLSchema-instance"
    xmlns="http://www.springframework.org/schema/beans"
    xmlns:context="http://www.springframework.org/schema/context"
    xsi:schemaLocation="http://www.springframework.org/schema/beans
        http://www.springframework.org/schema/beans/spring-beans-4.2.xsd
        http://www.springframework.org/schema/context
        http://www.springframework.org/schema/context/spring-context-4.2.xsd">

    <!-- context:component-scan base-package="com.springioc.bean" / -->
    <bean class="org.springframework.beans.factory.annotation.AutowiredAnnotationBeanPostProcessor"/>

    <bean id="zoo" class="com.springioc.bean.Zoo" >
    </bean>

    <bean id="tiger" class="com.springioc.animal.Tiger" />
    <bean id="monkey" class="com.springioc.animal.Monkey" />
</beans>
解读:
当 Spring 容器启动时,AutowiredAnnotationBeanPostProcessor 将扫描 Spring 容器中所有 Bean,当发现 Bean 中拥有@Autowired 注解时就找到和其匹配(默认按类型匹配)的 Bean,并注入到对应的地方中去。
按照上面的配置,Spring 将直接采用 Java 反射机制对 Zoo 中的 tiger 和 monkey 这两个私有成员变量进行自动注入。所以对成员变量使用 @Autowired 后,您大可将它们的 setter 方法(setTiger() 和 setOMonkey())从 Zoo 中删除。
注意:
Beans.xml文件中,可以用<context:component-scan base-package="com.springioc.bean" /> 替换 <bean class="org.springframework.beans.factory.annotation.AutowiredAnnotationBeanPostProcessor"/> 。
因为<context:component-scan>会默认激活<context:annotation-config>功能的。而<context:annotation-config>会隐式地向 Spring 容器注册AutowiredAnnotationBeanPostProcessor、CommonAnnotationBeanPostProcessor、PersistenceAnnotationBeanPostProcessor 以及equiredAnnotationBeanPostProcessor 这 4 个 BeanPostProcessor。
3.2 将 @Autowired 注解标注在 Setter 方法上


package com.springioc.bean;

import org.springframework.beans.factory.annotation.Autowired;

import com.springioc.animal.*;

public class Zoo {

    private Tiger tiger;
    private Monkey monkey;

    @Autowired
    public void setTiger(Tiger tiger) {
        this.tiger = tiger;
    }

    @Autowired
    public void setMonkey(Monkey monkey) {
        this.monkey = monkey;
    }

    public Tiger getTiger() {
        return tiger;
    }

    public Monkey getMonkey() {
        return monkey;
    }

    public String toString() {
        return tiger + "
" + monkey;
    }
}
3.3 将 @Autowired 注解标注在构造函数上
package com.springioc.bean;

import org.springframework.beans.factory.annotation.Autowired;

import com.springioc.animal.*;

public class Zoo {

    private Tiger tiger;
    private Monkey monkey;

    public void setTiger(Tiger tiger) {
        this.tiger = tiger;
    }

    public void setMonkey(Monkey monkey) {
        this.monkey = monkey;
    }

    public Tiger getTiger() {
        return tiger;
    }

    public Monkey getMonkey() {
        return monkey;
    }

    @Autowired
    public Zoo(Tiger tiger, Monkey monkey) {
        this.tiger = tiger;
        this.monkey = monkey;
    }

    public String toString() {
        return tiger + "
" + monkey;
    }
}
3.4 @Autowired(required = false)
当候选 Bean 数目不为 1 时的应对方法:@Autowired(required = false)
在默认情况下使用 @Autowired 注解进行自动注入时,Spring 容器中匹配的候选 Bean 数目必须有且仅有一个。当找不到一个匹配的 Bean 时,Spring 容器将抛出 BeanCreationException 异常,并指出必须至少拥有一个匹配的 Bean。我们可以来做一个实验:
Bean.xml文件中,注解掉Monkey
<!-- bean id="monkey" class="com.springioc.animal.Monkey" / -->
由于 Monkey Bean 被注解掉了,所以 Spring 容器中将没有类型为 Monkey的 Bean 了,而 Zoo 的 Monkey属性标注了 @Autowired,当启动 Spring 容器时,异常就产生了。
当不能确定 Spring 容器中一定拥有某个类的 Bean 时,可以在需要自动注入该类 Bean 的地方可以使用 @Autowired(required = false),这等于告诉 Spring:在找不到匹配 Bean 时也不报错。如下代码:
对Zoo类中setter注解@Autowired(required = false)
    @Autowired(required = false)
    public void setMonkey(Monkey monkey) {
        this.monkey = monkey;
    }
运行结果如下:
TigerName:LaoDa
null
4 使用注解@Resource示例
Spring 不但支持自己定义的 @Autowired 的注解,还支持几个由 JSR-250 规范定义的注解,它们分别是 @Resource、@PostConstruct以及 @PreDestroy。
@Resource 的作用相当于 @Autowired,只不过 @Autowired 按 byType(就是按Bean的Class的类型)自动注入,面 @Resource 默认按 byName(就是通过Bean的id或者name) 自动注入罢了。
Resource 有两个属性是比较重要的,分别是 name 和 type,Spring 将 @Resource 注解的 name 属性解析为 Bean 的名字,而 type 属性则解析为 Bean 的类型。所以如果使用 name 属性,则使用 byName 的自动注入策略,而使用 type 属性时则使用 byType 自动注入策略。如果既不指定 name 也不指定 type 属性,这时将通过反射机制使用 byName 自动注入策略。
Resource 注解类位于 Spring 发布包的 lib/j2ee/common-annotations.jar 类包中,因此在使用之前必须将其加入到项目的类库中。来看一个使用 @Resource 的例子:
    @Resource
    private Tiger tiger;

    @Resource(name="monkey1")
    private Monkey monkey;
注意一般情况下,我们无需使用类似于 @Resource(type=Tiger.class) 的注解方式,因为 Bean 的类型信息可以通过 Java 反射从代码中获取。
要让 JSR-250 的注解生效,除了在 Bean 类中标注这些注解外,还需要在 Spring 容器中注册一个负责处理这些注解的BeanPostProcessor:
<?xml version="1.0" encoding="UTF-8"?>
<beans xmlns:xsi="http://www.w3.org/2001/XMLSchema-instance"
    xmlns="http://www.springframework.org/schema/beans"
    xmlns:context="http://www.springframework.org/schema/context"
    xsi:schemaLocation="http://www.springframework.org/schema/beans
        http://www.springframework.org/schema/beans/spring-beans-4.2.xsd
        http://www.springframework.org/schema/context
        http://www.springframework.org/schema/context/spring-context-4.2.xsd">

    <!-- context:component-scan base-package="com.springioc.bean" / -->
    <!--bean class="org.springframework.beans.factory.annotation.AutowiredAnnotationBeanPostProcessor"/-->
    <bean class="org.springframework.context.annotation.CommonAnnotationBeanPostProcessor"/>


    <bean id="zoo" class="com.springioc.bean.Zoo" >
    </bean>

    <bean id="tiger" class="com.springioc.animal.Tiger" />
    <bean id="monkey1" class="com.springioc.animal.Monkey" />
    <bean id="monkey2" class="com.springioc.animal.Monkey"/>
</beans>
5 使用注解@Component示例
虽然我们可以通过 @Autowired 或 @Resource 在 Bean 类中使用自动注入功能,但是 Bean 还是在 XML 文件中通过 <bean> 进行定义 —— 也就是说,在 XML 配置文件中定义 Bean,通过 @Autowired 或 @Resource 为 Bean 的成员变量、方法入参或构造函数入参提供自动注入的功能。
能否也通过注解定义 Bean,从 XML 配置文件中完全移除 Bean 定义的配置呢?答案是肯定的,我们通过 Spring 2.5 提供的 @Component 注解就可以达到这个目标了。
5.1 示例
使用 @Component 注解的Monkey.java
仅需要在类定义处,使用 @Component 注解就可以将一个类定义了 Spring 容器中的 Bean
package com.springioc.animal;

import org.springframework.stereotype.Component;

@Component
public class Monkey {
    private String monkeyName = "LaoEr";

    public String toString() {
        return "MonkeyName:" + monkeyName;
    }
}
使用 @Component 注解的 Tiger.java
package com.springioc.animal;

import org.springframework.stereotype.Component;

@Component
public class Tiger {
    private String tigerName = "LaoDa";

    public String toString() {
        return "TigerName:" + tigerName;
    }
}
使用 @Component 注解的 Zoo.java
@Component("zoo")
public class Zoo {

    @Autowired
    private Tiger tiger;

    @Autowired
    private Monkey monkey;
...
}
@Component 有一个可选的入参,用于指定 Bean 的名称,在 Zoo 中,我们就将 Bean 名称定义为“zoo”(默认名称也是“zoo”,第一个字母变小写)。一般情况下,Bean 都是 singleton 的,需要注入 Bean 的地方仅需要通过 byType 策略就可以自动注入了,所以大可不必指定 Bean 的名称。
在使用 @Component 注解后,Spring 容器必须启用类扫描机制以启用注解驱动 Bean 定义和注解驱动 Bean 自动注入的策略。Spring 2.5 对 context 命名空间进行了扩展,提供了这一功能,在Beans.xml添加如下配置:
<context:component-scan base-package="com.springioc.bean" />
这里,所有通过 <bean> 元素定义 Bean 的配置内容已经被移除,仅需要添加一行 <context:component-scan/> 配置就解决所有问题了——Spring XML 配置文件得到了极致的简化(当然配置元数据还是需要的,只不过以注解形式存在罢了)。<context:component-scan/> 的 base-package 属性指定了需要扫描的类包,类包及其递归子包中所有的类都会被处理。
5.2 component scan过滤方式
<context:component-scan/> 还允许定义过滤器将基包下的某些类纳入或排除。Spring 支持以下 5 种类型的过滤方式,通过下表说明:
| Filter Type | Examples Expression | Description |
| annotation | org.example.SomeAnnotation | 符合SomeAnnoation的target class |
| assignable | org.example.SomeClass | 指定class或interface的全名 |
| aspectj | org.example..*Service+ | AspectJ語法 |
| regex | org.example.Default.* | Regelar Expression |
| custom | org.example.MyTypeFilter | Spring3新增自訂Type,實作org.springframework.core.type.TypeFilter |
5.3 @Component、@Controller、@Repository,@Service
@Component,@Controller,@Repository,@Service,这四个注解都在org.springframework.stereotype包下面,后面3个都属于@Component。
可以理解为@Component是@Controller,@Repository,@Service的基类。
- @Component是用来标记任何被Spring管理的组件。
- @Controller用来标记presentation层(比如web controller)。
- @Repository用来标记persistence层(比如DAO)。
- @Service用来标记service层。
参考
[1] 注解Annotation的IoC (@Autowired @Component )