Spring 4 MVC+Hibernate 4+MySQL+Maven使用注解集成实例
转自:通过注解的方式集成Spring 4 MVC+Hibernate 4+MySQL+Maven,开发项目样例
2017-01-23
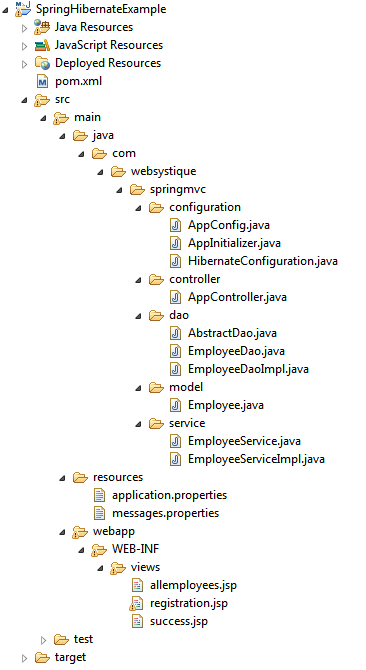
第1步:创建目录结构
第2步:更新 pom.xml
第3步:配置hibernate
3.1 com.websystique.springmvc.configuration.HibernateConfiguration
3.2 /src/main/resources/application.properties
第4步:配置Spring MVC
4.1 com.websystique.springmvc.configuration.AppConfig
4.2 /src/main/resources/messages.properties
第5步:配置初始化类
5.1 com.websystique.springmvc.configuration.AppInitializer
第6步:添加控制器以处理请求
6.1 com.websystique.springmvc.controller.AppController
第7步:添加DAO层
7.1 com.websystique.springmvc.dao.AbstractDao
7.2 com.websystique.springmvc.dao.EmployeeDao
7.3 com.websystique.springmvc.dao.EmployeeDaoImpl
第8步:添加服务层
8.1 com.websystique.springmvc.service.EmployeeService
8.2 com.websystique.springmvc.service.EmployeeServiceImpl
第9步:创建领域对象(普通的java bean对象)
9.1 com.websystique.springmvc.model.Employee
第10步:添加JSP视图 WEB-INF/views/allemployees.jsp
10.1 WEB-INF/views/allemployees.jsp [ 主页包含所有已经存在的员工]
10.2 WEB-INF/views/registration.jsp [注册页面用来创建和保存员工信息到数据库]
10.3 WEB-INF/views/success.jsp [成功页面包含新员工创建成功的确认信息并重定向到员工列表页面]
第11步:创建数据表
第12步:创建,部署和运行程序
源代码 : SpringHibernateExample.zip
注意:若没有springmvc基础,在看此篇前可看下这篇文章Spring4 MVC HelloWord实例 ,这篇文章是主要讲述MVC中的control层如何操作model和返回view,且以xml文件进行bean注入。
使用基于注解的配置集成Spring和Hibernate。 我们将开发包含表单要求用户输入一个简单的CRUD为导向Web应用程序,使用Hibernate保存输入的数据到 MySQL 数据库,从数据库和更新检索记录或删除它们在事务中,全部采用注解配置。
使用以下技术:
- Spring 4.0.6.RELEASE
- Hibernate Core 4.3.6.Final
- validation-api 1.1.0.Final
- hibernate-validator 5.1.3.Final
- MySQL Server 5.6
- Maven 3
- JDK 1.7
- Tomcat 8.0.21
- Eclipse JUNO Service Release 2
- TestNG 6.9.4
- Mockito 1.10.19
- DBUnit 2.2
- H2 Database 1.4.187
第1步:创建目录结构
第2步:更新 pom.xml


<?xml version="1.0"?>

<project xsi:schemaLocation="http://maven.apache.org/POM/4.0.0 http://maven.apache.org/xsd/maven-4.0.0.xsd"
    xmlns="http://maven.apache.org/POM/4.0.0" xmlns:xsi="http://www.w3.org/2001/XMLSchema-instance">

    <modelVersion>4.0.0</modelVersion>
    <groupId>com.websystique.springmvc</groupId>
    <artifactId>SpringHibernateExample</artifactId>
    <packaging>war</packaging>
    <version>1.0.0</version>
    <name>SpringHibernateExample</name>

    <properties>
        <springframework.version>4.0.6.RELEASE</springframework.version>
        <hibernate.version>4.3.6.Final</hibernate.version>
        <mysql.version>5.1.31</mysql.version>
        <joda-time.version>2.3</joda-time.version>
        <testng.version>6.9.4</testng.version>
        <mockito.version>1.10.19</mockito.version>
        <h2.version>1.4.187</h2.version>
        <dbunit.version>2.2</dbunit.version>
    </properties>

    <dependencies>
        <!-- Spring -->
        <dependency>
            <groupId>org.springframework</groupId>
            <artifactId>spring-core</artifactId>
            <version>${springframework.version}</version>
        </dependency>
        <dependency>
            <groupId>org.springframework</groupId>
            <artifactId>spring-web</artifactId>
            <version>${springframework.version}</version>
        </dependency>
        <dependency>
            <groupId>org.springframework</groupId>
            <artifactId>spring-webmvc</artifactId>
            <version>${springframework.version}</version>
        </dependency>
        <dependency>
            <groupId>org.springframework</groupId>
            <artifactId>spring-tx</artifactId>
            <version>${springframework.version}</version>
        </dependency>
        <dependency>
            <groupId>org.springframework</groupId>
            <artifactId>spring-orm</artifactId>
            <version>${springframework.version}</version>
        </dependency>

        <!-- Hibernate -->
        <dependency>
            <groupId>org.hibernate</groupId>
            <artifactId>hibernate-core</artifactId>
            <version>${hibernate.version}</version>
        </dependency>

        <!-- jsr303 validation -->
        <dependency>
            <groupId>javax.validation</groupId>
            <artifactId>validation-api</artifactId>
            <version>1.1.0.Final</version>
        </dependency>
        <dependency>
            <groupId>org.hibernate</groupId>
            <artifactId>hibernate-validator</artifactId>
            <version>5.1.3.Final</version>
        </dependency>

        <!-- MySQL -->
        <dependency>
            <groupId>mysql</groupId>
            <artifactId>mysql-connector-java</artifactId>
            <version>${mysql.version}</version>
        </dependency>

        <!-- Joda-Time -->
        <dependency>
            <groupId>joda-time</groupId>
            <artifactId>joda-time</artifactId>
            <version>${joda-time.version}</version>
        </dependency>

        <!-- To map JodaTime with database type -->
        <dependency>
            <groupId>org.jadira.usertype</groupId>
            <artifactId>usertype.core</artifactId>
            <version>3.0.0.CR1</version>
        </dependency>

        <!-- Servlet+JSP+JSTL -->
        <dependency>
            <groupId>javax.servlet</groupId>
            <artifactId>javax.servlet-api</artifactId>
            <version>3.1.0</version>
        </dependency>
        <dependency>
            <groupId>javax.servlet.jsp</groupId>
            <artifactId>javax.servlet.jsp-api</artifactId>
            <version>2.3.1</version>
        </dependency>
        <dependency>
            <groupId>javax.servlet</groupId>
            <artifactId>jstl</artifactId>
            <version>1.2</version>
        </dependency>


        <!-- Testing dependencies -->
        <dependency>
            <groupId>org.springframework</groupId>
            <artifactId>spring-test</artifactId>
            <version>${springframework.version}</version>
            <scope>test</scope>
        </dependency>
        <dependency>
            <groupId>org.testng</groupId>
            <artifactId>testng</artifactId>
            <version>${testng.version}</version>
            <scope>test</scope>
        </dependency>
        <dependency>
            <groupId>org.mockito</groupId>
            <artifactId>mockito-all</artifactId>
            <version>${mockito.version}</version>
            <scope>test</scope>
        </dependency>
        <dependency>
            <groupId>com.h2database</groupId>
            <artifactId>h2</artifactId>
            <version>${h2.version}</version>
            <scope>test</scope>
        </dependency>
        <dependency>
            <groupId>dbunit</groupId>
            <artifactId>dbunit</artifactId>
            <version>${dbunit.version}</version>
            <scope>test</scope>
        </dependency>

    </dependencies>

    <build>
        <pluginManagement>
            <plugins>
                <plugin>
                    <groupId>org.apache.maven.plugins</groupId>
                    <artifactId>maven-war-plugin</artifactId>
                    <version>2.4</version>
                    <configuration>
                        <warSourceDirectory>src/main/webapp</warSourceDirectory>
                        <warName>SpringHibernateExample</warName>
                        <failOnMissingWebXml>false</failOnMissingWebXml>
                    </configuration>
                </plugin>
            </plugins>
        </pluginManagement>
        <finalName>SpringHibernateExample</finalName>
    </build>
</project>
注意:
- maven的war包插件(maven-war-plugin)的声明:由于我们使用全注解方式进行配置。甚至在我们的工程当中没有包含web.xml文件。所以我们要配置这个插件,以避免maven在构建war包的时候失败。
- 验证用户的输入:在这个样例工程中,由于使用表单接受用户的输入。所以需要验证用户的输入。这里将选择JSR303 进行验证。所以我们要引入验证接口(validation-api)来说明这种规范。hibernate验证(hibernate-validator)正好是这种规范的一种实现。hibernate验证(hibernate-validator)同时也通过了他特有的注解校验(@Email, @NotEmpty等),这些并不是规范所囊括的。
- 其他依赖:我们也包含了(JSP/Servlet/Jstl)依赖。在我们代码中使用servelet api和jstl视图的时候需要。总而验证,容器需要包含这些jar包。所以我们在pom.xml文件当中去设置,这样maven才能下载他们。我们同时也需要测试依赖。测试部分将在下面的章节中讨论。剩下的部分是Spring,hibernate和Joda-Time等的依赖了。
第3步:配置hibernate
3.1 com.websystique.springmvc.configuration.HibernateConfiguration
package com.websystique.springmvc.configuration;

import java.util.Properties;

import javax.sql.DataSource;

import org.hibernate.SessionFactory;
import org.springframework.beans.factory.annotation.Autowired;
import org.springframework.context.annotation.Bean;
import org.springframework.context.annotation.ComponentScan;
import org.springframework.context.annotation.Configuration;
import org.springframework.context.annotation.PropertySource;
import org.springframework.core.env.Environment;
import org.springframework.jdbc.datasource.DriverManagerDataSource;
import org.springframework.orm.hibernate4.HibernateTransactionManager;
import org.springframework.orm.hibernate4.LocalSessionFactoryBean;
import org.springframework.transaction.annotation.EnableTransactionManagement;

@Configuration
@EnableTransactionManagement
@ComponentScan({ "com.websystique.springmvc.configuration" })
@PropertySource(value = { "classpath:application.properties" })
public class HibernateConfiguration {

    @Autowired
    private Environment environment;

    @Bean
    public LocalSessionFactoryBean sessionFactory() {
        LocalSessionFactoryBean sessionFactory = new LocalSessionFactoryBean();
        sessionFactory.setDataSource(dataSource());
        sessionFactory.setPackagesToScan(new String[] { "com.websystique.springmvc.model" });
        sessionFactory.setHibernateProperties(hibernateProperties());
        return sessionFactory;
     }

    @Bean
    public DataSource dataSource() {
        DriverManagerDataSource dataSource = new DriverManagerDataSource();
        dataSource.setDriverClassName(environment.getRequiredProperty("jdbc.driverClassName"));
        dataSource.setUrl(environment.getRequiredProperty("jdbc.url"));
        dataSource.setUsername(environment.getRequiredProperty("jdbc.username"));
        dataSource.setPassword(environment.getRequiredProperty("jdbc.password"));
        return dataSource;
    }

    private Properties hibernateProperties() {
        Properties properties = new Properties();
        properties.put("hibernate.dialect", environment.getRequiredProperty("hibernate.dialect"));
        properties.put("hibernate.show_sql", environment.getRequiredProperty("hibernate.show_sql"));
        properties.put("hibernate.format_sql", environment.getRequiredProperty("hibernate.format_sql"));
        return properties;
    }

    @Bean
    @Autowired
    public HibernateTransactionManager transactionManager(SessionFactory s) {
       HibernateTransactionManager txManager = new HibernateTransactionManager();
       txManager.setSessionFactory(s);
       return txManager;
    }
}
注意:
- @Configuration 注解表示这个类包含一个或多个使用了 @Bean 注解了的方法。将被spring容器所管理以产生beans。在这里。这个类代表hibernate配置。
- @ComponentScan 注解等同于XML配置文件中的context:component-scan base-package="..." 声明。用它来表示去哪里查找spring管理的beans/classes
- @EnableTransactionManagement 注解等同于SpringXMl中的tx:*命名空间声明。它将启用Spring注解驱动的事务管理功能。
- @PropertySource注解用于声明一组属性(在程序的classpath路径下的properties文件中定义),在spring运行环境下。通过他可以在不同运行环境下进行变更以提供不同的值。
- 由于@PropertySource注解提供的便利,我们可以在properties文件中提供具体的值,通过Spring’s Environment来提取这些值。
方法sessionFactory() 将创建LocalSessionFactoryBean,它映射配置:dataSource和hibernate属性文件配置(就像hibernate.properties文件)。
一旦SessionFactory创建,它将被注入bean方法transactionManager 中,最终可能对sessionFactory所创建的sesstions提供事务支持。
3.2 /src/main/resources/application.properties
jdbc.driverClassName = com.mysql.jdbc.Driver
jdbc.url = jdbc:mysql://localhost:3306/websystique
jdbc.username = myuser
jdbc.password = mypassword
hibernate.dialect = org.hibernate.dialect.MySQLDialect
hibernate.show_sql = true
hibernate.format_sql = true
第4步:配置Spring MVC
4.1 com.websystique.springmvc.configuration.AppConfig
package com.websystique.springmvc.configuration;

import org.springframework.context.MessageSource;
import org.springframework.context.annotation.Bean;
import org.springframework.context.annotation.ComponentScan;
import org.springframework.context.annotation.Configuration;
import org.springframework.context.support.ResourceBundleMessageSource;
import org.springframework.web.servlet.ViewResolver;
import org.springframework.web.servlet.config.annotation.EnableWebMvc;
import org.springframework.web.servlet.view.InternalResourceViewResolver;
import org.springframework.web.servlet.view.JstlView;

@Configuration
@EnableWebMvc
@ComponentScan(basePackages = "com.websystique.springmvc")
public class AppConfig {

    @Bean
    public ViewResolver viewResolver() {
        InternalResourceViewResolver viewResolver = new InternalResourceViewResolver();
        viewResolver.setViewClass(JstlView.class);
        viewResolver.setPrefix("/WEB-INF/views/");
        viewResolver.setSuffix(".jsp");
        return viewResolver;
    }

    @Bean
    public MessageSource messageSource() {
        ResourceBundleMessageSource messageSource = new ResourceBundleMessageSource();
        messageSource.setBasename("messages");
        return messageSource;
    }
}
注意:
- @Configuration注解标示着这个类被配置后的作用,就像上面提到的那样(表示这个类包含一个或多个使用了 @Bean 注解了的方法。将被spring容器所管理以产生beans。),
- @ComponentScan注解指出了可以在这些包路径下找到相关联的beans类。
- @EnableWebMvc注解相当于XML文件中的mvc:annotation-driven(启用web的MVC控制)。方法viewResolver配置了一个视图解析器。以定位到具体的视图页面。
4.2 /src/main/resources/messages.properties
在这篇文章中,我们使用表单进行提交,通过JSR303规范验证用户的输入。在验证失败的情况下,默认的错误信息将显示。你可以通过国际化的方式在其他消息绑定文件(以.properties结尾的文件)中定义适用于你语言环境的消息。在basename方法中。spring会程序运行的class路径中检索一个叫messages.properties的文件。让我们添加这个文件吧:
Size.employee.name=Name must be between {2} and {1} characters long
NotNull.employee.joiningDate=Joining Date can not be blank
NotNull.employee.salary=Salary can not be blank
Digits.employee.salary=Only numeric data with max 8 digits and with max 2 precision is allowed
NotEmpty.employee.ssn=SSN can not be blank
typeMismatch=Invalid format
non.unique.ssn=SSN {0} already exist. Please fill in different value.
注意:上面的消息采用了下面的规范格式
{ValidationAnnotationClass}.{modelObject}.{fieldName}
{验证注解类名}.{模块对象名}.{字段名}
此外,基于特定的注解(例如@Size)你甚至可以通过使用{0},{1},..{i}占位索引的方式来传递参数。
第5步:配置初始化类
5.1 com.websystique.springmvc.configuration.AppInitializer
package com.websystique.springmvc.configuration;

import javax.servlet.ServletContext;
import javax.servlet.ServletException;
import javax.servlet.ServletRegistration;

import org.springframework.web.WebApplicationInitializer;
import org.springframework.web.context.support.AnnotationConfigWebApplicationContext;
import org.springframework.web.servlet.DispatcherServlet;

public class AppInitializer implements WebApplicationInitializer {

    public void onStartup(ServletContext container) throws ServletException {

        AnnotationConfigWebApplicationContext ctx = new AnnotationConfigWebApplicationContext();
        ctx.register(AppConfig.class);
        ctx.setServletContext(container);

        ServletRegistration.Dynamic servlet = container.addServlet(
                "dispatcher", new DispatcherServlet(ctx));

        servlet.setLoadOnStartup(1);
        servlet.addMapping("/");
    }

}
注意:
上面的代码类似于web.xml文件的内容。由于我们使用了前端控制器(DispatherServler),分配这些映射(就像xml文件中的url-pattern那样)。通过上面的方法,我们就不用在spring-servlet.xml文件中去配置路径了。这里我们注册了这个配置类。
第6步:添加控制器以处理请求
添加这个控制器,可以对get和post请求提供服务。
6.1 com.websystique.springmvc.controller.AppController
package com.websystique.springmvc.controller;

import java.util.List;
import java.util.Locale;

import javax.validation.Valid;

import org.springframework.beans.factory.annotation.Autowired;
import org.springframework.context.MessageSource;
import org.springframework.stereotype.Controller;
import org.springframework.ui.ModelMap;
import org.springframework.validation.BindingResult;
import org.springframework.validation.FieldError;
import org.springframework.web.bind.annotation.PathVariable;
import org.springframework.web.bind.annotation.RequestMapping;
import org.springframework.web.bind.annotation.RequestMethod;

import com.websystique.springmvc.model.Employee;
import com.websystique.springmvc.service.EmployeeService;

@Controller
@RequestMapping("/")
public class AppController {

    @Autowired
    EmployeeService service;

    @Autowired
    MessageSource messageSource;

    /*
     * This method will list all existing employees.
     */
    @RequestMapping(value = { "/", "/list" }, method = RequestMethod.GET)
    public String listEmployees(ModelMap model) {

        List<Employee> employees = service.findAllEmployees();
        model.addAttribute("employees", employees);
        return "allemployees";
    }

    /*
     * This method will provide the medium to add a new employee.
     */
    @RequestMapping(value = { "/new" }, method = RequestMethod.GET)
    public String newEmployee(ModelMap model) {
        Employee employee = new Employee();
        model.addAttribute("employee", employee);
        model.addAttribute("edit", false);
        return "registration";
    }

    /*
     * This method will be called on form submission, handling POST request for
     * saving employee in database. It also validates the user input
     */
    @RequestMapping(value = { "/new" }, method = RequestMethod.POST)
    public String saveEmployee(@Valid Employee employee, BindingResult result,
            ModelMap model) {

        if (result.hasErrors()) {
            return "registration";
        }

        /*
         * Preferred way to achieve uniqueness of field [ssn] should be implementing custom @Unique annotation
         * and applying it on field [ssn] of Model class [Employee].
         *
         * Below mentioned peace of code [if block] is to demonstrate that you can fill custom errors outside the validation
         * framework as well while still using internationalized messages.
         *
         */
        if(!service.isEmployeeSsnUnique(employee.getId(), employee.getSsn())){
            FieldError ssnError =new FieldError("employee","ssn",messageSource.getMessage("non.unique.ssn", new String[]{employee.getSsn()}, Locale.getDefault()));
            result.addError(ssnError);
            return "registration";
        }

        service.saveEmployee(employee);

        model.addAttribute("success", "Employee " + employee.getName() + " registered successfully");
        return "success";
    }


    /*
     * This method will provide the medium to update an existing employee.
     */
    @RequestMapping(value = { "/edit-{ssn}-employee" }, method = RequestMethod.GET)
    public String editEmployee(@PathVariable String ssn, ModelMap model) {
        Employee employee = service.findEmployeeBySsn(ssn);
        model.addAttribute("employee", employee);
        model.addAttribute("edit", true);
        return "registration";
    }

    /*
     * This method will be called on form submission, handling POST request for
     * updating employee in database. It also validates the user input
     */
    @RequestMapping(value = { "/edit-{ssn}-employee" }, method = RequestMethod.POST)
    public String updateEmployee(@Valid Employee employee, BindingResult result,
            ModelMap model, @PathVariable String ssn) {

        if (result.hasErrors()) {
            return "registration";
        }

        if(!service.isEmployeeSsnUnique(employee.getId(), employee.getSsn())){
            FieldError ssnError =new FieldError("employee","ssn",messageSource.getMessage("non.unique.ssn", new String[]{employee.getSsn()}, Locale.getDefault()));
            result.addError(ssnError);
            return "registration";
        }

        service.updateEmployee(employee);

        model.addAttribute("success", "Employee " + employee.getName()  + " updated successfully");
        return "success";
    }


    /*
     * This method will delete an employee by it's SSN value.
     */
    @RequestMapping(value = { "/delete-{ssn}-employee" }, method = RequestMethod.GET)
    public String deleteEmployee(@PathVariable String ssn) {
        service.deleteEmployeeBySsn(ssn);
        return "redirect:/list";
    }

}
注意:
- @Controller。这个注解表明这个类是用来处理请求的控制类。通过注解@RequestMapping提供将要处理的请求URL路径。这里我们配置的是根目录'/'。它将作为默认的控制器。
- 方法listEmployees,被@RequestMethod.GET所注解。将处理来自'/'和'/list'的请求。它接管了程序初始化页面的处理,并响应所有存在的员工列表。
- 方法newEmployee 处理来着新员工注册页面的请求。显示页面由一个Employee对象模型。
- 方法saveEmployee 被@RequestMethod.POST所注解。它将处理表单提交的post请求(在进行新员工注册的时候,提交请求道url路径:/new)。注意这个方法的参数和这些参数在方法中的顺序。@Valid 注解将要求spring去验证这些关联的对象(Employee)。参数 BindingResult包含了这个验证的结果和任何在验证过程中报出的错误信息。请注意这个参数 BindingResult 必须紧跟在被验证的对象之后。否则spring无法进行验证并且有异常被抛出。在验证出错的情况下。响应的错误消息将会显示(我们在第4步配置的那些消息)。我们同时也包含了对SSN唯一性进行核对的校验。因为他在数据库中被声明为唯一的。在保存和更新一个员工之前。我们要核对这个SSN是否是唯一的。如果不是。我们将生成校验错误的信息并且重定向到注册页面。这段代码演示了在校验框架之外填写客户错误信息的情况,不过还是用message.properties文件中配置的信息(你可以通过国际化的方式进行定制)。
- 方法editEmployee 将定位到注册页面,并把员工的详细信息填充 到页面的控件当中。在你点击页面的更新按钮进行更新而出发的更新员工资料请求的时候。
- 方法deleteEmployee 处理根据员工SSN值删除员工数据的请求。注意@PathVariable注解,他表示这个参数将被在uri模板中绑定(我们这里就是SSN的值)
第7步:添加DAO层
随着基于注释的配置,这是我们需要做的。为了进一步完善程序。我们添加服务层,dao层。视图层。领域对象层和一个简单的数据库模式。最后运行这个程序吧。
7.1 com.websystique.springmvc.dao.AbstractDao
package com.websystique.springmvc.dao;

import java.io.Serializable;

import java.lang.reflect.ParameterizedType;

import org.hibernate.Criteria;
import org.hibernate.Session;
import org.hibernate.SessionFactory;
import org.springframework.beans.factory.annotation.Autowired;

public abstract class AbstractDao<PK extends Serializable, T> {

    private final Class<T> persistentClass;

    @SuppressWarnings("unchecked")
    public AbstractDao(){
        this.persistentClass =(Class<T>) ((ParameterizedType) this.getClass().getGenericSuperclass()).getActualTypeArguments()[1];
    }

    @Autowired
    private SessionFactory sessionFactory;

    protected Session getSession(){
        return sessionFactory.getCurrentSession();
    }

    @SuppressWarnings("unchecked")
    public T getByKey(PK key) {
        return (T) getSession().get(persistentClass, key);
    }

    public void persist(T entity) {
        getSession().persist(entity);
    }

    public void delete(T entity) {
        getSession().delete(entity);
    }

    protected Criteria createEntityCriteria(){
        return getSession().createCriteria(persistentClass);
    }

}
这个泛型抽象类是所有DAO实现类的父类。它提供了所有hibernate操作的通用方法。请注意上面。我们在第3步创建的SessionFactory对象将会被Spring容器自动装载。
7.2 com.websystique.springmvc.dao.EmployeeDao
package com.websystique.springmvc.dao;

import java.util.List;

import com.websystique.springmvc.model.Employee;

public interface EmployeeDao {

    Employee findById(int id);

    void saveEmployee(Employee employee);

    void deleteEmployeeBySsn(String ssn);

    List<Employee> findAllEmployees();

    Employee findEmployeeBySsn(String ssn);

}
7.3 com.websystique.springmvc.dao.EmployeeDaoImpl
package com.websystique.springmvc.dao;

import java.util.List;

import org.hibernate.Criteria;
import org.hibernate.Query;
import org.hibernate.criterion.Restrictions;
import org.springframework.stereotype.Repository;

import com.websystique.springmvc.model.Employee;

@Repository("employeeDao")
public class EmployeeDaoImpl extends AbstractDao<Integer, Employee> implements EmployeeDao {

    public Employee findById(int id) {
        return getByKey(id);
    }

    public void saveEmployee(Employee employee) {
        persist(employee);
    }

    public void deleteEmployeeBySsn(String ssn) {
        Query query = getSession().createSQLQuery("delete from Employee where ssn = :ssn");
        query.setString("ssn", ssn);
        query.executeUpdate();
    }

    @SuppressWarnings("unchecked")
    public List<Employee> findAllEmployees() {
        Criteria criteria = createEntityCriteria();
        return (List<Employee>) criteria.list();
    }

    public Employee findEmployeeBySsn(String ssn) {
        Criteria criteria = createEntityCriteria();
        criteria.add(Restrictions.eq("ssn", ssn));
        return (Employee) criteria.uniqueResult();
    }
}
第8步:添加服务层
8.1 com.websystique.springmvc.service.EmployeeService
package com.websystique.springmvc.service;

import java.util.List;

import com.websystique.springmvc.model.Employee;

public interface EmployeeService {

    Employee findById(int id);

    void saveEmployee(Employee employee);

    void updateEmployee(Employee employee);

    void deleteEmployeeBySsn(String ssn);

    List<Employee> findAllEmployees();

    Employee findEmployeeBySsn(String ssn);

    boolean isEmployeeSsnUnique(Integer id, String ssn);

}
8.2 com.websystique.springmvc.service.EmployeeServiceImpl
package com.websystique.springmvc.service;

import java.util.List;

import org.springframework.beans.factory.annotation.Autowired;
import org.springframework.stereotype.Service;
import org.springframework.transaction.annotation.Transactional;

import com.websystique.springmvc.dao.EmployeeDao;
import com.websystique.springmvc.model.Employee;

@Service("employeeService")
@Transactional
public class EmployeeServiceImpl implements EmployeeService {

    @Autowired
    private EmployeeDao dao;

    public Employee findById(int id) {
        return dao.findById(id);
    }

    public void saveEmployee(Employee employee) {
        dao.saveEmployee(employee);
    }

    /*
     * Since the method is running with Transaction, No need to call hibernate update explicitly.
     * Just fetch the entity from db and update it with proper values within transaction.
     * It will be updated in db once transaction ends.
     */
    public void updateEmployee(Employee employee) {
        Employee entity = dao.findById(employee.getId());
        if(entity!=null){
            entity.setName(employee.getName());
            entity.setJoiningDate(employee.getJoiningDate());
            entity.setSalary(employee.getSalary());
            entity.setSsn(employee.getSsn());
        }
    }

    public void deleteEmployeeBySsn(String ssn) {
        dao.deleteEmployeeBySsn(ssn);
    }

    public List<Employee> findAllEmployees() {
        return dao.findAllEmployees();
    }

    public Employee findEmployeeBySsn(String ssn) {
        return dao.findEmployeeBySsn(ssn);
    }

    public boolean isEmployeeSsnUnique(Integer id, String ssn) {
        Employee employee = findEmployeeBySsn(ssn);
        return ( employee == null || ((id != null) && (employee.getId() == id)));
    }

}
注意:
- @Transactional注解了。它将在每个方法调用的时候开启事务。在每个方法结束的时候提交事务(或者在方法执行失败并产生错误的时候回滚他)。请注意,由于transaction注解是基于方法领域的。在方法里面我们使用DAO对象。dao方法将在同一个事务当中执行。
第9步:创建领域对象(普通的java bean对象)
让我们创建这个实际的雇员实体对象。在数据里面有一张与之对应的。这个对象用于实例化这些数据。
9.1com.websystique.springmvc.model.Employee
package com.websystique.springmvc.model;

import java.math.BigDecimal;

import javax.persistence.Column;
import javax.persistence.Entity;
import javax.persistence.GeneratedValue;
import javax.persistence.GenerationType;
import javax.persistence.Id;
import javax.persistence.Table;
import javax.validation.constraints.Digits;
import javax.validation.constraints.NotNull;
import javax.validation.constraints.Size;

import org.hibernate.annotations.Type;
import org.hibernate.validator.constraints.NotEmpty;
import org.joda.time.LocalDate;
import org.springframework.format.annotation.DateTimeFormat;

@Entity
@Table(name="EMPLOYEE")
public class Employee {

    @Id
    @GeneratedValue(strategy = GenerationType.IDENTITY)
    private int id;

    @Size(min=3, max=50)
    @Column(name = "NAME", nullable = false)
    private String name;

    @NotNull
    @DateTimeFormat(pattern="dd/MM/yyyy")
    @Column(name = "JOINING_DATE", nullable = false)
    @Type(type="org.jadira.usertype.dateandtime.joda.PersistentLocalDate")
    private LocalDate joiningDate;

    @NotNull
    @Digits(integer=8, fraction=2)
    @Column(name = "SALARY", nullable = false)
    private BigDecimal salary;

    @NotEmpty
    @Column(name = "SSN", unique=true, nullable = false)
    private String ssn;

    public int getId() {
        return id;
    }

    public void setId(int id) {
        this.id = id;
    }

    public String getName() {
        return name;
    }

    public void setName(String name) {
        this.name = name;
    }

    public LocalDate getJoiningDate() {
        return joiningDate;
    }

    public void setJoiningDate(LocalDate joiningDate) {
        this.joiningDate = joiningDate;
    }

    public BigDecimal getSalary() {
        return salary;
    }

    public void setSalary(BigDecimal salary) {
        this.salary = salary;
    }

    public String getSsn() {
        return ssn;
    }

    public void setSsn(String ssn) {
        this.ssn = ssn;
    }

    @Override
    public int hashCode() {
        final int prime = 31;
        int result = 1;
        result = prime * result + id;
        result = prime * result + ((ssn == null) ? 0 : ssn.hashCode());
        return result;
    }

    @Override
    public boolean equals(Object obj) {
        if (this == obj)
            return true;
        if (obj == null)
            return false;
        if (!(obj instanceof Employee))
            return false;
        Employee other = (Employee) obj;
        if (id != other.id)
            return false;
        if (ssn == null) {
            if (other.ssn != null)
                return false;
        } else if (!ssn.equals(other.ssn))
            return false;
        return true;
    }

    @Override
    public String toString() {
        return "Employee [id=" + id + ", name=" + name + ", joiningDate="
                + joiningDate + ", salary=" + salary + ", ssn=" + ssn + "]";
    }

}
注意:
- @Entity, @Table, @Column 和hibernate 特有的注解
- @Type 所标注(我们将是通过他来映射Joda-Time的LocalDate对象和数据库的date type)。
- @DateTimeFormat是spring所特有的注解,用于声明一个字段应该被给定的时间格式来格式化。
- 余下的注解是JSR303相关的验证。回调第四步我们已经配置好的属性文件(messages.properties)。在验证失败的情况下提供相应的消息。
第10步:添加JSP视图 WEB-INF/views/allemployees.jsp
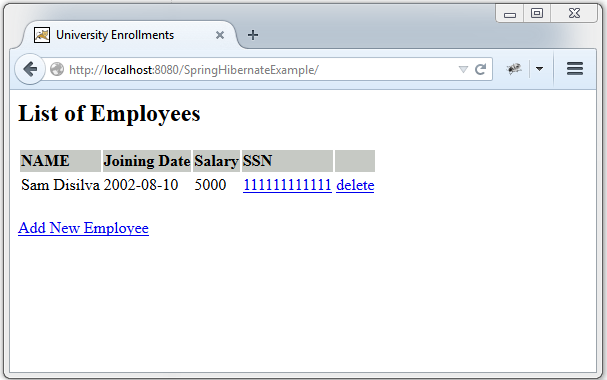
10.1 WEB-INF/views/allemployees.jsp [ 主页包含所有已经存在的员工]
<%@ page language="java" contentType="text/html; charset=ISO-8859-1"
    pageEncoding="ISO-8859-1"%>
<%@ taglib prefix="c" uri="http://java.sun.com/jsp/jstl/core" %>
<html>
<head>
    <meta http-equiv="Content-Type" content="text/html; charset=ISO-8859-1">
    <title>University Enrollments</title>

    <style>
        tr:first-child{
            font-weight: bold;
            background-color: #C6C9C4;
        }
    </style>

</head>


<body>
    <h2>List of Employees</h2>
    <table>
        <tr>
            <td>NAME</td><td>Joining Date</td><td>Salary</td><td>SSN</td><td></td>
        </tr>
        <c:forEach items="${employees}" var="employee">
            <tr>
            <td>${employee.name}</td>
            <td>${employee.joiningDate}</td>
            <td>${employee.salary}</td>
            <td><a href="<c:url value='/edit-${employee.ssn}-employee' />">${employee.ssn}</a></td>
            <td><a href="<c:url value='/delete-${employee.ssn}-employee' />">delete</a></td>
            </tr>
        </c:forEach>
    </table>
    <br/>
    <a href="<c:url value='/new' />">Add New Employee</a>
</body>
</html>
10.2 WEB-INF/views/registration.jsp [注册页面用来创建和保存员工信息到数据库]
<%@ page language="java" contentType="text/html; charset=ISO-8859-1"
    pageEncoding="ISO-8859-1"%>
<%@ taglib prefix="form" uri="http://www.springframework.org/tags/form"%>
<%@ taglib prefix="c" uri="http://java.sun.com/jsp/jstl/core" %>

<html>

<head>
    <meta http-equiv="Content-Type" content="text/html; charset=ISO-8859-1">
    <title>Employee Registration Form</title>

<style>

    .error {
        color: #ff0000;
    }
</style>

</head>

<body>

    <h2>Registration Form</h2>

    <form:form method="POST" modelAttribute="employee">
        <form:input type="hidden" path="id" id="id"/>
        <table>
            <tr>
                <td><label for="name">Name: </label> </td>
                <td><form:input path="name" id="name"/></td>
                <td><form:errors path="name" cssClass="error"/></td>
            </tr>

            <tr>
                <td><label for="joiningDate">Joining Date: </label> </td>
                <td><form:input path="joiningDate" id="joiningDate"/></td>
                <td><form:errors path="joiningDate" cssClass="error"/></td>
            </tr>

            <tr>
                <td><label for="salary">Salary: </label> </td>
                <td><form:input path="salary" id="salary"/></td>
                <td><form:errors path="salary" cssClass="error"/></td>
            </tr>

            <tr>
                <td><label for="ssn">SSN: </label> </td>
                <td><form:input path="ssn" id="ssn"/></td>
                <td><form:errors path="ssn" cssClass="error"/></td>
            </tr>

            <tr>
                <td colspan="3">
                    <c:choose>
                        <c:when test="${edit}">
                            <input type="submit" value="Update"/>
                        </c:when>
                        <c:otherwise>
                            <input type="submit" value="Register"/>
                        </c:otherwise>
                    </c:choose>
                </td>
            </tr>
        </table>
    </form:form>
    <br/>
    <br/>
    Go back to <a href="<c:url value='/list' />">List of All Employees</a>
</body>
</html>
10.3 WEB-INF/views/success.jsp [成功页面包含新员工创建成功的确认信息并重定向到员工列表页面]
<%@ page language="java" contentType="text/html; charset=ISO-8859-1"
    pageEncoding="ISO-8859-1"%>
<%@ taglib prefix="c" uri="http://java.sun.com/jsp/jstl/core" %>

<html>
<head>
<meta http-equiv="Content-Type" content="text/html; charset=ISO-8859-1">
<title>Registration Confirmation Page</title>
</head>
<body>
    message : ${success}
    <br/>
    <br/>
    Go back to <a href="<c:url value='/list' />">List of All Employees</a>

</body>

</html>
第11步:创建数据表
CREATE TABLE EMPLOYEE(
    id INT NOT NULL auto_increment,
    name VARCHAR(50) NOT NULL,
    joining_date DATE NOT NULL,
    salary DOUBLE NOT NULL,
    ssn VARCHAR(30) NOT NULL UNIQUE,
    PRIMARY KEY (id)
);
第12步:创建,部署和运行程序
现在开始打war包(既可以通过eclipse) 或者通过maven命令行(mvn clean install).将war包部署到servlet3.0容器当中。由于这里我使用的是tomcat容器。我就直接将war包放在tomcat的webapps文件夹下。并点击start.bat脚本启动tomcat(在tomcat的bin目录下面)。 打开浏览器输入网址:http://localhost:8080/SpringHibernateExample/