线性布局
<?xml version="1.0" encoding="utf-8"?>
<LinearLayout xmlns:android="http://schemas.android.com/apk/res/android"
    android:layout_width="fill_parent"
    android:layout_height="44dp"
    android:orientation="horizontal">

    <TextView
        android:layout_width="match_parent"
        android:layout_height="44dp"
        android:layout_gravity="center"
        android:background="#ff0000"
        android:ellipsize="end"
        android:layout_weight="1"
        android:gravity="center"
        android:singleLine="true"
        android:text="111111111111111111111111" />

    <TextView
        android:layout_width="match_parent"
        android:layout_gravity="center"
        android:layout_weight="1"
        android:background="#000000"
        android:text="2222222222222" />

    <TextView
        android:layout_width="match_parent"
        android:layout_height="44dp"
        android:layout_gravity="center"
        android:background="#ff0000"
        android:layout_weight="1"
        android:ellipsize="end"
        android:gravity="center"
        android:singleLine="true"
        android:text="111111111111" />
</LinearLayout>
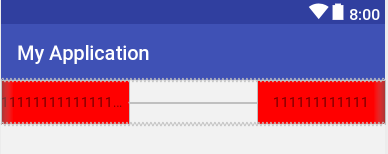
给每个TextView设置layout_weight=1属性平分父级空间。可以做到文字超出隐藏。
或是
<?xml version="1.0" encoding="utf-8"?>
<LinearLayout xmlns:android="http://schemas.android.com/apk/res/android"
    android:layout_width="fill_parent"
    android:layout_height="44dp"
    android:orientation="horizontal">

    <TextView
        android:layout_width="wrap_content"
        android:layout_height="44dp"
        android:layout_gravity="center"
        android:background="#ff0000"
        android:gravity="center"
        android:text="111111111111111111111111" />

    <TextView
        android:layout_width="match_parent"
        android:layout_gravity="center"
        android:layout_weight="1"
        android:background="#000000"
        android:text="2222222222222" />

    <TextView
        android:layout_width="wrap_content"
        android:layout_height="44dp"
        android:layout_gravity="center"
        android:background="#ff0000"
        android:gravity="center"
        android:text="111111111111" />
</LinearLayout>
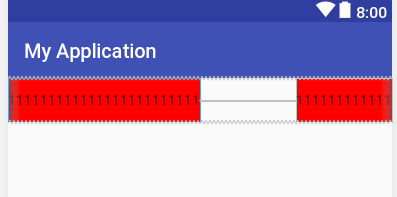
只给中间占位的TextView设置android:layout_weight=1,撑开空间做到分离左右TextView。此时左右的TextView的宽度为wrap_content,所以如果哪个TrxtView内容过多的话,会占满整个父元素。
或是
<LinearLayout xmlns:android="http://schemas.android.com/apk/res/android"
    android:id="@+id/mRelativeLayout"
    android:layout_width="match_parent"
    android:layout_height="match_parent">

    <EditText
        android:id="@+id/input_message"
        android:layout_width="0dp"
        android:layout_height="wrap_content"
        android:layout_weight="1"
        android:hint="Type something" />

    <Button
        android:layout_width="wrap_content"
        android:layout_height="wrap_content"
        android:text="button" />
</LinearLayout>
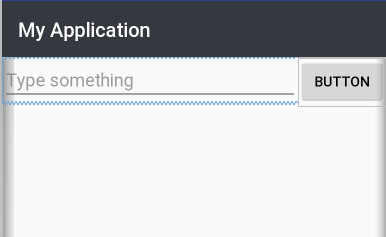
除去一边元素宽度,左边自适应宽度。
layout_weight的计算方式同flexbox一致。
相对布局
<?xml version="1.0" encoding="utf-8"?>
<RelativeLayout xmlns:android="http://schemas.android.com/apk/res/android"
    android:layout_width="match_parent"
    android:layout_height="match_parent">

    <Button
        android:id="@+id/button1"
        android:layout_width="wrap_content"
        android:layout_height="wrap_content"
        android:layout_alignParentLeft="true"
        android:layout_alignParentTop="true"
        android:text="button 1" />

    <Button
        android:id="@+id/button2"
        android:layout_width="wrap_content"
        android:layout_height="wrap_content"
        android:layout_alignParentRight="true"
        android:layout_alignParentTop="true"
        android:text="button 2" />

    <Button
        android:id="@+id/button3"
        android:layout_width="wrap_content"
        android:layout_height="wrap_content"
        android:layout_centerInParent="true"
        android:text="button 3" />

    <Button
        android:id="@+id/button4"
        android:layout_width="wrap_content"
        android:layout_height="wrap_content"
        android:layout_alignParentBottom="true"
        android:layout_alignParentLeft="true"
        android:text="button 4" />

    <Button
        android:id="@+id/button5"
        android:layout_width="wrap_content"
        android:layout_height="wrap_content"
        android:layout_alignParentBottom="true"
        android:layout_alignParentRight="true"
        android:text="button 5"
        android:textAllCaps="false" />


</RelativeLayout>
子控件相对于父容器
android:layout_alignParentBottom 如果该值为true,则将该控件的底部和父控件的底部对齐
android:layout_alignParentLeft 如果该值为true,则将该控件的左边与父控件的左边对齐
android:layout_alignParentRight 如果该值为true,则将该控件的右边与父控件的右边对齐
android:layout_alignParentTop 如果该值为true,则将空间的顶部与父控件的顶部对齐
android:layout_centerHorizontal 如果值为true,该控件将被至于水平方向的中央
android:layout_centerInParent 如果值为true,该控件将被至于父控件水平方向和垂直方向的中央
android:layout_centerVertical 如果值为true,该控件将被至于垂直方向的中央
子控件相对于子控件
android:layout_above 在给定ID控件的上面
android:ayout_below在给定ID控件的下面
android:layout_toLeftOf 在给定ID控件的左边
android:layout_toRightOf 在给定ID控件的右边
android:layout_alignBottom 与给定ID控件的底部边缘对齐
android:layout_alignLeft 与给定ID控件的左边缘对齐
android:layout_alignRight 与给定ID控件的右边缘对齐
android:layout_alignTop 与给定ID控件的上边缘对齐
约束布局
<?xml version="1.0" encoding="utf-8"?>
<android.support.constraint.ConstraintLayout xmlns:android="http://schemas.android.com/apk/res/android"
    xmlns:app="http://schemas.android.com/apk/res-auto"
    xmlns:tools="http://schemas.android.com/tools"
    android:layout_width="match_parent"
    android:layout_height="match_parent"
    tools:context="com.example.thinkpad.testandroid.Main4Activity">
    <Button
        android:id="@+id/button1"
        android:layout_width="wrap_content"
        android:layout_height="wrap_content"
        android:text="Demo"/>
    <Button
        android:id="@+id/button2"
        android:layout_width="wrap_content"
        android:layout_height="wrap_content"
        android:text="button2"
        app:layout_constraintLeft_toRightOf="@id/button1"/>
    <Button
        android:id="@+id/button3"
        android:layout_width="wrap_content"
        android:layout_height="wrap_content"
        android:layout_marginBottom="20dp"
        android:text="button3"
        app:layout_constraintBottom_toBottomOf="parent"/>
</android.support.constraint.ConstraintLayout>
属性形如layout_constraintXXX_toYYYOf,constraintXXX里的XXX代表是这个子控件自身的哪条边(Left、Right、Top、Bottom、Baseline,而toYYYOf里的YYY代表的是和约束控件的哪条边发生约束(取值同样是Left、Right、Top、Bottom、Baseline)。
例如:app:layout_constraintLeft_toRightOf="@id/button1",表示的是控件自身的左侧在button1的右侧; app:layout_constraintLeft_toRightOf="parent",表示的是控件自身的底部和父控件的底部对齐。