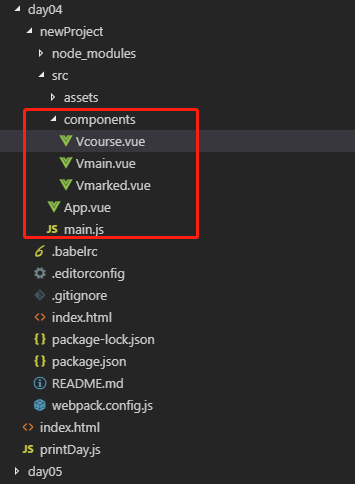
 1 import Vue from 'vue'
 2 import App from './App.vue'
 3 import VueRouter from 'vue-router'
 4 //1、定义路由组件
 5 //可以从其他文件导入进来
 6 import Vmain from './components/Vmain.vue'
 7 import Vcourse from './components/Vcourse.vue'
 8 import Vmarked from './components/Vmarked.vue'
 9
10 Vue.use(VueRouter);//告诉Vue在用VurRouter
11 //console.log(Vue);
12
13 // 2. 定义路由
14 // 每个路由应该映射一个组件。 其中"component" 可以是
15 // 通过 Vue.extend() 创建的组件构造器,
16 // 或者,只是一个组件配置对象。
17 // 我们晚点再讨论嵌套路由。
18 const routes = [
19   { path: '/', component: Vmain },
20   { path: '/course', component: Vcourse },
21   { path: '/mark', component: Vmarked }
22 ]
23
24 // 3. 创建 router 实例,然后传 `routes` 配置
25 // 你还可以传别的配置参数, 不过先这么简单着吧。
26 const router = new VueRouter({
27   mode: 'history',
28   routes // (缩写) 相当于 routes: routes
29 })
30
31
32
33
34 new Vue({
35   el: '#app',
36   router,
37   render: h => h(App)
38 })

 1 <!-- 一个组件由三个部分组成 -->
 2 <template>
 3 <!-- 页面结构  -->
 4
 5
 6   <div class="app">
 7       <ul>
 8         <li>
 9           <!-- 使用 router-link 组件来导航. -->
10     <!-- 通过传入 `to` 属性指定链接. -->
11     <!-- <router-link> 默认会被渲染成一个 `<a>` 标签 -->
12     <router-link to="/">首页</router-link>
13
14         </li>
15         <li>
16             <router-link to="/course">课程</router-link>
17
18         </li>
19         <li>
20             <router-link to="/mark">Mark笔记</router-link>
21
22         </li>
23       </ul>
24
25
26       <!-- 路由出口 -->
27   <!-- 路由匹配到的组件将渲染在这里 -->
28   <router-view></router-view>
29   <!-- <div class="btn-group" role="group" aria-label="...">
30       <button type="button" class="btn btn-default">Left</button>
31       <button type="button" class="btn btn-default">Middle</button>
32       <button type="button" class="btn btn-default">Right</button>
33     </div>  -->
34   </div>
35
36 </template>
37
38 <script>
39   //1.先引入子组件
40
41
42
43 //导入bootstrap
44 import 'bootstrap/dist/css/bootstrap.min.css'
45
46
47 //页面的业务逻辑
48 export default{
49   name:"App",
50   data(){
51     return {
52
53     }
54   },
55   methods:{
56     addHandler(str){
57       //alert(str);
58       this.citys.push(str);
59     }
60
61   },
62   computed:{
63
64   },
65   created(){
66       // 通常都做页面的初始化操作
67       // console.log("ok")
68   },
69   //2.挂在组件
70   components:{
71     //Vmain:Vmain,
72   }
73 }
74
75
76 </script>
77
78 <style>
79 /* css样式渲染 */
80 *{
81   margin: 0;
82   padding: 0;
83 }
84 </style>

 1 <template >
 2
 3         <div class="main">
 4
 5             首页
 6         </div>
 7
 8 </template>
 9     <script>
10     export default{
11         name:"Vmain",
12         data(){
13             return {
14
15             }
16         },
17         props:{
18
19         }
20     }
21     </script>
22
23     <style scoped>
24
25
26     </style>

 1 <template >
 2
 3         <div class="editor">
 4
 5             编辑器
 6         </div>
 7
 8 </template>
 9     <script>
10     export default{
11         name:"Veditor",
12         data(){
13             return {
14
15             }
16         },
17         props:{
18
19         }
20     }
21     </script>
22
23     <style scoped>
24
25
26     </style>

 1 <template >
 2
 3         <div class="course">
 4
 5             课程
 6         </div>
 7
 8 </template>
 9     <script>
10     export default{
11         name:"Vcourse",
12         data(){
13             return {
14
15             }
16         },
17         props:{
18
19         }
20     }
21     </script>
22
23     <style scoped>
24
25
26     </style>


//webpack +node.js 快速开始我们的项目
1. cd 当前目录
2. vue init webpack-simple 01   //根据提示操作
3. cd 01
4. npm install
5. npm run dev
