(本系列文章由柠檬的(lc_mtt)原创,转载请注明出处,谢谢~)
有关 PIDL
PIDL亦有“绝对路径”与“相对路径”的概念。表示“相对路径”的PIDL(本文简称为“相对PIDL”)只有一个ITEMIDLIST结构的元素,用于标识相对于父文件夹的“路径”;表示“绝对路径”的PIDL(简称为“绝对PIDL”)有若干个ITEMIDLIST结构的元素,第一个元素表示外壳名字空间根文件夹(“桌面”)下的某一子文件夹A,第二个元素则表示文件夹A下的某一子文件夹B,其余依此类推。这样绝对PIDL就通过保存一条从“桌面”下的直接子文件夹或文件的绝对PIDL与相对PIDL是相同的,而其他的文件夹或文件的相对PIDL就只是其绝对PIDL的最后一部分了。
为什么要说这些呢?因为有些函数,必须使用绝对PIDL,例如图标,如果不使用绝对PIDL,某些图标是无法正常获得的(驱动器、控制面板等)。
但使用 EnumObjects 获得的,仅仅是相对PIDL,如果通过相对PIDL获取绝对PIDL呢?我参考了开源项目 C# FileBrowser 中的 PIDL 类
![]()
![]() PIDL.cs
PIDL.cs  using System; using System.Collections.Generic; using System.Text; using System.Collections; using System.Runtime.InteropServices; namespace WinShell

 {
{  public class PIDL
 { private IntPtr pidl = IntPtr.Zero; public PIDL(IntPtr pidl, bool clone) { if (clone) this.pidl = ILClone(pidl); else this.pidl = pidl;
  } public PIDL(PIDL pidl, bool clone) { if (clone) this.pidl = ILClone(pidl.Ptr); else this.pidl = pidl.Ptr; } public IntPtr Ptr { get { return pidl; } } public void Insert(IntPtr insertPidl) { IntPtr newPidl = ILCombine(insertPidl, pidl); Marshal.FreeCoTaskMem(pidl); pidl = newPidl; } public void Free() { if (pidl != IntPtr.Zero) { Marshal.FreeCoTaskMem(pidl); pidl = IntPtr.Zero; } } private static int ItemIDSize(IntPtr pidl) { if (!pidl.Equals(IntPtr.Zero)) { byte[] buffer = new byte[2]; Marshal.Copy(pidl, buffer, 0, 2); return buffer[1] * 256 + buffer[0]; } else return 0; } private static int ItemIDListSize(IntPtr pidl) { if (pidl.Equals(IntPtr.Zero)) return 0; else { int size = ItemIDSize(pidl); int nextSize = Marshal.ReadByte(pidl, size) + (Marshal.ReadByte(pidl, size + 1) * 256); while (nextSize > 0) { size += nextSize; nextSize = Marshal.ReadByte(pidl, size) + (Marshal.ReadByte(pidl, size + 1) * 256); } return size; } } public static IntPtr ILClone(IntPtr pidl) { int size = ItemIDListSize(pidl); byte[] bytes = new byte[size + 2]; Marshal.Copy(pidl, bytes, 0, size); IntPtr newPidl = Marshal.AllocCoTaskMem(size + 2); Marshal.Copy(bytes, 0, newPidl, size + 2); return newPidl; } public static IntPtr ILCombine(IntPtr pidl1, IntPtr pidl2) { int size1 = ItemIDListSize(pidl1); int size2 = ItemIDListSize(pidl2); IntPtr newPidl = Marshal.AllocCoTaskMem(size1 + size2 + 2); byte[] bytes = new byte[size1 + size2 + 2]; Marshal.Copy(pidl1, bytes, 0, size1); Marshal.Copy(pidl2, bytes, size1, size2); Marshal.Copy(bytes, 0, newPidl, bytes.Length); return newPidl; } }
  }
}
该类实现了 PIDL 的复制和结合功能。现在我们修改 ShellItem 类,使它带有父节点的 IShellFolder 以及提供获取绝对 PIDL 的属性:
private ShellItem m_ParentItem; public ShellItem ParentItem { get { return m_ParentItem; } set { m_ParentItem = value; } } /**//// <summary> /// 绝对 PIDL /// </summary> public PIDL PIDLFull { get { PIDL pidlFull = new PIDL(PIDL, true); ShellItem current = ParentItem; while (current != null) { pidlFull.Insert(current.PIDL); current = current.ParentItem; } return pidlFull; } }
获取图标
言归正传,既然已经获得绝对 PIDL,那么获取图标就是很简单的事情了,我们使用的是 SHGetFileInfo 这个API:
[DllImport("shell32", EntryPoint = "SHGetFileInfo", ExactSpelling = false, CharSet = CharSet.Auto, SetLastError = true)] public static extern IntPtr SHGetFileInfo( IntPtr ppidl, FILE_ATTRIBUTE dwFileAttributes, ref SHFILEINFO sfi, int cbFileInfo, SHGFI uFlags); [DllImport("Shell32.dll", CharSet = CharSet.Auto)] public static extern IntPtr SHGetFileInfo( string Path, FILE_ATTRIBUTE fileAttributes, out SHFILEINFO sfi, int cbFileInfo, SHGFI flags);
这里提供了一个重载,你可以选择是通过 PIDL 还是 路径 获取图标(如果是路径,那么仅仅能获取 文件夹/文件 的图标)。
/**//// <summary> /// 获取小图标索引 /// </summary> public static int GetSmallIconIndex(string strFilename) { SHFILEINFO psfi = new SHFILEINFO(); IntPtr ipIcon = SHGetFileInfo(strFilename, 0, out psfi, Marshal.SizeOf(psfi), SHGFI.ICON | SHGFI.SMALLICON | SHGFI.SYSICONINDEX); return psfi.iIcon; } public static int GetSmallIconIndex(IntPtr ipIDList) { SHFILEINFO psfi = new SHFILEINFO(); IntPtr ipIcon = SHGetFileInfo(ipIDList, 0, ref psfi, Marshal.SizeOf(psfi), SHGFI.ICON | SHGFI.PIDL | SHGFI.SMALLICON | SHGFI.SYSICONINDEX); return psfi.iIcon; }
大家也许会觉得奇怪,GetSmallIconIndex 返回的是 int ,到底要怎么使用?
其实没错,GetSmallIconIndex 仅仅是返回该图标在系统图像列表(System ImageList)的索引(Index)而已。我们只要获取系统图像列表的指针,再把它关联到你的 TreeView 或 ListView ,即可通过 Icon Index 来显示图标了。
IntPtr m_ipSmallSystemImageList; IntPtr m_ipLargeSystemImageList; //获取系统 ImageList SHFILEINFO shfi = new SHFILEINFO(); m_ipSmallSystemImageList = API.SHGetFileInfo("", 0, out shfi, Marshal.SizeOf(typeof(SHFILEINFO)), SHGFI.SYSICONINDEX | SHGFI.SMALLICON | SHGFI.USEFILEATTRIBUTES); m_ipLargeSystemImageList = API.SHGetFileInfo("", 0, out shfi, Marshal.SizeOf(typeof(SHFILEINFO)), SHGFI.SYSICONINDEX | SHGFI.LARGEICON | SHGFI.USEFILEATTRIBUTES); //把系统 ImageList 关联到 TreeView 和 ListView API.SendMessage(Tree1.Handle, API.TVM_SETIMAGELIST, API.TVSIL_NORMAL, m_ipSmallSystemImageList); API.SendMessage(lvFile.Handle, API.LVM_SETIMAGELIST, API.LVSIL_NORMAL, m_ipLargeSystemImageList);
OK,我们修改以往的例子,就可以在 Tree 节点上显示图标了:
ShellItem shellItem=new ShellItem(pidlSub, iSub, sItem); int imgIndex = API.GetSmallIconIndex(shellItem.PIDLFull.Ptr); TreeNode nodeSub = new TreeNode(name, imgIndex, imgIndex);
(注:关于文中出现的一些结构体或常量,读者可以自行查阅 MSDN,精力有限实在不能一一说明。)
我们来看一下效果: 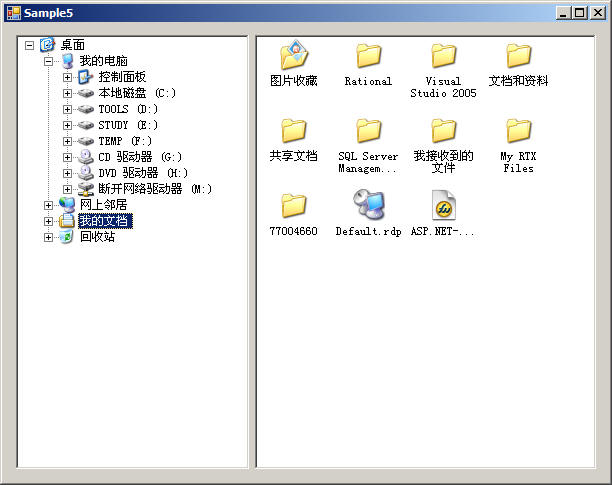
事实上,这个代码改了很多,也涉及到下一节的部分内容,因此代码将在下一节中抛出...