springboot引入mangodb依赖坐标:在spring-boot集成条件下,使用mongodb的DAO层开发。
swagger查看接口文档,请求地址:http://localhost:31001/swagger-ui.html
本项目前端使用的框架开发库:Element,一套为开发者、设计师准备的基于 Vue 2.0 的桌面端组件库。
1 自定义条件查询
1.1 需求分析
查询条件如下:
站点Id:精确匹配
模板Id:精确匹配
页面别名:模糊匹配
...
1.2 服务端
1.2.1 Dao
使用接口 CmsPageRepository中的findAll(Example<S> var1, Pageable var2)方法实现,无需定义。


debug运行@Test方法需要从右键菜单入口执行
1.2.2 Service
在PageService的findlist方法中增加自定义条件查询代码


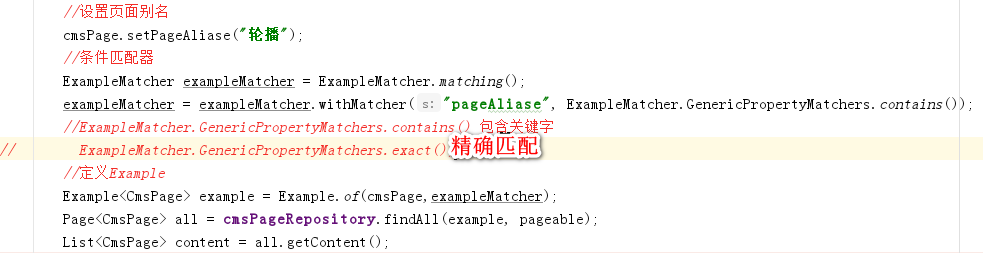
    public QueryResponseResult findList(int page, int size, QueryPageRequest queryPageRequest){
        if(queryPageRequest == null){
            queryPageRequest = new QueryPageRequest();
        }
        //自定义条件查询
        //定义条件匹配器
        ExampleMatcher exampleMatcher = ExampleMatcher.matching()
                .withMatcher("pageAliase", ExampleMatcher.GenericPropertyMatchers.contains());
        //条件值对象
        CmsPage cmsPage = new CmsPage();
        //设置条件值(站点id)
        if(StringUtils.isNotEmpty(queryPageRequest.getSiteId())){
            cmsPage.setSiteId(queryPageRequest.getSiteId());
        }
        //设置模板id作为查询条件
        if(StringUtils.isNotEmpty(queryPageRequest.getTemplateId())){
            cmsPage.setTemplateId(queryPageRequest.getTemplateId());
        }
        //设置页面别名作为查询条件
        if(StringUtils.isNotEmpty(queryPageRequest.getPageAliase())){
            cmsPage.setPageAliase(queryPageRequest.getPageAliase());
        }
        //定义条件对象Example
        Example<CmsPage> example = Example.of(cmsPage,exampleMatcher);
        //分页参数
        if(page <=0){
            page = 1;
        }
        page = page -1;
        if(size<=0){
            size = 10;
        }
        Pageable pageable = PageRequest.of(page,size);
        Page<CmsPage> all = cmsPageRepository.findAll(example,pageable);//实现自定义条件查询并且分页查询
        QueryResult queryResult = new QueryResult();
        queryResult.setList(all.getContent());//数据列表
        queryResult.setTotal(all.getTotalElements());//数据总记录数
        QueryResponseResult queryResponseResult = new QueryResponseResult(CommonCode.SUCCESS,queryResult);
        return queryResponseResult;
    }
1.2.3 Controller
@RestController
@RequestMapping("/cms/page")
public class CmsPageController implements CmsPageControllerApi {

    @Autowired
    PageService pageService;

    @Override
    @GetMapping("/list/{page}/{size}")
    public QueryResponseResult findList(@PathVariable("page") int page, @PathVariable("size") int size, QueryPageRequest queryPageRequest) {


        //调用service返回查询结果
        return pageService.findList(page,size,queryPageRequest);
    }
1.2.4 测试
使用SwaggerUI测试

1.3 前端
1.3.1 页面
1、增加查询表单
<template>
  <div>
    <!--编写页面静态部分,即view部分-->
    <!--查询表单-->
    <el-form :model="params">
      <el-select v-model="params.siteId" placeholder="请选择站点">
        <el-option
          v-for="item in siteList"
          :key="item.siteId"
          :label="item.siteName"
          :value="item.siteId">
        </el-option>
      </el-select>
      页面别名:<el-input v-model="params.pageAliase"  style=" 100px"></el-input>
      <el-button type="primary" size="small" v-on:click="query">查询</el-button>
      <router-link :to="{path:'/cms/page/add',query:{
        page:this.params.page,
        siteId:this.params.siteId
      }}">
         <el-button  type="primary" size="small">新增页面</el-button>
      </router-link>
    </el-form>
2、数据模型对象
增加siteList、pageAliase、siteId,如下:
    data(){
      return {
        params:{
          page:1,//页码
          size:5,//每页显示个数
          pageAliase:'',
          siteId:''//站点id
        },
        listLoading:false,
        list:[],
        total:0,

        siteList:[]//站点列表
      }
    }
3、在钩子方法中 构建siteList站点列表
    mounted() {
      //默认查询页面
      this.query()
      //初始化站点列表
      this.siteList = [
        {
          siteId:'5a751fab6abb5044e0d19ea1',
          siteName:'门户主站'
        },
        {
          siteId:'102',
          siteName:'测试站'
        }
      ]
    }
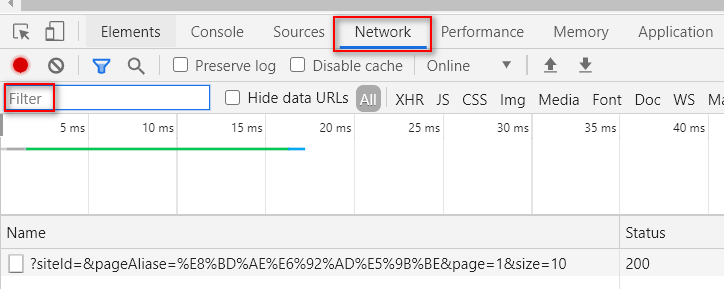
使用浏览器作调试工具,查看按钮发送请求的url地址。
1.3.2 Api调用
1、向服务端传递查询条件,修改 cms.js,如下:
require()函数用于引入本地模块或者JSON文件
import http from './../../../base/api/public'
import querystring from 'querystring'
let sysConfig = require('@/../config/sysConfig')
let apiUrl = sysConfig.xcApiUrlPre;
//测试
export const page_test= id => {
  return http.requestQuickGet(apiUrl+'/cms/user/get/'+id)
}
/*页面列表*/
export const page_list = (page,size,params) => {
  //params为json格式
  //使用querystring将json对象转成key/value串
  let querys = querystring.stringify(params)
  return http.requestQuickGet(apiUrl+'/cms/page/list/'+page+'/'+size+'/?'+querys)
}
/*页面添加*/
export const page_add = params => {
  return http.requestPost(apiUrl+'/cms/page/add',params)
}
/*页面修改*/
export const page_edit = params => {
  return http.requestPut(apiUrl+'/cms/page/edit',params)
}
/*页面查询*/
export const page_get = id => {
  return http.requestQuickGet(apiUrl+'/cms/page/get/'+id)
}
/*页面删除*/
export const page_del = id => {
  return http.requestDelete(apiUrl+'/cms/page/del/'+id)
}
/*生成静态文件 */
export const page_generateHtml= id => {
  return http.requestPost(apiUrl+'/cms/page/generateHtml/'+id)
}
/*取出静态文件 */
export const page_getHtml= id => {
  return http.requestQuickGet(apiUrl+'/cms/page/getHtml/'+id)
}
/*发布页面*/
export const page_postPage= id => {
  return http.requestPost(apiUrl+'/cms/page/postPage/'+id)
}
2、页面调用api方法
    methods:{
      //页面查询
      query:function(){
        // alert('查询')
        //调用服务端的接口
        cmsApi.page_list(this.params.page,this.params.size,this.params).then((res)=>{
          //将res结果数据赋值给数据模型对象
          this.list = res.queryResult.list;
          this.total = res.queryResult.total;
        })

      },
2.2 新增页面服务端开发
2.1 新增页面接口定义
1、定义响应模型
@Data
public class CmsPageResult extends ResponseResult {
    CmsPage cmsPage;
    public CmsPageResult(ResultCode resultCode,CmsPage cmsPage) {
        super(resultCode);
        this.cmsPage = cmsPage;
    }
}
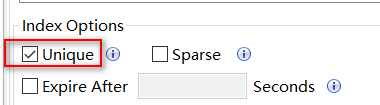
2.2.1 页面新增不重复的校验条件
在cms_page集中上创建页面名称、站点Id、页面webpath为唯一索引
mangodb使用studio3T创建Unique索引。
2.2.2 Dao
1、添加根据页面名称、站点Id、页面webpath查询页面方法,此方法用于校验页面是否存在
public interface CmsPageRepository extends MongoRepository<CmsPage,String> {

    //根据页面名称、站点Id、页面webpath查询
    CmsPage findByPageNameAndSiteIdAndPageWebPath(String pageName,String siteId,String pageWebPath);
    //根据页面名称查询
    CmsPage findByPageName(String pageName);
}
2、使用 CmsPageRepository提供的save方法
2.2.3 Service
    //新增页面
    public CmsPageResult add(CmsPage cmsPage) {
        if(cmsPage == null){
            //抛出异常,非法参数异常..指定异常信息的内容

        }
        //校验页面名称、站点Id、页面webpath的唯一性
        //根据页面名称、站点Id、页面webpath去cms_page集合,如果查到说明此页面已经存在,如果查询不到再继续添加
        CmsPage cmsPage1 = cmsPageRepository.findByPageNameAndSiteIdAndPageWebPath(cmsPage.getPageName(), cmsPage.getSiteId(), cmsPage.getPageWebPath());
        if(cmsPage1!=null){
            //页面已经存在
            //抛出异常,异常内容就是页面已经存在
            ExceptionCast.cast(CmsCode.CMS_ADDPAGE_EXISTSNAME);
        }

        //调用dao新增页面
        cmsPage.setPageId(null);
        cmsPageRepository.save(cmsPage);
        return new CmsPageResult(CommonCode.SUCCESS,cmsPage);

    }
2.2.4 Controller
    @Override
    @PostMapping("/add")
    public CmsPageResult add(@RequestBody  CmsPage cmsPage) {
        return pageService.add(cmsPage);
    }
2.2.5 接口测试
05-新增页面-服务端-接口测试
使用postman测试,请求内容为json数据。
6、站点及模板数据(先使用静态数据)
在created钩子方法中定义,created是在html渲染之前执行,这里推荐使用created。
小技巧:使用 ||返回第一个有效值
2.3.2 Api调用
1、在module/cms/api/cms.js中定义page_add方法。
/*页面添加*/
export const page_add = params => {
  return http.requestPost(apiUrl+'/cms/page/add',params)
}
2、添加事件
本功能使用到两个UI组件:
1、使用element-ui的message-box组件弹出确认提交窗口(http://element.eleme.io/#/zhCN/component/message-box)
2、使用 message组件提示操作结果 (http://element.eleme.io/#/zh-CN/component/message)
3 修改页面
修改页面用户操作流程:
1、用户进入修改页面,在待修改的页面上显示了修改页面的信息。
2、用户修改页面的内容,点击“提交”,提示“修改成功”或“修改失败”
修改页面需要定义的API如下:
@ApiOperation("通过ID查询页面")
public CmsPage findById(String id);
@ApiOperation("修改页面")
public CmsPageResult edit(String id,CmsPage cmsPage);
说明:提交数据使用put可以,只是根据http方法的规范,put方法是对服务器指定资源进行修改,所以这里使用put方法对页面修改进行修改。
3.2 修改页面服务端开发
3.2.1Dao
使用 Spring Data提供的findById方法完成根据主键查询 。
使用 Spring Data提供的save方法完成数据保存 。
3.2.2Service
    //根据页面id查询页面
    public CmsPage getById(String id){
        Optional<CmsPage> optional = cmsPageRepository.findById(id);
        if(optional.isPresent()){
            CmsPage cmsPage = optional.get();
            return cmsPage;
        }
        return null;
    }

    //修改页面
    public CmsPageResult update(String id,CmsPage cmsPage){
        //根据id从数据库查询页面信息
        CmsPage one = this.getById(id);
        if(one!=null){
            //准备更新数据
            //设置要修改的数据
            //更新模板id
            one.setTemplateId(cmsPage.getTemplateId());
            //更新所属站点
            one.setSiteId(cmsPage.getSiteId());
            //更新页面别名
            one.setPageAliase(cmsPage.getPageAliase());
            //更新页面名称
            one.setPageName(cmsPage.getPageName());
            //更新访问路径
            one.setPageWebPath(cmsPage.getPageWebPath());
            //更新物理路径
            one.setPagePhysicalPath(cmsPage.getPagePhysicalPath());
            //提交修改
            cmsPageRepository.save(one);
            return new CmsPageResult(CommonCode.SUCCESS,one);
        }
        //修改失败
        return new CmsPageResult(CommonCode.FAIL,null);

    }
3.2.3Controller
    @Override
    @GetMapping("/get/{id}")
    public CmsPage findById(@PathVariable("id") String id) {
        return pageService.getById(id);
    }

    @Override
    @PutMapping("/edit/{id}")//这里使用put方法,http 方法中put表示更新
    public CmsPageResult edit(@PathVariable("id")String id, @RequestBody CmsPage cmsPage) {
        return pageService.update(id,cmsPage);
    }
3.3 修改页面前端开发
3.3.1 页面处理流程
页面的处理流程如下:
1、进入页面,通过钩子方法请求服务端获取页面信息,并赋值给数据模型对象
2、页面信息通过数据绑定在表单显示
3、用户修改信息点击“提交”请求服务端修改页面信息接口
3.3.3 修改页面
3.3.3.1 编写page_edit页面
修改页面的布局同添加页面,可以直接复制添加页面,在添加页面基础上修改。
1、编写page_edit.vue
2、配置路由
3、在页面列表添加“编辑”链接
参考table组件的例子,在page_list.vue上添加“操作”列
编写edit方法
3.3.3.2 页面内容显示
本功能实现:进入修改页面立即显示要修改的页面信息。
1、定义api方法
/*根据id页面查询*/
export const page_get = id => {
  return http.requestQuickGet(apiUrl+'/cms/page/get/'+id)
}
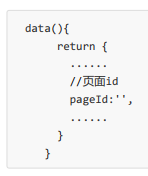
2、定义数据对象
进入修改页面传入pageId参数,在数据模型中添加pageId。
3、在created钩子方法 中查询页面信息
    created: function () {
      //页面参数通过路由传入,这里通过this.$route.params来获取
      this.pageId=this.$route.params.pageId;
      //根据主键查询页面信息
      cmsApi.page_get(this.pageId).then((res) => {
        console.log(res);
        if(res){
          this.pageForm = res;
        }
      });
    },
4、预览页面回显效果
3.3.4 Api调用
1、定义api方法
/*页面修改,采用put方法*/
export const page_edit = (id,params) => {
  return http.requestPut(apiUrl+'/cms/page/edit/'+id,params)
}
2、提交按钮方法
添加提交按钮事件:
<el‐button type="primary" @click="editSubmit" >提交</el‐button>
3、提交按钮事件内容:
      editSubmit(){
        this.$refs.pageForm.validate((valid) => {//表单校验
          if (valid) {//表单校验通过
            this.$confirm('确认提交吗?', '提示', {}).then(() => {
              this.addLoading = true;
              //修改提交请求服务端的接口
              cmsApi.page_edit(this.pageId,this.pageForm).then((res) => {
                  console.log(res);
                if(res.success){
                  this.addLoading = false;
                  this.$message({
                    message: '提交成功',
                    type: 'success'
                  });
                  //返回
                  this.go_back();

                }else{
                  this.addLoading = false;
                  this.$message.error('提交失败');
                }
              });
            });
          }
        });
      }
4 删除页面
用户操作流程:
1、用户进入用户列表,点击“删除”
2、执行删除操作,提示“删除成功”或“删除失败”
2、删除事件
      del:function (pageId) {
        this.$confirm('您确认删除吗?', '提示', { }).then(() => {

          //调用服务端接口
          cmsApi.page_del(pageId).then(res=>{

            if(res.success){
              this.$message.success("删除成功")
              //刷新页面
              this.query()
            }else{
              this.$message.error("删除失败")
            }
          })
        })

      }
5 异常处理
5.1 异常处理的问题分析
解决方案:
1、在Service方法中的编码顺序是先校验判断,有问题则抛出具体的异常信息,最后执行具体的业务操作,返回成功信息。
2、在统一异常处理类中去捕获异常,无需controller捕获异常,向用户返回统一规范的响应信息。
15-异常处理-异常处理流程
5.2 异常处理流程
1、自定义异常类型。
2、自定义错误代码及错误信息。
3、对于可预知的异常由程序员在代码中主动抛出,由SpringMVC统一捕获。
可预知异常是程序员在代码中手动抛出本系统定义的特定异常类型,由于是程序员抛出的异常,通常异常信息比较齐全,程序员在抛出时会指定错误代码及错误信息,获取异常信息也比较方便。
4、对于不可预知的异常(运行时异常)由SpringMVC统一捕获Exception类型的异常。
不可预知异常通常是由于系统出现bug、或一些不要抗拒的错误(比如网络中断、服务器宕机等),异常类型为
RuntimeException类型(运行时异常)。
5、可预知的异常及不可预知的运行时异常最终会采用统一的信息格式(错误代码+错误信息)来表示,最终也会随请求响应给客户端。
1、在controller、service、dao中程序员抛出自定义异常;springMVC框架抛出框架异常类型。
2、统一由异常捕获类捕获异常,并进行处理。
3、捕获到自定义异常则直接取出错误代码及错误信息,响应给用户。
4、捕获到非自定义异常类型首先从Map中找该异常类型是否对应具体的错误代码,如果有则取出错误代码和错误信息并响应给用户,如果从Map中找不到异常类型所对应的错误代码则统一为99999错误代码并响应给用户。
5、将错误代码及错误信息以Json格式响应给用户。
16-异常处理-可预知异常处理-自定义异常类型和抛出类
5.3 可预知异常处理
5.3.1 自定义异常类
package com.xuecheng.framework.exception;

import com.xuecheng.framework.model.response.ResultCode;


public class CustomException extends RuntimeException {

    //错误代码
    ResultCode resultCode;

    public CustomException(ResultCode resultCode){
        this.resultCode = resultCode;
    }
    public ResultCode getResultCode(){
        return resultCode;
    }


}
使用类的静态方法封装throw new runtimeException
package com.xuecheng.framework.exception;

import com.xuecheng.framework.model.response.ResultCode;

/**
 * @author Administrator
 * @version 1.0
 * @create 2018-09-14 17:31
 **/
public class ExceptionCast {

    public static void cast(ResultCode resultCode){
        throw new CustomException(resultCode);
    }
}
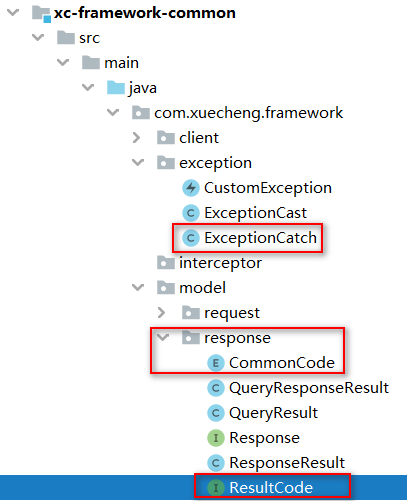
5.3.3 异常捕获类
ExceptionCatch
使用 @ControllerAdvice和@ExceptionHandler注解来捕获指定类型的异常
@ControllerAdvice//控制器增强
public class ExceptionCatch {

    private static final Logger LOGGER = LoggerFactory.getLogger(ExceptionCatch.class);

    //定义map,配置异常类型所对应的错误代码
    private static ImmutableMap<Class<? extends Throwable>,ResultCode> EXCEPTIONS;
    //定义map的builder对象,去构建ImmutableMap
    protected static ImmutableMap.Builder<Class<? extends Throwable>,ResultCode> builder = ImmutableMap.builder();

    //捕获CustomException此类异常
    @ExceptionHandler(CustomException.class)
    @ResponseBody
    public ResponseResult customException(CustomException customException){
        //记录日志
        LOGGER.error("catch exception:{}",customException.getMessage());
        ResultCode resultCode = customException.getResultCode();
        return new ResponseResult(resultCode);
    }
    //捕获Exception此类异常
    @ExceptionHandler(Exception.class)
    @ResponseBody
    public ResponseResult exception(Exception exception){
        //记录日志
        LOGGER.error("catch exception:{}",exception.getMessage());
        if(EXCEPTIONS == null){
            EXCEPTIONS = builder.build();//EXCEPTIONS构建成功
        }
        //从EXCEPTIONS中找异常类型所对应的错误代码,如果找到了将错误代码响应给用户,如果找不到给用户响应99999异常
        ResultCode resultCode = EXCEPTIONS.get(exception.getClass());
        if(resultCode !=null){
            return new ResponseResult(resultCode);
        }else{
            //返回99999异常
            return new ResponseResult(CommonCode.SERVER_ERROR);
        }


    }

    static {
        //定义异常类型所对应的错误代码
        builder.put(HttpMessageNotReadableException.class,CommonCode.INVALID_PARAM);
    }
}
5.3.4异常处理测试
5.3.4.1定义错误代码
@ToString
public enum CmsCode implements ResultCode {
    CMS_ADDPAGE_EXISTSNAME(false,24001,"页面名称已存在!"),
    CMS_GENERATEHTML_DATAURLISNULL(false,24002,"从页面信息中找不到获取数据的url!"),
    CMS_GENERATEHTML_DATAISNULL(false,24003,"根据页面的数据url获取不到数据!"),
    CMS_GENERATEHTML_TEMPLATEISNULL(false,24004,"页面模板为空!"),
    CMS_GENERATEHTML_HTMLISNULL(false,24005,"生成的静态html为空!"),
    CMS_GENERATEHTML_SAVEHTMLERROR(false,24005,"保存静态html出错!"),
    CMS_COURSE_PERVIEWISNULL(false,24007,"预览页面为空!");
    //操作代码
    boolean success;
    //操作代码
    int code;
    //提示信息
    String message;
    private CmsCode(boolean success, int code, String message){
        this.success = success;
        this.code = code;
        this.message = message;
    }

    @Override
    public boolean success() {
        return success;
    }

    @Override
    public int code() {
        return code;
    }

    @Override
    public String message() {
        return message;
    }
}
5.3.4.2 异常处理测试
1、抛出异常
在controller、service、 dao中都可以抛出异常。
修改PageService的add方法,添加抛出异常的代码
        //根据页面名称、站点Id、页面webpath去cms_page集合,如果查到说明此页面已经存在,如果查询不到再继续添加
        CmsPage cmsPage1 = cmsPageRepository.findByPageNameAndSiteIdAndPageWebPath(cmsPage.getPageName(), cmsPage.getSiteId(), cmsPage.getPageWebPath());
        if(cmsPage1!=null){
            //页面已经存在
            //抛出异常,异常内容就是页面已经存在
            ExceptionCast.cast(CmsCode.CMS_ADDPAGE_EXISTSNAME);
        }
2、启动工程,扫描到异常捕获的类ExceptionCatch,在springBoot的启动类中添加。
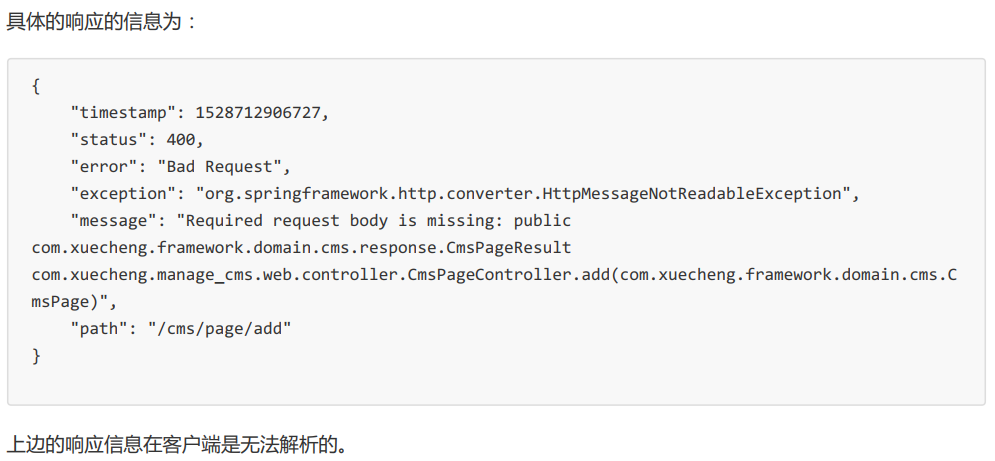
3、前端展示异常信息
服务端响应信息如下:
页面提取异常处理
     addSubmit:function () {
        this.$refs.pageForm.validate((valid) => {
          if (valid) {//表单校验成功
            //确认提示
            this.$confirm('确认提交吗?', '提示', {}).then(() => {
              //调用page_add方法请求服务端的新增页面接口
              this.addLoading = true;
              cmsApi.page_add(this.pageForm).then((res) => {
                  console.log(res);
                //解析服务端响应内容
                if(res.success){
                  this.addLoading = false;
                  //NProgress.done();
                  this.$message({
                    message: '提交成功',
                    type: 'success'
                  });
                  this.$refs['pageForm'].resetFields();

                }else if(res.message){
                  this.addLoading = false;
                  this.$message.error(res.message);
                }else{
                  this.addLoading = false;
                  this.$message.error('提交失败');
                }
              });
            });
          }
        });
      }
    },
5.4 不可预知异常处理
定义异常捕获方法
5.4.1.1 异常抛出测试
使用postman测试添加页面,不输入cmsPost信息,提交,报错信息如下:
org.springframework.http.converter.HttpMessageNotReadableException
此异常是springMVC在进行参数转换时报的错误。
5.4.1.2 异常捕获方法
针对上边的问题其解决方案是:
1、我们在map中配置HttpMessageNotReadableException和错误代码。
2、在异常捕获类中对Exception异常进行捕获,并从map中获取异常类型对应的错误代码,如果存在错误代码则返回此错误,否则统一返回99999错误。
具体的开发实现如下:
1、接口ResultCode里面,约定错误代码范围定义。
package com.xuecheng.framework.model.response;

/**
 * Created by mrt on 2018/3/5.
 * 10000-- 通用错误代码
 * 22000-- 媒资错误代码
 * 23000-- 用户中心错误代码
 * 24000-- cms错误代码
 * 25000-- 文件系统
 */
public interface ResultCode {
    //操作是否成功,true为成功,false操作失败
    boolean success();
    //操作代码
    int code();
    //提示信息
    String message();

}
2、枚举CommonCode继承它,并在里面添加抛出异常对应的内容。
package com.xuecheng.framework.model.response;

import lombok.ToString;


@ToString
public enum CommonCode implements ResultCode{
    INVALID_PARAM(false,10003,"非法参数!"),
    SUCCESS(true,10000,"操作成功!"),
    FAIL(false,11111,"操作失败!"),
    UNAUTHENTICATED(false,10001,"此操作需要登陆系统!"),
    UNAUTHORISE(false,10002,"权限不足,无权操作!"),
    SERVER_ERROR(false,99999,"抱歉,系统繁忙,请稍后重试!");
//    private static ImmutableMap<Integer, CommonCode> codes ;
    //操作是否成功
    boolean success;
    //操作代码
    int code;
    //提示信息
    String message;
    private CommonCode(boolean success,int code, String message){
        this.success = success;
        this.code = code;
        this.message = message;
    }

    @Override
    public boolean success() {
        return success;
    }
    @Override
    public int code() {
        return code;
    }

    @Override
    public String message() {
        return message;
    }

}
3、在统一异常捕获类ExceptionCatch中配置 HttpMessageNotReadableException 为非法参数异常。
package com.xuecheng.framework.exception;

import com.google.common.collect.ImmutableMap;
import com.xuecheng.framework.model.response.CommonCode;
import com.xuecheng.framework.model.response.ResponseResult;
import com.xuecheng.framework.model.response.ResultCode;
import org.slf4j.Logger;
import org.slf4j.LoggerFactory;
import org.springframework.http.converter.HttpMessageNotReadableException;
import org.springframework.web.bind.annotation.ControllerAdvice;
import org.springframework.web.bind.annotation.ExceptionHandler;
import org.springframework.web.bind.annotation.ResponseBody;

/**
 * 统一异常捕获类
 * @version 1.0
 **/
@ControllerAdvice//控制器增强
public class ExceptionCatch {

    private static final Logger LOGGER = LoggerFactory.getLogger(ExceptionCatch.class);

    //定义线程安全的map作成员变量,配置异常类型所对应的错误代码
    private static ImmutableMap<Class<? extends Throwable>,ResultCode> EXCEPTIONS;
    //定义map的builder对象,去构建ImmutableMap
    protected static ImmutableMap.Builder<Class<? extends Throwable>,ResultCode> builder = ImmutableMap.builder();

    //捕获CustomException此类异常
    @ExceptionHandler(CustomException.class)
    @ResponseBody
    public ResponseResult customException(CustomException customException){
        //记录日志
        LOGGER.error("catch exception:{}",customException.getMessage());
        ResultCode resultCode = customException.getResultCode();
        return new ResponseResult(resultCode);
    }
    //捕获Exception此类(不可预知)异常
    @ExceptionHandler(Exception.class)
    @ResponseBody
    public ResponseResult exception(Exception exception){
        //记录日志
        LOGGER.error("catch exception:{}",exception.getMessage());
        if(EXCEPTIONS == null){
            EXCEPTIONS = builder.build();//EXCEPTIONS构建成功
        }
        //从EXCEPTIONS中找异常类型所对应的错误代码,如果找到了将错误代码响应给用户,如果找不到给用户响应99999异常
        ResultCode resultCode = EXCEPTIONS.get(exception.getClass());
        if(resultCode !=null){ //非空说明在map容器里
            return new ResponseResult(resultCode);
        }else{
            //返回99999异常
            return new ResponseResult(CommonCode.SERVER_ERROR);
        }


    }

    static {
        //静态代码块,优先顺序执行一次
        //定义异常类型所对应的错误代码
        builder.put(HttpMessageNotReadableException.class,CommonCode.INVALID_PARAM);
    }
}
接口Response
package com.xuecheng.framework.model.response;


public interface Response {
    public static final boolean SUCCESS = true;
    public static final int SUCCESS_CODE = 10000;
}
实现类ResponseResult
package com.xuecheng.framework.model.response;

import lombok.Data;
import lombok.NoArgsConstructor;
import lombok.ToString;


@Data
@ToString
@NoArgsConstructor
public class ResponseResult implements Response {

    //操作是否成功
    boolean success = SUCCESS;

    //操作代码
    int code = SUCCESS_CODE;

    //提示信息
    String message;

    public ResponseResult(ResultCode resultCode){
        this.success = resultCode.success();
        this.code = resultCode.code();
        this.message = resultCode.message();
    }

    public static ResponseResult SUCCESS(){
        return new ResponseResult(CommonCode.SUCCESS);
    }
    public static ResponseResult FAIL(){
        return new ResponseResult(CommonCode.FAIL);
    }

}
5.4.2 异常处理测试
仍然模拟“问题测试”中的测试步骤,异常结果为“非法参数”。