首先打开dfs与yarn。
主要就是三步走:
     1.map
       2.reduce
       3.driver写驱动将以上两个类关联,运行
一、编写WordcountMapper
package cn.mark.mrWordCount;
import org.apache.hadoop.io.IntWritable;
import org.apache.hadoop.io.LongWritable;
import org.apache.hadoop.io.Text;
import org.apache.hadoop.mapreduce.Mapper;

import java.io.IOException;
//map阶段
//Mapper<keyIn,value,keyOut,value>
//keyOut输出key的类型 <mark,1>,<fun,1>等  按照方法说明来
public class WordcountMapper extends Mapper<LongWritable, Text,Text, IntWritable> {
    @Override
    protected void map(LongWritable key, Text value, Context context) throws IOException, InterruptedException {
        Text k = new Text();
        IntWritable v = new IntWritable(1);//设置默认为1
//        1.获取文件中的一行内容(默认都是这样)
//          比如第一行为mark fun
        String line = value.toString();
//        2.切割单词
        String[] words = line.split(" ");
//        3.循环写出
        for (String word: words) {
//            写出的内容要按照上面KEYOU的类型,有Text和IntWritable

            k.set(word);    //k为mark
//            v.set(1);       //v为1
            context.write(k,v);

        }
    }
}
二、编写WordcountReducer
package cn.mark.mrWordCount;

import org.apache.hadoop.io.IntWritable;
import org.apache.hadoop.io.Text;
import org.apache.hadoop.mapreduce.Reducer;

import java.io.IOException;

//KEYIN,VALUEIN : 为map阶段输出的(k,v)
//KEYOUT,VALUEOUT : 最终输出的(k,v)

public class WordcountReducer extends Reducer<Text, IntWritable,Text,IntWritable> {
//   由于int与IntWritable(为一个类)类型不同,需要特别设置
    IntWritable v = new IntWritable();

    @Override
    protected void reduce(Text key, Iterable<IntWritable> values, Context context)
            throws IOException, InterruptedException {
//        1.累加求和
        int sum = 0;
        for (IntWritable value:values) {
            sum=sum+value.get();
        }
//        特别设置v
        v.set(sum);//类型转换
//        2.写出
        context.write(key,v);
    }
}
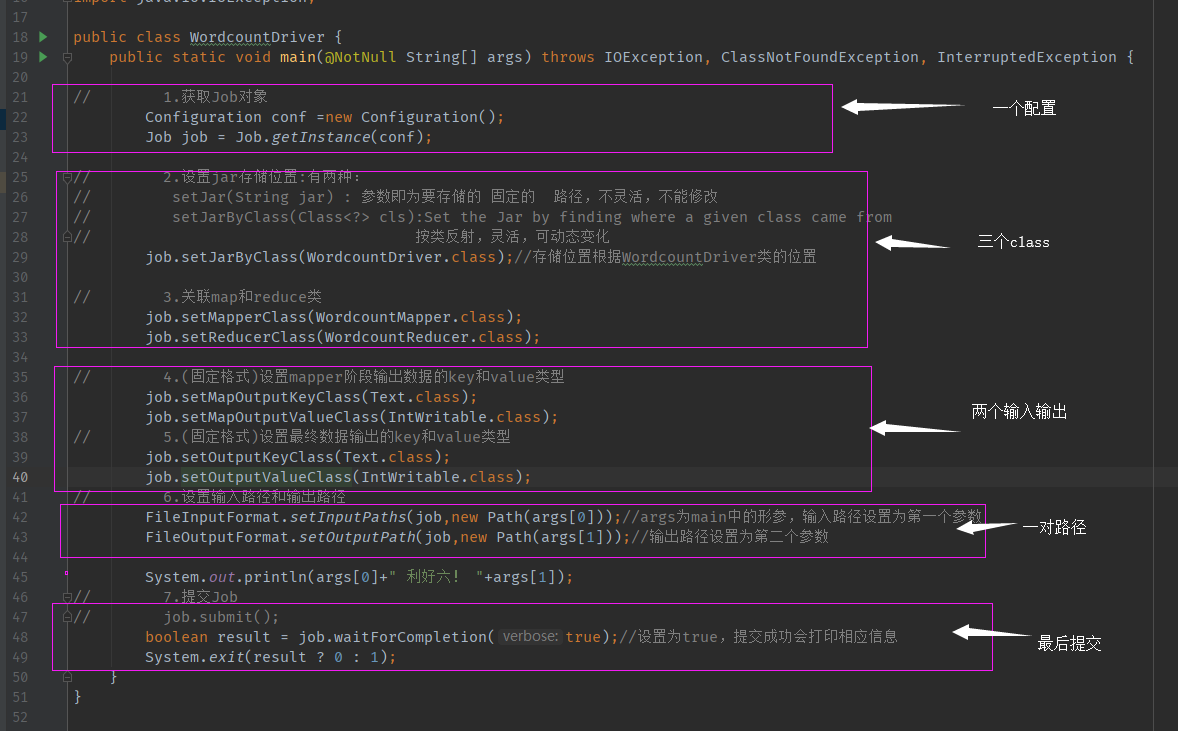
三、编写WordcountDriver
package cn.mark.mrWordCount;

//三步走:1.map
//       2.reduce
//       3.driver写驱动将以上两个类关联,运行

import org.apache.hadoop.conf.Configuration;
import org.apache.hadoop.fs.Path;
import org.apache.hadoop.io.IntWritable;
import org.apache.hadoop.io.Text;
import org.apache.hadoop.mapreduce.Job;
import org.apache.hadoop.mapreduce.lib.input.FileInputFormat;
import org.apache.hadoop.mapreduce.lib.output.FileOutputFormat;
import org.jetbrains.annotations.NotNull;

import java.io.IOException;

public class WordcountDriver {
    public static void main(@NotNull String[] args) throws IOException, ClassNotFoundException, InterruptedException {
//              此处标红的地方为在运行配置中所加入的参数,main里的参数很少用到,要用就要在运行时配置,如下图
//        1.获取Job对象
        Configuration conf =new Configuration();
        Job job = Job.getInstance(conf);

//        2.设置jar存储位置:有两种:
//         setJar(String jar) : 参数即为要存储的 固定的  路径,不灵活,不能修改
//         setJarByClass(Class<?> cls):Set the Jar by finding where a given class came from
//                                    按类反射,灵活,可动态变化
        job.setJarByClass(WordcountDriver.class);//存储位置根据WordcountDriver类的位置

//        3.关联map和reduce类
        job.setMapperClass(WordcountMapper.class);
        job.setReducerClass(WordcountReducer.class);

//        4.(固定格式)设置mapper阶段输出数据的key和value类型
        job.setMapOutputKeyClass(Text.class);
        job.setMapOutputValueClass(IntWritable.class);
//        5.(固定格式)设置最终数据输出的key和value类型
        job.setOutputKeyClass(Text.class);
        job.setOutputValueClass(IntWritable.class);
//        6.设置输入路径和输出路径
        FileInputFormat.setInputPaths(job,new Path(args[0]));//args为main中的形参,输入路径设置为第一个参数,下图
        FileOutputFormat.setOutputPath(job,new Path(args[1]));//输出路径设置为第二个参数,这种设置方式,可以便于打包后在集群上运行!

        System.out.println(args[0]+" 利好六! "+args[1]);
//        7.提交Job
//        job.submit();
        boolean result = job.waitForCompletion(true);//设置为true,提交成功会打印相应信息
   }
}

多数都是固定写法,会用即可!
顺便一提:如果在集群上运行:
1.maven install 打包之前的java程序为jar文件并改名为: wc.jar
2.上传该文件到集群的一个节点上
2.运行指令:hadoop jar wc.jar cn.mark.mrWordCount.WordcountDriver /user/mark/input/hello.txt /user/atguigu/output

欢迎留言交流!我的大数据菜鸟交流群,有你更精彩:875910806