"【画线drawLine】"
1.获取上下文件UIGraphicsGetCurrentContext();
2.设置起点CGContextMoveToPoint(ctx, 10, 10);
3.添加连接点AddLineToPoint(ctx, 110, 10);
4.渲染CGContextStrokePath(ctx);
5.设置线宽CGContextSetLineWidth(ctx, 3);
6.设置线的颜色CGContextSetRGBStrokeColor(ctx, 1, 0, 0, 1);
7.再添加1个连接点完成矩形绘制
8.设置线的首尾样式CGContextSetLineCap(ctx, kCGLineCapButt);
9.设置线的连接样式CGContextSetLineJoin(ctx, kCGLineJoinRound);
KCGLineJoinMiter 折点 KCGLineJoinRound 圆点 KCGLineJoinBevel 切点
Main.storyboard

"【画矩形drawRectangle】"
1.获取上下文件UIGraphicsGetCurrentContext();
2.设置起点,并连接四个点成为矩形
*CGContextMoveToPoint(ctx, 10, 10)
*AddLineToPoint(ctx, 110, 10);
*AddLineToPoint(ctx, 110, 110);
*AddLineToPoint(ctx, 110, 10);
*AddLineToPoint(ctx, 10, 10);
3.画空心CGContextStrokePath(ctx)
4.画实心CGContextFillPath(ctx);
5.使用CGContextStrokeRect();/ CGContextFillRect(); 画矩形
"【画三角形triangle】"
1.获取上下文件UIGraphicsGetCurrentContext();
2.设置起点,并连接三个点
3.关闭路径CGContextClosePath(ctx);
4.渲染CGContextStrokePath(ctx)
"【画圆circle】"
CGContextAddEllipseInRect(context, CGRectMake(10, 10, 100, 100));
"【画弧arc】"
//x y 圆点
//radius 半径
//startAngle 开始角度
//endAngle 结束角度
//clockwise 圆弧的伸展方向 0 顺时针 1 逆时针
CGContextAddArc(context, 100, 100, 50, 0, M_PI_2, 1);
//1顺时针 0
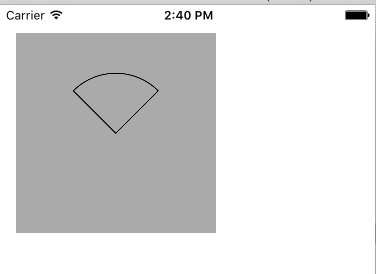
"【画扇形sector】"
//设置扇形路径的起点
CGContextMoveToPoint(context, 100, 100);
CGContextAddArc(context, 100, 100, 50, M_PI_4, 3 * M_PI_4, 0);
CGContextClosePath(context);
LineView.h
#import <UIKit/UIKit.h>
@interface LineView : UIView
@end
LineView.m
//
// LineView.m
// A05.画线
//
// Created by huan on 16/1/27.
// Copyright © 2016年 huanxi. All rights reserved.
//
#import "LineView.h"
@implementation LineView
/*
// Only override drawRect: if you perform custom drawing.
// An empty implementation adversely affects performance during animation.
*/
-(void)drawRectangle{
// 绘一条
//获取上下文 上下文的输出目录是 self[view]
CGContextRef context = UIGraphicsGetCurrentContext();
//设置线颜色
CGContextSetRGBStrokeColor(context, 1.0, 0.0, 0.0, 1);
// 设置线宽
CGContextSetLineWidth(context, 13);
// 画一条线
//设置线的头尾的样式
CGContextSetLineCap(context, kCGLineCapButt);
//设置连接点的样式
CGContextSetLineJoin(context, kCGLineJoinBevel);
//画一个矩形
//==========第一种方法===================
//设置一起点
// CGContextMoveToPoint(context, 10, 10);
//设置连线另外三点
// CGContextAddLineToPoint(context, 110, 10);
// CGContextAddLineToPoint(context, 110, 110);
// CGContextAddLineToPoint(context, 10, 110);
// CGContextAddLineToPoint(context, 10, 10);
//=============第二种方法============
CGContextAddRect(context, CGRectMake(10, 10, 100, 100));
//画到view[渲染](空心)
// CGContextStrokePath(context);
//填充(实心)
CGContextFillPath(context);
}
- (void)drawRect:(CGRect)rect {
// Drawing code
// [self drawRectangle];
[self drawTriangle];//三角形
// [self drawCircle];
// [self drawArc];//弧
// [self drawSector];//扇形
}
-(void)drawTriangle{
//获取上下文 上下文的输出目录是 self[view]
CGContextRef context = UIGraphicsGetCurrentContext();
//设置线颜色
//设置一起点
CGContextMoveToPoint(context, 10, 10);
//设置连线另外两点
CGContextAddLineToPoint(context, 110, 10);
CGContextAddLineToPoint(context, 110, 110);
// CGContextAddLineToPoint(context, 10, 10);
//关闭路径
CGContextClosePath(context);
//画到view[渲染](空心)
CGContextStrokePath(context);
}
-(void)drawCircle{
//上下文
CGContextRef context = UIGraphicsGetCurrentContext();
//画圈
CGContextAddEllipseInRect(context, CGRectMake(10, 10, 100, 100));
//渲染
CGContextStrokePath(context);
}
-(void)drawArc{
//上下文
CGContextRef context = UIGraphicsGetCurrentContext();
// x,y 圆心 radius 半径 startAngle 画弧的起始位置 endAngle画弧的结束位置 clockwidse 0 顺时针 1 逆时针
CGContextAddArc(context, 100, 100, 60, 0, M_PI, 1);
CGContextClosePath(context);
//渲染
CGContextStrokePath(context);
// CGContextFillPath(context);
}
-(void)drawSector{
//上下文
CGContextRef context = UIGraphicsGetCurrentContext();
//设置起点
CGContextMoveToPoint(context, 100, 100);
// x,y 圆心 radius 半径 startAngle 画弧的起始位置 endAngle画弧的结束位置 clockwidse 0 顺时针 1 逆时针
CGContextAddArc(context, 100, 100, 60, -M_PI_4, -3 * M_PI_4, 1);
CGContextClosePath(context);
//渲染
CGContextStrokePath(context);
}
@end


"【画文字和图片】"
调用文字或者图片的drawAtPoint:或drawInRect方法
文字可设置属性
@{NSFontAttributeName:[UIFont systemFontOfSize:15],NSForegroundColorAttributeName:[UIColor redColor]};
图片
可view上画图片调用drawAtPoint:或drawInRect方法
drawAsPatternInRect可以平铺图片
Main.storyboard

TextImageView.m
//
// TextImageView.m
// B04.画文字和图片
//
// Created by huan on 16/1/27.
// Copyright © 2016年 huanxi. All rights reserved.
//
#import "TextImageView.h"
@implementation TextImageView
/*
// Only override drawRect: if you perform custom drawing.
// An empty implementation adversely affects performance during animation.
*/
- (void)drawRect:(CGRect)rect {
// Drawing code
//画图片
UIImage *image = [UIImage imageNamed:@"papa"];
// [image drawAtPoint:CGPointZero];
// [image drawInRect:CGRectMake(10, 10, 50, 50)];
//平铺
[image drawAsPatternInRect:CGRectMake(0, 0, 180, 180)];
//画文字
NSString *text = @"adbsdfdsfskhjkhjkhjkhjkhkjhjkhkjhjkhjkhjkhjkhjkhjkhjkhhjkhjkhkjhkjhjkjkhad";
CGFloat w = rect.size.width;
CGFloat h = rect.size.height;
//这个方法不会换行
// [text drawAtPoint:CGPointZero withAttributes:nil];
// [text drawAtPoint:CGPointMake(10, 100) withAttributes:nil];
//设置字体的样式
NSDictionary *attr = @{NSFontAttributeName:[UIFont systemFontOfSize:13], NSForegroundColorAttributeName:[UIColor yellowColor]};
//指定宽度和高度 可以换行 当超过高度时, 不会换行,同时,内容也少了。
[text drawInRect:CGRectMake(0, 0, w, h * 0.5) withAttributes:attr];
}
@end

"【画进度圈】"

ViewController.m
//
// ViewController.m
// B05.进度圈
//
// Created by huan on 16/1/27.
// Copyright © 2016年 huanxi. All rights reserved.
//
#import "ViewController.h"
#import "ProgressCircle.h"
@interface ViewController ()
@property (weak, nonatomic) IBOutlet ProgressCircle *progressCircle;
@end
@implementation ViewController
- (void)viewDidLoad {
[super viewDidLoad];
}
-(IBAction)sliderChange:(UISlider *)sender{
NSLog(@"%f", sender.value);
self.progressCircle.progress = sender.value;
}
@end
ProgressCircle.h
#import <UIKit/UIKit.h>
@interface ProgressCircle : UIView
//进度 0~1
@property (nonatomic, assign) float progress;//进度
@end
ProgressCircle.m
//
// ProgressCircle.m
// B05.进度圈
//
// Created by huan on 16/1/27.
// Copyright © 2016年 huanxi. All rights reserved.
//
#import "ProgressCircle.h"
@implementation ProgressCircle
/*
// Only override drawRect: if you perform custom drawing.
// An empty implementation adversely affects performance during animation.
*/
- (void)drawRect:(CGRect)rect {//当显示在屏幕上会调用
// Drawing code
CGFloat textH = 20;
CGFloat textW = 30;
CGFloat viewW = rect.size.width;
CGFloat viewH = rect.size.height;
CGFloat textX = (viewW - textW) * 0.5;
CGFloat textY = (viewH - textH) * 0.5;
//1.画文字
NSString *text = [NSString stringWithFormat: @"%.2f", self.progress];
[text drawInRect:CGRectMake(textX, textY, textW, textH) withAttributes:nil];
//2.画弧
CGContextRef context = UIGraphicsGetCurrentContext();
CGFloat radius = (viewW - 10) * 0.5;
CGFloat endAngle = self.progress * 2 * M_PI - M_PI_4;
CGContextAddArc(context, viewW * 0.5, viewH * 0.5, radius, -M_PI_4, endAngle, 0);
CGContextStrokePath(context);
}
-(void)setProgress:(float)progress{
_progress = progress;
//重绘
[self setNeedsDisplay];
}
@end

小黄人"空"
Main.storyboard

HuangView.m
//
// HuangView.m
// B06.小黄人
//
// Created by huan on 16/1/27.
// Copyright © 2016年 huanxi. All rights reserved.
//
#import "HuangView.h"
#define topMargin 50 //头距离控制器view顶部的距离
#define middleH 150 //头部中间的高度
#define radius 80 //圆的半径
#define glassesH 30 //眼镜框的高度
@implementation HuangView
/*
// Only override drawRect: if you perform custom drawing.
// An empty implementation adversely affects performance during animation.
*/
- (void)drawRect:(CGRect)rect {
// Drawing code
//上下文
CGContextRef context = UIGraphicsGetCurrentContext();
//1.画头部
[self drawHead:rect context:context];
CGFloat viewCenterX = rect.size.width * 0.5;
CGFloat topCenterY = topMargin +radius;
//2.眼镜
//2.1 眼框
[[UIColor blackColor] set];
CGFloat padding = 5;//间距
CGContextAddRect(context, CGRectMake(viewCenterX - radius - padding, topCenterY, (radius + padding) * 2, glassesH));
CGContextFillPath(context);
//2.2 大眼睛
//画左边白色圆圈
[[UIColor whiteColor] set];
CGFloat whiteRadius = radius * 0.4;
CGContextAddArc(context, viewCenterX - whiteRadius, topCenterY + glassesH * 0.5, whiteRadius, 0, 2 * M_PI, 0);
CGContextFillPath(context);
//画右边白色圆圈
CGContextAddArc(context, viewCenterX + whiteRadius, topCenterY + glassesH * 0.5, whiteRadius, 0, 2 * M_PI, 0);
CGContextFillPath(context);
//画左边黑色空心圆
[[UIColor blackColor] set];
CGContextSetLineWidth(context, 10);
CGContextAddArc(context, viewCenterX - whiteRadius, topCenterY + glassesH * 0.5, whiteRadius, 0, 2 * M_PI, 0);
CGContextStrokePath(context);
CGContextAddArc(context, viewCenterX + whiteRadius, topCenterY + glassesH * 0.5, whiteRadius, 0, 2 * M_PI, 0);
CGContextStrokePath(context);
//2.3 眼珠
//3.画头发
//4.画晓嘴
}
-(void)drawHead:(CGRect)rect context:(CGContextRef)context{
CGFloat viewCenterX = rect.size.width * 0.5;
CGFloat topCenterY = topMargin +radius;
//1.画头部
//1.1 顶部
//设置颜色
[[UIColor yellowColor] set];
CGContextAddArc(context, viewCenterX, topCenterY, radius, 0, M_PI, 1);
CGContextFillPath(context);
//1.2 中间
CGContextAddRect(context, CGRectMake(viewCenterX - radius, topCenterY, radius * 2, middleH));
CGContextFillPath(context);
//1.3 尾部
CGContextAddArc(context, viewCenterX, topCenterY + middleH, radius, 0, M_PI, 0);
CGContextFillPath(context);
}
@end
