一.Ajax
Ajax是一种浏览器向服务端发送请求发送交互的形式。
1.地址栏输入URL,默认get请求
2.form表单提交按钮,使用method指定请求方式,get或post
3.a标签的形式,默认get请求
4.Ajax
1.Ajax特点:
1.异步
同步交互:客户端发出一个请求后,需要等待服务器响应完成,才能进行后续的操作。
异步交互:客户端发出一个请求后,无序等待服务器响应完成,就能进行其他操作。
2.局部刷新
2.示例:


$(".btn").click(function(){
    $.ajax({
        url:"/handle_ajax",
        type:"get",
        success:function(response){
               console.log(response)
       }
    })
})
3.json数据:
json数据
+-------------------+---------------+
| Python | JSON |
+===================+===============+
| dict | object |
+-------------------+---------------+
| list, tuple | array |
+-------------------+---------------+
| str | string |
+-------------------+---------------+
| int, float | number |
+-------------------+---------------+
| True | true |
+-------------------+---------------+
| False | false |
+-------------------+---------------+
| None | null |
+-------------------+---------------+
python使用json
import json


# d={"name":"alex"}
#
#
# s=json.dumps(d)
#
#
# with open("json.txt","w") as f:
#     f.write(s)


with open("data.txt","r") as f:
    data=f.read()

data=json.loads(data)

print(data)
js中使用json
<!DOCTYPE html>
<html lang="zh-CN">
<head>
    <meta charset="UTF-8">
    <title>Title</title>
    <meta name="viewport" content="width=device-width, initial-scale=1">

    <script>

        var i=10;
        var s='hello';
        var arr=["123",456,true];
        var obj={name:'alex',age:23};

        console.log(JSON.stringify(s));
        console.log(JSON.stringify(arr));
        console.log(JSON.stringify(obj));


      // console.log(JSON.parse(s));
      // console.log(JSON.parse(arr));
      console.log(JSON.parse('{"name":"alex","age":18}'))
        /*
        *     序列化方法:  JSON.stringify()  等同于Python json.dumps()
        *    反序列化方法: JSON.parse()      等同于Python json.loads()
        *
        *
        * */


    </script>
</head>
<body>

</body>
</html>
基于ajax的模拟登陆验证
from django.db import models


# Create your models here.


class UserInfo(models.Model):
    user = models.CharField(max_length=32)
    pwd = models.CharField(max_length=32)
from django.contrib import admin
from django.urls import path
from ajax import views

urlpatterns = [
    path('admin/', admin.site.urls),
    path('index/', views.index),
    path('handler/ajax/', views.handler_ajax),
    path('login/', views.login)
]
from django.shortcuts import render, HttpResponse
from ajax.models import UserInfo
import json


# Create your views here.


def login(request):
    if request.method == 'GET':
        return render(request, 'login.html')
    else:
        user = request.POST.get('user')
        pwd = request.POST.get('pwd')
        user_check = {'user': None, 'error': ''}
        user_obj = UserInfo.objects.filter(user=user, pwd=pwd).first()
        print(request.POST)
        if user_obj:
            user_check['user'] = user
        else:
            user_check['error'] = '用户名密码错误'
        user_check = json.dumps(user_check)
        return HttpResponse(user_check)


def index(request):
    return render(request, 'index.html')


def handler_ajax(request):
    return HttpResponse('党帅你好!')
<!DOCTYPE html>
<html lang="en">
<head>
    <meta charset="UTF-8">
    <title>Title</title>
    <script src="/static/js/jquery.js"></script>
</head>
<body>
<form>
    <label for="user">用户名</label>
    <input type="text" id="user">
    <label for="pwd">密码</label>
    <input type="password" id="pwd">
    <input type="button" id="submit" value="提交"> <span class="error"></span>
    {% csrf_token %}
</form>
<script>
            $('#submit').click(function () {
            $.ajax({
                url: "/login/",
                type: "post",
                data: {
                    user: $('#user').val(),
                    pwd: $('#pwd').val(),
                    csrfmiddlewaretoken: $("input[name ='csrfmiddlewaretoken']").val()
                },
                success: function (response) {
                    rsp = JSON.parse(response);
                    if (rsp.user) {
                        location.href='/index/'
                    } else {
                        $('.error').text(rsp.error).css('color', 'red')
                    }
                    setTimeout(function () {
                        $('.error').text('')
                    }, 3000)
                }
            })
        })
</script>
</body>
</html>
<!DOCTYPE html>
<html lang="en">
<head>
    <meta charset="UTF-8">
    <title>Title</title>
    <script src="/static/js/jquery.js"></script>
</head>
<body>
<button class="show">提交ajax</button>
<p class="message"></p>
<hr>

<script>
    $(function () {
        $('.show').click(function () {
            $.ajax({
                url: '/handler/ajax/',
                type: 'GET',
                success: function (response) {
                    $('.message').html(response)
                }
            })
        });
    })
</script>
</body>
</html>
STATIC_URL = '/static/'
STATICFILES_DIRS = [
    os.path.join(BASE_DIR, 'static')
]
二 contentType
ContentType指的是请求体的编码类型,常见的类型共有3种:
1 application/x-www-form-urlencoded
这应该是最常见的 POST 提交数据的方式了。浏览器的原生 <form> 表单,如果不设置 enctype 属性,那么最终就会以 application/x-www-form-urlencoded 方式提交数据。请求类似于下面这样(无关的请求头在本文中都省略掉了):
POST http://www.example.com HTTP/1.1
Content-Type: application/x-www-form-urlencoded;charset=utf-8

user=yuan&age=22
2 multipart/form-data
这又是一个常见的 POST 数据提交的方式。我们使用表单上传文件时,必须让 <form> 表单的 enctype 等于 multipart/form-data。直接来看一个请求示例:
POST http://www.example.com HTTP/1.1
Content-Type:multipart/form-data; boundary=----WebKitFormBoundaryrGKCBY7qhFd3TrwA

------WebKitFormBoundaryrGKCBY7qhFd3TrwA
Content-Disposition: form-data; name="user"

yuan
------WebKitFormBoundaryrGKCBY7qhFd3TrwA
Content-Disposition: form-data; name="file"; filename="chrome.png"
Content-Type: image/png

PNG ... content of chrome.png ...
------WebKitFormBoundaryrGKCBY7qhFd3TrwA--
这个例子稍微复杂点。首先生成了一个 boundary 用于分割不同的字段,为了避免与正文内容重复,boundary 很长很复杂。然后 Content-Type 里指明了数据是以 multipart/form-data 来编码,本次请求的 boundary 是什么内容。消息主体里按照字段个数又分为多个结构类似的部分,每部分都是以 --boundary 开始,紧接着是内容描述信息,然后是回车,最后是字段具体内容(文本或二进制)。如果传输的是文件,还要包含文件名和文件类型信息。消息主体最后以 --boundary-- 标示结束。关于 multipart/form-data 的详细定义,请前往 rfc1867 查看。
这种方式一般用来上传文件,各大服务端语言对它也有着良好的支持。
上面提到的这两种 POST 数据的方式,都是浏览器原生支持的,而且现阶段标准中原生 <form> 表单也只支持这两种方式(通过 <form> 元素的 enctype 属性指定,默认为 application/x-www-form-urlencoded。其实 enctype 还支持 text/plain,不过用得非常少)。
随着越来越多的 Web 站点,尤其是 WebApp,全部使用 Ajax 进行数据交互之后,我们完全可以定义新的数据提交方式,给开发带来更多便利。
3 application/json
application/json 这个 Content-Type 作为响应头大家肯定不陌生。实际上,现在越来越多的人把它作为请求头,用来告诉服务端消息主体是序列化后的 JSON 字符串。由于 JSON 规范的流行,除了低版本 IE 之外的各大浏览器都原生支持 JSON.stringify,服务端语言也都有处理 JSON 的函数,使用 JSON 不会遇上什么麻烦。
JSON 格式支持比键值对复杂得多的结构化数据,这一点也很有用。记得我几年前做一个项目时,需要提交的数据层次非常深,我就是把数据 JSON 序列化之后来提交的。不过当时我是把 JSON 字符串作为 val,仍然放在键值对里,以 x-www-form-urlencoded 方式提交。
4 服务端视图层获取数据的方式
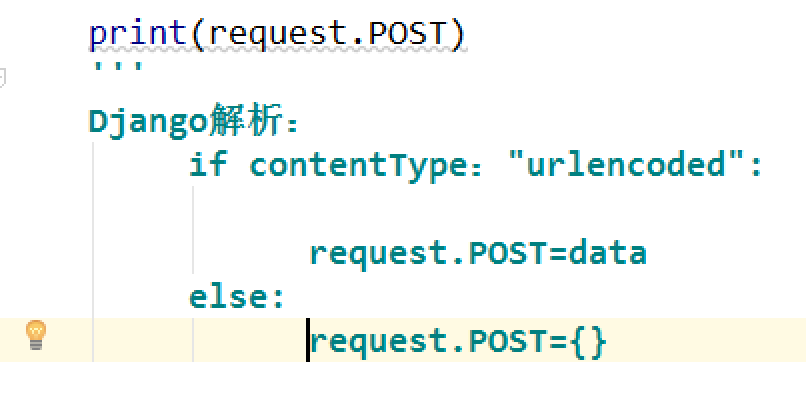
1.request.POST # POST请求体数据
2.request.GET # GET请求体数据
3.request.body # 原始的请求体数据,此种方式获取json数据
4.request.FILES # 上传的文件数据

http协议请求格式
http请求头:
post url http
user_agent:........................
accept:............................
ContenType: application/x-www-form-urlencoded
#指定请求体的数据封装格式
http请求体:
a=1&b=2&c=3 #application/x-www-form-urlencoded 数据封装格式:
{"a":1,"b":2,"c":3} #json 数据封装格式
django默认解析请求体数据过程:
http协议请求格式
浏览器------------------>服务器
<------------------
http协议响应格式
5.ajax上传json数据
三.文件上传
form表单文件上传
form表单需要设置下面两个属性,设置请求方式为post,需要设置http请求体数据格式为multipart/form-data
method="post"
enctype="multipart/form-data"
index.html
<form action="" method="post" enctype="multipart/form-data"
>
    {% csrf_token %}
    <label for="user">用户名</label>
    <input type="text" name="user" id="user">
    <label for="upload_file">文件名</label>
    <input type="file" name="file_obj" id="upload_file">
    <input type="submit">
</form>
views.py
def index(request):
    if request.method == "POST":
        # 获取文件对象
        file_obj = request.FILES.get('file_obj')
        # 设置文件保存的路径
        file_path = os.path.join(settings.BASE_DIR, 'media', 'img', file_obj.name)
        # 普通的表单数据还是通过request.POST获取
        user = request.POST.get('user')
        with open(file_path, 'wb') as f:
            for line in file_obj:
                f.write(line)

        return HttpResponse('%s上传%s成功!' % (user, file_obj.name))
    else:
        return render(request, 'index.html')
检查请求头:
Content-Type: multipart/form-data; boundary=----WebKitFormBoundarybEf6nyzoYAbyeIpg
Ajax 上传文件
index.html
<div>
    <label for="user">用户名</label>
    <input type="text" name="user" id="user_msg">
    <label for="upload_file">文件名</label>
    <input type="file" name="file_obj" id="img_file">
    <button class="upload_btn">提交</button>
    <p class="state_msg"></p>
</div>
upload.js
        $('.upload_btn').click(function () {
            // 如果用ajax上传文件需要使用ForData对象组装请求体数据
            let formdata = new FormData();
            // $('#img_file')[0].files[0] 获取input上传文件的数据
            formdata.append('file_obj', $('#img_file')[0].files[0]);
            // 普通的input数据也可以一起发送
            formdata.append('user', $('#user_msg').val());
            $.ajax({
                url: '',
                // 上传都是用post的方式
                type: 'post',
                // 不设置请求体数据格式类型
                contentType: false,
                // 不处理数据,直接源数据发送
                processData: false,
                // 上传FormData类型数据
                data: formdata,
                success: function (response) {
                    $('.state_msg').html(response)
                }
            })
        })
需要注意的是:当使用ajax上传文件时,上面的形式的几乎是固定格式了,contentType:false 和 processData:false 是必须的。
views.py
def index(request):
    if request.method == "POST":
        # 获取文件对象
        file_obj = request.FILES.get('file_obj')
        # 设置文件保存的路径
        file_path = os.path.join(settings.BASE_DIR, 'media', 'img', file_obj.name)
        # 普通的表单数据还是通过request.POST获取
        user = request.POST.get('user')
        with open(file_path, 'wb') as f:
            for line in file_obj:
                f.write(line)

        return HttpResponse('%s上传%s成功!' % (user, file_obj.name))
    else:
        return render(request, 'index.html')
这里可以看到,服务端接受处理请求数据的代码和form表单上传文件的形式是一样的。
检查浏览器的请求头:
Content-Type: multipart/form-data; boundary=----WebKitFormBoundaryPBkqKYGqhNC3SSZT