目录 :
基础
网络访问
数据管理
镜像构建
仓库
杂谈
--Docker 资源隔离
--Docker 资源限制
--Docker 网络模式
1:在 linux 64位上跑 (win不是不行,基本不用)
2:安装 https://docs.docker.com/install/linux/docker-ce/centos/ (yum 安装 挺快)
( 安装完后注意 Docker中配置国内镜像 不然pull的时候特慢 )
学习时 版本为
======================================================================
Package Arch Version Repository Size
======================================================================
Installing:
docker-ce x86_64 18.03.1.ce-1.el7.centos docker-ce-stable 35 M
2:启动 systemctl start docker
3:一些命令
[root@192 ~]#
docker search centos
名称 描述 星数 官方的 自动构建
NAME DESCRIPTION STARS OFFICIAL AUTOMATED
centos The official build of CentOS. 4214 [OK]
ansible/centos7-ansible Ansible on Centos7 109 [OK]
(名称格式介绍 官方的就算了 看这个 ansible/centos7-ansible ansible表示用户名 centos7-ansible表示项目名)
docker pull centos(就是 search 出来的 NAME) pull的时候挺慢的...
docker images 查看当前有的镜像
[root@192 ~]# docker images
跟search出来的NAME相同 镜像唯一id 这个是此镜像产生的时间
REPOSITORY TAG IMAGE ID CREATED SIZE
redis latest bfcb1f6df2db 2 days ago 107MB
docker rmi xxx 删除镜像
关键语句 : 基于镜像创建容器
docker run centos /bin/echo 'hello word' (运行centos镜像下的 /bin/echo 命令 参数为 "hello word" 运行时带名字加 --name xxx)
docker run --name LPfirstContainer -it centos /bin/bash (-it是两个参数的缩写 用了-it运行命令后不会退出docker容器 比较没用 还是用下面介绍的 -d 吧) 效果:
1:若没有 centos 镜像 会自动 pull 下来
2:会分配一个文件系统 在这个centos镜像位置的上一层 并让它可写 同时还会分配一个ip地址
3:最后会运行指定的命令或应用程序 就是后面的 /bin/bash (当 命令或应用程序退出 容器就会退出)
4:退出输入 exit 即可
[root@192 ~]# docker run --name LPfistContainer -it centos /bin/bash
[root@a3ba6ef4d0cc /]#
docker ps -a 可以看到运行的容器和停止运行的容器
[root@192 ~]# docker ps -a
CONTAINER ID        IMAGE               COMMAND                  CREATED              STATUS                          PORTS               NAMES(如果启动时不指定名字 会自动生成个)
6c03fff6f519        centos              "/bin/echo 'hello wo…"   About a minute ago   Exited (0) About a minute ago                       distracted_heisenberg
docker start (CONTAINER ID) 重启停了的容器
docker run -d --name mydocker11 centos (-d在后台启动容器 会返回容器ID 通过 docker ps -a 看到的容器ID会短点)
[root@192 ~]# docker run -d --name nginxfirst nginx
f2e8b29c9be7f85f61c62b1fa0c09838dcd79ee3d8c302f4c51e901c776371b4
[root@192 ~]# docker ps -a
CONTAINER ID        IMAGE               COMMAND                  CREATED             STATUS                     PORTS               NAMES
f2e8b29c9be7        nginx               "nginx -g 'daemon of…"   6 minutes ago       Up 6 minutes               80/tcp              nginxfirst
a3ba6ef4d0cc        centos              "/bin/bash"              2 hours ago         Exited (127) 2 hours ago                       LPfistContainer
6c03fff6f519        centos              "/bin/echo 'hello wo…"   3 hours ago         Exited (0) 3 hours ago                         distracted_heisenberg
[root@192 ~]#
docker stop (CONTAINER ID) 停止容器运行
docker rm (CONTAINER ID) 删除容器,容器得是停止状态 或者加 -f ,后面可跟多个容器ID 空格区分
docker attach (CONTAINER ID) 进入容器 靠谱的方式在下一条命令
[root@192 ~]# docker run --name nginxfff -d nginx
ee3888788a3ffa8e7c1ae72c58670fb2ed41e9868f0e4cea1254d49f4542283f
[root@192 ~]# docker ps -a
CONTAINER ID        IMAGE               COMMAND                  CREATED             STATUS              PORTS               NAMES
ee3888788a3f        nginx               "nginx -g 'daemon of…"   2 seconds ago       Up 1 second         80/tcp              nginxfff
[root@192 ~]# docker attach ee3888788a3f   (有些容器不能这样进入或者进去的几率低...  结果得 ctrl+c 最终结果是容器停止了)
^C[root@192 ~]# docker ps -a
CONTAINER ID        IMAGE               COMMAND                  CREATED              STATUS                    PORTS               NAMES
ee3888788a3f        nginx               "nginx -g 'daemon of…"   About a minute ago   Exited (0) 1 second ago                       nginxfff
[root@192 ~]#
nsenter 通过容器的 Pid 进入容器 容器得是启动状态 没有这个命令的话 linux 装下这个软件包 yum install util-linux 推荐的进入方法
1:首先获取容器Pid : docker inspect --format "{{.State.Pid}}" (容器名或容器ID)
[root@192 ~]# docker ps -a
CONTAINER ID        IMAGE               COMMAND                  CREATED             STATUS                      PORTS               NAMES
ee3888788a3f        nginx               "nginx -g 'daemon of…"   14 minutes ago      Exited (0) 12 minutes ago                       nginxfff
[root@192 ~]# docker start ee3888788a3f
ee3888788a3f
[root@192 ~]# docker ps -a
CONTAINER ID        IMAGE               COMMAND                  CREATED             STATUS              PORTS               NAMES
ee3888788a3f        nginx               "nginx -g 'daemon of…"   15 minutes ago      Up 1 second         80/tcp              nginxfff
[root@192 ~]# docker inspect --format "{{.State.Pid}}" nginxfff
4231
[root@192 ~]# docker inspect --format "{{.State.Pid}}" ee3888788a3f
4231
[root@192 ~]#
2:nsenter --target Pid值 --mount --uts --ipc --net --pid
[root@192 ~]# docker inspect --format "{{.State.Pid}}" ee3888788a3f
4231
[root@192 ~]# nsenter --target 4231 --mount --uts --ipc --net --pid
mesg: ttyname failed: No such file or directory
root@ee3888788a3f:/#    (退出 exit 退出后容器不会停止)
由于这两条命令经常用 脚本如下: (赋予脚本执行权限 chmod +x *.sh)
[root@test-node1 ~]# cat in.sh
#!/bin/bash
CNAME=$1
CPID=$(docker inspect --format "{{.State.Pid}}" $CNAME)
nsenter --target "$CPID" --mount --uts --ipc --net --pid
[root@test-node1 ~]#
网络访问
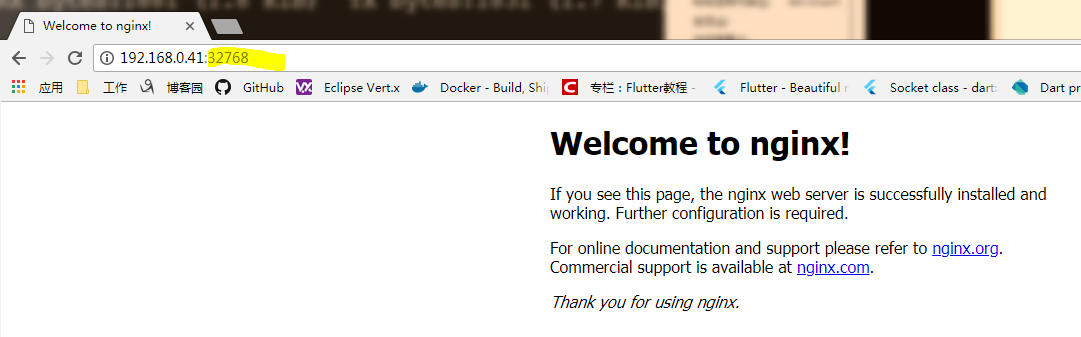
随机映射 : docker run -d -P --name mynginx1 nginx 启动 并随机映射端口 以下显示docker的80端口被映射到主机的32768端口
[root@192 ~]# docker ps -a
CONTAINER ID        IMAGE               COMMAND             CREATED             STATUS              PORTS               NAMES
[root@192 ~]# docker run -d -P --name mynginx1 nginx
2b0f1c1f585888c9189ba099afe75b54d9e77d60743866771e89369f2334f52c
[root@192 ~]# docker ps -l
CONTAINER ID        IMAGE               COMMAND                  CREATED             STATUS              PORTS                   NAMES
2b0f1c1f5858        nginx               "nginx -g 'daemon of…"   14 seconds ago      Up 12 seconds       0.0.0.0:32768->80/tcp   mynginx1
[root@192 ~]# docker ps -a
CONTAINER ID        IMAGE               COMMAND                  CREATED             STATUS              PORTS                   NAMES
2b0f1c1f5858        nginx               "nginx -g 'daemon of…"   21 seconds ago      Up 20 seconds       0.0.0.0:32768->80/tcp   mynginx1
[root@192 ~]#
指定映射 : docker run -d -p 91:80 --name mynginx2 nginx 启动 并指定映射端口 以下显示docker的80端口被映射到主机的91端口
[root@192 ~]# docker run -d -p 91:80 --name mynginx2 nginx
673fae5f191c26e0881bf4186d2bfdf56f61aaf67226b269e70935914fbacc7a
[root@192 ~]# docker ps -l
CONTAINER ID        IMAGE               COMMAND                  CREATED             STATUS              PORTS                NAMES
673fae5f191c        nginx               "nginx -g 'daemon of…"   2 seconds ago       Up 1 second         0.0.0.0:91->80/tcp   mynginx2
[root@192 ~]#
-p hostPort:containerPort
-p ip:hostPort:containerPort 主机有多个ip
-p ip::containerPort 主机有多个ip
-p hostPort:containerPort 这条命令可多次执行 但别执行一样的
-p hostPort:containerPort
数据管理
docker 的两种数据存储方案 一 数据卷,二 数据卷容器
一 数据卷
                                      主机名    使用数据卷    创建的数据卷叫data

          docker run -it --name volume-test1 -h   centoss   -v       /data         centos
[root@192 ~]# docker run -it --name volume-test1 -h centoss -v /data centos
[root@centoss /]# cd data (有这个目录了)
[root@centoss data]# ll
total 0
[root@centoss data]#
对比这个看看
[root@192 ~]# docker run -it --name volume-test1 centos
[root@ae83f6c898ad /]# cd data
bash: cd: data: No such file or directory
[root@ae83f6c898ad /]#
具体的这个 数据卷对应主机的目录是哪呢
docker inspect volume-test1(找到里面的 Mounts 或可以写成这样 docker inspect volume-test1 | grep Mounts -A 10)
        "Mounts": [
            {
                "Type": "volume",
                "Name": "be6ab5ff053cc22309b7734de8dc26decfb5a23fa9aac853cba65ff3e4be1336",
                "Source": "/var/lib/docker/volumes/be6ab5ff053cc22309b7734de8dc26decfb5a23fa9aac853cba65ff3e4be1336/_data",
                "Destination": "/data",
                "Driver": "local",
                "Mode": "",
                "RW": true,
                "Propagation": ""
            }
        ],
如:
[root@192 ~]# docker ps -a
CONTAINER ID        IMAGE               COMMAND             CREATED             STATUS                     PORTS               NAMES
beec10aa8689        centos              "/bin/bash"         9 minutes ago       Exited (0) 9 minutes ago                       volume-test1
[root@192 ~]# docker start beec10aa8689
beec10aa8689
[root@192 ~]# docker ps -a
CONTAINER ID        IMAGE               COMMAND             CREATED             STATUS              PORTS               NAMES
beec10aa8689        centos              "/bin/bash"         10 minutes ago      Up 2 seconds                            volume-test1
[root@192 ~]# ./in.sh beec10aa8689
[root@centoss /]# cd data/
[root@centoss data]# vi hello_docker
hahaha~
~
~
~
"hello_docker" [New] 1L, 8C written
[root@centoss data]# exit
logout
[root@192 ~]# more /var/lib/docker/volumes/be6ab5ff053cc22309b7734de8dc26decfb5a23fa9aac853cba65ff3e4be1336/_data/hello_docker
hahaha~
[root@192 ~]#
指定物理主机目录 挂载到容器上去
物理的opt目录:容器的opt目录 opt目录后别再加/(斜线)
docker run -it --name volume-test2 -h centosxx -v /opt:/opt centos
docker run -it --name volume-test2 -h centosxx -v /opt:/opt:ro centos 挂载为只读
二 数据卷容器
volume-test4的数据卷来自于volume-test1(就算volume-test1是停的也没关系,volume-test4也能访问到)
docker run -it --name volume-test4 --volumes-from volume-test1 centos
[root@192 ~]# docker run -it --name volume-test1 -h centoss -v /datass centos
[root@centoss /]# cd datass/
[root@centoss datass]# exit
exit
[root@192 ~]# docker run -it --name volume-test4 --volumes-from volume-test1 centos
[root@16c8c496fbea /]# cd datass/
[root@16c8c496fbea datass]# exit
exit
[root@192 ~]# docker ps -a;
CONTAINER ID        IMAGE               COMMAND             CREATED             STATUS                      PORTS               NAMES
16c8c496fbea        centos              "/bin/bash"         13 seconds ago      Exited (0) 4 seconds ago                        volume-test4
4000bbf68d26        centos              "/bin/bash"         53 seconds ago      Exited (0) 27 seconds ago                       volume-test1
[root@192 ~]#
镜像构建
包括 手动构建和Dockerfile 两种方式
例 : 手动构建 一个nginx (通过在官方的centos镜像中安装nginx实现 源码安装...)
[root@192 ~]# docker run --name nginx-man -it centos
[root@1ee70298d5bd /]# yum install -y wget gcc gcc-c++ make openssl-devel

...进行各种操作
接着
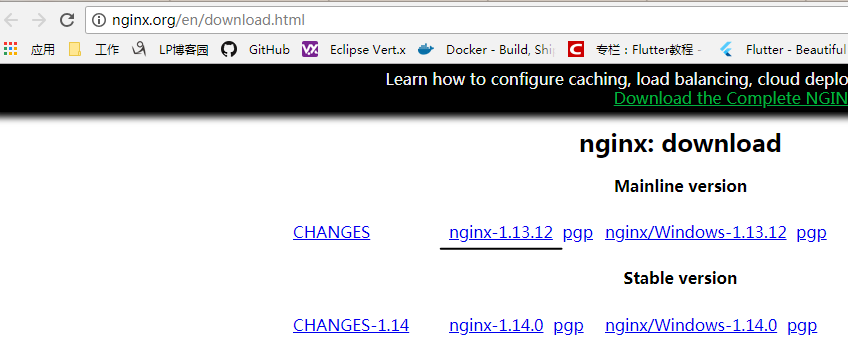
wget http://nginx.org/download/nginx-1.13.12.tar.gz
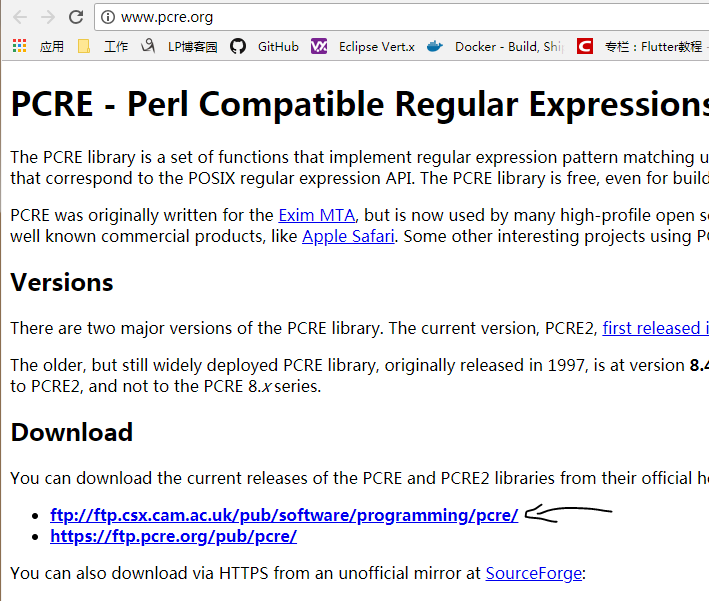
wget ftp://ftp.csx.cam.ac.uk/pub/software/programming/pcre/pcre-8.38.tar.gz
[root@1ee70298d5bd /]# mv *.tar.gz /usr/local/src/
[root@1ee70298d5bd /]# cd /usr/local/src/
[root@1ee70298d5bd src]# tar zxf pcre-8.38.tar.gz
[root@1ee70298d5bd src]# tar zxf nginx-1.13.12.tar.gz
[root@1ee70298d5bd src]# useradd -s /sbin/nologin -M www
-s<shell> 指定用户登入后所使用的shell。
/sbin/nologin指的是不允许login当前Linux系统。当用户配置成/sbin/nologin时,如果再使用该用户ssh到linux操作系统,会提示如下内
容:This account is currently not available。该功能类似于封掉某个帐户。
-M 不要自动建立用户的登入目录。
[root@1ee70298d5bd nginx-1.13.12]# ./configure --prefix=/usr/local/nginx --user=www --group=www --with-http_ssl_module --with-http_stub_status_module --with-pcre=/usr/local/src/pcre-8.38
[root@1ee70298d5bd nginx-1.13.12]# make
[root@1ee70298d5bd nginx-1.13.12]# make install
[root@1ee70298d5bd nginx-1.13.12]# vi /etc/rc.local (设置开机自动启动 这是使用者自订开机启动程序 (/etc/rc.d/rc.local) lrwxrwxrwx. 1 root root 13 Apr 2 18:38 rc.local -> rc.d/rc.local) 提示:这个设置开机启动的方法是不行的 下面有能用的开机启动方法
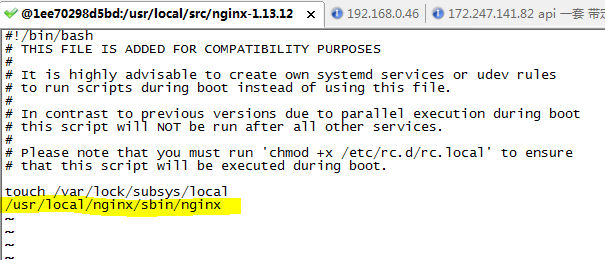
但 这样还是不行 docker 里面必须得前台运行
[root@1ee70298d5bd nginx-1.13.12]# vi /usr/local/nginx/conf/nginx.conf (将 nginx 配置为前台运行)

如果启动命令单纯是以后台守护(daemon)模式启动nginx,那么启动命令会立即结束,容器也会立即结束。
其实只要在任何命令之后加一句 && cat,就会让这条命令卡在前台而不会结束,不是非得用daemon off
将容器做成镜像
docker commit -m "my nginx" 1ee70298d5bd lp/myfirstnginx:v1(用户名 项目名 版本号)
[root@192 ~]# docker ps -a
CONTAINER ID        IMAGE               COMMAND             CREATED             STATUS                       PORTS               NAMES
1ee70298d5bd        centos              "/bin/bash"         5 hours ago         Exited (137) 2 seconds ago                       nginx-man
[root@192 ~]# docker commit -m "my nginx" 1ee70298d5bd lp/myfirstnginx:v1
sha256:caf2eb2e918e4ac6ad553e321ab78ea7b31ba707ea0d92ae772c9e934e1466d8
[root@192 ~]# docker images
REPOSITORY          TAG                 IMAGE ID            CREATED              SIZE
lp/myfirstnginx     v1                  caf2eb2e918e        About a minute ago   423MB
nginx               latest              ae513a47849c        10 days ago          109MB
kong                latest              b9dbcf499414        2 weeks ago          91.5MB
centos              latest              e934aafc2206        4 weeks ago          199MB
[root@192 ~]#
然后这个镜像就可以启动了
[root@192 ~]# docker run -d -p 99:80 lp/myfirstnginx
Unable to find image 'lp/myfirstnginx:latest' locally
docker: Error response from daemon: pull access denied for lp/myfirstnginx, repository does not exist or may require 'docker login'.
See 'docker run --help'.
[root@192 ~]# docker run -d -p 99:80 lp/myfirstnginx:v1 (加上版本号)
2e8f6810773814d9fec11e04a9528cf564a6515893ad8a32559bdfe41e6504c9
[root@192 ~]#
启动后却是 Exited
开机启动且不会退出的解决方式
/etc/rc.local 里面把启动 nginx 的语句删了 nginx的配置文件也还是要加那个daemon off然后从弄个镜像 启动语句这样
docker run -d -p 99:80 lp/myfirstnginx:v? /usr/local/nginx/sbin/nginx
例 : Dockerfile 一个nginx


[root@192 ~]# mkdir /opt/docker-file
[root@192 ~]# cd /opt/docker-file
[root@192 docker-file]# mkdir nginx
[root@192 docker-file]# cd nginx
[root@192 nginx]# pwd
/opt/docker-file/nginx
[root@192 nginx]#
[root@192 ~]# cd /opt/docker-file/nginx/
[root@192 nginx]#
[root@192 nginx]#
[root@192 nginx]# wget http://nginx.org/download/nginx-1.13.12.tar.gz
--2018-05-11 18:06:03--  http://nginx.org/download/nginx-1.13.12.tar.gz
Resolving nginx.org (nginx.org)... 206.251.255.63, 95.211.80.227, 2606:7100:1:69::3f, ...
Connecting to nginx.org (nginx.org)|206.251.255.63|:80... connected.
HTTP request sent, awaiting response... 200 OK
Length: 1016311 (992K) [application/octet-stream]
Saving to: ‘nginx-1.13.12.tar.gz’

100%[====================================================================================================================================================>] 1,016,311    378KB/s   in 2.6s

2018-05-11 18:06:06 (378 KB/s) - ‘nginx-1.13.12.tar.gz’ saved [1016311/1016311]

[root@192 nginx]# wget  ftp://ftp.csx.cam.ac.uk/pub/software/programming/pcre/pcre-8.38.tar.gz
--2018-05-11 18:06:12--  ftp://ftp.csx.cam.ac.uk/pub/software/programming/pcre/pcre-8.38.tar.gz
           => ‘pcre-8.38.tar.gz’
Resolving ftp.csx.cam.ac.uk (ftp.csx.cam.ac.uk)... 131.111.8.115
Connecting to ftp.csx.cam.ac.uk (ftp.csx.cam.ac.uk)|131.111.8.115|:21... connected.
Logging in as anonymous ... Logged in!
==> SYST ... done.    ==> PWD ... done.
==> TYPE I ... done.  ==> CWD (1) /pub/software/programming/pcre ... done.
==> SIZE pcre-8.38.tar.gz ... 2053336
==> PASV ... done.    ==> RETR pcre-8.38.tar.gz ... done.
Length: 2053336 (2.0M) (unauthoritative)

100%[====================================================================================================================================================>] 2,053,336    447KB/s   in 4.5s

2018-05-11 18:06:23 (447 KB/s) - ‘pcre-8.38.tar.gz’ saved [2053336]

[root@192 nginx]# ll
total 3004
-rw-r--r--. 1 root root 290 May 11 18:10 Dockerfile
-rw-r--r--. 1 root root 1016311 Apr 10 22:19 nginx-1.13.12.tar.gz
-rw-r--r--. 1 root root 2053336 May 11 18:06 pcre-8.38.tar.gz
[root@192 nginx]# pwd
/opt/docker-file/nginx (文件和包的准备都放在这里)
[root@192 nginx]#
[root@192 nginx]# cat Dockerfile
# This is my first Dockerfile
# Version 1.0
# Author: lp

#Base images
FROM centos

#MAINTAINER
MAINTAINER LP

#ADD
ADD pcre-8.38.tar.gz /usr/local/src
ADD nginx-1.13.12.tar.gz /usr/local/src

#RUN
RUN yum install -y wget gcc gcc-c++ make openssl-devel
RUN useradd -s /sbin/nologin -M www

#WORKDIR
WORKDIR /usr/local/src/nginx-1.13.12

RUN ./configure --prefix=/usr/local/nginx --user=www --group=www --with-http_ssl_module --with-http_stub_status_module --with-pcre=/usr/local/src/pcre-8.38 && make && make install

RUN echo "daemon off;" >> /usr/local/nginx/conf/nginx.conf

#EXPOSE
EXPOSE 80

ENV PATH /usr/local/nginx/sbin:$PATH

CMD ["nginx"]
[root@192 nginx]#
包 文件 目录都对上后 就可以开始构建了
-t 后面是指定的名字和版本
docker build -t nginx-file:v1 /opt/docker-file/nginx/
成功后
[root@192 nginx]# docker images
REPOSITORY          TAG                 IMAGE ID            CREATED             SIZE
nginx-file          v1                  fccb8c19890a        14 seconds ago      414MB
lp/myfirstnginx     v4                  03bf4c65af38        18 hours ago        423MB
lp/myfirstnginx     v3                  74b763176158        18 hours ago        423MB
lp/myfirstnginx     v2                  b2ec4b6c7068        19 hours ago        423MB
lp/myfirstnginx     v1                  caf2eb2e918e        20 hours ago        423MB
nginx               latest              ae513a47849c        10 days ago         109MB
kong                latest              b9dbcf499414        2 weeks ago         91.5MB
centos              latest              e934aafc2206        4 weeks ago         199MB
[root@192 nginx]#
跑的试试
[root@192 nginx]# docker run -d --name mynginxfile01 -p 99:80 nginx-file:v1
1117fcbf41ddbeddf6ba90d24f7f5d0d42596c8e4c1d46022a13f2f16c9ec8e0
[root@192 nginx]# docker ps -a
CONTAINER ID        IMAGE                COMMAND                  CREATED             STATUS                      PORTS                NAMES
1117fcbf41dd        nginx-file:v1        "nginx"                  9 seconds ago       Up 8 seconds                0.0.0.0:99->80/tcp   mynginxfile01
22b11f23f745        lp/myfirstnginx:v4   "/usr/local/nginx/sb…"   18 hours ago        Exited (0) 18 hours ago                          wizardly_turing
66e91bb016a5        lp/myfirstnginx:v3   "/bin/bash"              18 hours ago        Exited (0) 18 hours ago                          happy_hoover
28e93291b7db        lp/myfirstnginx:v2   "/bin/bash"              19 hours ago        Exited (0) 19 hours ago                          sad_visvesvaraya
dd699eee3c00        lp/myfirstnginx:v1   "/bin/bash"              19 hours ago        Exited (0) 19 hours ago                          cranky_edison
1ee70298d5bd        centos               "/bin/bash"              24 hours ago        Exited (137) 20 hours ago                        nginx-man
[root@192 nginx]#
仓库
docker pull registry 私库没弄
向docker传自己的镜像
0:登录docker :docker login (本人用户名是 lpregistry2018)
1:打 tag
[root@192 ~]# docker images
REPOSITORY          TAG                 IMAGE ID            CREATED             SIZE
stress-file         v1                  1aae2aa28157        22 hours ago        219MB
nginx-file          v1                  fccb8c19890a        23 hours ago        414MB
lp/myfirstnginx     v4                  03bf4c65af38        41 hours ago        423MB
lp/myfirstnginx     v3                  74b763176158        41 hours ago        423MB
lp/myfirstnginx     v2                  b2ec4b6c7068        41 hours ago        423MB
lp/myfirstnginx     v1                  caf2eb2e918e        42 hours ago        423MB
nginx               latest              ae513a47849c        11 days ago         109MB
kong                latest              b9dbcf499414        2 weeks ago         91.5MB
centos              latest              e934aafc2206        5 weeks ago         199MB
registry            latest              d1fd7d86a825        4 months ago        33.3MB
[root@192 ~]#
[root@192 ~]# docker tag --help

Usage:  docker tag SOURCE_IMAGE[:TAG] TARGET_IMAGE[:TAG]

Create a tag TARGET_IMAGE that refers to SOURCE_IMAGE

Options:

[root@192 ~]#
docker tag lp/myfirstnginx:v4 lpregistry2018/lpregistry_nginx 注意得带上账户名
[root@192 ~]#  docker tag lp/myfirstnginx:v4 lpregistry2018/lpregistry_nginx
[root@192 ~]# docker images
REPOSITORY                                  TAG                 IMAGE ID            CREATED             SIZE
stress-file                                 v1                  1aae2aa28157        23 hours ago        219MB
nginx-file                                  v1                  fccb8c19890a        24 hours ago        414MB
lpregistry_nginx                            v1                  03bf4c65af38        42 hours ago        423MB
lp/myfirstnginx                             v4                  03bf4c65af38        42 hours ago        423MB
lpregistry/nginx                            v1                  03bf4c65af38        42 hours ago        423MB
lpregistry2018/lpregistry_nginx             latest              03bf4c65af38        42 hours ago        423MB
lpregistry2018/nginx2018/lpregistry_nginx   latest              03bf4c65af38        42 hours ago        423MB
lp/myfirstnginx                             v3                  74b763176158        42 hours ago        423MB
lp/myfirstnginx                             v2                  b2ec4b6c7068        42 hours ago        423MB
lp/myfirstnginx                             v1                  caf2eb2e918e        43 hours ago        423MB
nginx                                       latest              ae513a47849c        11 days ago         109MB
kong                                        latest              b9dbcf499414        2 weeks ago         91.5MB
centos                                      latest              e934aafc2206        5 weeks ago         199MB
registry                                    latest              d1fd7d86a825        4 months ago        33.3MB
[root@192 ~]#
2:push
[root@192 ~]# docker push --help

Usage:  docker push [OPTIONS] NAME[:TAG]

Push an image or a repository to a registry

Options:
      --disable-content-trust   Skip image signing (default true)
[root@192 ~]#
docker push lpregistry2018/lpregistry_nginx
[root@192 ~]# docker push lpregistry2018/lpregistry_nginx
The push refers to repository [docker.io/lpregistry2018/lpregistry_nginx]
bebe3169f352: Pushed
29042eb7dbc3: Pushed
487b0057eefa: Pushed
979443975c56: Pushed
43e653f84b79: Pushed
latest: digest: sha256:dfcdda5336a8a86fd33a307da68f612eec67457ba4c2d376824e1e815185a6c9 size: 1364
[root@192 ~]#
在另一台机器pull下 (极慢...)
[root@192 ~]# systemctl start docker
[root@192 ~]# docker pull lpregistry2018/lpregistry_nginx
Using default tag: latest
latest: Pulling from lpregistry2018/lpregistry_nginx
469cfcc7a4b3: Pull complete
e00778fc1b45: Downloading [==============================>                    ]   51.6MB/85.28MB
446f480867b2: Download complete
72a721fcc3f1: Download complete
b3281401aa76: Download complete
杂谈
Docker 资源隔离 LXC Kernel namespace
Pid
Net
lpc
Mnt
Uts
User
Docker 资源限制 cgroup (安卓也是的 不同进程崩溃 不会影响其他的)
CPU 内存 (磁盘?)
安装个 stress 压力测试工具 首先需要 epel-6的yum源 提供处 http://mirrors.aliyun.com/repo/
直接弄个 stress的Dockerfile
[root@192 docker-file]# mkdir stress
[root@192 docker-file]# cd stress/
[root@192 stress]# ll
total 0
[root@192 stress]# wget http://mirrors.aliyun.com/repo/epel-6.repo
--2018-05-11 19:10:23--  http://mirrors.aliyun.com/repo/epel-6.repo
Resolving mirrors.aliyun.com (mirrors.aliyun.com)... 183.61.241.239, 59.63.233.107, 59.63.233.104, ...
Connecting to mirrors.aliyun.com (mirrors.aliyun.com)|183.61.241.239|:80... connected.
HTTP request sent, awaiting response... 200 OK
Length: 1083 (1.1K) [application/octet-stream]
Saving to: ‘epel-6.repo’

100%[====================================================================================================================================================>] 1,083       --.-K/s   in 0s

2018-05-11 19:10:23 (71.0 MB/s) - ‘epel-6.repo’ saved [1083/1083]

[root@192 stress]# pwd
/opt/docker-file/stress
[root@192 stress]# ll
total 4
-rw-r--r--. 1 root root 1083 Jul  2  2014 epel-6.repo
[root@192 stress]# vi Dockerfile
[root@192 ~]# cd /opt/docker-file/stress/
[root@192 stress]# ll
total 8
-rw-r--r--. 1 root root  111 May 11 19:14 Dockerfile
-rw-r--r--. 1 root root 1083 Jul  2  2014 epel-6.repo
[root@192 stress]# more Dockerfile
FROM centos
ADD epel-6.repo /etc/yum.repos.d/
RUN yum -y install stress && yum clean all
ENTRYPOINT ["stress"]
[root@192 stress]# docker build -t stress-file:v1 .
[root@192 stress]# docker run --help

Usage:  docker run [OPTIONS] IMAGE [COMMAND] [ARG...]

Run a command in a new container

Options:
      --add-host list                  Add a custom host-to-IP mapping (host:ip)
  -a, --attach list                    Attach to STDIN, STDOUT or STDERR
      --blkio-weight uint16            Block IO (relative weight), between 10 and 1000, or 0 to disable (default 0)
      --blkio-weight-device list       Block IO weight (relative device weight) (default [])
      --cap-add list                   Add Linux capabilities
      --cap-drop list                  Drop Linux capabilities
      --cgroup-parent string           Optional parent cgroup for the container
      --cidfile string                 Write the container ID to the file
      --cpu-period int                 Limit CPU CFS (Completely Fair Scheduler) period
      --cpu-quota int                  Limit CPU CFS (Completely Fair Scheduler) quota
      --cpu-rt-period int              Limit CPU real-time period in microseconds
      --cpu-rt-runtime int             Limit CPU real-time runtime in microseconds
  -c, --cpu-shares int                 CPU shares (relative weight)
      --cpus decimal                   Number of CPUs
      --cpuset-cpus string             CPUs in which to allow execution (0-3, 0,1)
      --cpuset-mems string             MEMs in which to allow execution (0-3, 0,1)
  -c, --cpu-shares int                 CPU shares (relative weight)

    默认配额是 1024
    假如物理机只启动了一个docker容器 默认就是1024的配额 那么在这种情况下这个容器是可以跑物理机100%cpu的
    假如物理机启动了两个docker容器 默认都是1024的配置  这种情况每个容器只能跑50%cpu
对cpu的限制
cat /proc/cpuinfo
只有一个 processor 即一个逻辑核
--rm 运行结束后删除容器 --cpu是stress的指令 简单说就是跑满一个cpu
docker run -it --rm stress-file:v1 --cpu 1
另一个窗口看一下
top - 19:47:52 up 20:57,  2 users,  load average: 0.97, 0.32, 0.15
Tasks: 234 total,   3 running, 231 sleeping,   0 stopped,   0 zombie
%Cpu(s):100.0 us,  0.0 sy,  0.0 ni,  0.0 id,  0.0 wa,  0.0 hi,  0.0 si,  0.0 st
KiB Mem :  1877664 total,   916408 free,   314720 used,   646536 buff/cache
KiB Swap:  2097148 total,  2097148 free,        0 used.  1369004 avail Mem
Maximum tasks = 0, change to (0 is unlimited) null
  PID USER      PR  NI    VIRT    RES    SHR S %CPU %MEM     TIME+ COMMAND
13443 root      20   0    7264     92      0 R 99.3  0.0   1:22.90 stress
13448 root      20   0  146236   2184   1432 R  0.3  0.1   0:00.09 top
    1 root      20   0   46224   6712   3968 S  0.0  0.4   0:02.76 systemd
    2 root      20   0       0      0      0 S  0.0  0.0   0:00.02 kthreadd
再开一个窗口 再运行 docker run -it --rm stress-file:v1 --cpu 1
结果 被平均了 两个 stress 占用cpu 1:1
top - 19:50:38 up 21:00,  3 users,  load average: 2.11, 0.90, 0.39
Tasks: 247 total,   4 running, 243 sleeping,   0 stopped,   0 zombie
%Cpu(s):100.0 us,  0.0 sy,  0.0 ni,  0.0 id,  0.0 wa,  0.0 hi,  0.0 si,  0.0 st
KiB Mem :  1877664 total,   893220 free,   327024 used,   657420 buff/cache
KiB Swap:  2097148 total,  2097148 free,        0 used.  1354492 avail Mem

  PID USER      PR  NI    VIRT    RES    SHR S %CPU %MEM     TIME+ COMMAND
13569 root      20   0    7264     96      0 R 49.8  0.0   0:13.55 stress
13443 root      20   0    7264     92      0 R 49.5  0.0   3:54.26 stress
    1 root      20   0   46224   6712   3968 S  0.0  0.4   0:02.78 systemd
    2 root      20   0       0      0      0 S  0.0  0.0   0:00.03 kthreadd
关掉第二个stress 再运行 docker run -it -c 512 --rm stress-file:v1 --cpu 1
结果 被平均了 两个 stress 占用cpu 2:1 等于 1024:512
top - 19:54:50 up 21:04,  3 users,  load average: 1.65, 1.23, 0.65
Tasks: 247 total,   4 running, 243 sleeping,   0 stopped,   0 zombie
%Cpu(s):100.0 us,  0.0 sy,  0.0 ni,  0.0 id,  0.0 wa,  0.0 hi,  0.0 si,  0.0 st
KiB Mem :  1877664 total,   895648 free,   325048 used,   656968 buff/cache
KiB Swap:  2097148 total,  2097148 free,        0 used.  1356332 avail Mem

  PID USER      PR  NI    VIRT    RES    SHR S %CPU %MEM     TIME+ COMMAND
13443 root      20   0    7264     92      0 R 66.1  0.0   7:35.48 stress
13744 root      20   0    7264     92      0 R 33.2  0.0   0:05.47 stress
  741 root      20   0  283124   6800   4140 S  0.3  0.4   0:00.19 rsyslogd
 2220 root      20   0  141320   5164   3880 S  0.3  0.3   0:06.71 sshd
13571 root      20   0       0      0      0 S  0.3  0.0   0:00.31 kworker/0:3
关掉各种测试 容器
再试试其他参数
[root@192 stress]# docker run --help

Usage:  docker run [OPTIONS] IMAGE [COMMAND] [ARG...]

Run a command in a new container

Options:
      --add-host list                  Add a custom host-to-IP mapping (host:ip)
  -a, --attach list                    Attach to STDIN, STDOUT or STDERR
      --blkio-weight uint16            Block IO (relative weight), between 10 and 1000, or 0 to disable (default 0)
      --blkio-weight-device list       Block IO weight (relative device weight) (default [])
      --cap-add list                   Add Linux capabilities
      --cap-drop list                  Drop Linux capabilities
      --cgroup-parent string           Optional parent cgroup for the container
      --cidfile string                 Write the container ID to the file
      --cpu-period int                 Limit CPU CFS (Completely Fair Scheduler) period
      --cpu-quota int                  Limit CPU CFS (Completely Fair Scheduler) quota
      --cpu-rt-period int              Limit CPU real-time period in microseconds
      --cpu-rt-runtime int             Limit CPU real-time runtime in microseconds
  -c, --cpu-shares int                 CPU shares (relative weight)
      --cpus decimal                   Number of CPUs
      --cpuset-cpus string             CPUs in which to allow execution (0-3, 0,1)
      --cpuset-mems string             MEMs in which to allow execution (0-3, 0,1)

--cpuset-cpus string             CPUs in which to allow execution (0-3, 0,1)
    分配几个cpu
cat /proc/cpuinfo
有两个 processor 即两个逻辑核
启动一个 docker run -it --cpuset-cpus 1 --rm stress-file:v1 --cpu 1
另一个窗口查看
top - 20:11:37 up 4 min,  2 users,  load average: 0.67, 0.27, 0.11
Tasks: 243 total,   3 running, 240 sleeping,   0 stopped,   0 zombie
%Cpu(s): 50.1 us,  0.2 sy,  0.0 ni, 49.8 id,  0.0 wa,  0.0 hi,  0.0 si,  0.0 st
KiB Mem :  1877688 total,  1132340 free,   309020 used,   436328 buff/cache
KiB Swap:  2097148 total,  2097148 free,        0 used.  1385912 avail Mem
Maximum tasks = 0, change to (0 is unlimited) nullnull
  PID USER      PR  NI    VIRT    RES    SHR S  %CPU %MEM     TIME+ COMMAND
 2971 root      20   0    7264     92      0 R  99.7  0.0   1:05.08 stress
  142 root      20   0       0      0      0 S   0.3  0.0   0:00.66 kworker/1:0
cat /proc/cpuinfo
有4个 processor 即4个逻辑核
启动一个 docker run -it --cpuset-cpus 1 --rm stress-file:v1 --cpu 1
另一个窗口查看
top - 20:21:03 up 5 min,  2 users,  load average: 0.31, 0.11, 0.06
Tasks: 255 total,   2 running, 253 sleeping,   0 stopped,   0 zombie
%Cpu(s): 25.0 us,  0.1 sy,  0.0 ni, 74.9 id,  0.0 wa,  0.0 hi,  0.0 si,  0.0 st
KiB Mem :  1877688 total,  1129316 free,   312108 used,   436264 buff/cache
KiB Swap:  2097148 total,  2097148 free,        0 used.  1380556 avail Mem

  PID USER      PR  NI    VIRT    RES    SHR S  %CPU %MEM     TIME+ COMMAND
 2997 root      20   0    7264     92      0 R  99.7  0.0   0:07.71 stress
 2684 root      20   0  383368  23624  12224 S   0.3  1.3   0:00.83 docker-containe
    1 root      20   0   46224   6712   3968 S   0.0  0.4   0:02.02 systemd
    2 root      20   0       0      0      0 S   0.0  0.0   0:00.01 kthreadd
  -m, --memory bytes                   Memory limit
      --memory-reservation bytes       Memory soft limit
      --memory-swap bytes              Swap limit equal to memory plus swap: '-1' to enable unlimited swap
      --memory-swappiness int          Tune container memory swappiness (0 to 100) (default -1)
      --mount mount                    Attach a filesystem mount to the container
对内存的限制
--vm 1 --vm-bytes 120m --vm-hang 0 stress的命令
docker run -it --rm -m 128m stress-file:v1 --vm 1 --vm-bytes 120m --vm-hang 0 没问题

docker run -it --rm -m 128m stress-file:v1 --vm 1 --vm-bytes 127m --vm-hang 0 物理主机(VMware装的)自动重启了 连接也会断开

Docker 网络模式
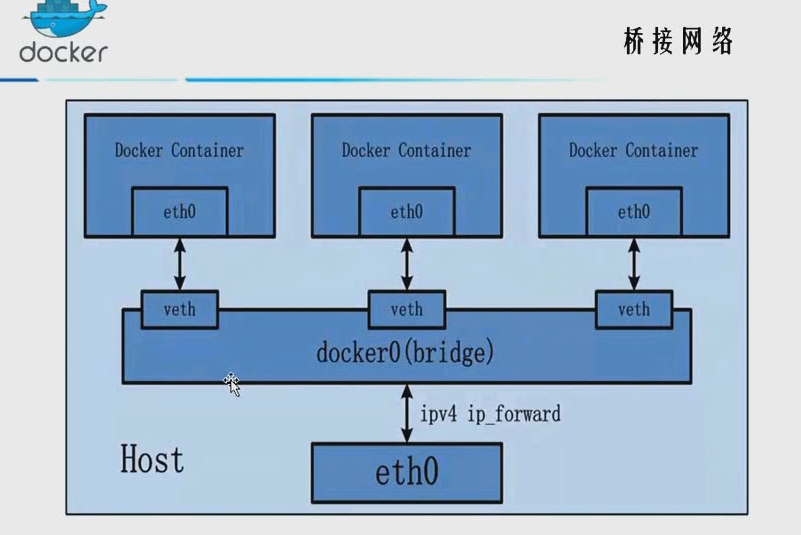
默认桥接网络模式
[root@192 ~]# brctl show
bridge name     bridge id               STP enabled     interfaces
docker0         8000.024256934b14       no
[root@192 ~]#

虚拟网桥
[root@192 ~]# ifconfig
docker0: flags=4099<UP,BROADCAST,MULTICAST>  mtu 1500
        inet 172.17.0.1  netmask 255.255.0.0  broadcast 172.17.255.255
        ether 02:42:56:93:4b:14  txqueuelen 0  (Ethernet)
        RX packets 0  bytes 0 (0.0 B)
        RX errors 0  dropped 0  overruns 0  frame 0
        TX packets 0  bytes 0 (0.0 B)
        TX errors 0  dropped 0 overruns 0  carrier 0  collisions 0

eno16777736: flags=4163<UP,BROADCAST,RUNNING,MULTICAST>  mtu 1500
        inet 192.168.0.41  netmask 255.255.255.0  broadcast 192.168.0.255
        inet6 fe80::20c:29ff:fea3:af35  prefixlen 64  scopeid 0x20<link>
        ether 00:0c:29:a3:af:35  txqueuelen 1000  (Ethernet)
        RX packets 15748  bytes 1054569 (1.0 MiB)
        RX errors 0  dropped 0  overruns 0  frame 0
        TX packets 666  bytes 66394 (64.8 KiB)
        TX errors 0  dropped 0 overruns 0  carrier 0  collisions 0

lo: flags=73<UP,LOOPBACK,RUNNING>  mtu 65536
        inet 127.0.0.1  netmask 255.0.0.0
        inet6 ::1  prefixlen 128  scopeid 0x10<host>
        loop  txqueuelen 0  (Local Loopback)
        RX packets 0  bytes 0 (0.0 B)
        RX errors 0  dropped 0  overruns 0  frame 0
        TX packets 0  bytes 0 (0.0 B)
        TX errors 0  dropped 0 overruns 0  carrier 0  collisions 0

[root@192 ~]#
HOST网络模式
直接与物理机使用相同的网络(不同容器模式可以不同)

奇葩网络模式
