ELK Stack企业日志平台文档
实验环境
|
主机名 |
IP地址 |
配置 |
系统版本 |
用途 |
|
controlnode |
172.16.1.120 |
2核/4G/60G |
Centos7.4 |
nginxtomcat filebeat redis logstash kibana |
|
slavenode1 |
172.16.1.121 |
2核/2G/60G |
Centos7.4 |
ES-head elastic01 |
|
slavenode2 |
172.16.1.122 |
2核/2G/60G |
Centos7.4 |
elastic02 |
|
slavenode3 |
172.16.1.123 |
2核/2G/60G |
Centos7.4 |
elastic03 |
目录
一、ELK介绍
ELKStacks是一个技术栈的组合,分别是Elasticsearch、Logstash、Kibana
ELK Stack:
1、扩展性:采用高扩展性分布式架构设计,可支持每日TB级数据
2、简单易用:通过图形页面可对日志数据各种统计,可视化
3、查询效率高:能做到秒级数据采集、处理和搜索
https://www.elastic.co/cn/products/elasticsearch
https://www.elastic.co/cn/products/kibana
https://www.elastic.co/cn/products/beats/filebeat
https://www.elastic.co/cn/products/beats/metricbeat
二、ELK架构
Logstash :开源的服务器端数据处理管道,能够同时从多个来源采集数据、转换数据,然后将数据存储到数据库中。
Elasticsearch:搜索、分析和存储数据。
Kibana:数据可视化。
Beats :轻量型采集器的平台,从边缘机器向 Logstash 和 Elasticsearch 发送数据。
Filebeat:轻量型日志采集器。
https://www.elastic.co/subscriptions
Input:输入,输出数据可以是Stdin、File、TCP、Redis、Syslog等。
Filter:过滤,将日志格式化。有丰富的过滤插件:Grok正则捕获、Date时间处理、Json编解码、Mutate数据修改等。
Output:输出,输出目标可以是Stdout、File、TCP、Redis、ES等。
三、ElasticSearch
3.1 基本概念
Node:运行单个ES实例的服务器
Cluster:一个或多个节点构成集群
Index:索引是多个文档的集合
Document:Index里每条记录称为Document,若干文档构建一个Index
Type:一个Index可以定义一种或多种类型,将Document逻辑分组
Field:ES存储的最小单元
Shards:ES将Index分为若干份,每一份就是一个分片
Replicas:Index的一份或多份副本
|
ES |
关系型数据库(比如Mysql) |
|
Index |
Database |
|
Type |
Table |
|
Document |
Row |
|
Field |
Column |
3.2 集群部署
确认时区:
date
如果时区是EST,要修改为CST(中国时区)
cp /usr/share/zoneinfo/Asia/Shanghai /etc/localtime
在172.16.1.121、172.16.1.122、172.16.1.123节点上配置elastic 的YUM仓库:
# rpm --import https://artifacts.elastic.co/GPG-KEY-elasticsearch
# vim /etc/yum.repos.d/elactic.repo
[elasticsearch]
name=Elasticsearch repository for 7.x packages
baseurl=https://artifacts.elastic.co/packages/7.x/yum
gpgcheck=1
gpgkey=https://artifacts.elastic.co/GPG-KEY-elasticsearch
enabled=0
autorefresh=1
type=rpm-md
# yum install --enablerepo=elasticsearch elasticsearch -y
提示:如果下载慢可以更换为清华源或者直接下载相应版本的rpm包进行安装
sed -i 's#artifacts.elastic.co/packages/7.x/yum#mirrors.tuna.tsinghua.edu.cn/elasticstack/yum/elastic-7.x/#g' /etc/yum.repos.d/elactic.repo
172.16.1.121节点
# egrep -v "^$|#" /etc/elasticsearch/elasticsearch.yml
cluster.name: elk-cluster
node.name: node-1
path.data: /var/lib/elasticsearch
path.logs: /var/log/elasticsearch
network.host: 172.16.1.121
http.port: 9200
discovery.seed_hosts: ["172.16.1.121", "172.16.1.122", "172.16.1.123"]
cluster.initial_master_nodes: ["172.16.1.121", "172.16.1.122", "172.16.1.123"]
172.16.1.122节点
# egrep -v "^$|#" /etc/elasticsearch/elasticsearch.yml
cluster.name: elk-cluster
node.name: node-2
path.data: /var/lib/elasticsearch
path.logs: /var/log/elasticsearch
network.host: 172.16.1.122
http.port: 9200
discovery.seed_hosts: ["172.16.1.121", "172.16.1.122", "172.16.1.123"]
cluster.initial_master_nodes: ["172.16.1.121", "172.16.1.122", "172.16.1.123"]
172.16.1.123 节点
# egrep -v "^$|#" /etc/elasticsearch/elasticsearch.yml
cluster.name: elk-cluster
node.name: node-3
path.data: /var/lib/elasticsearch
path.logs: /var/log/elasticsearch
discovery.seed_hosts: ["172.16.1.121", "172.16.1.122", "172.16.1.123"]
cluster.initial_master_nodes: ["172.16.1.121", "172.16.1.122", "172.16.1.123"]
cluster.name: # 集群名称
node.name: # 节点名称
path.data: # 数据目录。可以设置多个路径,这种情况下,所有的路径都会存储数据。
network.host: # elasticsearch 监听的IP地址
http.port: # elasticsearch 监听的端口号
集群主要关注两个参数:
discovery.seed_hosts: # 单播,集群节点IP列表,提供了自动组织集群,自动扫描端口9300-9305连接其他节点,无需额外配置。
cluster.initial_master_nodes: # 初始化引导集群节点,集群节点IP列表,初始化时只有一个集群。
分别启动各elastic节点,并加入到开机自启动
# systemctl restart elasticsearch.service
# systemctl enable elasticsearch.service
# netstat -tunlp | grep "java"
tcp6 0 0 172.16.1.121:9200 :::* LISTEN 1810/java
tcp6 0 0 172.16.1.121:9300 :::* LISTEN 1810/java
查看集群节点:
# curl -X GET 'http://172.16.1.121:9200/_cat/nodes?v'
查看集群健康状态:
# curl -X GET 'http://172.16.1.121:9200/_cluster/health?pretty'
green:所有的主分片和副本分片都已分配。你的集群是 100% 可用的。
yellow:所有的主分片已经分片了,但至少还有一个副本是缺失的。不会有数据丢失,所以搜索结果依然是完整的。不过,你的高可用性在某种程度上被弱化。如果更多的分片消失,你就会丢数据了。把yellow想象成一个需要及时调查的警告。
red:至少一个主分片(以及它的全部副本)都在缺失中。这意味着你在缺少数据:搜索只能返回部分数据,而分配到这个分片上的写入请求会返回一个异常。
green/yellow/red 状态是一个概览你的集群并了解眼下正在发生什么的好办法。
补充:
1修改内存限制
在172.16.1.121、172.16.1.122、172.16.1.123节点上配置
锁定物理内存地址,防止es内存被交换出去,也就是避免es使用swap交换分区,频繁的交换,会导致IOPS变高。在elasticsearch.yml中开启"bootstrap.memory_lock: true"内存锁配置项,需要修改以下配置文件,否则会导致elasticsearch启动失败。
(1)将jvm堆大小设置为大约可用内存的一半
# vim /etc/elasticsearch/jvm.options
-Xms512m
-Xmx512m
# 说明:默认锁定内存是1GB,一般设置为服务器内存的50%最好,但是最大不能超过32G。
(2)允许进程的所有者使用此限制
# vim /usr/lib/systemd/system/elasticsearch.service
LimitMEMLOCK=infinity
# 说明:该参数需要自己添加,要放到[install]标签的上面,不然启动不了。
(3)重启elasticsearch
# systemctl restart elasticsearch.service
3.3 数据操作
RestFul API格式
curl -X <verb> '<protocol>://<host>:<port>/<path>?<query_string>' -d '<body>'
|
参数 |
描述 |
|
verb |
HTTP方法,比如GET、POST、PUT、HEAD、DELETE |
|
host |
ES集群中的任意节点主机名 |
|
port |
ES HTTP服务端口,默认9200 |
|
path |
索引路径 |
|
query_string |
可选的查询请求参数。例如?pretty参数将返回JSON格式数据 |
|
-d |
里面放一个GET的JSON格式请求主体 |
|
body |
自己写的 JSON格式的请求主体 |
查看索引:
curl -X GET 'http://172.16.1.121:9200/_cat/indices?v'
新建索引:
curl -X PUT '172.16.1.121:9200/logs-2020.8.05'
curl -X DELETE '172.16.1.121:9200/logs-2020.8.05'
3.4 常用查询
ES提供一种可用于执行查询JSON式的语言,被称为Query DSL。
示例数据
使用官方提供的示例数据:
https://www.elastic.co/guide/en/elasticsearch/reference/current/_exploring_your_data.html
wget https://raw.githubusercontent.com/elastic/elasticsearch/master/docs/src/test/resources/accounts.json
导入数据:
curl -H "Content-Type: application/json" -X POST "172.16.1.121:9200/bank/_doc/_bulk?pretty&refresh" --data-binary "@accounts.json"
# 说明:bank 表示索引(数据库),_doc 表示type(表),_bulk 表示API接口
curl -X GET "172.16.1.121:9200/_cat/indices?v"
curl -X GET "172.16.1.121:9200/bank/_search?q=*&sort=account_number:asc&pretty"
_search:表示查询API接口
q=* ES批量索引中的所有文档
sort=account_number:asc 表示根据account_number按升序对结果排序
以上方式是使用查询字符串替换请求主体。
curl -X GET "172.16.1.121:9200/bank/_search" -H 'Content-Type: application/json' -d'
{
"query": { "match_all": {} },
"sort": [
{ "account_number": "asc" }
]
}'
这个区别在于不是传入的q=* URI,而是向 _search API提供JSON格式的查询请求体。
导入前的json 数据文件
导入json 文件后显示的数据
match_all
match_all:匹配所有文档(行)。默认查询
示例:查询所有,默认只返回10个文档
curl -X GET "localhost:9200/bank/_search?pretty" -H 'Content-Type: application/json' -d'
{
"query": { "match_all": {} }
}'
query告诉我们查询什么,match_all使我们查询的类型。match_all查询仅仅在指定的索引的所有文件进行搜索。
from,size
除了query参数外,还可以传递其他参数影响查询结果,比如上面的sort,下面的size:
curl -X GET "localhost:9200/bank/_search" -H 'Content-Type: application/json' -d'
{
"query": { "match_all": {} },
"size": 1
}'
注意:size未指定,默认为10
返回10-19的文档:
curl -X GET "localhost:9200/bank/_search" -H 'Content-Type: application/json' -d'
{
"query": { "match_all": {} },
"from": 10,
"size": 10
}'
此功能实现分页功能非常有用。如果from未指定,默认为0
返回_source字段中的几个字段:
_source包含的是一行数据Document的所有字段Field
curl -X GET "localhost:9200/bank/_search" -H 'Content-Type: application/json' -d'
{
"query": { "match_all": {} },
"_source": ["account_number", "balance"]
}'
match
基本搜索查询,针对特定字段或字段集合进行搜索
查询编号为20的账户:
curl -X GET "localhost:9200/bank/_search" -H 'Content-Type: application/json' -d'
{
"query": { "match": { "account_number": 20 } }
}'
返回地址中包含mill的账户:
curl -X GET "localhost:9200/bank/_search" -H 'Content-Type: application/json' -d'
{
"query": { "match": { "address": "mill" } }
}'
返回地址有包含mill或lane的所有账户:
curl -X GET "localhost:9200/bank/_search" -H 'Content-Type: application/json' -d'
{
"query": { "match": { "address": "mill lane" } }
}'
bool
查询包含mill和lane的所有账户:
curl -X GET "localhost:9200/bank/_search" -H 'Content-Type: application/json' -d'
{
"query": {
"bool": {
"must": [
{ "match": { "address": "mill" } },
{ "match": { "address": "lane" } }
]
}
}
}'
该bool must指定了所有必须为真才匹配。
查询包含mill或lane的所有账户:
curl -X GET "localhost:9200/bank/_search" -H 'Content-Type: application/json' -d'
{
"query": {
"bool": {
"should": [
{ "match": { "address": "mill" } },
{ "match": { "address": "lane" } }
]
}
}
}'
range
l range
指定区间内的数字或者时间。
操作符:gt大于,gte大于等于,lt小于,lte小于等于
查询余额大于或等于20000且小于等于30000的账户:
curl -X GET "localhost:9200/bank/_search" -H 'Content-Type: application/json' -d'
{
"query": {
"bool": {
"must": { "match_all": {} },
"filter": {
"range": {
"balance": {
"gte": 20000,
"lte": 30000
}
}
}
}
}
}'
3.5 Head插件
在 172.16.1.121 节点上操作
安装nodejs环境
# wget https://npm.taobao.org/mirrors/node/latest-v14.x/node-v14.1.0-linux-x64.tar.gz
# tar -xzf node-v14.1.0-linux-x64.tar.gz
# mv node-v14.1.0-linux-x64/ /usr/local/node14.1/
# vim /etc/profile
export NODE_HOME=/usr/local/node14.1
export PATH=$NODE_HOME/bin:$PATH
# source /etc/profile
# node -v
v14.1.0
# npm -v
6.14.4
以上步骤是二进制方式安装nodejs,也可以执行下面的命令进行yum安装nodejs
# yum install nodejs npm -y
# yum install git -y
# mkdir -p /tmp/phantomjs/
# cd /tmp/phantomjs/
# wget https://github.com/Medium/phantomjs/releases/download/v2.1.1/phantomjs-2.1.1-linux-x86_64.tar.bz2
# cd /usr/local/
# git clone https://github.com/mobz/elasticsearch-head.git
# cd elasticsearch-head/
# npm install phantomjs-prebuilt@2.1.16 --ignore-scripts
# npm install
出现下面的问题正常
修改elasticsearch-head监听地址
# vim /usr/local/elasticsearch-head/Gruntfile.js
运行elasticsearch-head
# cd /usr/local/elasticsearch-head/ && npm run start &>/dev/null &
# netstat -tunlp | grep "grunt"
tcp 0 0 0.0.0.0:9100 0.0.0.0:* LISTEN 1659/grunt
加入开机自启动
# echo 'source /etc/profile' >>/etc/rc.local
# echo 'cd /usr/local/elasticsearch-head/ && npm run start &>/dev/null &' >>/etc/rc.local
# chmod +x /etc/rc.d/rc.local
在172.16.1.121、172.16.1.122、172.16.1.123节点开启elastic跨域访问功能
# vim /etc/elasticsearch/elasticsearch.yml
# 配置文件末尾增加如下字段
http.cors.enabled: true
http.cors.allow-origin: "*"
# 重启elasticsearch 服务
# systemctl restart elasticsearch.service
在浏览器中输入http://172.16.1.121:9100/地址进行访问
四、Logstash
在172.16.1.120节点上操作
4.1 安装
https://www.elastic.co/guide/en/logstash/current/configuration.html
# 安装 elk 的yum 源或在清华源下载elasticsearch对应版本的logstash rpm包
# 安装 jdk
# yum install java-1.8.0-openjdk.x86_64 -y
# yum install logstash -y
启动logstash并加入开机自启动
# systemctl restart logstash.service
# systemctl enable logstash.service
# tailf /var/log/logstash/logstash-plain.log
# netstat -tunlp | grep 9600
tcp6 0 0 127.0.0.1:9600 :::* LISTEN 733/java
# 注意:logstash启动后在不收集日志的情况下,监听的9600端口是出不来的。
# 配置监听日志的文件放在 /etc/logstash/conf.d/ 目录下。
参数设置
# 通过指定收集日志的配置文件启动logstash,常用于日志收集调试。
# /usr/share/logstash/bin/logstash -f /etc/logstash/conf.d/test.conf
|
-f, --path.config CONFIG_PATH
|
指定配置文件。使用文件,目录,或者通配符加载配置信息,如果指定目录或者通配符,按字符顺序加载。 |
|
-e, --config.string CONFIG_STRING
|
指定字符串输入 |
|
-w, --pipeline.workers COUNT |
指定管道数量,默认3 |
|
--log.level LEVEL |
指定Logstash日志级别,fatal/error/warn/info/debug/trace |
|
-r,--config.reload.automatic
|
配置文件自动重新加载。默认每3s检查一次配置文件更改。 --config.reload.interval <interval> 修改时间间隔。 如果没有启用自动加载,也可以向Logstash进程发送SIGHUP(信号挂起)信号重启管道,例如:kill -1 14175 |
|
-t, --config.test_and_exit |
检查配置文件是否正确 |
4.2 条件判断
使用条件来决定filter和output处理特定的事件
比较操作:
相等: ==, !=, <, >, <=, >=
正则: =~(匹配正则), !~(不匹配正则)
包含: in(包含), not in(不包含)
布尔操作:
and(与), or(或), nand(非与), xor(非或)
一元运算符:
!(取反)
()(复合表达式), !()(对复合表达式结果取反)
可以像其他编程语言那样,条件if判断、多分支,嵌套。
if EXPRESSION {
...
} else if EXPRESSION {
...
} else {
...
}
4.3 输入插件(Input)
Input:输入数据可以是Stdin、File、TCP、Syslog、Redis、Kafka等。
https://www.elastic.co/guide/en/logstash/current/input-plugins.html
4.3.1 所有输入插件都支持的配置选项
|
Setting |
Input type |
Required |
Default |
Description |
|
add_field |
hash |
{} |
添加一个字段到一个事件 | |
|
codec |
codec |
No |
plain |
用于输入数据的编解码器 |
|
enable_metric |
boolean |
No |
true |
|
|
id |
string |
No |
|
添加一个ID插件配置,如果没有指定ID,则Logstash将生成一个ID。强烈建议配置此ID,当两个或多个相同类型的插件时,这个非常有用的。例如,有两个文件输入,添加命名标识有助于监视 |
|
tags |
array |
No |
|
添加任意数量的标签,有助于后期处理 |
|
type |
string |
No |
|
为输入处理的所有事件添加一个字段,自已随便定义,比如linux系统日志,定义为syslog |
4.3.1 Stdin
标准输入。
示例:
# cat /etc/logstash/conf.d/logstash.conf
stdin {
}
}
filter {
}
output {
stdout{codec => rubydebug}
}
4.3.1 File
https://www.elastic.co/guide/en/logstash/current/plugins-inputs-file.html
|
Setting |
Input type |
Required |
Default |
Description | ||
|
close_older |
number |
No |
3600 |
单位秒,打开文件多长时间关闭 | ||
|
delimiter |
string |
No |
|
每行分隔符 | ||
|
discover_interval |
number |
No |
15 |
单位秒,多长时间检查一次path选项是否有新文件 | ||
|
exclude |
array |
No |
|
排除监听的文件,跟path一样,支持通配符 | ||
|
max_open_files |
number |
No |
|
打开文件最大数量 | ||
|
path |
array |
YES |
|
输入文件的路径,可以使用通配符 例如/var/log/**/*.log,则会递归搜索 | ||
|
sincedb_path |
string |
No |
|
sincedb数据库文件的路径,用于记录被监控的日志文件当前位置 | ||
|
sincedb_write_interval |
number |
No |
15 |
单位秒,被监控日志文件当前位置写入数据库的频率 | ||
|
string, one of ["beginning", "end"] |
No |
end |
指定从什么位置开始读取文件:开头或结尾。默认从结尾开始,如果要想导入旧数据,将其设置为begin。如果sincedb记录了此文件位置,那么此选项不起作用 | |||
|
number |
No |
1 |
单位秒,统计文件的频率,判断是否被修改。增加此值会减少系统调用次数。 |
修改/var/log/messages 权限
# chmod 644 /var/log/messages
# cat /etc/logstash/conf.d/file.conf
input {
file {
path => "/var/log/messages"
tags => ["syslog"]
type => "syslog"
}
}
filter {
}
output {
stdout{codec => rubydebug}
}
日志收集
4.3.2 TCP
通过TCP套接字读取事件。与标准输入和文件输入一样,每个事件都被定位一行文本。
# cat /etc/logstash/conf.d/tcp.conf
input {
tcp {
port => 12345
type => "nc"
}
}
filter {
}
output {
stdout{codec => rubydebug}
}
# /usr/share/logstash/bin/logstash -f /etc/logstash/conf.d/tcp.conf
# netstat -tunlp | grep java
# nc 172.16.1.120 12345
4.3.4 Beats
从Elastic Beats框架接收事件。
# cat /etc/logstash/conf.d/beat.conf
input {
beats {
port => 5044
}
}
filter {
}
output {
stdout {codec => rubydebug}
}
4.4 编码插件(Codec)
Logstash处理流程:input->decode->filter->encode->output
4.4.1 json/json_lines
该解码器可用于解码(Input)和编码(Output)JSON消息。如果发送的数据是JSON数组,则会创建多个事件(每个元素一个)
如果传输JSON消息以 分割,就需要使用json_lines。
# cat /etc/logstash/conf.d/json.conf
input {
stdin {
codec => json {
charset => ["UTF-8"]
}
}
}
filter {
}
output {
stdout{codec => rubydebug}
}
# /usr/share/logstash/bin/logstash -f /etc/logstash/conf.d/json.conf
# netstat -tunlp | grep java
tcp6 0 0 127.0.0.1:9600 :::* LISTEN 5732/java
4.4.2 multline
匹配多行。
|
Setting |
Input type |
Required |
Default |
Description | ||
|
number |
No |
|
| |||
|
string |
No |
UTF-8 |
输入使用的字符编码 | |||
|
bytes |
No |
10M |
如果事件边界未明确定义,则事件的的积累可能会导致logstash退出,并出现内存不足。与max_lines组合使用 | |||
|
number |
No |
500 |
如果事件边界未明确定义,则事件的的积累可能会导致logstash退出,并出现内存不足。与max_bytes组合使用 | ||
|
string |
No |
multiline |
给定标签标记多行事件 | |||
|
boolean |
No |
false |
正则表达式模式,设置正向匹配还是反向匹配。默认正向 | |||
|
string |
Yes |
|
正则表达式匹配 | |||
|
array |
No |
[] |
默认带的一堆模式 | |||
|
string, one of ["previous", "next"] |
Yes |
无 |
设置未匹配的内容是向前合并还是向后合并。 |
input {
stdin {
codec => multiline {
pattern => "pattern, a regexp"
negate => "true" or "false"
what => "previous" or "next"
}
}
}
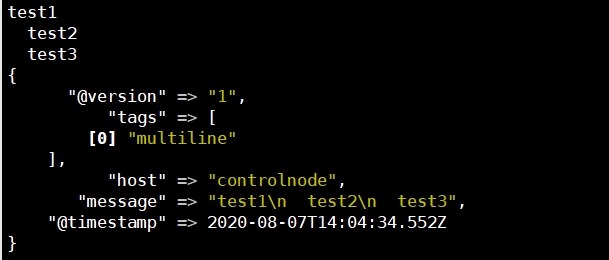
例1:将JAVA堆栈跟踪是多行的,通常从最左边开始,每个后续行都缩进。
实现思路:以任意空白开头的行都属于上一行
# cat /etc/logstash/conf.d/java-exe.conf
input {
stdin {
codec => multiline {
pattern => "^s"
what => "previous"
}
}
}
filter {
}
output {
stdout{codec => rubydebug}
}
测试
test1
test2
test3
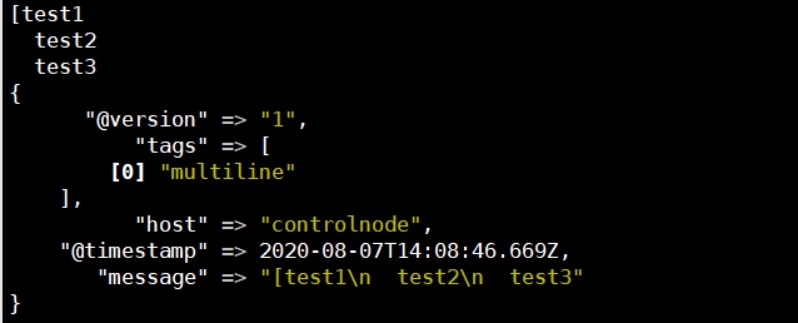
例2:不以时间戳开始的行应与前一行合并
# cat /etc/logstash/conf.d/multline.conf
input {
stdin {
codec => multiline {
pattern => "^["
negate => true
what => "previous"
}
}
}
filter {
}
stdout{codec => rubydebug}
}
测试
[test1
test2
test3
补充
input {
stdin {
codec => multiline {
# Grok pattern names are valid! :)
pattern => "^%{TIMESTAMP_ISO8601}"
negate => true
what => "previous"
}
}
}
4.4.3 rubydebug
采用ruby awsone print库来解析日志。
output {
stdout{codec => rubydebug}
}
4.5 过滤器插件(Filter)
Filter:过滤,将日志格式化。有丰富的过滤插件:Grok正则捕获、date时间处理、JSON编解码、数据修改Mutate等。
所有的过滤器插件都支持以下配置选项:
|
Setting |
Input type |
Required |
Default |
Description |
|
add_field |
hash |
No |
{} |
如果过滤成功,添加任何field到这个事件。例如:add_field => [ "foo_%{somefield}", "Hello world, from %{host}" ],如果这个事件有一个字段somefiled,它的值是hello,那么我们会增加一个字段foo_hello,字段值则用%{host}代替。 |
|
add_tag |
array |
No |
[] |
过滤成功会增加一个任意的标签到事件例如:add_tag => [ "foo_%{somefield}" ] |
|
enable_metric |
boolean |
No |
true |
|
|
id |
string |
No |
|
|
|
periodic_flush |
boolean |
No |
false |
定期调用过滤器刷新方法 |
|
remove_field |
array |
No |
[] |
过滤成功从该事件中移除任意filed。例:remove_field => [ "foo_%{somefield}" ] |
|
remove_tag |
array |
No |
[] |
过滤成功从该事件中移除任意标签,例如:remove_tag => [ "foo_%{somefield}" ] |
4.5.1 json
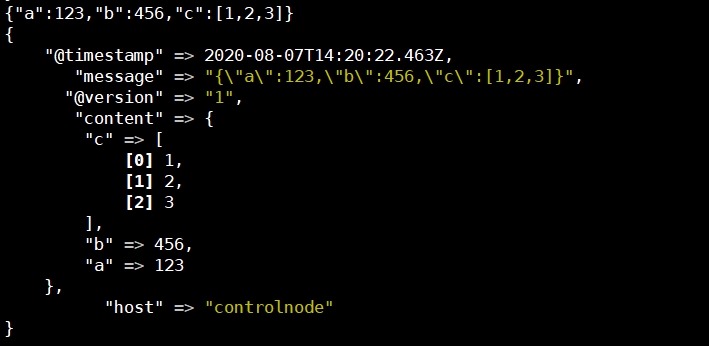
JSON解析过滤器,接收一个JSON的字段,将其展开为Logstash事件中的实际数据结构。
当事件解析失败时,这个插件有一个后备方案,那么事件将不会触发,而是标记为_jsonparsefailure,可以使用条件来清楚数据。也可以使用tag_on_failure
input {
stdin {
}
}
filter {
json {
source => "message"
target => "content"
}
}
output {
stdout{codec => rubydebug}
}
测试
{"a":123,"b":456,"c":[1,2,3]}
4.5.2 kv
自动解析key=value。也可以任意字符串分割数据。
field_split 一串字符,指定分隔符分析键值对
例如URL查询字符串拆分参数,根据&和?分隔:
input {
stdin {
}
}
filter {
kv {
field_split => "&?"
}
}
output {
stdout{codec => rubydebug}
}
测试
www.baidu.com?pin=12345~0&d=123&e=foo@bar.com&oq=bobo&ss=12345
4.5.3 grok
grok是将非结构化数据解析为结构化。
这个工具非常适于系统日志,mysql日志,其他Web服务器日志以及通常人类无法编写任何日志的格式。
默认情况下,Logstash附带约120个模式。也可以添加自己的模式(patterns_dir)
https://github.com/logstash-plugins/logstash-patterns-core/tree/master/patterns
http://grokdebug.herokuapp.com/ Grok调试网站
|
Setting |
Input type |
Required |
Default |
Description |
|
break_on_match |
boolean |
No |
true |
|
|
keep_empty_captures |
|
No |
false |
如果true将空保留为事件字段 |
|
match |
hash |
No |
{} |
一个hash匹配字段=>值 |
|
named_captures_only |
boolean |
No |
true |
如果true,只存储 |
|
overwrite |
array |
No |
[] |
覆盖已存在的字段的值 |
|
pattern_definitions |
|
No |
{} |
|
|
patterns_dir |
array |
No |
[] |
自定义模式 |
|
patterns_files_glob |
string |
No |
* |
Glob模式,用于匹配patterns_dir指定目录中的模式文件 |
|
tag_on_failure |
array |
No |
_grokparsefailure |
tags没有匹配成功时,将值附加到字段 |
|
tag_on_timeout |
string |
No |
_groktimeout |
如果Grok正则表达式超时,则应用标记 |
|
timeout_millis |
number |
|
30000 |
正则表达式超时时间 |
grok模式的语法是 %{SYNTAX:SEMANTIC}
SYNTAX模式名称
SEMANTIC匹配文本的标识符
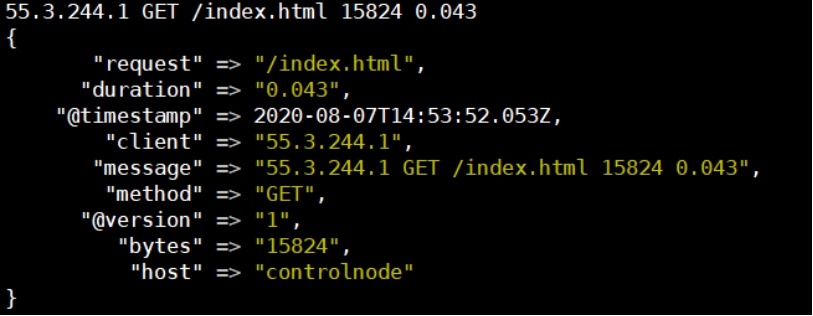
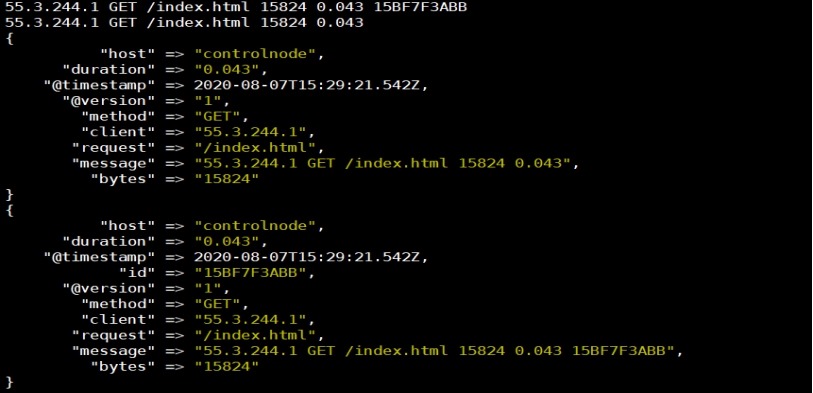
例如:%{NUMBER:duration} %{IP:client}
例如:虚构http请求日志抽出有用的字段
55.3.244.1 GET /index.html 15824 0.043
# cat /etc/logstash/conf.d/filter-grok.conf
input {
stdin {
}
}
filter {
grok {
match => {
"message" => "%{IP:client} %{WORD:method} %{URIPATHPARAM:request} %{NUMBER:bytes} %{NUMBER:duration}"
}
}
}
output {
stdout{codec => rubydebug}
}
测试
自定义模式
如果默认模式中没有匹配的,可以自己写正则表达式。
# cat /etc/logstash/conf.d/patterns
ID [0-9A-Z]{10,11}
# cat /etc/logstash/conf.d/filter-grok-customize.conf
input {
stdin {
}
}
filter {
grok {
patterns_dir => "/etc/logstash/conf.d/patterns"
match => {
"message" => "%{IP:client} %{WORD:method} %{URIPATHPARAM:request} %{NUMBER:bytes} %{NUMBER:duration} %{ID:id}"
}
}
}
output {
stdout{codec => rubydebug}
}
测试
55.3.244.1 GET /index.html 15824 0.043 15BF7F3ABB
多模式匹配
一个日志可能有多种格式,一个匹配可以有多条规则匹配多种格式。
一条匹配模式,如果匹配不到,只会到message字段。
例如:新版本项目日志需要添加日志字段,需要兼容旧日志匹配
# cat /etc/logstash/conf.d/filter-grok-MultiModule.conf
input {
stdin {
}
}
filter {
grok {
patterns_dir =>"/etc/logstash/conf.d/patterns"
match => [
"message", "%{IP:client} %{WORD:method} %{URIPATHPARAM:request} %{NUMBER:bytes} %{NUMBER:duration} %{ID:id}",
"message", "%{IP:client} %{WORD:method} %{URIPATHPARAM:request} %{NUMBER:bytes} %{NUMBER:duration}"
]
}
}
output {
stdout{codec => rubydebug}
}
测试
55.3.244.1 GET /index.html 15824 0.043 15BF7F3ABB
55.3.244.1 GET /index.html 15824 0.043
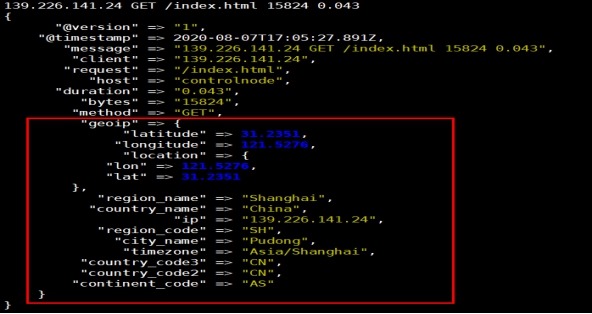
4.5.4 geoip
下载开源IP地址库:
https://dev.maxmind.com/geoip/geoip2/geolite2/
# cat /etc/logstash/conf.d/geoip1.conf
input {
stdin {
}
}
filter {
grok {
match => {
"message" => "%{IP:client} %{WORD:method} %{URIPATHPARAM:request} %{NUMBER:bytes} %{NUMBER:duration}"
}
}
geoip {
source => "client"
database => "/etc/logstash/conf.d/GeoLite2-City_20200804/GeoLite2-City.mmdb"
}
}
output {
stdout{codec => rubydebug}
}
测试
139.226.141.24 GET /index.html 15824 0.043
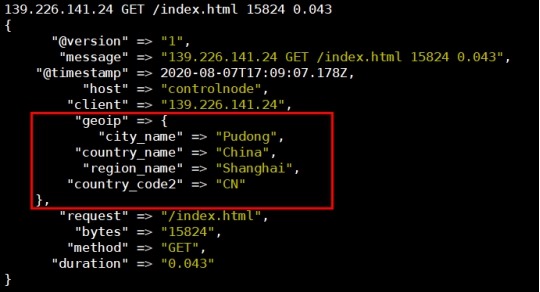
# cat /etc/logstash/conf.d/geoip2.conf
input {
stdin {
}
}
filter {
grok {
match => {
"message" => "%{IP:client} %{WORD:method} %{URIPATHPARAM:request} %{NUMBER:bytes} %{NUMBER:duration}"
}
}
geoip {
source => "client"
database => "/etc/logstash/conf.d/GeoLite2-City_20200804/GeoLite2-City.mmdb"
target => "geoip"
fields => ["city_name", "country_code2", "country_name", "region_name"]
}
}
output {
stdout{codec => rubydebug}
}
测试
139.226.141.24 GET /index.html 15824 0.043
geoip 字段所代表的含义
city_name, 城市名称
continent_code, 大洲代码
country_code2, 国家/地区代码2
country_code3, 国家/地区代码3
country_name, 国家/地区名称
dma_code, dma代码
ip, ip
latitude, 纬度
longitude, 经度
postal_code, 邮政编码
region_code, 地区代码
region_name、地区名称
timezone. 时区
4.5.5 date
日志时间过滤器用于从字段中解析日期,然后使用日期或时间戳作为事件的logstash时间戳。
如果不使用date插件,那么Logstash将处理事件作为时间戳。时间戳字段是Logstash自己添加到内置字段@timestamp,默认是UTC时间,比北京时间少8个小时。
插入到ES中保存的也是UTC时间,创建索引也是根据这个时间创建的。但Kibana是根据你当前浏览器的时区显示的(对timestamp加减)。
对nginx的访问日志做date处理
# cat /etc/logstash/conf.d/filter-date.conf
input {
stdin {
}
}
filter {
grok {
match => {
"message" => "%{IPV4:remote_addr} - (%{USERNAME:remote_user}|-) [%{HTTPDATE:time_local}] "%{WORD:request_method} %{URIPATHPARAM:request_uri} HTTP/%{NUMBER:http_protocol}" %{NUMBE
R:http_status} %{NUMBER:body_bytes_sent} "%{GREEDYDATA:http_referer}" "%{GREEDYDATA:http_user_agent}" "(%{GREEDYDATA:http_x_forwarded_for}|-)"" }
overwrite => ["message"]
}
date {
locale => "en"
match => ["time_local", "dd/MMM/yyyy:HH:mm:ss Z"]
# 默认target是@timestamp,所以time_local会更新@timestamp时间
}
}
output {
stdout{codec => rubydebug}
}
测试
172.16.1.254 - - [07/Aug/2020:15:20:33 +0800] "GET /favicon.ico HTTP/1.1" 401 581 "http://172.16.1.120/" "Mozilla/5.0 (Windows NT 10.0; Win64; x64) AppleWebKit/537.36 (KHTML, like Gecko) Chrome/81.0.4044.122 Safari/537.36" "-"
还是以UTC时间存储,但@timestamp不是采集时当前系统时间了,而是根据匹配模式里的time_local时间,可以写个别的时间测试。
4.5.6 mutate
修改指定字段的内容。
|
Setting |
Input type |
Required |
Default |
Description |
|
convert |
hash |
No |
|
将字段的值转换为其他类型 |
|
gsub |
array |
No |
|
用字符串替换正则匹配的内容,只支持字符串类型。 |
|
replace |
hash |
No |
|
用新值替换一个字段 |
比如字段类型转换:
filter {
mutate {
convert => { "fieldname" => "integer" }
}
}
4.6 输出插件(Output)
Output:输出,输出目标可以是Stdout、ES、Redis、File、TCP等。
4.6.1 ES
|
Setting |
Input type |
Required |
Default |
Description |
|
hosts |
URL |
No |
|
|
|
index |
string |
No |
logstash-%{+YYYY.MM.dd} |
将事件写入索引。默认按日期划分。 |
|
user |
string |
No |
|
ES集群用户 |
|
password |
password |
No |
|
ES集群密码 |
elasticsearch {
hosts => "localhost:9200"
index => "ytjh-admin-%{+YYYY.MM.dd}"
}
}
Lostash->ES
收集audit.log和messages日志
更改收集日志的权限
# chmod 644 /var/log/audit/audit.log
# chmod 644 /var/log/messages
logstash配置文件
# cat /etc/logstash/conf.d/logstash-es.conf
input {
file {
path => ["/var/log/messages"]
type => "system"
tags => ["syslog"]
start_position => "beginning"
}
file {
path => ["/var/log/audit/audit.log"]
type => "system"
tags => ["auth"]
start_position => "beginning"
}
}
filter {
}
output {
if [type] == "system" {
if [tags][0] == "syslog" {
elasticsearch {
hosts => ["http://172.16.1.121:9200","http://172.16.1.122:9200","http://172.16.1.123:9200"]
index => "logstash-system-syslog-%{+YYYY.MM.dd}"
}
stdout { codec=> rubydebug }
}
else if [tags][0] == "auth" {
elasticsearch {
hosts => ["http://172.16.1.121:9200","http://172.16.1.122:9200","http://172.16.1.123:9200"]
index => "logstash-system-auth-%{+YYYY.MM.dd}"
}
stdout {codec=> rubydebug}
}
}
}
启动logstash,也可以通过调试命令启动查看日志收集状态,因为带有stdout {codec=> rubydebug}参数
systemctl start logstash
在elastic-head中查看生成的索引
五、Kibana
在172.16.1.120节点上进行操作
安装kibana
# 安装 elk 的yum 源或在清华源下载elasticsearch对应版本的kibana rpm包
# yum install kibana –y
# vim /etc/kibana/kibana.yml
server.port: 5601
server.host: "0.0.0.0"
elasticsearch.hosts: ["http://172.16.1.121:9200"]
# systemctl start kibana
# systemctl enable kibana
# netstat -tunlp | grep "5601"
tcp 0 0 0.0.0.0:5601 0.0.0.0:* LISTEN 745/node
访问:
使用nginx对 kibana登录进行验证
安装 nginx
# yum install nginx -y
配置nginx 验证参数
# openssl passwd -crypt 123456
RbgCOrMsYkZCE
# echo "liuchang:RbgCOrMsYkZCE" >>/etc/nginx/passwd.db
# vim /etc/nginx/nginx.conf 修改nginx.conf server标签内容如下
server {
listen 80;
server_name _;
location / {
proxy_pass http://172.16.1.120:5601;
auth_basic "Please input user and password";
auth_basic_user_file /etc/nginx/passwd.db;
}
}
启动nginx并加入开机自启动
# systemctl start nginx
# systemctl enable nginx
# netstat -tunlp | grep nginx
tcp 0 0 0.0.0.0:80 0.0.0.0:* LISTEN 9722/nginx: master
六、引入Redis
优势:
1、相比上图,在多台服务器,大量日志情况下可减少对ES压力,队列起到缓冲作用,也可以一定程度保护数据不丢失。(当Filetbeat收集数据能力超过ES处理能力时,可增加队列均衡网络传输)
2、将收集的日志统一在Indexer中处理。
如果日志量大可采用Kafka做缓冲队列,相比Redis更适合大吞吐量。
在172.16.1.120节点上操作
安装redis
# yum install redis -y
# vim /etc/redis.conf
bind 0.0.0.0
requirepass 123456
# systemctl start redis
# systemctl enable redis
# netstat -tunlp | grep redis
tcp 0 0 0.0.0.0:6379 0.0.0.0:* LISTEN 32688/redis-server
七、引入Filebeat
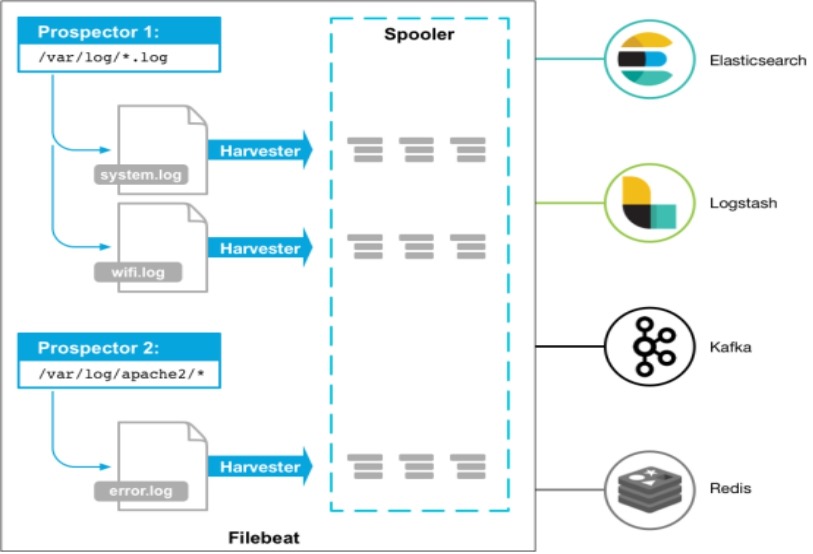
如果只采集日志,Filebeat比Logstash更适合,filebeat占用资源少,配置简单。
采集系统日志示例:
在172.16.1.120节点上操作
安装filebeat
# 安装 elk 的yum 源或在清华源下载elasticsearch对应版本的filebeat rpm包
# yum install filebeat -y
# systemctl start filebeat.service
# systemctl enable filebeat.service
# grep -E -v "^$|#" filebeat.yml
filebeat.inputs:
- type: log
enabled: true
paths:
- /var/log/messages
tags: ["filebeat-system-log"]
exclude_lines: ['^DBG','^$']
- type: log
enabled: true
paths:
- /var/log/tomcat/catalina.out
tags: ["filebeat-catalina-out"]
exclude_lines: ['^DBG','^$']
fields:
app: www
type: tomcat-catalina
fields_under_root: true
multiline:
pattern: '^['
negate: true
match: after
filebeat.config.modules:
path: ${path.config}/modules.d/*.yml
reload.enabled: false
setup.template.settings:
index.number_of_shards: 1
setup.kibana:
output.logstash:
hosts: ["172.16.1.91:5044"]
enabled: true
worker: 2
compression_level: 3
processors:
- add_host_metadata: ~
- add_cloud_metadata: ~
paths # 指定监控的文件,可通配符匹配。如果要对目录递归处理,例如/var/log/*/*.log
encoding:# 指定监控的文件编码类型,使用plain和utf-8都可以处理中文日志
exclude_lines: ['^DEBUG'] # 排除 DEBUG开头的行
include_lines: ['^ERR', '^WARN'] # 只读取ERR,WARN开头的行
fields # 新增字段,向输出的日志添加额外的信息,方面后面分组统计
fields_under_root # 设置true,则新增字段为根目录。否则是fields.level
# processors定义处理器在发送数据之前处理事件
drop_fields # 指定删除的字段
# 以JSON格式控制台输出,和processors同级
output.console:
pretty: true
多行匹配参数:
multiline:
pattern: '^['
negate: true
match: after
上面配置的意思是:不以 [ 开头的行都合并到上一行的末尾
pattern:正则表达式。
negate:true 或 false;默认是false,匹配pattern的行合并到上一行;true,不匹配pattern的行合并到上一行。
match:after 或 before,合并到上一行的末尾或开头。
八、生产实验
8.1 修改 nginx 为json格式
1 配置文件
vim /etc/nginx/nginx.conf #在nginx配置文件的http模块进行如下操作;
…………………………
http {
#log_format main '$remote_addr - $remote_user [$time_local] "$request" '
# '$status $body_bytes_sent "$http_referer" '
# '"$http_user_agent" "$http_x_forwarded_for"';
#access_log /var/log/nginx/access.log main;
log_format access_json '{"@timestamp":"$time_iso8601",'
'"server_addr":"$server_addr",'
'"remote_addr":"$remote_addr",'
'"body_bytes_sent":"$body_bytes_sent",'
'"request_time":"$request_time",'
'"upstream_response_time":"$upstream_response_time",'
'"upstream_addr":"$upstream_addr",'
'"uri":"$uri",'
'"http_referer":"$http_referer",'
'"http_user_agent":"$http_user_agent",'
'"http_x_forwarded_for":"$http_x_forwarded_for",'
'"remote_user":"$remote_user",'
'"request":"$request",'
'"status":"$status"}';
access_log /var/log/nginx/access.log access_json;
…………………………
}
2 检查配置文件
nginx -t
nginx: the configuration file /etc/nginx/nginx.conf syntax is ok
nginx: configuration file /etc/nginx/nginx.conf test is successful
3 启动nginx
systemctl start nginx.service
4 访问nginx
yum install httpd-tools -y
ab -n10000 -c100 http://172.16.1.120/index.html
5 查看nginx 访问日志变为了json格式
{"@timestamp":"2020-08-05T10:39:06+08:00","server_addr":"172.16.1.120","remote_addr":"120.204.241.100","body_bytes_sent":"15","request_time":"0.619","upstream_response_time":"0.619","upstream_addr":"172.16.1.120:5601","uri":"/api/ui_metric/report","http_referer":"http://172.16.1.120/app/kibana","http_user_agent":"Mozilla/5.0 (Windows NT 10.0; Win64; x64) AppleWebKit/537.36 (KHTML, like Gecko) Chrome/81.0.4044.122 Safari/537.36","http_x_forwarded_for":"-","remote_user":"liuchang","request":"POST /api/ui_metric/report HTTP/1.1","status":"200"}
转化为易看的json格式
{
"@timestamp": "2020-08-05T10:39:06+08:00",
"server_addr": "172.16.1.120",
"remote_addr": "120.204.241.100",
"body_bytes_sent": "15",
"request_time": "0.619",
"upstream_response_time": "0.619",
"upstream_addr": "172.16.1.120:5601",
"uri": "/api/ui_metric/report",
"http_referer": "http://172.16.1.120/app/kibana",
"http_user_agent": "Mozilla/5.0 (Windows NT 10.0; Win64; x64) AppleWebKit/537.36 (KHTML, like Gecko) Chrome/81.0.4044.122 Safari/537.36",
"http_x_forwarded_for": "-",
"remote_user": "liuchang",
"request": "POST /api/ui_metric/report HTTP/1.1",
"status": "200"
}
8.2 logstash 收集日志配置文件
1 修改被收集日志文件的权限
# chmod 644 /usr/local/tomcat/logs/catalina.out
# chmod 644 /var/log/nginx/access.log
# chmod 644 /var/log/nginx/error.log
2 filebeat 配置文件
# cat /etc/filebeat/filebeat.yml
filebeat.inputs:
- type: log
enabled: true
paths:
- /var/log/nginx/access.log
tags: ["nginx-access-log"]
exclude_lines: ['^DBG','^$']
- type: log
enabled: true
paths:
- /var/log/nginx/error.log
tags: ["nginx-error-log"]
exclude_lines: ['^DBG','^$']
- type: log
enabled: true
paths:
- /usr/local/tomcat/logs/catalina.out
tags: ["catalina-out-log"]
exclude_lines: ['^DBG','^$']
multiline:
pattern: '^['
negate: true
match: after
filebeat.config.modules:
path: ${path.config}/modules.d/*.yml
reload.enabled: false
setup.template.settings:
index.number_of_shards: 1
setup.kibana:
#output.logstash:
# hosts: ["172.16.1.91:5044"]
# enabled: true
# worker: 2
# compression_level: 3
output.redis:
hosts: ["172.16.1.120"]
password: "123456"
key: "filebeat"
db: 0
datatype: list
processors:
- add_host_metadata: ~
8.3 logstash 从redis中取数据配置文件
# cat /etc/logstash/conf.d/logstash-to-es-nginx.conf
input {
redis {
host => "172.16.1.120"
port => 6379
password => "123456"
db => "0"
data_type => "list"
key => "filebeat"
}
}
filter {
if "nginx-access-log" in [tags] {
json {
source => "message"
#remove_field => ["message"]
}
geoip {
source => "remote_addr"
target => "geoip"
database => "/opt/GeoLite2-City.mmdb"
add_field => ["[geoip][coordinates]", "%{[geoip][longitude]}"]
add_field => ["[geoip][coordinates]", "%{[geoip][latitude]}"]
}
mutate {
convert => ["[geoip][coordinates]", "float"]
}
}
}
output {
if "nginx-access-log" in [tags] {
elasticsearch {
hosts => ["172.16.1.121:9200","172.16.1.122:9200","172.16.1.123:9200"]
index => "logstash-nginx-access-log-%{+YYYY.MM.dd}"
}
stdout{codec => rubydebug}
}
if "nginx-error-log" in [tags] {
elasticsearch {
hosts => ["172.16.1.121:9200","172.16.1.122:9200","172.16.1.123:9200"]
index => "logstash-nginx-error-log-%{+YYYY.MM.dd}"
}
stdout{codec => rubydebug}
}
if "catalina-out-log" in [tags] {
elasticsearch {
hosts => ["172.16.1.121:9200","172.16.1.122:9200","172.16.1.123:9200"]
index => "logstash-catalina-out-log-%{+YYYY.MM.dd}"
}
stdout{codec => rubydebug}
}
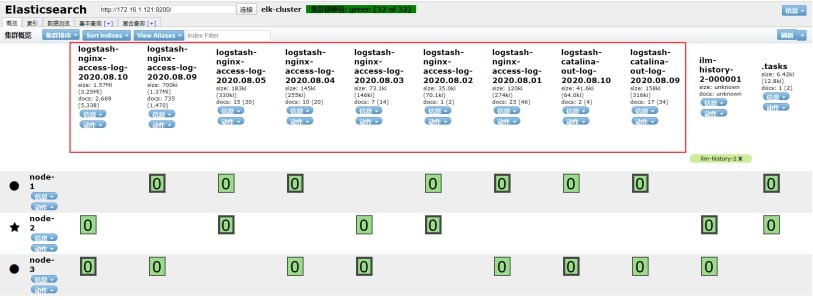
8.4 在 elastci-head 中查看收集的日志
8.5 kibana nginx access.log 数据可视化设置
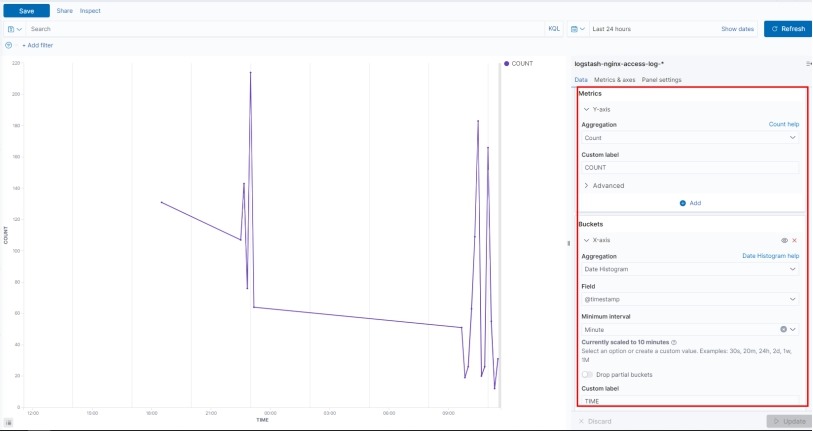
1 NGINX-PV
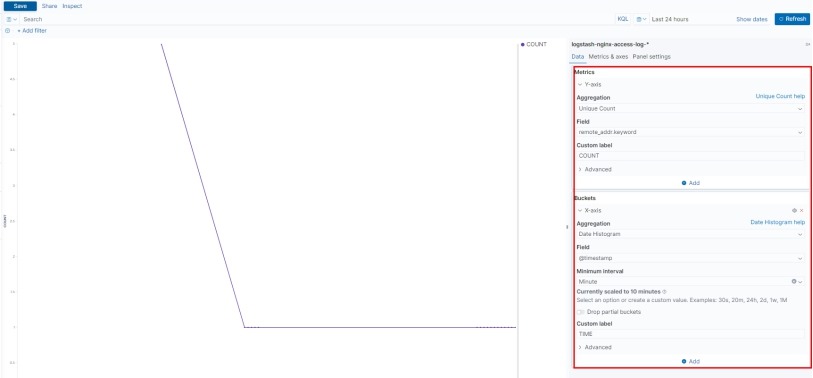
2 NGINX-UV
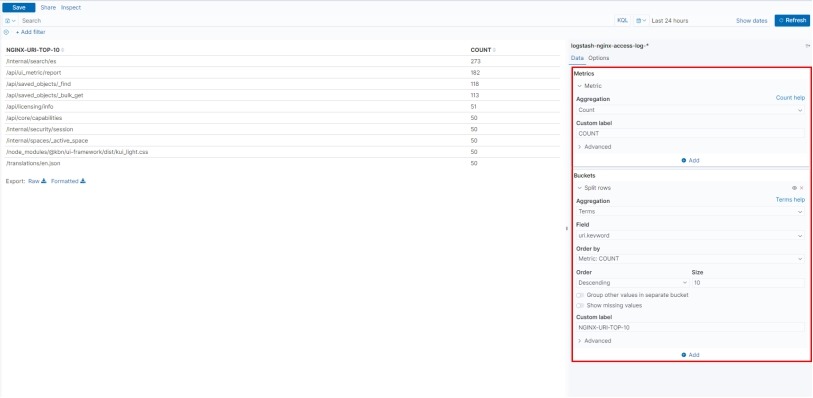
3 NGINX-URI-TOP-10
4 NGINX-HTTP-STATUS-TOP-10
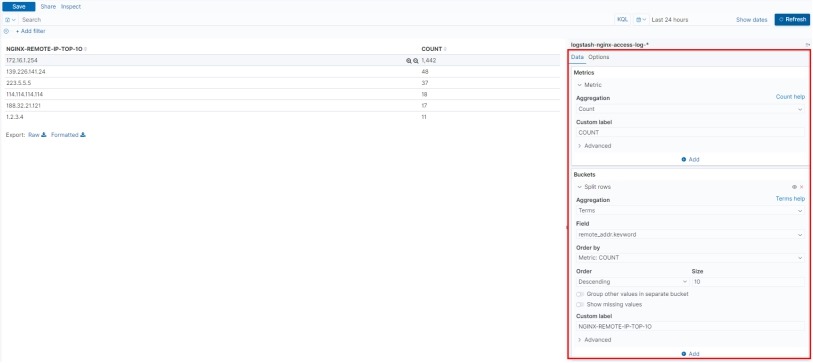
5 NGINX-REMOTE-IP-TOP-1O
6 NGINX-AGENT-TOP-10
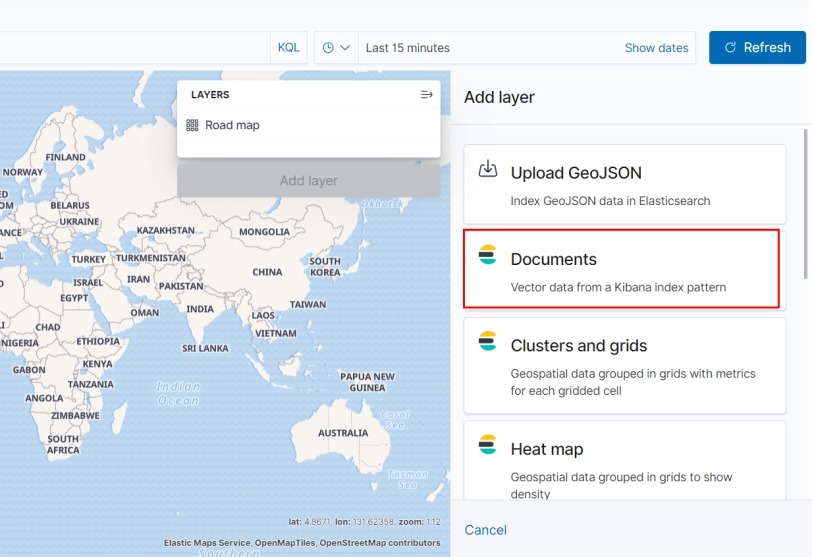
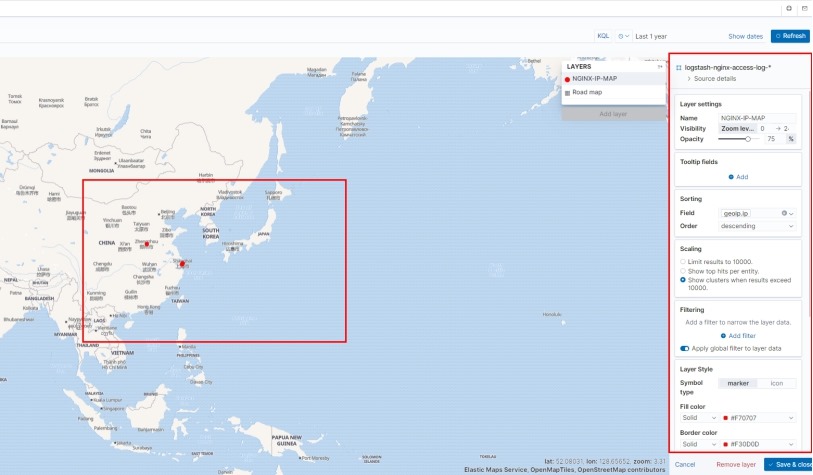
7 NGINX-IP-MAP
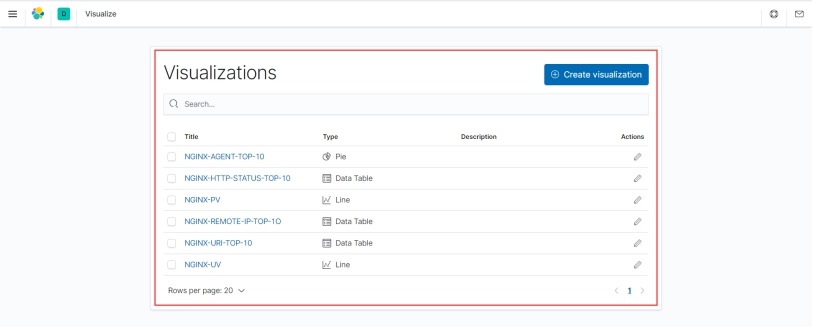
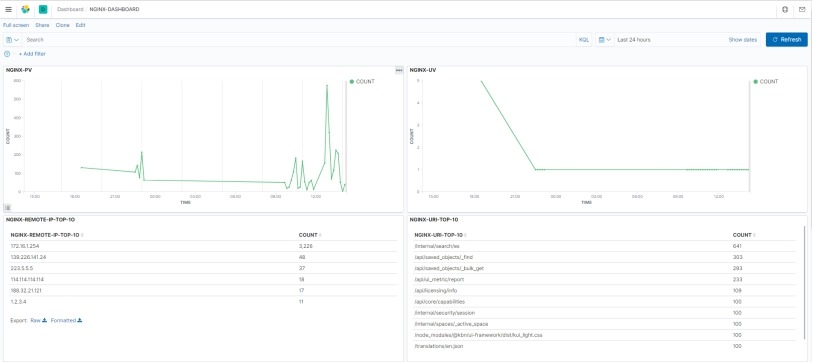
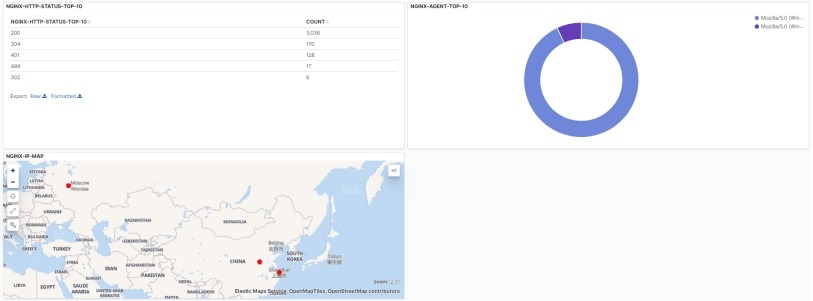
8 可视化图表
8.6 kibana nginx access.log仪表板设置
1将上面创建的可视化图表加入到仪表板中
2 仪表板显示
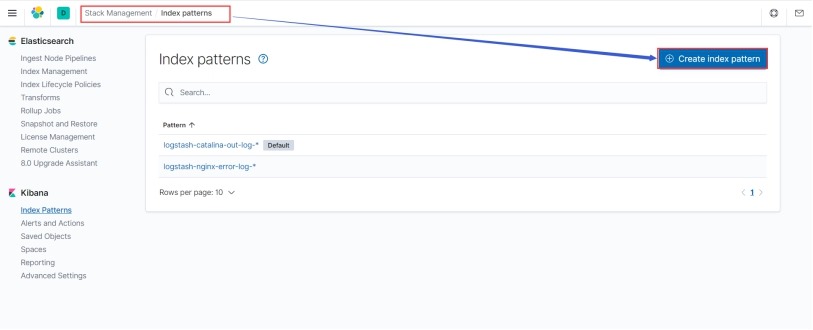
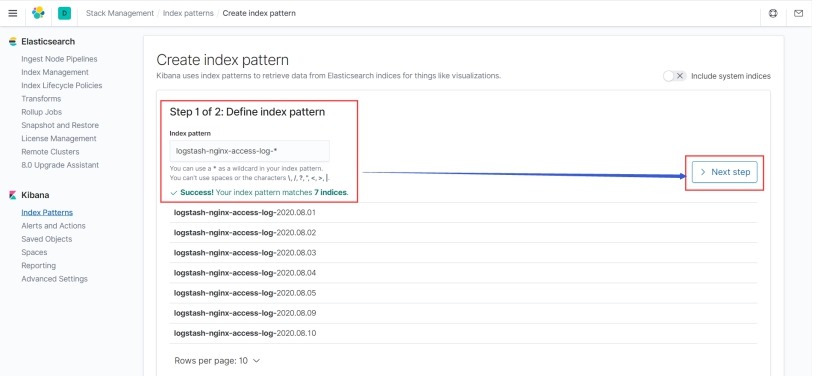
8.7 在 kibana 中添加 日志索引
1 创建索引模式
2 定义索引模式
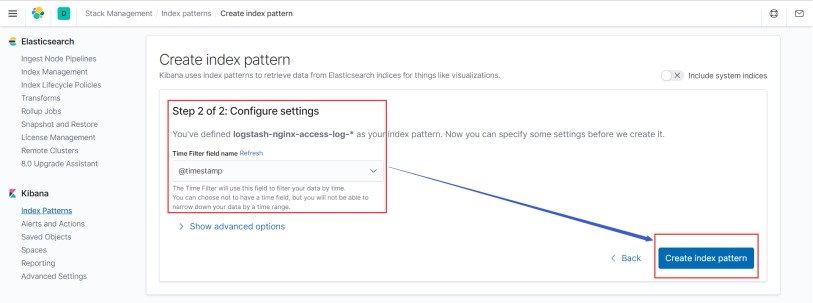
3 通过数据中的时间戳字段对索引进行过滤
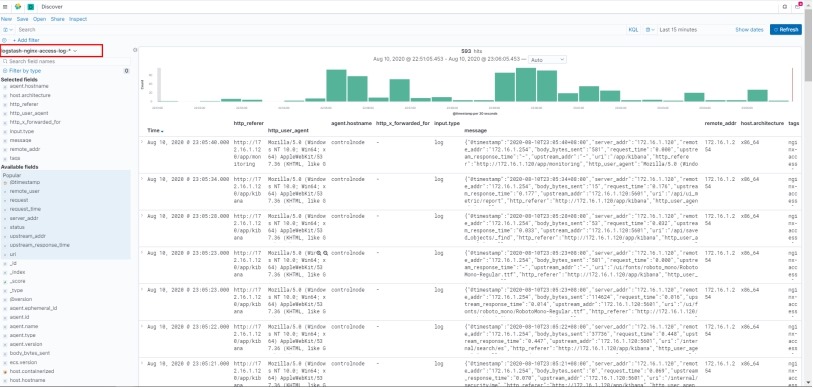
4 在discover中查看数据
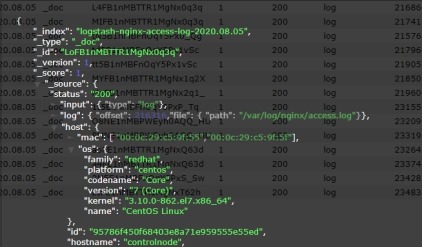
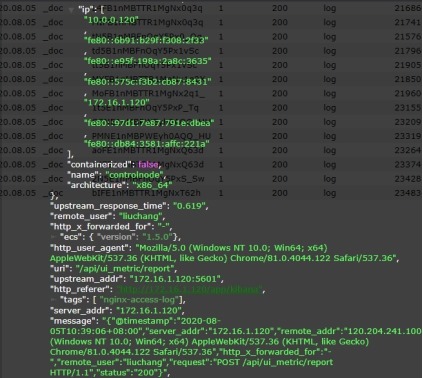
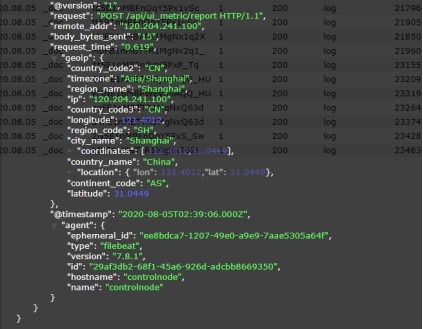
8.8 nginx access.log 一条日志在elasticsearch集群中存储的字段数据
8.9 小结
1 logstash/filebeat将处理事件作为时间戳,时间戳字段是logstash/filebeat自己添加到内置字段@timestamp(该时间戳可以被后来指定的时间戳覆盖),默认是UTC时间,比北京时间少8个小时,插入到ES中保存的也是UTC时间,创建索引(index => "*-log-%{+YYYY.MM.dd})也是根据这个时间创建的,但Kibana是根据你当前浏览器的时区显示的对timestamp加减。
2 es 中以xxx-<时间格式> 的索引方式对一类日志按天进行存储,在kibana中通过xxx-* 的方式把该类索引匹配为一个数据集,然后以每条数据中存在的时间戳对该类索引的数据集合进行查询。


