Azure构建PredictionIO和Spark的推荐引擎服务
1. 在Azure构建Ubuntu 16.04虚拟机
假设前提条件您已有 Azure 帐号,登陆 Azure https://portal.azure.com 。
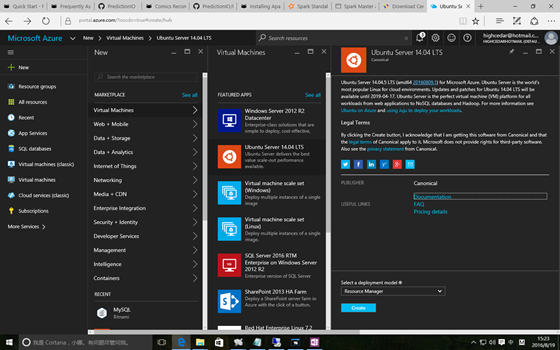
点击左上部的 +New 按钮,在搜索框中输入 Ubuntu ,或者点击 Virtual Machine 选择 Ubuntu Server 14.04 LTS,然后点击 Create 创建虚拟机。
创建完成虚拟机后,在虚拟机的设置中找到 Azure 为其分配的 IP 地址,通过 Bitvise SSH Client 远程登陆虚拟机开始快速搭建推荐引擎服务之旅。
2. 以 PredictionIO 源码编译的方式安装
之所以本文以源码编译的方式安装 PredictionIO ,是因为其他方式我都未尝试成功。
2.1 编译
Run the following to download and build Apache PredictionIO (incubating) from its source code.
$ git clone https://github.com/apache/incubator-predictionio.git
$ cd incubator-predictionio
$ git checkout master
$ ./make-distribution.sh
You should see something like the following when it finishes building successfully.
... PredictionIO-0.9.6/sbt/sbt PredictionIO-0.9.6/conf/
PredictionIO-0.9.6/conf/pio-env.sh PredictionIO binary distribution
created at PredictionIO-0.9.6.tar.gz Extract the binary distribution
you have just built.
$ tar zxvf PredictionIO-0.9.6.tar.gz2.2 安装依赖
Let us install dependencies inside a subdirectory of the Apache PredictionIO (incubating) installation. By following this convention, you can use Apache PredictionIO (incubating)'s default configuration as is.
$ mkdir PredictionIO-0.9.6/vendors2.3 安装Spark依赖包
Apache Spark is the default processing engine for PredictionIO. Download and extract it.
$ wget http://d3kbcqa49mib13.cloudfront.net/spark-1.5.1-bin-hadoop2.6.tgz
$ tar zxvfC spark-1.5.1-bin-hadoop2.6.tgz PredictionIO-0.9.6/vendors
If you decide to install Apache Spark to another location, you must edit PredictionIO-0.9.6/conf/pio-env.sh and change the SPARK_HOME variable to point to your own Apache Spark installation.
2.4 数据存储
官方给的例子是采用 PostgreSQL 或者Hbase + Elasticsearch,我选择 MySQL 作为数据存储,因为在将来的数据可视化方面会采用 Caravel 自动化生成仪表板展现数据,在后续的文章中我会再详细介绍这方面。
在mysql官方网站下载 mysql-connector-java-5.1.37.jar 并保存至 PredictionIO-0.9.6/lib 文件夹中。
修改pi配置文件 pio-env.sh
#!/usr/bin/env bash

# Copy this file as pio-env.sh and edit it for your site's configuration.

# PredictionIO Main Configuration
#
# This section controls core behavior of PredictionIO. It is very likely that
# you need to change these to fit your site.

# SPARK_HOME: Apache Spark is a hard dependency and must be configured.
SPARK_HOME=$PIO_HOME/vendors/spark-1.5.1-bin-hadoop2.6

#POSTGRES_JDBC_DRIVER=$PIO_HOME/lib/postgresql-9.4-1204.jdbc41.jar
MYSQL_JDBC_DRIVER=$PIO_HOME/lib/mysql-connector-java-5.1.37.jar

# ES_CONF_DIR: You must configure this if you have advanced configuration for
# your Elasticsearch setup.
# ES_CONF_DIR=/opt/elasticsearch

# HADOOP_CONF_DIR: You must configure this if you intend to run PredictionIO
# with Hadoop 2.
# HADOOP_CONF_DIR=/opt/hadoop

# HBASE_CONF_DIR: You must configure this if you intend to run PredictionIO
# with HBase on a remote cluster.
# HBASE_CONF_DIR=$PIO_HOME/vendors/hbase-1.0.0/conf

# Filesystem paths where PredictionIO uses as block storage.
PIO_FS_BASEDIR=$HOME/.pio_store
PIO_FS_ENGINESDIR=$PIO_FS_BASEDIR/engines
PIO_FS_TMPDIR=$PIO_FS_BASEDIR/tmp

# PredictionIO Storage Configuration
#
# This section controls programs that make use of PredictionIO's built-in
# storage facilities. Default values are shown below.
#
# For more information on storage configuration please refer to
# https://docs.prediction.io/system/anotherd
# Storage Repositories

# Default is to use PostgreSQL
PIO_STORAGE_REPOSITORIES_METADATA_NAME=pio_meta
PIO_STORAGE_REPOSITORIES_METADATA_SOURCE=MYSQL

PIO_STORAGE_REPOSITORIES_EVENTDATA_NAME=pio_event
PIO_STORAGE_REPOSITORIES_EVENTDATA_SOURCE=MYSQL

PIO_STORAGE_REPOSITORIES_MODELDATA_NAME=pio_model
PIO_STORAGE_REPOSITORIES_MODELDATA_SOURCE=MYSQL

# Storage Data Sources

# PostgreSQL Default Settings
# Please change "pio" to your database name in PIO_STORAGE_SOURCES_PGSQL_URL
# Please change PIO_STORAGE_SOURCES_PGSQL_USERNAME and
# PIO_STORAGE_SOURCES_PGSQL_PASSWORD accordingly
#PIO_STORAGE_SOURCES_PGSQL_TYPE=jdbc
#PIO_STORAGE_SOURCES_PGSQL_URL=jdbc:postgresql://localhost/pio
#PIO_STORAGE_SOURCES_PGSQL_USERNAME=pio
#PIO_STORAGE_SOURCES_PGSQL_PASSWORD=pio

# MySQL Example
PIO_STORAGE_SOURCES_MYSQL_TYPE=jdbc
PIO_STORAGE_SOURCES_MYSQL_URL=jdbc:mysql://10.18.218.9:13306/xuesongpio
PIO_STORAGE_SOURCES_MYSQL_USERNAME=root
PIO_STORAGE_SOURCES_MYSQL_PASSWORD=******

# Elasticsearch Example
# PIO_STORAGE_SOURCES_ELASTICSEARCH_TYPE=elasticsearch
# PIO_STORAGE_SOURCES_ELASTICSEARCH_CLUSTERNAME=<elasticsearch_cluster_name>
# PIO_STORAGE_SOURCES_ELASTICSEARCH_HOSTS=localhost
# PIO_STORAGE_SOURCES_ELASTICSEARCH_PORTS=9300
# PIO_STORAGE_SOURCES_ELASTICSEARCH_HOME=$PIO_HOME/vendors/elasticsearch-1.4.4

# Local File System Example
# PIO_STORAGE_SOURCES_LOCALFS_TYPE=localfs
# PIO_STORAGE_SOURCES_LOCALFS_PATH=$PIO_FS_BASEDIR/models
atastore/

# HBase Example
# PIO_STORAGE_SOURCES_HBASE_TYPE=hbase
# PIO_STORAGE_SOURCES_HBASE_HOME=$PIO_HOME/vendors/hbase-1.0.0
2.5声明 PrecidtionIO 和 Java 的环境变量
我是在 /root/.bahsrc 里增加如下代码:
PIO_HOME=/root/PredictionIO-0.9.6
JAVA_HOME=/usr/lib/jvm/java-8-oracle
JRE_HOME=$JAVA_HOME/jre
PATH=$PATH:$PIO_HOME/bin:$JAVA_HOME/bin:$JRE_HOME/bin
export PIO_HOME
export JAVA_HOME
export PATH
3. 创建推荐引擎服务
3.1 启动 PredictionIO Event Server
因为我在运行 PredictionIO 过程中发现它还是挺吃内存的,不管是 PredictionIO 还是 Spark,因此我特别分配的16的内存运行 Event server
JAVA_OPTS=-Xmx16g bin/pio eventserver & 3.2 启动 Spark
通过 PredictionIO 内置的脚本启动 Spark 进行模型训练时总是出现问题,所以采用手动启动 Spark 集群的方式规避此问题。
You can start a standalone master server by executing:
PredictionIO-0.9.6/vendors/spark-1.5.1-bin-hadoop2.6/sbin/start-master.shOnce started, the master will print out a spark://HOST:PORT URL for itself, which you can use to connect workers to it, or pass as the "master" argument to SparkContext. You can also find this URL on the master's web UI, which is http://localhost:8080 by default.
Similarly, you can start one or more workers and connect them to the master via:
./sbin/start-slave.sh <master-spark-URL>即
PredictionIO-0.9.6/vendors/spark-1.5.1-bin-hadoop2.6/sbin/start-slave.shspark://localhost:8080Once you have started a worker, look at the master's web UI (http://localhost:8080 by default). You should see the new node listed there, along with its number of CPUs and memory (minus one gigabyte left for the OS).

3.3 Create a new Engine from an Engine Template
Now let's create a new engine called MyRecommendation by downloading the Recommendation Engine Template. Go to a directory where you want to put your engine and run the following:
$ pio template get PredictionIO/template-scala-parallel-recommendation MyRecommendation
$ cd MyRecommendation
A new directory MyRecommendation is created, where you can find the downloaded engine template.
3.4 Generate an App ID and Access Key
You will need to create a new App in PredictionIO to store all the data of your app. The data collected will be used for machine learning modeling.
Let's assume you want to use this engine in an application named "MyApp1". Run the following to create a new app "MyApp1":
$ pio app new MyApp1You should find the following in the console output:
... [INFO] [App]InitializedEventStoreforthisappID:1.[INFO][App]InitializedEventStoreforthisappID:1.[INFO][App] Created new app: [INFO] [App]Name:MyApp1[INFO][App]Name:MyApp1[INFO][App] ID: 1
[INFO] [App$] Access Key:
3mZWDzci2D5YsqAnqNnXH9SB6Rg3dsTBs8iHkK6X2i54IQsIZI1eEeQQyMfs7b3F Note
that App ID, **Access Key* are created for this App "MyApp1". You will need the Access Key when you collect data with EventServer for this App.
You can list all of the apps created its corresponding ID and Access Key by running the following command:
$ pio app listYou should see a list of apps created. For example:
[INFO] [App]Name|ID|AccessKey|AllowedEvent(s)[INFO][App]Name|ID|AccessKey|AllowedEvent(s)[INFO][App]
MyApp1 | 1 |
3mZWDzci2D5YsqAnqNnXH9SB6Rg3dsTBs8iHkK6X2i54IQsIZI1eEeQQyMfs7b3F |
(all) [INFO] [App]MyApp2|2|io5lz6Eg4m3Xe4JZTBFE13GMAf1dhFl6ZteuJfrO84XpdOz9wRCrDU44EUaYuXq5|(all)[INFO][App]MyApp2|2|io5lz6Eg4m3Xe4JZTBFE13GMAf1dhFl6ZteuJfrO84XpdOz9wRCrDU44EUaYuXq5|(all)[INFO][App] Finished listing 2 app(s).
3.5 Import More Sample Data
This engine requires more data in order to train a useful model. Instead of sending more events one by one in real time, for quickstart demonstration purpose, we are going to use a script to import more events in batch.
A Python import script import_eventserver.py is provided in the template to import the data to Event Server using Python SDK. Please upgrade to the latest Python SDK.
First, you will need to install Python SDK in order to run the sample data import script. To install Python SDK, run:
$ pip install predictionioYou may need sudo access if you have permission issue. (ie. sudo pip install predictionio)
Replace the value of access_key parameter by your Access Key and run:
These commands must be executed in the Engine directory, for example: MyRecomendation.
$ cd MyRecommendation
$ curl https://raw.githubusercontent.com/apache/spark/master/data/mllib/sample_movielens_data.txt --create-dirs -o data/sample_movielens_data.txt
$ python data/import_eventserver.py --access_key $ACCESS_KEY
You should see the following output:
Importing data... 1501 events are imported.
3.6 编译模型
Start with building your MyRecommendation engine. Run the following command:
$ pio build --verboseThis command should take few minutes for the first time; all subsequent builds should be less than a minute. You can also run it without --verbose if you don't want to see all the log messages.
Upon successful build, you should see a console message similar to the following.
[INFO] [Console$] Your engine is ready for training.
3.7 训练模型
在上文中提到 Spark 集群是由我们手工启动的,因此在模型训练时指定 Spark master UI 和运行时内存参数。
To train your engine, run the following command:
pio train -- --master spark://localhost:7077 --driver-memory 16G --executor-memory 24G
Deploy Engine
To increase the heap space, specify the "-- --driver-memory " parameter in the command. For example, set the driver memory to 8G when deploy the engine:
$ pio deploy -- --driver-memory 8GWhen the engine is deployed successfully and running, you should see a console message similar to the following:
[INFO] [HttpListener] Bound to /0.0.0.0:8000 [INFO] [MasterActor] Bind
successful. Ready to serve.
Do not kill the deployed engine process.
By default, the deployed engine binds to http://localhost:8000. You can visit that page in your web browser to check its status.

3.8 Use the Engine
Now, You can try to retrieve predicted results. To recommend 4 movies to user whose id is 1, you send this JSON { "user": "1", "num": 4 } to the deployed engine and it will return a JSON of the recommended movies. Simply send a query by making a HTTP request or through the EngineClient of an SDK.
With the deployed engine running, open another temrinal and run the following curl command or use SDK to send the query:
$ curl -H "Content-Type: application/json"
-d '{ "user": "1", "num": 4 }' http://localhost:8000/queries.json
或者执行 Python 程序,程序代码如下:
import predictionio
engine_client = predictionio.EngineClient(url="http://localhost:8000")
print engine_client.send_query({"user": "1", "num": 4})
The following is sample JSON response:
{
"itemScores":[
{"item":"22","score":4.072304374729956},
{"item":"62","score":4.058482414005789},
{"item":"75","score":4.046063009943821},
{"item":"68","score":3.8153661512945325}
]
}
Congratulations, MyRecommendation is now running!
本文被批评文档格式不好,特意用 markdown 重新编辑一遍,请笑纳。