1、下载flume,解压到自建文件夹
2、修改flume-env.sh文件
在文件中添加JAVA_HOME
3、修改flume.conf 文件(原名好像不叫这个,我自己把模板名改了)
里面我自己配的(具体配置参见 http://flume.apache.org/FlumeUserGuide.html)
agent1 是我的代理名称
source是netcat (数据源)
channel 是memory(内存)
sink是hdfs(输出)
注意配置中添加
agent1.sinks.k1.hdfs.fileType = DataStream
否则hdfs中接收的文件会出现乱码
如果要配置根据时间来分类写入hdfs的功能,要求传入的文件必须要有时间戳(datastamp)
# Licensed to the Apache Software Foundation (ASF) under one
# or more contributor license agreements.  See the NOTICE file
# distributed with this work for additional information
# regarding copyright ownership.  The ASF licenses this file
# to you under the Apache License, Version 2.0 (the
# "License"); you may not use this file except in compliance
# with the License.  You may obtain a copy of the License at
#
#  http://www.apache.org/licenses/LICENSE-2.0
#
# Unless required by applicable law or agreed to in writing,
# software distributed under the License is distributed on an
# "AS IS" BASIS, WITHOUT WARRANTIES OR CONDITIONS OF ANY
# KIND, either express or implied.  See the License for the
# specific language governing permissions and limitations
# under the License.


# The configuration file needs to define the sources,
# the channels and the sinks.
# Sources, channels and sinks are defined per agent,
# in this case called 'agent'

agent1.sources = r1
agent1.channels = c1
agent1.sinks = k1

# For each one of the sources, the type is defined
agent1.sources.r1.type = netcat
agent1.sources.r1.channels = c1
#agent1.sources.r1.ack-every-event = false
agent1.sources.r1.max-line-length = 100
agent1.sources.r1.bind = 192.168.19.107
agent1.sources.r1.port = 44445


# Describe/configure the interceptor

#agent1.sources.r1.interceptors = i1
#agent1.sources.r1.interceptors.i1.type = com.nd.bigdata.insight.interceptor.KeyTimestampForKafka$Builder


# Each sink's type must be defined
#agent1.sinks.k1.type = org.apache.flume.sink.kafka.KafkaSink
#agent1.sinks.k1.topic = insight-test6
#agent1.sinks.k1.brokerList =192.168.181.120:9092,192.168.181.121:9092,192.168.181.66:9092
#agent1.sinks.k1.batchSize=100
#agent1.sinks.k1.requiredAcks = 0

# logger
#agent1.sinks.k1.type = logger
#agent1.sinks.k1.channel = c1

#HDFS
agent1.sinks.k1.type = hdfs
agent1.sinks.k1.channel = c1
agent1.sinks.k1.hdfs.path = test/flume/events/
agent1.sinks.k1.hdfs.filePrefix = events-
agent1.sinks.k1.hdfs.round = true
agent1.sinks.k1.hdfs.roundValue = 10
agent1.sinks.k1.hdfs.roundUnit = minute
agent1.sinks.k1.hdfs.fileType = DataStream

# Each channel's type is defined.
agent1.channels.c1.type = memory
agent1.channels.c1.capacity = 1000
"flume.conf" 70L, 2291C
4、启动flume:(文件根目录下启动)
bin/flume-ng agent --conf conf --conf-file conf/flume.conf --name agent1 -Dflume.root.logger=INFO,console(里面的flume.conf ,agent1 请替换成你自己的名字)
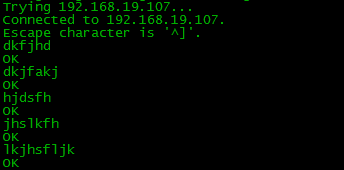
5、用另一台机试着发送文件
telnet 192.168.19.107 44445 (创建连接)
然后发送内容
6、生成的hdfs文件
