原来有个教程是关于Javamail的,但是那个是自己写Javamail的发送过程,这次不同的是:使用Spring的Mail功能,使用了消息队列。
先看一下设想的场景
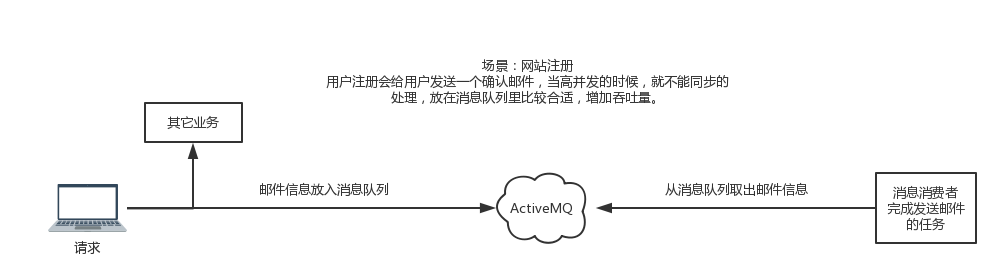
不过本文重点不是消息队列,而是使用spring发送邮件。
首先针对于不会Maven和消息队列的小盆友们
依赖jar包:
spring系列jar包
Javamail
先建立一个封装Mail信息的类:很好理解,里面的成员变量代表(收件人,主题,内容)
package com.mq.entity;

import java.io.Serializable;

public class MailInfo implements Serializable {

    /**
     *
     */
    private static final long serialVersionUID = -5853264487189248317L;
    private String to;
    private String subject;
    private String content;
    public MailInfo() {
    }
    public MailInfo(String to, String subject, String content) {
        this.to = to;
        this.subject = subject;
        this.content = content;
    }
    public String getTo() {
        return to;
    }
    public void setTo(String to) {
        this.to = to;
    }
    public String getSubject() {
        return subject;
    }
    public void setSubject(String subject) {
        this.subject = subject;
    }
    public String getContent() {
        return content;
    }
    public void setContent(String content) {
        this.content = content;
    }

}
然后呢,在classpath下面整一个属性文件,email.properties
mail.account=用户名
mail.pass=密码
mail.host=smtp.exmail.qq.com
mail.port=465
mail.protocol=smtp

mail.debug=true
mail.smtp.auth=true
mail.smtp.ssl.enable=true
注意:企业邮箱不用什么授权码,就是密码
然后classpath下建立spring配置文件。
<?xml version="1.0" encoding="UTF-8"?>
<beans xmlns="http://www.springframework.org/schema/beans"
    xmlns:xsi="http://www.w3.org/2001/XMLSchema-instance" xmlns:context="http://www.springframework.org/schema/context"
    xmlns:core="http://activemq.apache.org/schema/core" xmlns:task="http://www.springframework.org/schema/task"
    xsi:schemaLocation="http://www.springframework.org/schema/beans http://www.springframework.org/schema/beans/spring-beans.xsd
        http://www.springframework.org/schema/context http://www.springframework.org/schema/context/spring-context-4.3.xsd
        http://activemq.apache.org/schema/core http://activemq.apache.org/schema/core
        http://www.springframework.org/schema/task http://www.springframework.org/schema/task/spring-task-4.3.xsd">


    <context:component-scan base-package="com.mq.mail"></context:component-scan>

    <context:property-placeholder location="classpath:email.properties"/>

    <!-- 使用SSL,企业邮箱必需! -->
    <bean id="mailSSLSocketFactory" class="com.sun.mail.util.MailSSLSocketFactory">
        <property name="trustAllHosts" value="true"></property>
    </bean>

    <bean id="javaMailSender" class="org.springframework.mail.javamail.JavaMailSenderImpl">
        <property name="host" value="${mail.host}"></property>
        <property name="port" value="${mail.port}"></property>
        <property name="username" value="${mail.account}"></property>
        <property name="password" value="${mail.pass}"></property>
        <property name="protocol" value="${mail.protocol}"></property>
        <property name="defaultEncoding" value="UTF-8"></property>
        <!--
        -->
        <property name="javaMailProperties">
            <props>
                <!-- 使用SMTP身份验证 -->
                <prop key="mail.smtp.auth">${mail.smtp.auth}</prop>
                <!-- Debug模式 -->
                <prop key="mail.debug">${mail.debug}</prop>
                <!-- 使用SSL -->
                <prop key="mail.smtp.ssl.enable">${mail.smtp.ssl.enable}</prop>
                <!-- 配置MailSSLSocketFactory -->
                <prop key="mail.smtp.ssl.socketFactory">mailSSLSocketFactory</prop>
            </props>
        </property>
    </bean>

    <bean id="simpleMailMessage" class="org.springframework.mail.SimpleMailMessage">
        <property name="from" value="${mail.account}"></property>
    </bean>

    <bean id="threadPoolTaskExecutor" class="org.springframework.scheduling.concurrent.ThreadPoolTaskExecutor">
        <!-- 线程池维护线程的最少数量 -->
        <property name="corePoolSize" value="5" />
        <!-- 线程池维护线程的最大数量 -->
        <property name="maxPoolSize" value="20" />
        <!-- 线程池维护线程所允许的空闲时间 -->
        <property name="keepAliveSeconds" value="30000" />
        <!-- 线程池所使用的缓冲队列 -->
        <property name="queueCapacity" value="1000" />
    </bean>

</beans>
然后写一个发送邮件类
package com.mq.mail;

import org.springframework.beans.factory.annotation.Autowired;
import org.springframework.mail.SimpleMailMessage;
import org.springframework.mail.javamail.JavaMailSender;
import org.springframework.scheduling.concurrent.ThreadPoolTaskExecutor;
import org.springframework.stereotype.Component;

import com.mq.entity.MailInfo;

@Component
public class SendMail {

    @Autowired
    private JavaMailSender javaMailSender;
    @Autowired
    private SimpleMailMessage simpleMailMessage;
    @Autowired
    private ThreadPoolTaskExecutor threadPoolTaskExecutor;

    public void send(final MailInfo mailInfo){
        threadPoolTaskExecutor.execute(new Runnable() {

            @Override
            public void run() {
                try {
                    simpleMailMessage.setTo(mailInfo.getTo());
                    simpleMailMessage.setSubject(mailInfo.getSubject());
                    simpleMailMessage.setText(mailInfo.getContent());
                    javaMailSender.send(simpleMailMessage);
                } catch (Exception e) {
                    e.printStackTrace();
                }
            }
        });
    }

}
最后写一个测试类:
package com.mq.test;

import org.springframework.context.support.ClassPathXmlApplicationContext;

import com.mq.entity.MailInfo;
import com.mq.mail.SendMail;

public class TestMail {

    public static void main(String[] args) {
        ClassPathXmlApplicationContext app = new ClassPathXmlApplicationContext("classpath:spring-mail.xml");
        app.start();
        MailInfo mailInfo = new MailInfo("XXX@qq.com", "这是主题", "这是内容");
        app.getBean(SendMail.class).send(mailInfo);
        app.close();
    }
}
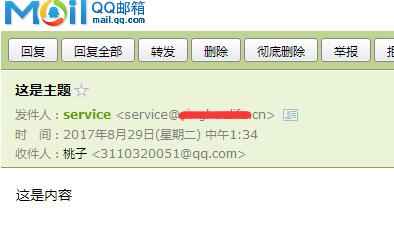
结果:
下面是Maven+消息队列的部分
我有两个工程,一个是生产者,一个是消费者。都是Maven的web工程。PS:这两个工程加入了mvc,因为本来想做个好玩的东西的,但是太忙了,先放下了,目前只有利用消息队列发送邮件的部分。这也是为啥依赖这么多的原因。
首先是生产者
Maven依赖:
   <properties>
        <spring.version>4.3.9.RELEASE</spring.version>
    </properties>

    <dependencies>
        <!-- https://mvnrepository.com/artifact/junit/junit -->
        <dependency>
            <groupId>junit</groupId>
            <artifactId>junit</artifactId>
            <version>4.12</version>
            <scope>test</scope>
        </dependency>
        <!-- https://mvnrepository.com/artifact/org.springframework/spring-test -->
        <dependency>
            <groupId>org.springframework</groupId>
            <artifactId>spring-test</artifactId>
            <version>${spring.version}</version>
            <scope>test</scope>
        </dependency>

        <dependency>
            <groupId>org.springframework</groupId>
            <artifactId>spring-context</artifactId>
            <version>${spring.version}</version>
        </dependency>
        <dependency>
            <groupId>org.springframework</groupId>
            <artifactId>spring-context-support</artifactId>
            <version>${spring.version}</version>
        </dependency>
        <dependency>
            <groupId>org.springframework</groupId>
            <artifactId>spring-aop</artifactId>
            <version>${spring.version}</version>
        </dependency>
        <dependency>
            <groupId>org.springframework</groupId>
            <artifactId>spring-beans</artifactId>
            <version>${spring.version}</version>
        </dependency>
        <dependency>
            <groupId>org.springframework</groupId>
            <artifactId>spring-core</artifactId>
            <version>${spring.version}</version>
        </dependency>
        <dependency>
            <groupId>org.springframework</groupId>
            <artifactId>spring-jms</artifactId>
            <version>${spring.version}</version>
        </dependency>
        <dependency>
            <groupId>org.springframework</groupId>
            <artifactId>spring-tx</artifactId>
            <version>${spring.version}</version>
        </dependency>
        <dependency>
            <groupId>org.springframework</groupId>
            <artifactId>spring-web</artifactId>
            <version>${spring.version}</version>
        </dependency>
        <dependency>
            <groupId>org.springframework</groupId>
            <artifactId>spring-webmvc</artifactId>
            <version>${spring.version}</version>
        </dependency>
        <dependency>
            <groupId>org.springframework</groupId>
            <artifactId>spring-aspects</artifactId>
            <version>${spring.version}</version>
        </dependency>
        <dependency>
            <groupId>org.springframework</groupId>
            <artifactId>spring-expression</artifactId>
            <version>${spring.version}</version>
        </dependency>
        <dependency>
            <groupId>org.springframework</groupId>
            <artifactId>spring-messaging</artifactId>
            <version>${spring.version}</version>
        </dependency>

        <dependency>
            <groupId>org.apache.activemq</groupId>
            <artifactId>activemq-all</artifactId>
            <version>5.15.0</version>
        </dependency>
        <dependency>
            <groupId>org.apache.activemq</groupId>
            <artifactId>activemq-pool</artifactId>
            <version>5.15.0</version>
        </dependency>

        <dependency>
            <groupId>com.alibaba</groupId>
            <artifactId>fastjson</artifactId>
            <version>1.2.35</version>
        </dependency>

        <!-- https://mvnrepository.com/artifact/com.fasterxml.jackson.core/jackson-core -->
        <dependency>
            <groupId>com.fasterxml.jackson.core</groupId>
            <artifactId>jackson-core</artifactId>
            <version>2.8.9</version>
        </dependency>
        <!-- https://mvnrepository.com/artifact/com.fasterxml.jackson.core/jackson-databind -->
        <dependency>
            <groupId>com.fasterxml.jackson.core</groupId>
            <artifactId>jackson-databind</artifactId>
            <version>2.8.9</version>
        </dependency>
        <!-- https://mvnrepository.com/artifact/com.fasterxml.jackson.core/jackson-annotations -->
        <dependency>
            <groupId>com.fasterxml.jackson.core</groupId>
            <artifactId>jackson-annotations</artifactId>
            <version>2.8.9</version>
        </dependency>
        <!-- https://mvnrepository.com/artifact/javax.mail/mail -->
        <dependency>
            <groupId>javax.mail</groupId>
            <artifactId>mail</artifactId>
            <version>1.4.7</version>
        </dependency>

        <dependency>
            <groupId>javax.servlet</groupId>
            <artifactId>jstl</artifactId>
            <version>1.2</version>
        </dependency>

    </dependencies>
建立ActiveMQ的属性文件:activemq.properties
activemq.brokerUrl=tcp://localhost:61616
activemq.userName=admin
activemq.password=admin
activemq.pool.maxConnection=10


activemq.queueName=foodQueue
activemq.topicName=foodTopic
因为是本地测试,我就在windows系统启动了一个ActiveMQ。
下面建立spring-activemq.xml
<?xml version="1.0" encoding="UTF-8"?>
<beans xmlns="http://www.springframework.org/schema/beans"
    xmlns:xsi="http://www.w3.org/2001/XMLSchema-instance"
    xmlns:context="http://www.springframework.org/schema/context"
    xmlns:core="http://activemq.apache.org/schema/core"
    xmlns:jms="http://www.springframework.org/schema/jms"
    xmlns:mvc="http://www.springframework.org/schema/mvc"
    xsi:schemaLocation="http://www.springframework.org/schema/beans http://www.springframework.org/schema/beans/spring-beans.xsd
        http://www.springframework.org/schema/context http://www.springframework.org/schema/context/spring-context-4.3.xsd
        http://activemq.apache.org/schema/core http://activemq.apache.org/schema/core
        http://www.springframework.org/schema/jms http://www.springframework.org/schema/jms/spring-jms-4.3.xsd
        http://www.springframework.org/schema/mvc http://www.springframework.org/schema/mvc/spring-mvc-4.3.xsd">

    <context:component-scan base-package="com.mq.service"></context:component-scan>
    <mvc:annotation-driven></mvc:annotation-driven>

    <context:property-placeholder location="classpath:activemq.properties"/>

    <!-- Spring提供的ConnectionFactory只是Spring用于管理ConnectionFactory的,
           真正产生到JMS服务器链接的ConnectionFactory还得是由JMS服务厂商提供,并且需要把它注入到Spring提供的ConnectionFactory中。 -->
    <bean id="activeMQConnectionFactory" class="org.apache.activemq.ActiveMQConnectionFactory">
        <property name="brokerURL" value="${activemq.brokerUrl}"></property>
        <property name="userName" value="${activemq.userName}"></property>
        <property name="password" value="${activemq.password}"></property>
    </bean>

    <!-- ActiveMQ为我们提供了一个PooledConnectionFactory,通过往里面注入一个ActiveMQConnectionFactory
          可以用来将Connection、Session和MessageProducer池化,这样可以大大的减少我们的资源消耗。 -->
    <bean id="pooledConnectionFactory" class="org.apache.activemq.pool.PooledConnectionFactory">
        <property name="connectionFactory" ref="activeMQConnectionFactory"></property>
        <property name="maxConnections" value="${activemq.pool.maxConnection}"></property>
    </bean>

    <!--  ConnectionFactory是用于产生到JMS服务器的链接的,Spring为我们提供了多个ConnectionFactory,有SingleConnectionFactory和CachingConnectionFactory。
          SingleConnectionFactory对于建立JMS服务器链接的请求会一直返回同一个链接,并且会忽略Connection的close方法调用。
          CachingConnectionFactory继承了SingleConnectionFactory,所以它拥有SingleConnectionFactory的所有功能,同时它还新增了缓存功能,它可以缓存Session、MessageProducer和MessageConsumer。 -->
    <bean id="connectionFactory" class="org.springframework.jms.connection.SingleConnectionFactory">
        <property name="targetConnectionFactory" ref="pooledConnectionFactory"></property>
    </bean>

    <!--     在真正利用JmsTemplate进行消息发送的时候,我们需要知道消息发送的目的地,即destination。
            在Jms中有一个用来表示目的地的Destination接口,它里面没有任何方法定义,只是用来做一个标识而已。
            当我们在使用JmsTemplate进行消息发送时没有指定destination的时候将使用默认的Destination。
            默认Destination可以通过在定义jmsTemplate bean对象时通过属性defaultDestination或defaultDestinationName来进行注入,
            defaultDestinationName对应的就是一个普通字符串。在ActiveMQ中实现了两种类型的Destination,
            一个是点对点的ActiveMQQueue,另一个就是支持订阅/发布模式的ActiveMQTopic。
            在定义这两种类型的Destination时我们都可以通过一个name属性来进行构造 -->

    <!-- 定义消息队列 -->
    <bean id="queueDestination" class="org.apache.activemq.command.ActiveMQQueue">
        <constructor-arg>
            <value>${activemq.queueName}</value>
        </constructor-arg>
    </bean>

    <!-- 定义主题 -->
    <bean id="topicDestination" class="org.apache.activemq.command.ActiveMQTopic">
        <constructor-arg>
            <value>${activemq.topicName}</value>
        </constructor-arg>
    </bean>

    <!-- 配置JMS模板,Spring提供的JMS工具类,它发送、接收消息。 -->
    <bean id="jmsTemplate" class="org.springframework.jms.core.JmsTemplate">
        <property name="connectionFactory" ref="connectionFactory"></property>
        <!--
        <property name="defaultDestinationName" value="${activemq.queueName}"></property>
        -->

        <property name="defaultDestination" ref="queueDestination"></property>

    </bean>

</beans>
spring.xml
<?xml version="1.0" encoding="UTF-8"?>
<beans xmlns="http://www.springframework.org/schema/beans"
    xmlns:xsi="http://www.w3.org/2001/XMLSchema-instance"
    xmlns:aop="http://www.springframework.org/schema/aop"
    xmlns:context="http://www.springframework.org/schema/context"
    xmlns:core="http://activemq.apache.org/schema/core"
    xmlns:tx="http://www.springframework.org/schema/tx"
    xsi:schemaLocation="http://www.springframework.org/schema/beans http://www.springframework.org/schema/beans/spring-beans.xsd
        http://www.springframework.org/schema/aop http://www.springframework.org/schema/aop/spring-aop-4.3.xsd
        http://www.springframework.org/schema/context http://www.springframework.org/schema/context/spring-context-4.3.xsd
        http://activemq.apache.org/schema/core http://activemq.apache.org/schema/core
        http://www.springframework.org/schema/tx http://www.springframework.org/schema/tx/spring-tx-4.3.xsd">


    <import resource="classpath:spring-activemq.xml"/>
</beans>
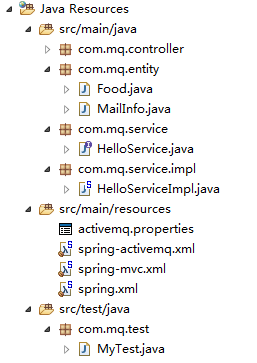
接下来写代码,目录结构如下:(你不需要考虑controller,以及spring-mvc.xml,以及Food)
建立Mail信息类:


package com.mq.entity;

import java.io.Serializable;

public class MailInfo implements Serializable {

    /**
     *
     */
    private static final long serialVersionUID = -5853264487189248317L;
    private String to;
    private String subject;
    private String content;
    public MailInfo() {
    }
    public MailInfo(String to, String subject, String content) {
        this.to = to;
        this.subject = subject;
        this.content = content;
    }
    public String getTo() {
        return to;
    }
    public void setTo(String to) {
        this.to = to;
    }
    public String getSubject() {
        return subject;
    }
    public void setSubject(String subject) {
        this.subject = subject;
    }
    public String getContent() {
        return content;
    }
    public void setContent(String content) {
        this.content = content;
    }

}
关于那个Food是我测试着玩的哈哈,满足你的好奇心
package com.mq.entity;

import java.io.Serializable;
import java.util.Date;

public class Food implements Serializable {

    private static final long serialVersionUID = 1L;

    private String foodName;
    private double foodPrice;
    private int foodNumber;
    private Date orderTime;
    public Food() {
    }
    public Food(String foodName, double foodPrice, int foodNumber, Date orderTime) {
        super();
        this.foodName = foodName;
        this.foodPrice = foodPrice;
        this.foodNumber = foodNumber;
        this.orderTime = orderTime;
    }
    public String getFoodName() {
        return foodName;
    }
    public void setFoodName(String foodName) {
        this.foodName = foodName;
    }
    public double getFoodPrice() {
        return foodPrice;
    }
    public void setFoodPrice(double foodPrice) {
        this.foodPrice = foodPrice;
    }
    public int getFoodNumber() {
        return foodNumber;
    }
    public void setFoodNumber(int foodNumber) {
        this.foodNumber = foodNumber;
    }
    public Date getOrderTime() {
        return orderTime;
    }
    public void setOrderTime(Date orderTime) {
        this.orderTime = orderTime;
    }
    @Override
    public String toString() {
        return "Food [foodName=" + foodName + ", foodPrice=" + foodPrice + ", foodNumber=" + foodNumber + ", orderTime="
                + orderTime + "]";
    }


}
消息服务接口
package com.mq.service;

import javax.jms.Destination;

import org.springframework.stereotype.Service;

import com.mq.entity.Food;
import com.mq.entity.MailInfo;

@Service
public interface HelloService {

    void sendMessage(Destination destination, Food food);

    void sendMail(Destination destination, MailInfo mail);
}
消息服务实现:
package com.mq.service.impl;

import javax.jms.Destination;
import javax.jms.JMSException;
import javax.jms.Message;
import javax.jms.Session;

import org.springframework.beans.factory.annotation.Autowired;
import org.springframework.jms.core.JmsTemplate;
import org.springframework.jms.core.MessageCreator;
import org.springframework.stereotype.Service;

import com.alibaba.fastjson.JSONObject;
import com.mq.entity.Food;
import com.mq.entity.MailInfo;
import com.mq.service.HelloService;

@Service
public class HelloServiceImpl implements HelloService {

    @Autowired
    private JmsTemplate jmsTemplate;

    @Override
    public void sendMessage(Destination destination, Food food){
        jmsTemplate.send(destination, new MessageCreator() {

            @Override
            public Message createMessage(Session session) throws JMSException {
                return session.createTextMessage(JSONObject.toJSONString(food));
//                return session.createObjectMessage(new Food("蛋糕", 66.5, 1, new Date()));
            }
        });
    }

    @Override
    public void sendMail(Destination destination, MailInfo mail) {
        jmsTemplate.send(destination, new MessageCreator() {

            @Override
            public Message createMessage(Session session) throws JMSException {
                return session.createTextMessage(JSONObject.toJSONString(mail));
            }
        });
    }

}
最后是测试类,这里使用了springTest。
package com.mq.test;

import javax.jms.Destination;

import org.junit.Test;
import org.junit.runner.RunWith;
import org.springframework.beans.factory.annotation.Autowired;
import org.springframework.beans.factory.annotation.Qualifier;
import org.springframework.test.context.ContextConfiguration;
import org.springframework.test.context.junit4.SpringJUnit4ClassRunner;

import com.mq.entity.MailInfo;
import com.mq.service.HelloService;

@ContextConfiguration(locations={"classpath:spring.xml"})
@RunWith(SpringJUnit4ClassRunner.class)
public class MyTest {

    //@Autowired与@Resource都可以用来装配bean. 都可以写在字段上,或写在setter方法上。

    //使用@Autowired的话,想使用名称装配可以结合@Qualifier注解进行使用

    //@Resource(这个注解属于J2EE的),默认安照名称进行装配,名称可以通过name属性进行指定,
    //如果没有指定name属性,当注解写在字段上时,默认取字段名进行按照名称查找,如果注解写在setter方法上默认取属性名进行装配。

    @Autowired
    private HelloService helloService;

    @Autowired
    @Qualifier("queueDestination")
    private Destination destination;

    @Test
    public void test(){
        //helloService.sendMessage(destination, new Food("蛋糕", 66.5, 1, new Date()));
        for (int i = 0; i < 1; i++) {
            helloService.sendMail(destination, new MailInfo("XXX@qq.com", "Spring java mail"+i, "生产者-消息队列-消费者-spring-mail"));
        }
    }
}
下面是消费者:
依赖和生产者一样的,这里不重复了。activemq.properties也一样。
邮箱属性文件:
mail.account=用户名
mail.pass=密码
mail.host=smtp.exmail.qq.com
mail.port=465
mail.protocol=smtp

mail.debug=true
mail.smtp.auth=true
mail.smtp.ssl.enable=true
spring-activemq.xml:
<?xml version="1.0" encoding="UTF-8"?>
<beans xmlns="http://www.springframework.org/schema/beans"
    xmlns:xsi="http://www.w3.org/2001/XMLSchema-instance"
    xmlns:context="http://www.springframework.org/schema/context"
    xmlns:core="http://activemq.apache.org/schema/core"
    xmlns:jms="http://www.springframework.org/schema/jms"
    xmlns:mvc="http://www.springframework.org/schema/mvc"
    xsi:schemaLocation="http://www.springframework.org/schema/beans http://www.springframework.org/schema/beans/spring-beans.xsd
        http://www.springframework.org/schema/context http://www.springframework.org/schema/context/spring-context-4.3.xsd
        http://activemq.apache.org/schema/core http://activemq.apache.org/schema/core
        http://www.springframework.org/schema/jms http://www.springframework.org/schema/jms/spring-jms-4.3.xsd
        http://www.springframework.org/schema/mvc http://www.springframework.org/schema/mvc/spring-mvc-4.3.xsd">

    <mvc:annotation-driven></mvc:annotation-driven>
    <!--
    <context:property-placeholder location="classpath:activemq.properties"/>
    -->

    <!-- Spring提供的ConnectionFactory只是Spring用于管理ConnectionFactory的,
           真正产生到JMS服务器链接的ConnectionFactory还得是由JMS服务厂商提供,并且需要把它注入到Spring提供的ConnectionFactory中。 -->
    <bean id="activeMQConnectionFactory" class="org.apache.activemq.ActiveMQConnectionFactory">
        <property name="brokerURL" value="${activemq.brokerUrl}"></property>
        <property name="userName" value="${activemq.userName}"></property>
        <property name="password" value="${activemq.password}"></property>
    </bean>

    <!-- ActiveMQ为我们提供了一个PooledConnectionFactory,通过往里面注入一个ActiveMQConnectionFactory
          可以用来将Connection、Session和MessageProducer池化,这样可以大大的减少我们的资源消耗。 -->
    <bean id="pooledConnectionFactory" class="org.apache.activemq.pool.PooledConnectionFactory">
        <property name="connectionFactory" ref="activeMQConnectionFactory"></property>
        <property name="maxConnections" value="${activemq.pool.maxConnection}"></property>
    </bean>

    <!--  ConnectionFactory是用于产生到JMS服务器的链接的,Spring为我们提供了多个ConnectionFactory,有SingleConnectionFactory和CachingConnectionFactory。
          SingleConnectionFactory对于建立JMS服务器链接的请求会一直返回同一个链接,并且会忽略Connection的close方法调用。
          CachingConnectionFactory继承了SingleConnectionFactory,所以它拥有SingleConnectionFactory的所有功能,同时它还新增了缓存功能,它可以缓存Session、MessageProducer和MessageConsumer。 -->
    <bean id="connectionFactory" class="org.springframework.jms.connection.SingleConnectionFactory">
        <property name="targetConnectionFactory" ref="pooledConnectionFactory"></property>
    </bean>

    <!--     在真正利用JmsTemplate进行消息发送的时候,我们需要知道消息发送的目的地,即destination。
            在Jms中有一个用来表示目的地的Destination接口,它里面没有任何方法定义,只是用来做一个标识而已。
            当我们在使用JmsTemplate进行消息发送时没有指定destination的时候将使用默认的Destination。
            默认Destination可以通过在定义jmsTemplate bean对象时通过属性defaultDestination或defaultDestinationName来进行注入,
            defaultDestinationName对应的就是一个普通字符串。在ActiveMQ中实现了两种类型的Destination,
            一个是点对点的ActiveMQQueue,另一个就是支持订阅/发布模式的ActiveMQTopic。
            在定义这两种类型的Destination时我们都可以通过一个name属性来进行构造 -->

    <!-- 定义消息队列 -->
    <bean id="queueDestination" class="org.apache.activemq.command.ActiveMQQueue">
        <constructor-arg>
            <value>${activemq.queueName}</value>
        </constructor-arg>
    </bean>

    <!-- 定义主题 -->
    <bean id="topicDestination" class="org.apache.activemq.command.ActiveMQTopic">
        <constructor-arg>
            <value>${activemq.topicName}</value>
        </constructor-arg>
    </bean>

    <!-- 装配监听器 -->
    <bean id="mqListener" class="com.mq.listener.ActiveMQListener"></bean>

    <!-- 消费者是如何知道有生产者发送消息到指定目的地Destination了呢?这是通过Spring为我们封装的消息监听容器MessageListenerContainer实现的,它负责接收信息,并把接收到的信息分发给真正的MessageListener进行处理。
           我们在配置一个MessageListenerContainer的时候有三个属性必须指定,一个是表示从哪里监听的ConnectionFactory;一个是表示监听什么的Destination;一个是接收到消息以后进行消息处理的MessageListener。
         Spring一共为我们提供了两种类型的MessageListenerContainer,SimpleMessageListenerContainer和DefaultMessageListenerContainer。
         大多数情况下我们还是使用的DefaultMessageListenerContainer,跟SimpleMessageListenerContainer相比,DefaultMessageListenerContainer会动态的适应运行时需要,并且能够参与外部的事务管理。
     -->
    <bean id="jmsContainer" class="org.springframework.jms.listener.DefaultMessageListenerContainer">
        <property name="connectionFactory" ref="connectionFactory"></property>
        <property name="destination" ref="queueDestination"></property>
        <property name="messageListener" ref="mqListener"></property>
    </bean>

</beans>
spring-mail.xml:
<?xml version="1.0" encoding="UTF-8"?>
<beans xmlns="http://www.springframework.org/schema/beans"
    xmlns:xsi="http://www.w3.org/2001/XMLSchema-instance" xmlns:context="http://www.springframework.org/schema/context"
    xmlns:core="http://activemq.apache.org/schema/core" xmlns:task="http://www.springframework.org/schema/task"
    xsi:schemaLocation="http://www.springframework.org/schema/beans http://www.springframework.org/schema/beans/spring-beans.xsd
        http://www.springframework.org/schema/context http://www.springframework.org/schema/context/spring-context-4.3.xsd
        http://activemq.apache.org/schema/core http://activemq.apache.org/schema/core
        http://www.springframework.org/schema/task http://www.springframework.org/schema/task/spring-task-4.3.xsd">

    <!-- 使用SSL,企业邮箱必需! -->
    <bean id="mailSSLSocketFactory" class="com.sun.mail.util.MailSSLSocketFactory">
        <property name="trustAllHosts" value="true"></property>
    </bean>

    <bean id="javaMailSender" class="org.springframework.mail.javamail.JavaMailSenderImpl">
        <property name="host" value="${mail.host}"></property>
        <property name="port" value="${mail.port}"></property>
        <property name="username" value="${mail.account}"></property>
        <property name="password" value="${mail.pass}"></property>
        <property name="protocol" value="${mail.protocol}"></property>
        <property name="defaultEncoding" value="UTF-8"></property>
        <!--
        -->
        <property name="javaMailProperties">
            <props>
                <!-- 使用SMTP身份验证 -->
                <prop key="mail.smtp.auth">${mail.smtp.auth}</prop>
                <!-- Debug模式 -->
                <prop key="mail.debug">${mail.debug}</prop>
                <!-- 使用SSL -->
                <prop key="mail.smtp.ssl.enable">${mail.smtp.ssl.enable}</prop>
                <!-- 配置MailSSLSocketFactory -->
                <prop key="mail.smtp.ssl.socketFactory">mailSSLSocketFactory</prop>
            </props>
        </property>
    </bean>

    <bean id="simpleMailMessage" class="org.springframework.mail.SimpleMailMessage">
        <property name="from" value="${mail.account}"></property>
    </bean>

    <bean id="threadPoolTaskExecutor" class="org.springframework.scheduling.concurrent.ThreadPoolTaskExecutor">
        <!-- 线程池维护线程的最少数量 -->
        <property name="corePoolSize" value="5" />
        <!-- 线程池维护线程的最大数量 -->
        <property name="maxPoolSize" value="20" />
        <!-- 线程池维护线程所允许的空闲时间 -->
        <property name="keepAliveSeconds" value="30000" />
        <!-- 线程池所使用的缓冲队列 -->
        <property name="queueCapacity" value="1000" />
    </bean>

</beans>
spring.xml
<?xml version="1.0" encoding="UTF-8"?>
<beans xmlns="http://www.springframework.org/schema/beans"
    xmlns:xsi="http://www.w3.org/2001/XMLSchema-instance"
    xmlns:aop="http://www.springframework.org/schema/aop"
    xmlns:context="http://www.springframework.org/schema/context"
    xmlns:core="http://activemq.apache.org/schema/core"
    xmlns:tx="http://www.springframework.org/schema/tx"
    xsi:schemaLocation="http://www.springframework.org/schema/beans http://www.springframework.org/schema/beans/spring-beans.xsd
        http://www.springframework.org/schema/aop http://www.springframework.org/schema/aop/spring-aop-4.3.xsd
        http://www.springframework.org/schema/context http://www.springframework.org/schema/context/spring-context-4.3.xsd
        http://activemq.apache.org/schema/core http://activemq.apache.org/schema/core
        http://www.springframework.org/schema/tx http://www.springframework.org/schema/tx/spring-tx-4.3.xsd">

    <context:component-scan base-package="com.mq.entity,com.mq.mail"></context:component-scan>
    <!-- 不允许有多个属性文件标签,所以只能把项目中的属性文件统一读取 -->
    <context:property-placeholder location="classpath:activemq.properties,classpath:email.properties"/>
    <import resource="spring-activemq.xml"/>
    <import resource="spring-mail.xml"/>

</beans>
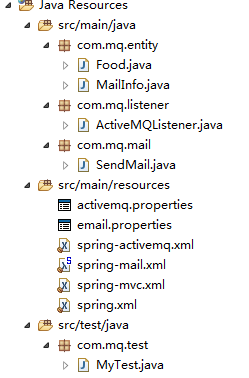
下面是工程结构:entity不说了,是一样的。
ActiveMQ监听器:
package com.mq.listener;

import javax.jms.JMSException;
import javax.jms.Message;
import javax.jms.MessageListener;
import javax.jms.TextMessage;

import org.springframework.beans.factory.annotation.Autowired;

import com.alibaba.fastjson.JSONObject;
import com.mq.entity.MailInfo;
import com.mq.mail.SendMail;

public class ActiveMQListener implements MessageListener {

    @Autowired
    private SendMail sendMail;

    @Override
    public void onMessage(Message message) {
        TextMessage text = (TextMessage) message;

        try {
            MailInfo mail = JSONObject.parseObject(text.getText(), MailInfo.class);
            if(mail != null){
                System.out.println(mail.getTo() + "," + mail.getSubject() + "," + mail.getContent());
                System.out.println("发送邮件...");
                sendMail.send(mail);
            }
        } catch (JMSException e) {
            // TODO Auto-generated catch block
            e.printStackTrace();
        }

//        try {
//            System.out.println(text.getText());
//            Food food = JSONObject.parseObject(text.getText(), Food.class);
//            System.out.println("============收到消息===========");
//            System.out.println(food);
//        } catch (JMSException e) {
//            e.printStackTrace();
//        }

    }

}
SendMail:
package com.mq.mail;

import org.springframework.beans.factory.annotation.Autowired;
import org.springframework.mail.SimpleMailMessage;
import org.springframework.mail.javamail.JavaMailSender;
import org.springframework.scheduling.concurrent.ThreadPoolTaskExecutor;
import org.springframework.stereotype.Component;

import com.mq.entity.MailInfo;

@Component
public class SendMail {

    @Autowired
    private JavaMailSender javaMailSender;
    @Autowired
    private SimpleMailMessage simpleMailMessage;
    @Autowired
    private ThreadPoolTaskExecutor threadPoolTaskExecutor;

    public void send(final MailInfo mailInfo){
        threadPoolTaskExecutor.execute(new Runnable() {

            @Override
            public void run() {
                try {
                    simpleMailMessage.setTo(mailInfo.getTo());
                    simpleMailMessage.setSubject(mailInfo.getSubject());
                    simpleMailMessage.setText(mailInfo.getContent());
                    javaMailSender.send(simpleMailMessage);
                } catch (Exception e) {
                    e.printStackTrace();
                }
            }
        });
    }

}
最后测试:
package com.mq.test;

import javax.jms.Destination;

import org.junit.Test;
import org.junit.runner.RunWith;
import org.springframework.beans.factory.annotation.Autowired;
import org.springframework.beans.factory.annotation.Qualifier;
import org.springframework.test.context.ContextConfiguration;
import org.springframework.test.context.junit4.SpringJUnit4ClassRunner;

@ContextConfiguration(locations={"classpath:spring.xml"})
@RunWith(SpringJUnit4ClassRunner.class)
public class MyTest {

    //@Autowired与@Resource都可以用来装配bean. 都可以写在字段上,或写在setter方法上。

    //使用@Autowired的话,想使用名称装配可以结合@Qualifier注解进行使用

    //@Resource(这个注解属于J2EE的),默认安照名称进行装配,名称可以通过name属性进行指定,
    //如果没有指定name属性,当注解写在字段上时,默认取字段名进行按照名称查找,如果注解写在setter方法上默认取属性名进行装配。

    @Autowired
    @Qualifier("queueDestination")
    private Destination destination;

    @Test
    public void test(){
        try {
            Thread.sleep(Integer.MAX_VALUE);
        } catch (InterruptedException e) {
            // TODO Auto-generated catch block
            e.printStackTrace();
        }
        //在单元测试里,如果test方法先于我们要执行的任务结束,会导致任务出错,所以我们这里睡眠了MAX秒,就为了给我们的任务争取时间
    }
}
先启动ActiveMQ,然后执行生产者的test方法,
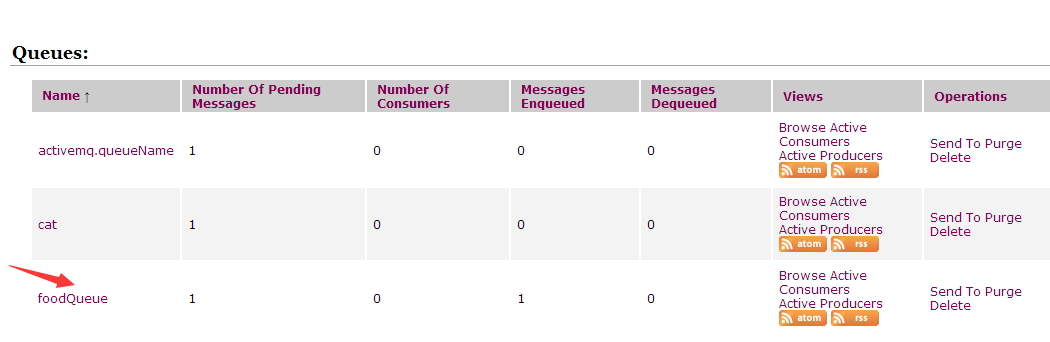
然后执行消费者的test方法。
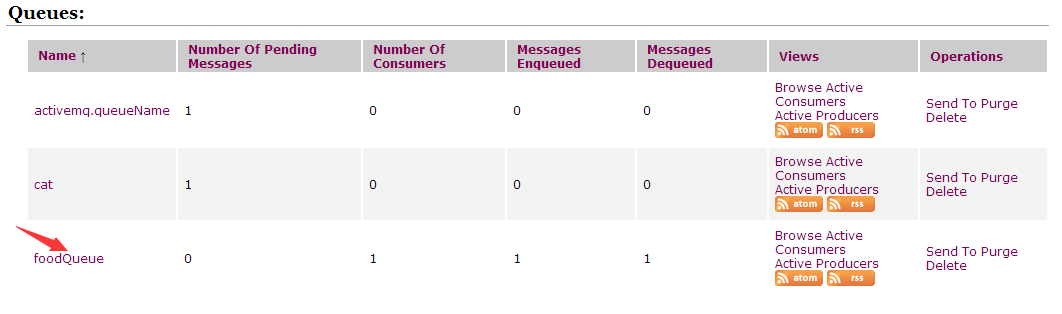
结果:
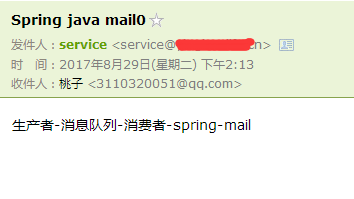
你运行的时候记得修改收件人哦,别给我发哦。