Sersync项目简介与框架
简介
Sersync项目利用inotify与rsync技术实现对服务器数据实时同步的解决方案,其中inotify用于监控sersync所在服务器上文件系统的事件变化,rsync是目前广泛使用的本地及异地数据同步工具,其优点是只对变化的目录数据操作,甚至是一个文件不同的部分进行同步,所有其优势大大超过使用挂载文件系统或scp等方式进行镜像同步。
Sersync项目优点
- 使用c++编写,对linux系统文件产生的临时文件和重复的文件操作会进行过滤,在结全rsyn同步的时候,会减少运行时消耗的本地及网络资源,因此速度更快。
- 使用多线程进行同步
- Sersync自带crontab功能
- Sersync自带socket与http的协议扩展,可以满足二次开发
- 配置简单,源代码:http://code.google.com/p/sersync/downloads/list处下载
Sersync安装配置
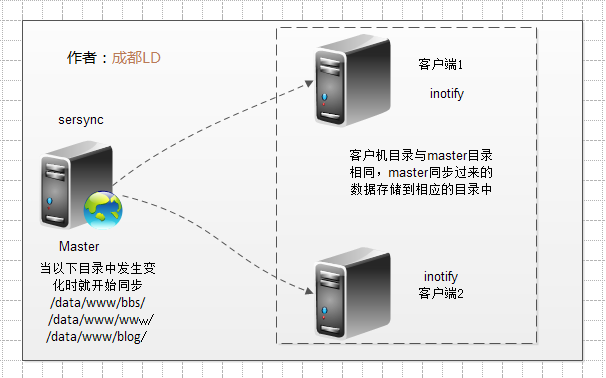
Sersync实际上sersync就是监控本地的数据写入或更新事件,然后,调用rsync客户端的命令,将写入或更新事件对应的文件通通rsync推送到目标服务器.
拓扑图:
安装环境:
|
主机名 |
操作系统版本 |
IP |
角色 |
|
master.test.com |
CentOS release 5.9 (Final) 2.6.18-348.el5 |
192.168.157.143 |
Sersync主机 |
|
Server1.test.com |
CentOS release 5.9 (Final) 2.6.18-348.el5 |
192.168.157.153 |
Sersync客户端1 |
|
Server2.test.com |
CentOS release 5.9 (Final) 2.6.18-348.el5 |
192.168.157.155 |
Sersync客户端2 |
配置rsync
在客户机1上配置rsync,rsync的版本在3.x以上
[root@server1 ~]# rsync --version
rsync version 3.0.6 protocol version 30
[root@server1 ~]# vim /etc/rsyncd.conf
#Rsync server
#author:luodi date:2013/10/09
#version:1.0
##rsyncd.conf start##
uid = root
gid = root
use chroot = no
max connections = 2000
timeout = 600
pid file = /var/run/rsyncd.pid
lock file = /var/run/rsync.lock
log file = /var/log/rsyncd.log
ignore errors
read only = false
list = false
hosts allow = 192.168.157.0/24
hosts deny = 0.0.0.0/32
auth users = rsync_backup
secrets file = /etc/rsync.password
#####################################
[www]
path = /data/www/www/
#####################################
[bbs]
path = /data/www/bbs/
#####################################
[blog]
path = /data/www/blog/
[root@server1 ~]# vim /etc/rsync.password
rsync_backup:123456
[root@server1 ~]# chmod 600 /etc/rsync.password
[root@server1 ~]# mkdir -p /data/www/www/
[root@server1 ~]# mkdir -p /data/www/bbs/
[root@server1 ~]# mkdir -p /data/www/blog/
[root@server1 ~]# rsync --daemon
[root@server1 ~]# ps -ef | grep rsync
root 5217 1 0 09:12 ? 00:00:00 rsync --daemon
root 5219 5119 0 09:12 pts/0 00:00:00 grep --color rsync
[root@server1 ~]# lsof -i:873
COMMAND PID USER FD TYPE DEVICE SIZE/OFF NODE NAME
rsync 5217 root 3u IPv6 47480 0t0 TCP *:rsync (LISTEN)
rsync 5217 root 5u IPv4 47481 0t0 TCP *:rsync (LISTEN)
[root@server1 ~]#
[root@server1 ~]# echo "/usr/bin/rsync --daemon" >> /etc/rc.local
在客户机2上配置rsync
[root@server2 ~]# rsync --version
rsync version 3.0.6 protocol version 30
[root@server2 ~]# vim /etc/rsyncd.conf
#Rsync server
#author:luodi date:2013/10/09
#version:1.0
##rsyncd.conf start##
uid = root
gid = root
use chroot = no
max connections = 2000
timeout = 600
pid file = /var/run/rsyncd.pid
lock file = /var/run/rsync.lock
log file = /var/log/rsyncd.log
ignore errors
read only = false
list = false
hosts allow = 192.168.157.0/24
hosts deny = 0.0.0.0/32
auth users = rsync_backup
secrets file = /etc/rsync.password
#####################################
[www]
path = /data/www/www/
#####################################
[bbs]
path = /data/www/bbs/
#####################################
[blog]
path = /data/www/blog/
[root@server2 ~]# vim /etc/rsync.password
rsync_backup:123456
[root@server2 ~]# chmod 600 /etc/rsync.password
[root@server2 ~]# mkdir -p /data/www/www/
[root@server2 ~]# mkdir -p /data/www/bbs/
[root@server2 ~]# mkdir -p /data/www/blog/
[root@server2 ~]# rsync --daemon
[root@server2 ~]# ps -elf | grep rsync
5 S root 2561 1 0 77 0 - 1079 - 07:25 ? 00:00:00 rsync --daemon
0 R root 2563 2460 0 78 0 - 1001 - 07:25 pts/0 00:00:00 grep --color rsync
[root@server2 ~]# lsof -i:873
COMMAND PID USER FD TYPE DEVICE SIZE/OFF NODE NAME
rsync 2561 root 3u IPv6 7347 0t0 TCP *:rsync (LISTEN)
rsync 2561 root 5u IPv4 7348 0t0 TCP *:rsync (LISTEN)
[root@server2 ~]#
[root@server2 ~]# echo "/usr/bin/rsync --daemon" >> /etc/rc.local
配置master
[root@master ~]# vim /etc/rsync.password <--建立rsync客户端密码
123456
[root@master ~]# chmod 600 /etc/rsync.password <--设置权限为600
[root@master ~]# mkdir -p /data/www/bbs/ <--建立同步的目录
[root@master ~]# mkdir -p /data/www/www/
[root@master ~]# mkdir -p /data/www/blog/
[root@master ~]# cd /data/www/bbs/
[root@master bbs]# ls
[root@master bbs]# touch aa
[root@master bbs]# rsync -avz /data/www/bbs/ rsync_backup@192.168.157.153::bbs --password-file=/etc/rsync.password <--手工测试同步到客户端1
sending incremental file list
./
aa
sent 72 bytes received 30 bytes 7.03 bytes/sec
total size is 0 speedup is 0.00
[root@master bbs]# rsync -avz /data/www/bbs/ rsync_backup@192.168.157.155::bbs --password-file=/etc/rsync.password <--手工测试同步到客户端2
sending incremental file list
./
aa
sent 72 bytes received 30 bytes 7.03 bytes/sec
total size is 0 speedup is 0.00
[root@server1 bbs]# ls <--查看同步过来的文件,发现已成功
aa
[root@server1 bbs]#
[root@server2 bbs]# ls <--查看同步过来的文件,发现已成功
aa
[root@server2 bbs]#
注意:如果出现同步很慢的情况的话,那么就修改一下每台服务器的hosts文件
[root@master ~]# cat /etc/hosts
# Do not remove the following line, or various programs
# that require network functionality will fail.
127.0.0.1 localhost.localdomain localhost
::1 localhost6.localdomain6 localhost6
192.168.157.153 server1.test.com
192.168.157.155 server2.test.com
[root@server1 ~]# cat /etc/hosts
192.168.157.143 master.test.com
[root@server2 ~]# cat /etc/hosts
192.168.157.143 master.test.com
安装sersync
[root@master tools]# wget 下载sersync软件并解压到/usr/local中
http://sersync.googlecode.com/files/sersync2.5_32bit_binary_stable_final.tar.gz
[root@master tools]# ls
mfs-1.6.11 mfs-1.6.11.tar.gz sersync2.5_32bit_binary_stable_final.tar.gz
[root@master tools]# tar zxf sersync2.5_32bit_binary_stable_final.tar.gz -C /usr/local/
[root@master local]# mv GNU-Linux-x86/ sersync <--把解压后的目录重命名为sersync
[root@master local]# ls
bin etc games include lib libexec mfs sbin sersync share src
[root@master local]# cd sersync/
[root@master sersync]# ls <--解压后有两个文件
confxml.xml sersync2
[root@master sersync]# mkdir conf bin log <--分别建立配置文件目录
[root@master sersync]# mv confxml.xml conf <--把主配置文件放到conf目录下
[root@master sersync]# mv sersync2 bin/sersync <--把启动bin文件放到bin目录并改名
[root@master sersync]# cd bin/
[root@master bin]# ls
sersync
[root@master bin]# cd ..
[root@master sersync]# cd conf/
[root@master conf]# cp confxml.xml confxml.xml.bak <--先把配置文件备份
[root@master conf]# cp confxml.xml web_confxml.xml <--复制配置文件为www的配置
[root@master conf]# vim web_confxml.xml <--编辑www的配置文件从24行开始
<localpath watch="/data/www/www">
25 <remote ip="192.168.157.153" name="www"/> <--客户端1
26 <remote ip="192.168.157.155" name="www"/> <--客户端2
27 <!--<remote ip="192.168.8.39" name="tongbu"/>-->
28 <!--<remote ip="192.168.8.40" name="tongbu"/>-->
29 </localpath>
31 <commonParams params="-artuz"/>
32 <auth start="true" users="rsync_backup" passwordfile="/etc/rsync.passwo
rd"/> <--指定rsync的用户和密码文件
[root@master conf]# <--把sersync的执行脚本加入到PATH中
[root@master conf]# echo "export PATH=$PATH:/usr/local/sersync/bin" >>/etc/profile
[root@master conf]# source /etc/profile <--让配置生效
[root@master conf]# sersync -r -d -o /usr/local/sersync/conf/web_confxml.xml <--启动sersync
-o:指定配置文件 -d:在后台启动 -r:主服务器和同步服务器先做同步初始保持一致
set the system param
execute锛歟cho 50000000 > /proc/sys/fs/inotify/max_user_watches
execute锛歟cho 327679 > /proc/sys/fs/inotify/max_queued_events
parse the command param
option: -r rsync all the local files to the remote servers before the sersync work
option: -d run as a daemon
option: -o config xml name锛? /usr/local/sersync/conf/web_confxml.xml
daemon thread num: 10
parse xml config file
host ip : localhost host port: 8008
daemon start锛宻ersync run behind the console
use rsync password-file :
user is rsync_backup
passwordfile is /etc/rsync.password
config xml parse success
please set /etc/rsyncd.conf max connections=0 Manually
sersync working thread 12 = 1(primary thread) + 1(fail retry thread) + 10(daemon sub threads)
Max threads numbers is: 32 = 12(Thread pool nums) + 20(Sub threads)
please according your cpu 锛寀se -n param to adjust the cpu rate
------------------------------------------
rsync the directory recursivly to the remote servers once
working please wait...
execute command: cd /data/www/www && rsync -artuz -R --delete ./ rsync_backup@192.168.157.153::www --password-file=/etc/rsync.password >/dev/null 2>&1
run the sersync:
watch path is: /data/www/www
[root@master ~]# ps -elf | grep sersync
1 S root 2909 1 0 75 0 - 33719 inotif 14:33 ? 00:00:01 sersync -r -d -o /usr/local/sersync/conf/web_confxml.xml
0 R root 3042 2643 0 78 0 - 1001 - 14:38 pts/1 00:00:00 grep --color sersync
测试:
[root@master www]# mkdir admin <--在master的www目录中建立一个admin的目录
[root@server1 ~]# cd /data/www/www/
[root@server1 www]# ls
admin file2 fileb fileluodi <--发现在客户机1上已同步过来
[root@server1 www]#
[root@server2 www]# ls
admin file2 fileb fileluodi <--发现在客户机2上已同步过来
[root@master conf]# pwd
/usr/local/sersync/conf
[root@master conf]# cp web_confxml.xml bbs_confxml.xml <--复制三个文件
[root@master conf]# cp bbs_confxml.xml blog_confxml.xml
[root@master conf]# vim bbs_confxml.xml
<localpath watch="/data/www/bbs">
<remote ip="192.168.157.153" name="bbs"/>
<remote ip="192.168.157.155" name="bbs"/>
<!--<remote ip="192.168.8.39" name="tongbu"/>-->
<!--<remote ip="192.168.8.40" name="tongbu"/>-->
</localpath>
[root@master conf]# vim blog_confxml.xml
<localpath watch="/data/www/blog">
<remote ip="192.168.157.153" name="blog"/>
<remote ip="192.168.157.155" name="blog"/>
<!--<remote ip="192.168.8.39" name="tongbu"/>-->
<!--<remote ip="192.168.8.40" name="tongbu"/>-->
</localpath>
启动另两个进程
[root@master conf]# sersync -r -d -o /usr/local/sersync/conf/bbs_confxml.xml
[root@master conf]# sersync -r -d -o /usr/local/sersync/conf/blog_confxml.xml
[root@master conf]# ps -elf |grep sersync <--查看进程数已变成3个
1 S root 2909 1 0 83 0 - 33719 inotif 14:33 ? 00:00:01 sersync -r -d -o /usr/local/sersync/conf/web_confxml.xml
1 S root 3066 1 0 79 0 - 28599 inotif 14:42 ? 00:00:00 sersync -r -d -o /usr/local/sersync/conf/bbs_confxml.xml
1 S root 3086 1 0 81 0 - 28599 inotif 14:42 ? 00:00:00 sersync -r -d -o /usr/local/sersync/conf/blog_confxml.xml
0 R root 3104 2643 0 78 0 - 1001 - 14:43 pts/1 00:00:00 grep --color sersync
[root@master conf]#
在master上的bbs和blog目录中建立文件做测试
[root@master www]# cd bbs/
[root@master bbs]# ls
[root@master bbs]# touch bbs1.file
[root@master bbs]# touch bbs2.file
[root@master bbs]# cd ../blog/
[root@master blog]# touch blog1.file
[root@master blog]# touch blog2.file
在客户机1上查看文件是否同步
[root@server1 www]# cd bbs/
[root@server1 bbs]# ls
bbs1.file bbs2.file
[root@server1 bbs]# cd ../blog/
[root@server1 blog]# ls
blog1.file blog2.file
[root@server1 blog]#
在客户机2上查看文件是否同步
[root@server2 www]# cd bbs/
[root@server2 bbs]# ls
bbs1.file bbs2.file
[root@server2 bbs]# cd ..
[root@server2 www]# cd blog/
[root@server2 blog]# ls
blog1.file blog2.file
[root@server2 blog]#