在Python 2中,有urllib和urllib2两个库来实现请求的发送。而在Python 3中,已经不存在urllib2这个库了,统一为urllib,其官方文档链接为:https://docs.python.org/3/library/urllib.html。
urllib库,是Python内置的HTTP请求库,也就是说不需要额外安装即可使用。它包含如下4个模块:
- request:它是最基本的HTTP请求模块,可以用来模拟发送请求。就像在浏览器里输入网址然后回车一样,只需要给库方法传入URL以及额外的参数,就可以模拟实现这个过程了。
- error:异常处理模块,如果出现请求错误,我们可以捕获这些异常,然后进行重试或其他操作以保证程序不会意外终止。
- parse:一个工具模块,提供了许多URL处理方法,比如拆分、解析、合并等。
- robotparser:主要是用来识别网站的robots.txt文件,然后判断哪些网站可以爬,哪些网站不可以爬,它其实用得比较少。
这里重点讲解一下前3个模块。
一、 request模块
使用urllib的request模块,我们可以方便地实现请求的发送并得到响应。
1.urlopen()方法
打开指定的URL
(1)语法
urllib.request.urlopen(url, data=None, [timeout, ]*, cafile=None, capath=None, cadefault=False, context=None)
- url参数可以是一个string,或者一个Request对象。
- data参数是可选的,并且是一个是bytes(字节流)对象,或者None,传递给服务器的数据,需要通过bytes()方法转换。另外,如果传递了这个参数,则它的请求方式就不再是GET方式,而是POST方式。
- timeout参数用于设置超时时间,单位为秒,意思就是如果请求超出了设置的这个时间,还没有得到响应,就会抛出异常。如果不指定该参数,就会使用全局默认时间。它支持HTTP、HTTPS、FTP请求。
- cafile和capath这两个参数分别指定CA证书和它的路径,这个在请求HTTPS链接时会有用。
- cadefault参数现在已经弃用了,其默认值为False。
- context参数必须是ssl.SSLContext类型,用来指定SSL设置。
(2)示例
基本使用
import urllib.request

response = urllib.request.urlopen('https://www.python.org')
print(response.read().decode('utf-8'))
传递数据
import urllib.parse
import urllib.request

data = bytes(urllib.parse.urlencode({'name': 'helloworld'}), encoding='utf8')  # 需要将数据转换成bytes对象
response = urllib.request.urlopen('http://httpbin.org/post', data=data)
print(response.read())
设置超时时间
import socket
import urllib.request
import urllib.error

try:
    response = urllib.request.urlopen('http://httpbin.org/get', timeout=0.1)  # 设置0.1秒请求就会超时
except urllib.error.URLError as e:
    if isinstance(e.reason, socket.timeout):
        print('TIMEOUT')
(3)urllib.request.urlopen()响应结果操作
首先,利用type()方法输出响应的类型:
import urllib.request

response = urllib.request.urlopen('https://www.python.org')
print(type(response))

输出结果:
<class 'http.client.HTTPResponse'>
可以发现,它是一个HTTPResposne类型的对象。它主要包含read()、readinto()、getheader(name)、getheaders()、fileno()等方法,以及msg、version、status、reason、debuglevel、closed等属性。
import urllib.request

response = urllib.request.urlopen('https://www.python.org')
print(response.status)
print(response.getheaders())
print(response.getheader('Server'))

输出结果:
200
[('Server', 'nginx'), ('Content-Type', 'text/html; charset=utf-8'), ('X-Frame-Options', 'SAMEORIGIN'), ('x-xss-protection', '1; mode=block'), ('X-Clacks-Overhead', 'GNU Terry Pratchett'), ('Via', '1.1 varnish'), ('Content-Length', '49094'), ('Accept-Ranges', 'bytes'), ('Date', 'Sun, 30 Sep 2018 03:03:43 GMT'), ('Via', '1.1 varnish'), ('Age', '1389'), ('Connection', 'close'), ('X-Served-By', 'cache-iad2124-IAD, cache-hnd18721-HND'), ('X-Cache', 'HIT, HIT'), ('X-Cache-Hits', '3, 881'), ('X-Timer', 'S1538276623.322806,VS0,VE0'), ('Vary', 'Cookie'), ('Strict-Transport-Security', 'max-age=63072000; includeSubDomains')]
nginx
2.Request类
URL请求的抽象类,我们知道利用urlopen()方法可以实现最基本请求的发起,但这几个简单的参数并不足以构建一个完整的请求。如果请求中需要加入Headers等信息,就可以利用更强大的Request类来构建。
(1)构造方法
class urllib.request.Request(url, data=None, headers={}, origin_req_host=None, unverifiable=False, method=None)
- url参数用于请求URL,这是必传参数。
- data参数如果要传,必须传
bytes(字节流)类型的。如果它是字典,可以先用urllib.parse模块里的urlencode()编码。跟urlopen()方法的data参数一样。 - headers参数是一个字典,它就是请求头,我们可以在构造请求时通过
headers参数直接构造,也可以通过调用请求实例的add_header()方法添加。 - origin_req_host参数是请求方的host名称或者IP地址。
- unverifiable参数表示这个请求是否是无法验证的,默认是
False,意思就是说用户没有足够权限来选择接收这个请求的结果。例如,我们请求一个HTML文档中的图片,但是我们没有自动抓取图像的权限,这时unverifiable的值就是True。 - method参数是一个字符串,用来指示请求使用的方法,比如GET、POST和PUT等。
(2)示例
from urllib import request, parse

url = 'http://httpbin.org/post'
headers = {
    'User-Agent': 'Mozilla/4.0 (compatible; MSIE 5.5; Windows NT)'
}
dict = {
    'name': 'Germey'
}
data = bytes(parse.urlencode(dict), encoding='utf8')
req = request.Request(url=url, data=data, headers=headers, method='POST')
req.add_header('Host', 'httpbin.org')
response = request.urlopen(req)
print(response.read().decode('utf-8'))

输出结果:
{
  "args": {},
  "data": "",
  "files": {},
  "form": {
    "name": "Germey"
  },
  "headers": {
    "Accept-Encoding": "identity",
    "Connection": "close",
    "Content-Length": "11",
    "Content-Type": "application/x-www-form-urlencoded",
    "Host": "httpbin.org",
    "User-Agent": "Mozilla/4.0 (compatible; MSIE 5.5; Windows NT)"
  },
  "json": null,
  "origin": "123.147.199.132",
  "url": "http://httpbin.org/post"
}
3.高级用法
除了上面提到的简单的构造请求,有点时候还会遇到一些更高级的东西,比如,登录验证、Cookie、代理等一些处理。就需要一个更强大的工具来做这些处理,urllib.request模块里的BaseHandler类这个时候就派上了用场了,它是所有其他Handler的父类,它提供了最基本的方法,例如default_open()、protocol_request()等。
下面是一些继承BaseHandler类的子类:
HTTPDefaultErrorHandler:用于处理HTTP响应错误,错误都会抛出HTTPError类型的异常。HTTPRedirectHandler:用于处理重定向。HTTPCookieProcessor:用于处理Cookies。ProxyHandler:用于设置代理,默认代理为空。HTTPPasswordMgr:用于管理密码,它维护了用户名和密码的表。HTTPBasicAuthHandler:用于管理认证,如果一个链接打开时需要认证,那么可以用它来解决认证问题。
另外,还有其他的Handler类请参考官方文档:https://docs.python.org/3/library/urllib.request.html#urllib.request.BaseHandler。
示例:
(1)登录验证
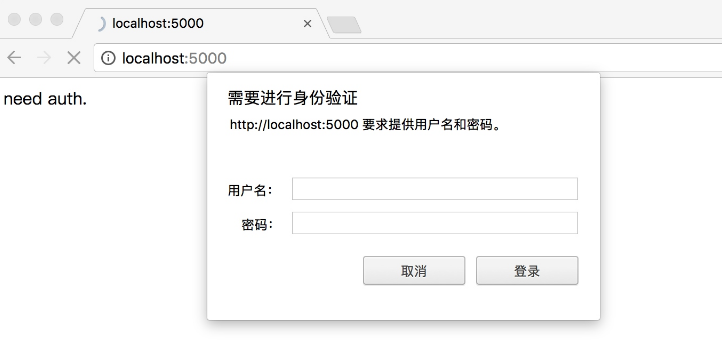
有些网站在打开时就会弹出提示框,直接提示你输入用户名和密码,验证成功后才能查看页面,如下图所示:
from urllib.request import HTTPPasswordMgrWithDefaultRealm, HTTPBasicAuthHandler, build_opener
from urllib.error import URLError

username = 'username'
password = 'password'
url = 'http://localhost:5000/'

p = HTTPPasswordMgrWithDefaultRealm()
p.add_password(None, url, username, password)
auth_handler = HTTPBasicAuthHandler(p)
opener = build_opener(auth_handler)

try:
    result = opener.open(url)
    html = result.read().decode('utf-8')
    print(html)
except URLError as e:
    print(e.reason)
代码解释:
首先实例化HTTPBasicAuthHandler对象,其参数是HTTPPasswordMgrWithDefaultRealm对象,它利用add_password()添加进去用户名和密码,这样就建立了一个处理验证的Handler。
接下来,利用这个Handler并使用build_opener()方法构建一个Opener,这个Opener在发送请求时就相当于已经验证成功了。
接下来,利用Opener的open()方法打开链接,就可以完成验证了。这里获取到的结果就是验证后的页面源码内容。
(2)代理
在做爬虫的时候,免不了要使用代理,如果要添加代理,可以这样做:
from urllib.error import URLError
from urllib.request import ProxyHandler, build_opener

proxy_handler = ProxyHandler({
    'http': 'http://127.0.0.1:9743',
    'https': 'https://127.0.0.1:9743'
})
opener = build_opener(proxy_handler)
try:
    response = opener.open('https://www.baidu.com')
    print(response.read().decode('utf-8'))
except URLError as e:
    print(e.reason)
代码解释:
这里我们在本地搭建了一个代理,它运行在9743端口上。
这里使用了ProxyHandler,其参数是一个字典,键名是协议类型(比如HTTP或者HTTPS等),键值是代理链接,可以添加多个代理。
然后,利用这个Handler及build_opener()方法构造一个Opener,之后发送请求即可。
(3)Cookie
a.获取网站的Cookie
import http.cookiejar, urllib.request

cookie = http.cookiejar.CookieJar()
handler = urllib.request.HTTPCookieProcessor(cookie)
opener = urllib.request.build_opener(handler)
response = opener.open('http://www.baidu.com')
for item in cookie:
    print(item.name+"="+item.value)

输出结果:
BAIDUID=ABC21AF733113C91DA9A89E3E7CD9C53:FG=1
BIDUPSID=ABC21AF733113C91DA9A89E3E7CD9C53
H_PS_PSSID=1444_21087
PSTM=1538278865
delPer=0
BDSVRTM=0
BD_HOME=0
代码解释:
首先,我们必须声明一个CookieJar对象。
接下来,就需要利用HTTPCookieProcessor来构建一个Handler。
最后利用build_opener()方法构建出Opener,执行open()函数即可。
b.将cookie保存成Mozilla型浏览器格式的Cookies文件
import http.cookiejar, urllib.request

filename = 'cookies.txt'
cookie = http.cookiejar.MozillaCookieJar(filename)
handler = urllib.request.HTTPCookieProcessor(cookie)
opener = urllib.request.build_opener(handler)
response = opener.open('http://www.baidu.com')
cookie.save(ignore_discard=True, ignore_expires=True)
此时,需要将CookieJar换成MozillaCookieJar,执行上面的程序会生成了一个cookies.txt文件。
c.读取Mozilla行浏览器格式的Cookie文件
import http.cookiejar, urllib.request

cookie = http.cookiejar.MozillaCookieJar()
cookie.load('cookies.txt', ignore_discard=True, ignore_expires=True)
handler = urllib.request.HTTPCookieProcessor(cookie)
opener = urllib.request.build_opener(handler)
response = opener.open('http://www.baidu.com')
print(response.read().decode('utf-8'))
运行结果正常的话,会输出百度网页的源代码。
d.将Cookie文件保存成libwww-perl(LWP)格式的Cookies文件
import http.cookiejar, urllib.request

filename = 'cookies.txt'
cookie = http.cookiejar.LWPCookieJar(filename)
handler = urllib.request.HTTPCookieProcessor(cookie)
opener = urllib.request.build_opener(handler)
response = opener.open('http://www.baidu.com')
cookie.save(ignore_discard=True, ignore_expires=True)
此时,需要将MozillaCookieJar换成LWPCookieJar,执行上面的程序会生成了一个cookies.txt文件。
e.读取libwww-perl(LWP)格式的Cookies文件
import http.cookiejar, urllib.request

cookie = http.cookiejar.LWPCookieJar()
cookie.load('cookies.txt', ignore_discard=True, ignore_expires=True)
handler = urllib.request.HTTPCookieProcessor(cookie)
opener = urllib.request.build_opener(handler)
response = opener.open('http://www.baidu.com')
print(response.read().decode('utf-8'))
运行结果正常的话,会输出百度网页的源代码。
二、 error模块
urllib的error模块定义了由request模块产生的异常。如果出现了问题,request模块便会抛出error模块中定义的异常。
1.URLError类
URLError类来自urllib库的error模块,它继承自OSError类,是error异常模块的基类,由request模块生的异常都可以通过捕获这个类来处理。它具有一个属性reason,即返回错误的原因。
from urllib import request, error
try:
    response = request.urlopen('https://blog.csdn.net/1')
except error.URLError as e:
    print(e.reason)

输出结果:
Not Found
2.HTTPError类
它是URLError的子类,专门用来处理HTTP请求错误,比如认证请求失败等。它有如下3个属性。
code:返回HTTP状态码,比如404表示网页不存在,500表示服务器内部错误等。reason:同父类一样,用于返回错误的原因。headers:返回请求头。
from urllib import request,error
try:
    response = request.urlopen('https://blog.csdn.net/1')
except error.HTTPError as e:
    print(e.reason, e.code, e.headers, sep='
')

输出结果:
Not Found
404
Server: openresty
Date: Sun, 30 Sep 2018 06:13:52 GMT
Content-Type: text/html; charset=utf-8
Content-Length: 12868
Connection: close
Vary: Accept-Encoding
因为URLError是HTTPError的父类,所以可以先选择捕获子类的错误,再去捕获父类的错误,所以上述代码更好的写法如下:
from urllib import request, error

try:
    response = request.urlopen('https://blog.csdn.net/1')
except error.HTTPError as e:
    print(e.reason, e.code, e.headers, sep='
')
except error.URLError as e:
    print(e.reason)
else:
    print('Request Successfully')

输出结果:
Not Found
404
Server: openresty
Date: Sun, 30 Sep 2018 06:17:53 GMT
Content-Type: text/html; charset=utf-8
Content-Length: 12868
Connection: close
Vary: Accept-Encoding
Set-Cookie: uuid_tt_dd=10_20732824360-1538288273861-180630; Expires=Thu, 01 Jan 2025 00:00:00 GMT; Path=/; Domain=.csdn.net;
Set-Cookie: dc_session_id=10_1538288273861.705662; Expires=Thu, 01 Jan 2025 00:00:00 GMT; Path=/; Domain=.csdn.net;
ETag: "5b0fa58c-3244"
有时候,reason属性返回的不一定是字符串,也可能是一个对象。示例如下:
import socket
import urllib.request
import urllib.error

try:
    response = urllib.request.urlopen('https://www.baidu.com', timeout=0.01)
except urllib.error.URLError as e:
    print(type(e.reason))
    if isinstance(e.reason, socket.timeout):
        print('TIMEOUT')

输出结果:
<class 'socket.timeout'>
TIMEOUT
三、parse模块
parse模块定义了处理URL的标准接口,例如实现URL各部分的抽取、合并以及链接转换。它支持如下协议的URL处理:file、ftp、gopher、hdl、http、https、imap、mailto、 mms、news、nntp、prospero、rsync、rtsp、rtspu、sftp、 sip、sips、snews、svn、svn+ssh、telnet和wais。
1.urlparse()方法
该方法可以实现URL的识别和分段。
(1)语法
urllib.parse.urlparse(urlstring, scheme='', allow_fragments=True)
urlstring:这是必填项,即待解析的URL。scheme:它是默认的协议(比如http或https等)allow_fragments:即是否忽略fragment。如果它被设置为False,fragment部分就会被忽略,它会被解析为path、parameters或者query的一部分,而fragment部分为空。
通常一个基本的URL由6大组件组成(scheme://netloc/path;parameters?query#fragment ),每个元素组都为 String 字符串类型,或者为空。例如:http://www.baidu.com/index.html;user?id=5#comment
除这六大组件外,该类具有以下附加的只读便利属性(可看下表):
| 属性 | 索引 | 值 | 值如果不存在 |
| scheme | 0 | URL 协议 | scheme 参数 |
| netloc | 1 | 域名及网络端口 | 空字符串 |
| path | 2 | 分层路径 | 空字符串 |
| params | 3 | 最后一个路径元素参数 | 空字符串 |
| query | 4 | Query 组件 | 空字符串 |
| fragment | 5 | 片段标志符 | 空字符串 |
| username | 用户名 | None | |
| password | Password | None | |
| hostname | 主机名 (小写) | None | |
| port | 如果存在,端口值为整数 | None |
(2)示例
from urllib.parse import urlparse
result = urlparse('http://www.baidu.com/index.html;user?id=5#comment')
print(type(result), result)
print(result.scheme, result[0])
print(result.netloc, result[1])
print(result.path, result[2])
print(result.params, result[3])
print(result.query, result[4])
print(result.fragment, result[5])

输出结果:
<class 'urllib.parse.ParseResult'> ParseResult(scheme='http', netloc='www.baidu.com', path='/index.html', params='user', query='id=5', fragment='comment')
http http
www.baidu.com www.baidu.com
/index.html /index.html
user user
id=5 id=5
comment comment
可以看到,返回结果是一个ParseResult类型的对象,它包含6部分,分别是scheme、netloc、path、params、query和fragment。
2.urlunparse()方法
有了urlparse(),相应地就有了它的对立方法urlunparse()。它接受的参数是一个可迭代对象,但是它的长度必须是6,否则会抛出参数数量不足或者过多的问题。
from urllib.parse import urlunparse
data = ['http', 'www.baidu.com', 'index.html', 'user', 'a=6', 'comment']
print(urlunparse(data))

输出结果:
http://www.baidu.com/index.html;user?a=6#comment
3.urljoin()方法
该方法可以提供一个base_url(基础链接)作为第一个参数,将新的链接作为第二个参数,该方法会分析base_url的scheme、netloc和path这3个内容并对新链接缺失的部分进行补充,最后返回结果。
from urllib.parse import urljoin

print(urljoin('http://www.baidu.com', 'FAQ.html'))
print(urljoin('http://www.baidu.com', 'https://cuiqingcai.com/FAQ.html'))
print(urljoin('http://www.baidu.com/about.html', 'https://cuiqingcai.com/FAQ.html'))
print(urljoin('http://www.baidu.com/about.html', 'https://cuiqingcai.com/FAQ.html?question=2'))
print(urljoin('http://www.baidu.com?wd=abc', 'https://cuiqingcai.com/index.php'))
print(urljoin('http://www.baidu.com', '?category=2#comment'))
print(urljoin('www.baidu.com', '?category=2#comment'))
print(urljoin('www.baidu.com#comment', '?category=2'))

输出结果:
http://www.baidu.com/FAQ.html
https://cuiqingcai.com/FAQ.html
https://cuiqingcai.com/FAQ.html
https://cuiqingcai.com/FAQ.html?question=2
https://cuiqingcai.com/index.php
http://www.baidu.com?category=2#comment
www.baidu.com?category=2#comment
www.baidu.com?category=2
可以发现,base_url提供了三项内容scheme、netloc和path。如果这3项在新的链接里不存在,就予以补充;如果新的链接存在,就使用新的链接的部分。而base_url中的params、query和fragment是不起作用的。
4.urlencode()方法
该方法可以构造GET请求参数。
from urllib.parse import urlencode

params = {
    'name': 'germey',
    'age': 22
}
base_url = 'http://www.baidu.com?'
url = base_url + urlencode(params)
print(url)

输出结果:
http://www.baidu.com?name=germey&age=22
5.parse_qs()方法
该方法可以将一串GET请求参数转换成字典。
from urllib.parse import parse_qs

query = 'name=germey&age=22'
print(parse_qs(query))

输出结果:
{'name': ['germey'], 'age': ['22']}
6.parse_qsl()方法
该方法可以将一串GET请求参数转换成元组组成的列表。
from urllib.parse import parse_qsl

query = 'name=germey&age=22'
print(parse_qsl(query))

输出结果:
[('name', 'germey'), ('age', '22')]
可以看到,运行结果是一个列表,而列表中的每一个元素都是一个元组,元组的第一个内容是参数名,第二个内容是参数值。
7.quote()方法
该方法可以将内容转化为URL编码的格式。RL中带有中文参数时,有时可能会导致乱码的问题,此时用这个方法可以将中文字符转化为URL编码。
from urllib.parse import quote

keyword = '美女'
url = 'https://www.baidu.com/s?wd=' + quote(keyword)
print(url)

输出结果:
https://www.baidu.com/s?wd=%E7%BE%8E%E5%A5%B3
8.unquote()方法
有了quote()方法,当然还有unquote()方法,它可以进行URL解码。
from urllib.parse import unquote

url = 'https://www.baidu.com/s?wd=%E7%BE%8E%E5%A5%B3'
print(unquote(url))

输出结果:
https://www.baidu.com/s?wd=美女
本文参考:静觅的Python3网络爬虫开发实战